
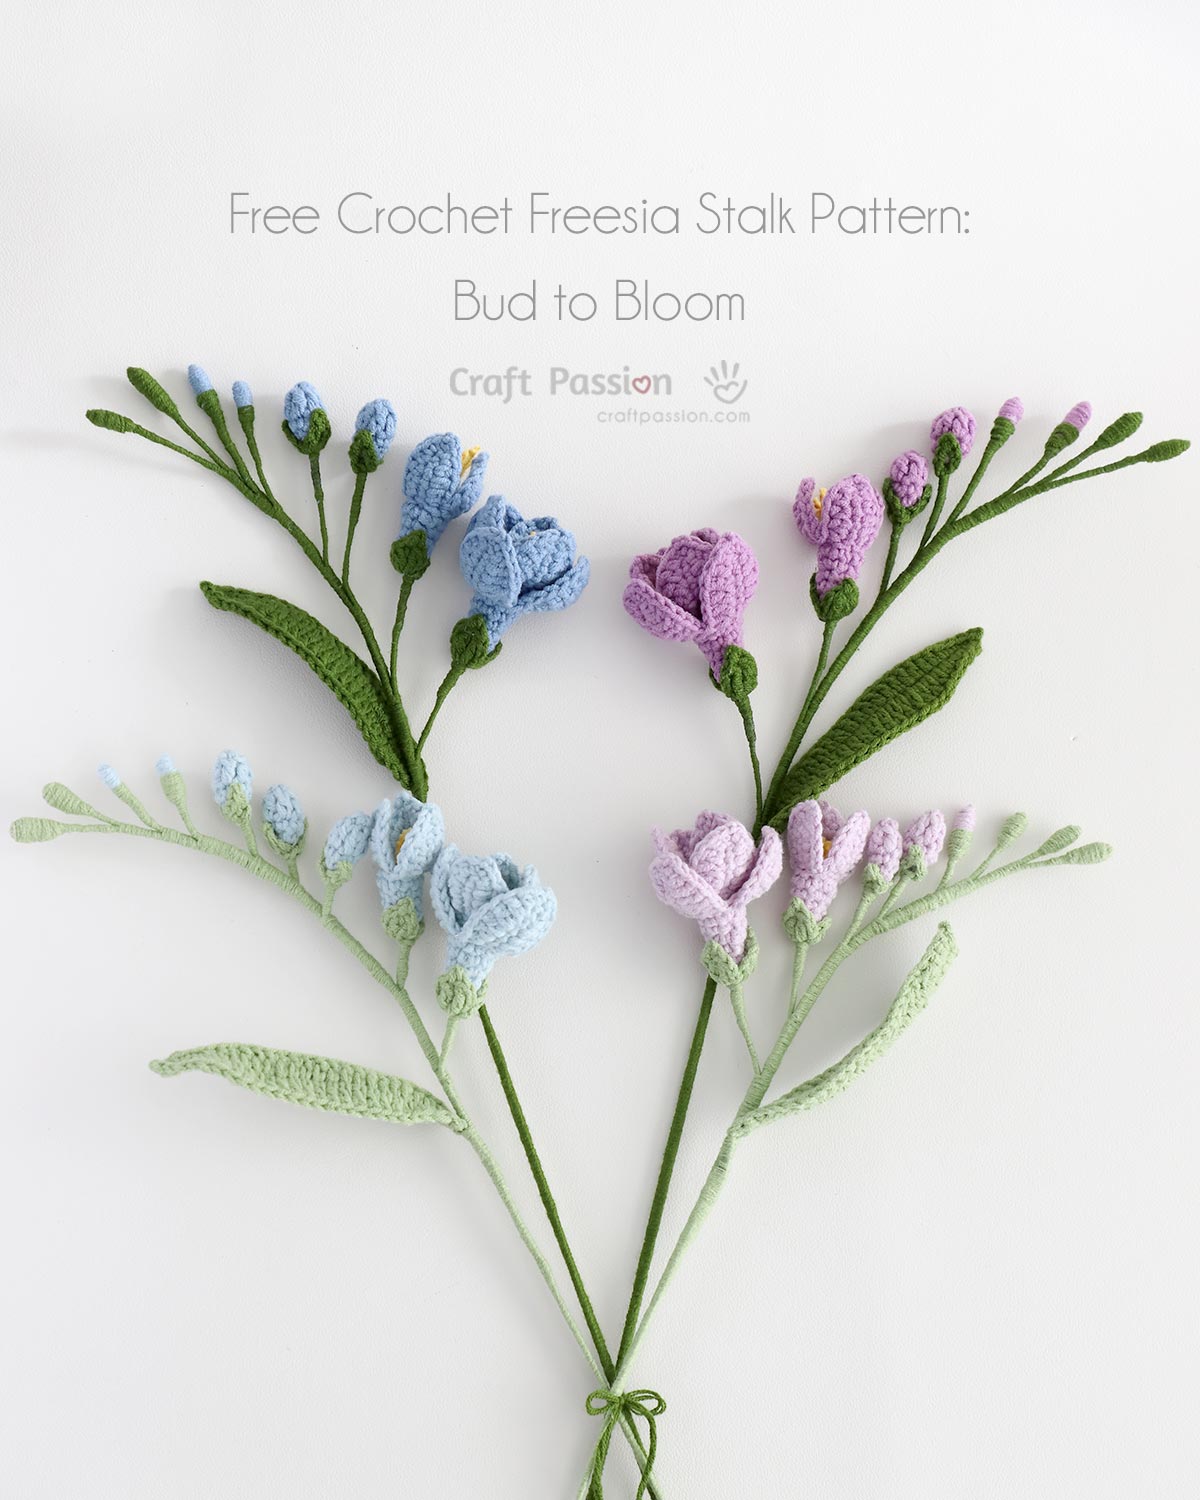
Get ready to bring a little floral magic to life with your hook and yarn! This crochet freesia pattern captures the graceful blooming journey of a freesia stalk, from tiny closed buds to soft, elegant flowers. The design reflects the natural flow of buds gradually opening into larger blooms, creating a delicate sense of movement.
This post may contain affiliate links, and we may earn a commission on purchases made through them at no extra cost to you. ❤️ Thank you!
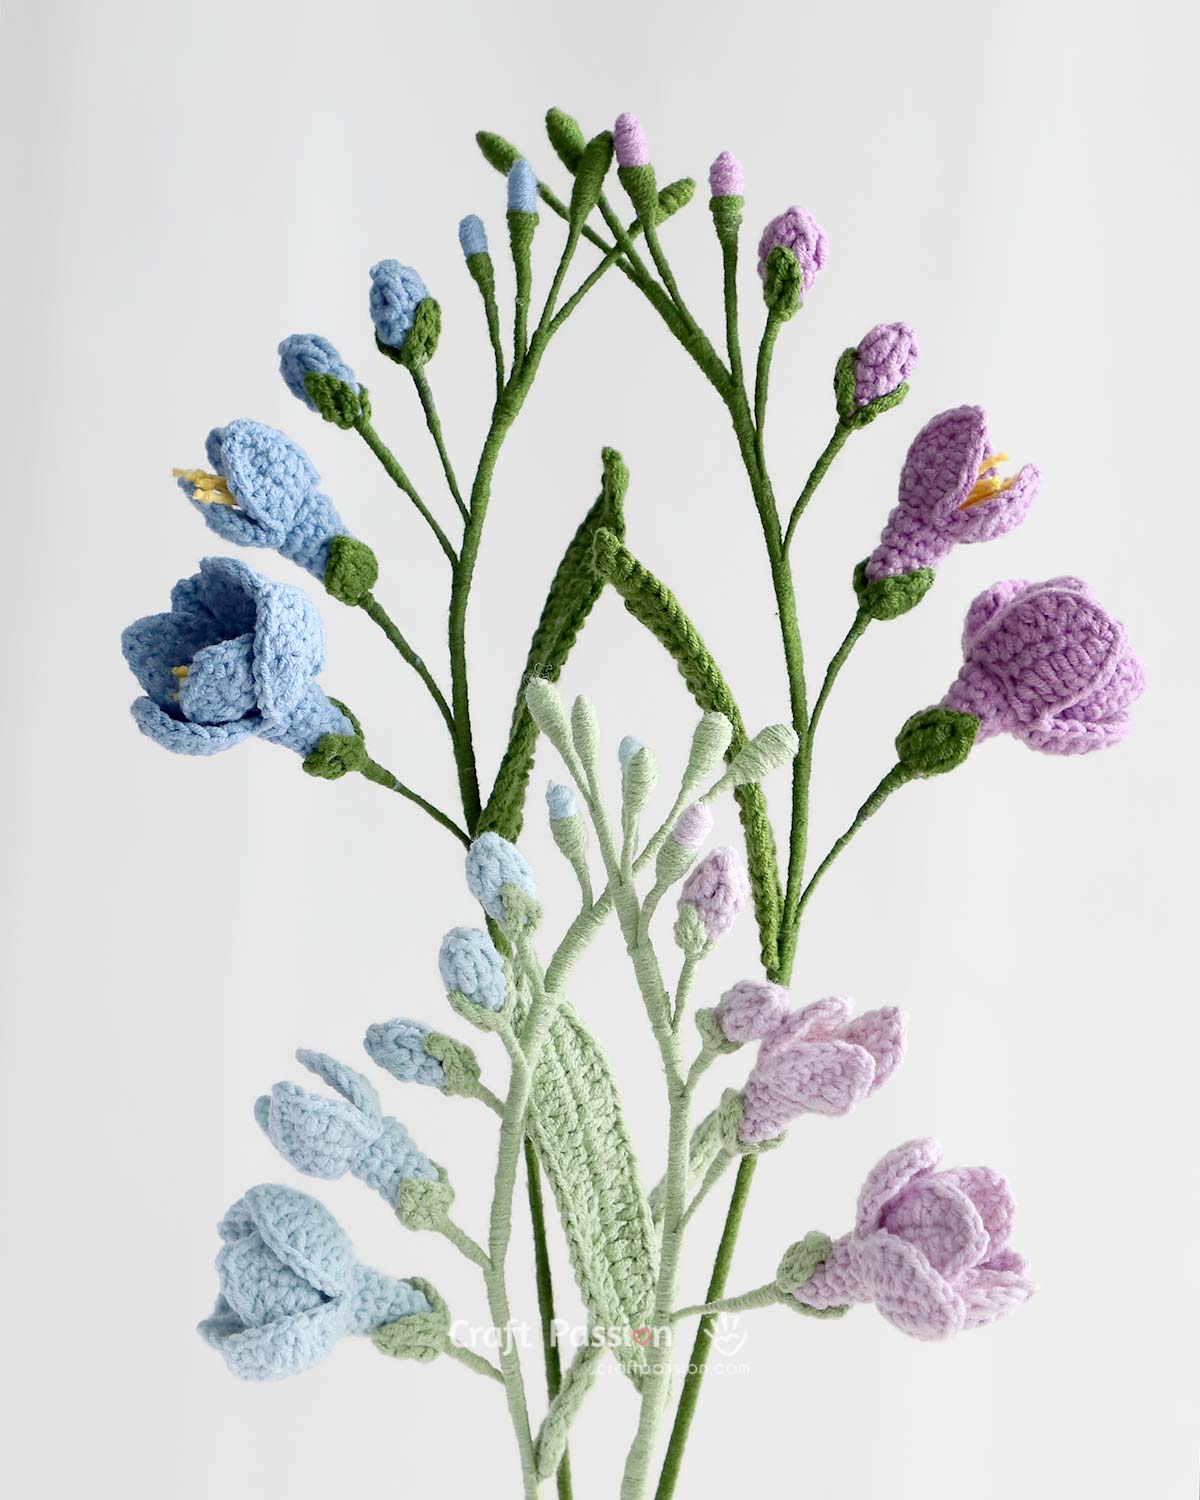
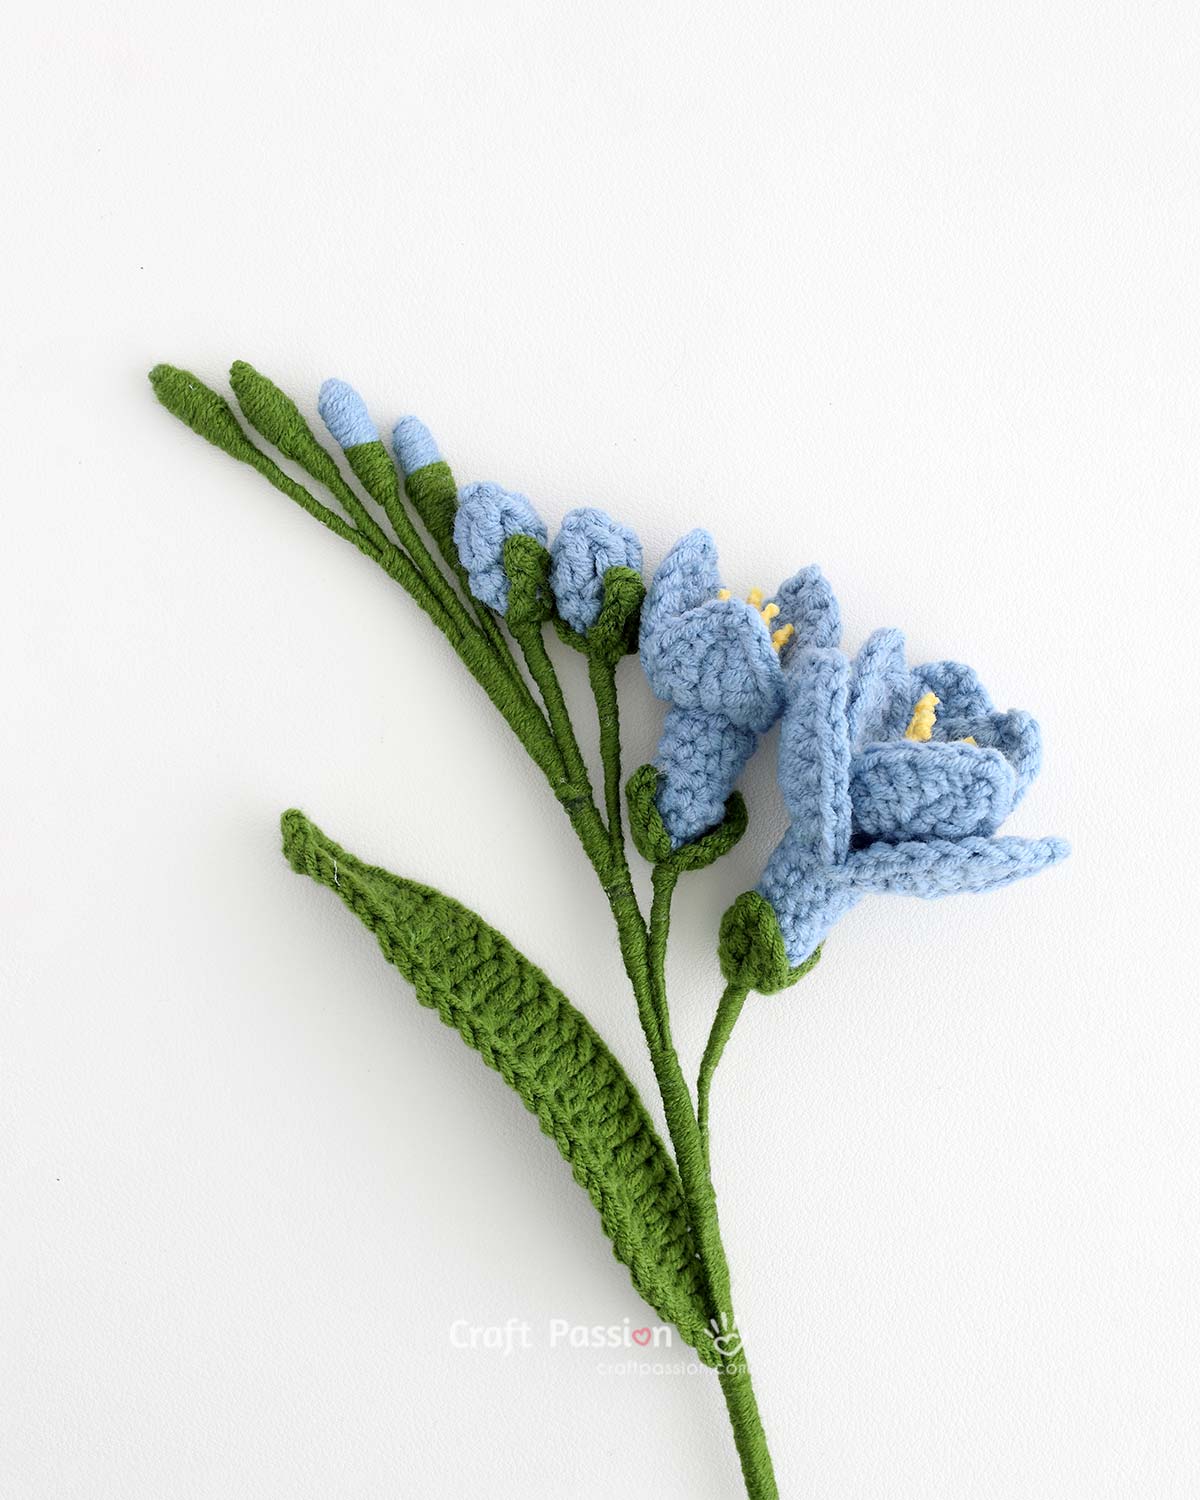
I designed this pattern based on real freesia flowers. This free crochet freesia pattern includes four blooming stages: bud, opening bud, half-bloom, and full-bloom. When arranged together on a wired stem, they form a realistic freesia flower stalk that looks beautiful in a handmade bouquet.
Grab your yarn and hook, and let’s crochet along!
About this Crochet Freesia Flower Pattern
The crochet freesia flower pattern is made in separate parts and then assembled into a single stalk. It includes a full-bloom freesia, a half-bloom freesia, an opening bud, a closed bud, and leaves, all worked individually to create a natural progression of growth along the stem.
The full-bloom freesia is made by starting with a small flower holder and building upward through the petal foundation, which then progresses into the full petals. It features two layers of petals—top and bottom—with fine wire along to allow easy shaping.
The half-bloom freesia is created in a similar way but with a single layer of petals, giving it a partially opened appearance.
The opening bud is worked with fewer stitches to create a smaller, early-stage bloom shape.
The small buds are formed by simply wrapping yarn around the wire, with no crocheting involved.
The leaf is crocheted separately in a simple elongated shape and attached at the end to complete the natural freesia structure.
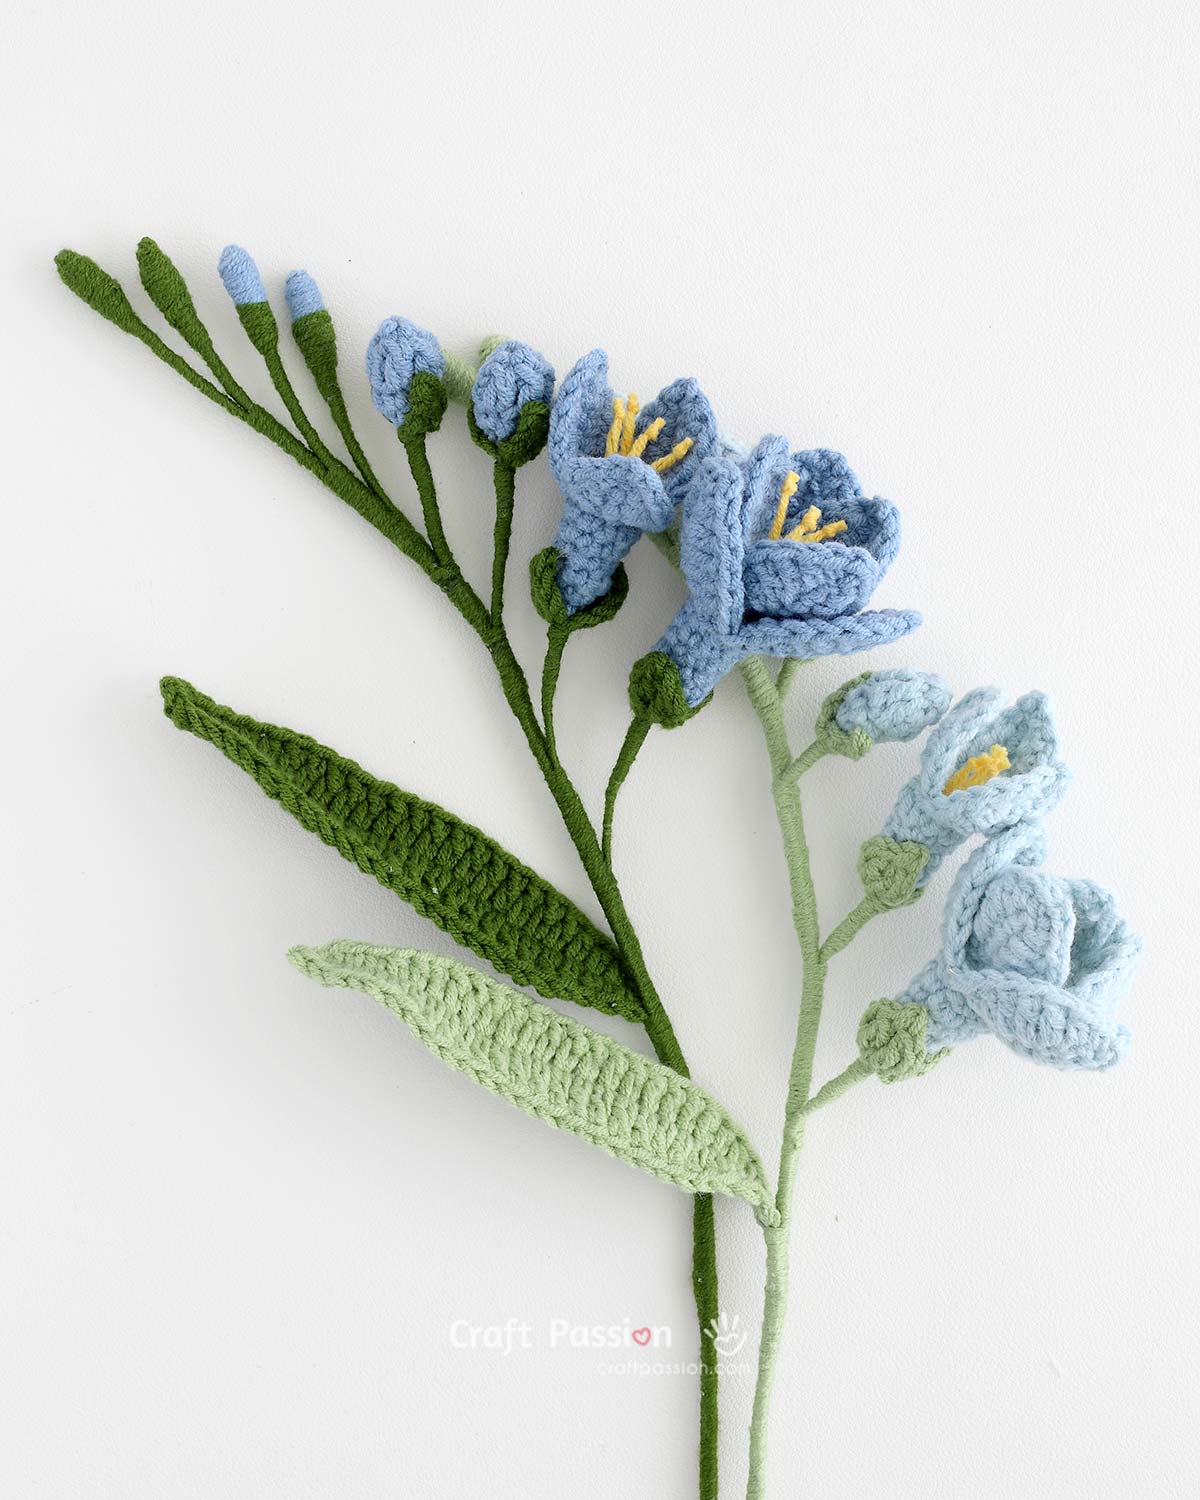
One freesia stalk includes:
- 2 green buds
- 2 blue buds
- 2 to 3 opening buds
- 1 half-bloom freesia
- 1 full-bloom freesia
- 1 crochet leaf
After all the pieces are ready, everything is wrapped onto a main floral wire to form the finished crochet flower stem pattern.
Materials and Tools
Sport-weight or baby-weight yarn works best for this crochet freesia flower. Blue yarn makes the petals, yellow yarn forms the stamens, and green yarn is used for the buds, sepals, leaves, and stems. I used this yarn for all my crochet flower projects and love it so much.
A 2.5 mm crochet hook (I used Tulip brand, my new love), stitch markers, a tapestry needle, pliers, scissors, and clear all-purpose glue are also needed. The glue (I used UHU, but you may use hot glue if it works better for you) helps secure yarn wrapping and keeps all flower parts neatly in place.
Wire plays an important role in this realistic crochet flower pattern. Fine 0.3 mm wire shapes the petals, 24 AWG floral wire supports smaller flower and bud stems, and a thicker 2 mm floral wire forms the main stalk.
Important Notes on Crochet Freesia Pattern
A downloadable, printable crochet pattern sheet is available below for easy offline reference. The written crochet pattern itself is easy to follow; however, if you have any doubts along the way, refer back to this crochet flower tutorial for photo guidance. The photos below not only highlight the key steps but also give you a better understanding of how the crochet freesia is constructed.
Crochet Full-Bloom Freesia Flower
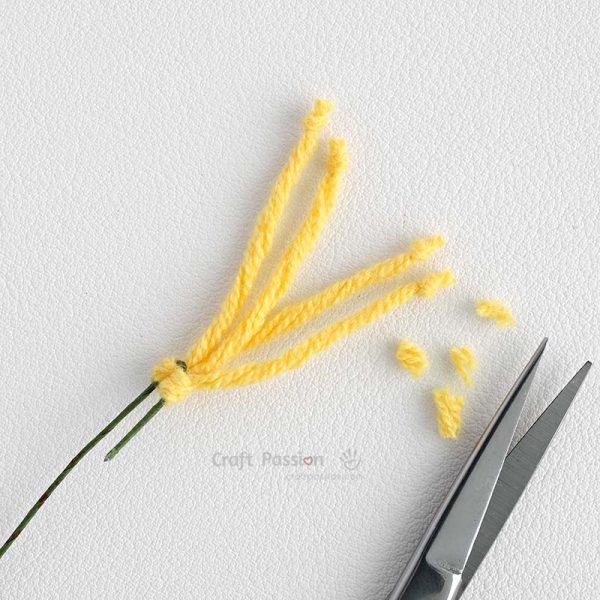
1. Make the Stamen.
Tie 2 short strands of yellow yarn to the wire, then knot and trim the yarn ends to form small pollen tips.
2. Crochet the Full-Bloom Freesia
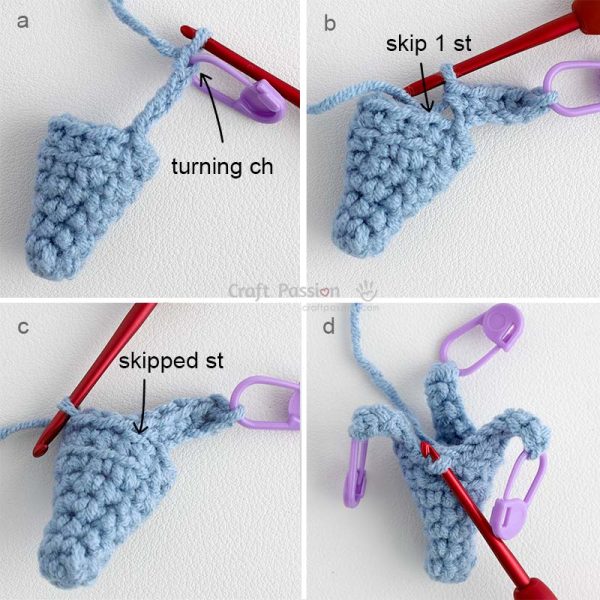
Full Bloom Freesia has a cone-shaped holder as the base for the petals and comes in two layers, top and bottom. The petals are made with two rounds of crochet stitches.
a. Place a stitch marker in the last chain for the petal foundation. This marks the stitch to form the petal tip at round 2.
b. Shows where to skip a stitch at the holder, as instructed by the crochet pattern.
c. Made the first petal foundation.
d. Repeat the same steps until 3 top petal foundations are completed.
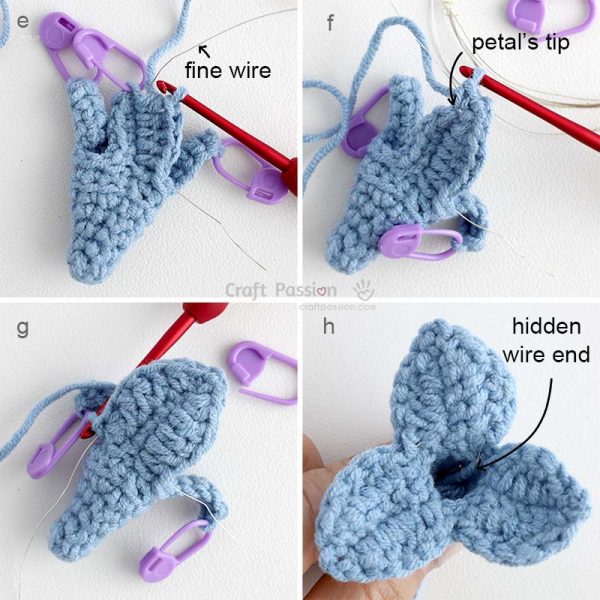
e. Round 2 of the petal patterns involved crocheting around the first petal foundation while carrying 0.3 mm fine wire.
f. Work the petal tip into the marked stitch.
g. The first petal is completed; repeat for the remaining 2 top petals.
h. Gather the wire ends, wrap them with the yarn tails, and push the wrapped wire into the flower holder to hide it.
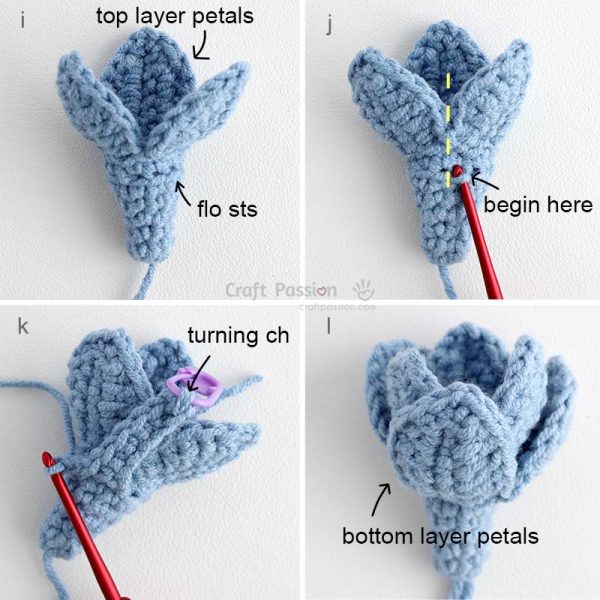
i. Locate the front loops of Round 7 at the holder. This is where the bottom petals are worked.
j. Skip the first 2 stitches and start at the 3rd stitch so the bottom petals align between the top petals.
k. Similar to the top petals, crochet the bottom petal foundations and mark the stitch for the petal tip.
l. Crochet around each bottom petal foundation while carrying 0.3 mm wire to finish the bottom layer. Hide the wire and yarn end just as you did for the top petals.
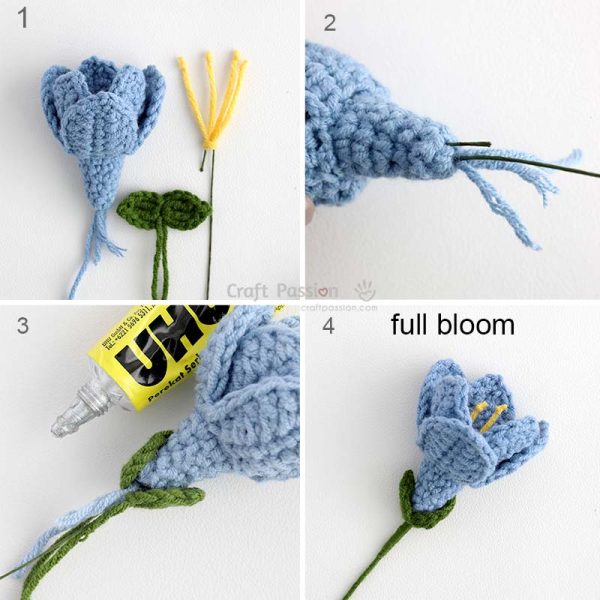
3. Assemble the Freesia Flower
1. Prepare the 3 parts: flower, stamen, and sepal.
2. Insert the stamen wire through the magic ring center of the flower.
3. Insert the sepal from the bottom and glue it in place.
4. Wrap the remaining green yarn around the wire stem to finish the flower.
Freesia Blooms in Different Stages
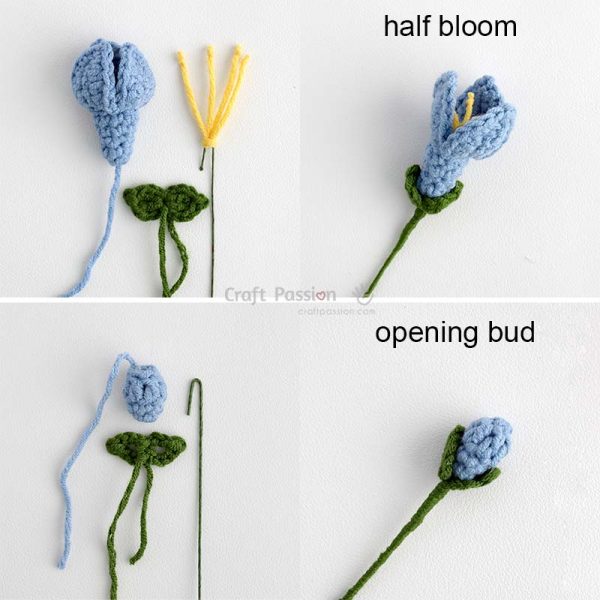
Half-Bloom Freesia and Opening Bud
The half-bloom freesia only has a single layer of petals. Construction and assembly methods are similar to those of the full-bloom freesia.
For the opening bud, crochet the bud instead of a flower with petals. The assembly method is similar to that of the full-bloom freesia.
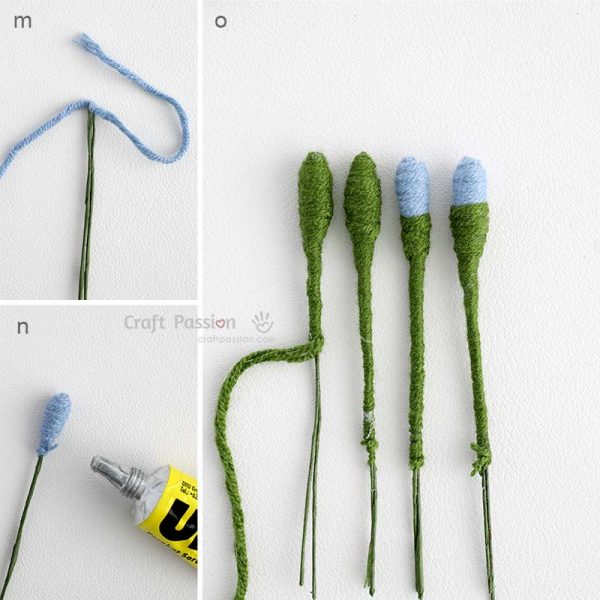
Make the Small Buds
m. Tie blue yarn to the folded wire section.
n. Wrap the yarn around the wire to form a small bud, then glue to secure. Wrap green yarn down the stem.
o. Make 2 blue buds and 2 green buds. Green buds are wrapped fully with green yarn.
Note: Do not cut the green yarn after the second green bud; continue using it for the final stalk assembly later.
Crochet Leaf For Freesia
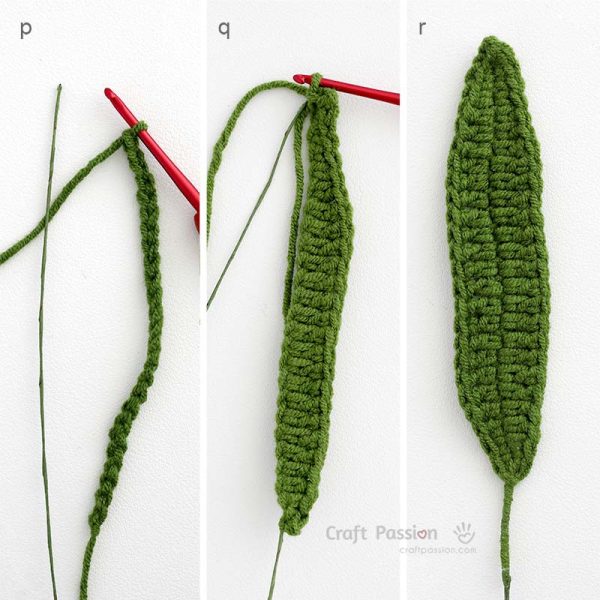
p. Make the foundation chain.
q. Crochet along one side of the chain while carrying the wire.
r. Bend the wire at the end and continue crocheting along the opposite side.
Assemble The Crochet Freesia Stalk
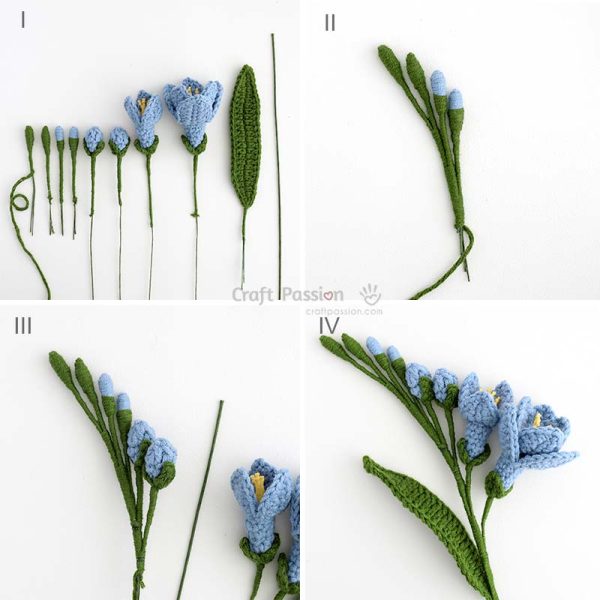
I. Gather all parts: 2 green buds, 2 blue buds, 2 to 3 opening buds, 1 half-bloom freesia, 1 full-bloom freesia, 1 leaf, and 1 piece of 2 mm floral wire.
II. Start from the top with the green buds, followed by the blue buds. Wrap them onto the main wire in a cascading arrangement.
III. Add the opening buds the same way, placing each one slightly lower.
IV. Add the half bloom, full bloom, and leaf to complete the stalk.
Notes:
- Stagger the flowers naturally instead of placing them in a straight line.
- Wrap firmly so all parts stay secure.
- Shape the stalk, petals, buds, and leaf gently after assembly.
Your crochet freesia flower is complete!
Frequently Asked Questions
1. What yarn is best for crochet freesia?
Sport-weight or baby-weight yarn works best for crochet flowers, generally. A finer yarn gives the petals a more delicate and realistic look, especially for the buds and smaller blooms. You may use cotton, cotton blend, or other smooth yarn that can hold the stitch shape well.
2. Can I use thicker yarn?
Yes, but the finished freesia flower will turn out larger and may look less delicate. If you use thicker yarn, you may also need a larger hook and thicker wire to support the petals and stem.
3. Why do I need wire for this crochet flower?
Wire helps the crochet flower hold its shape. Fine wire is used in the petals so you can gently bend and shape them, while floral wire is used for the buds, flowers, leaves, and main stalk. Without wire, the flower may look too soft or floppy.
4. What type of wire should I use?
For this pattern, I used 0.3 mm fine wire (meant for jewelry making) for the petals, 24 AWG floral wire for the flowers, buds, and leaf stems, and 2 mm floral wire for the main stalk. These wires give enough support while still allowing the freesia to be shaped naturally.
5. Is this crochet freesia pattern beginner-friendly?
This pattern is best for avid beginners or intermediate crocheters. The stitches are simple, but the flower includes wire work, small parts, and assembly. The written crochet pattern is easy to follow, and the key notes photos will help you understand the construction more clearly.
6. Can I use this crochet freesia in a bouquet?
Yes, this freesia is perfect for a handmade bouquet. Make a few stalks in matching or mixed colors, then arrange them with other crochet flowers for a long-lasting floral display. I actually made it into a graduation bouquet for my daughter (photo below), and it turned out to be such a meaningful and lasting keepsake for her special day.
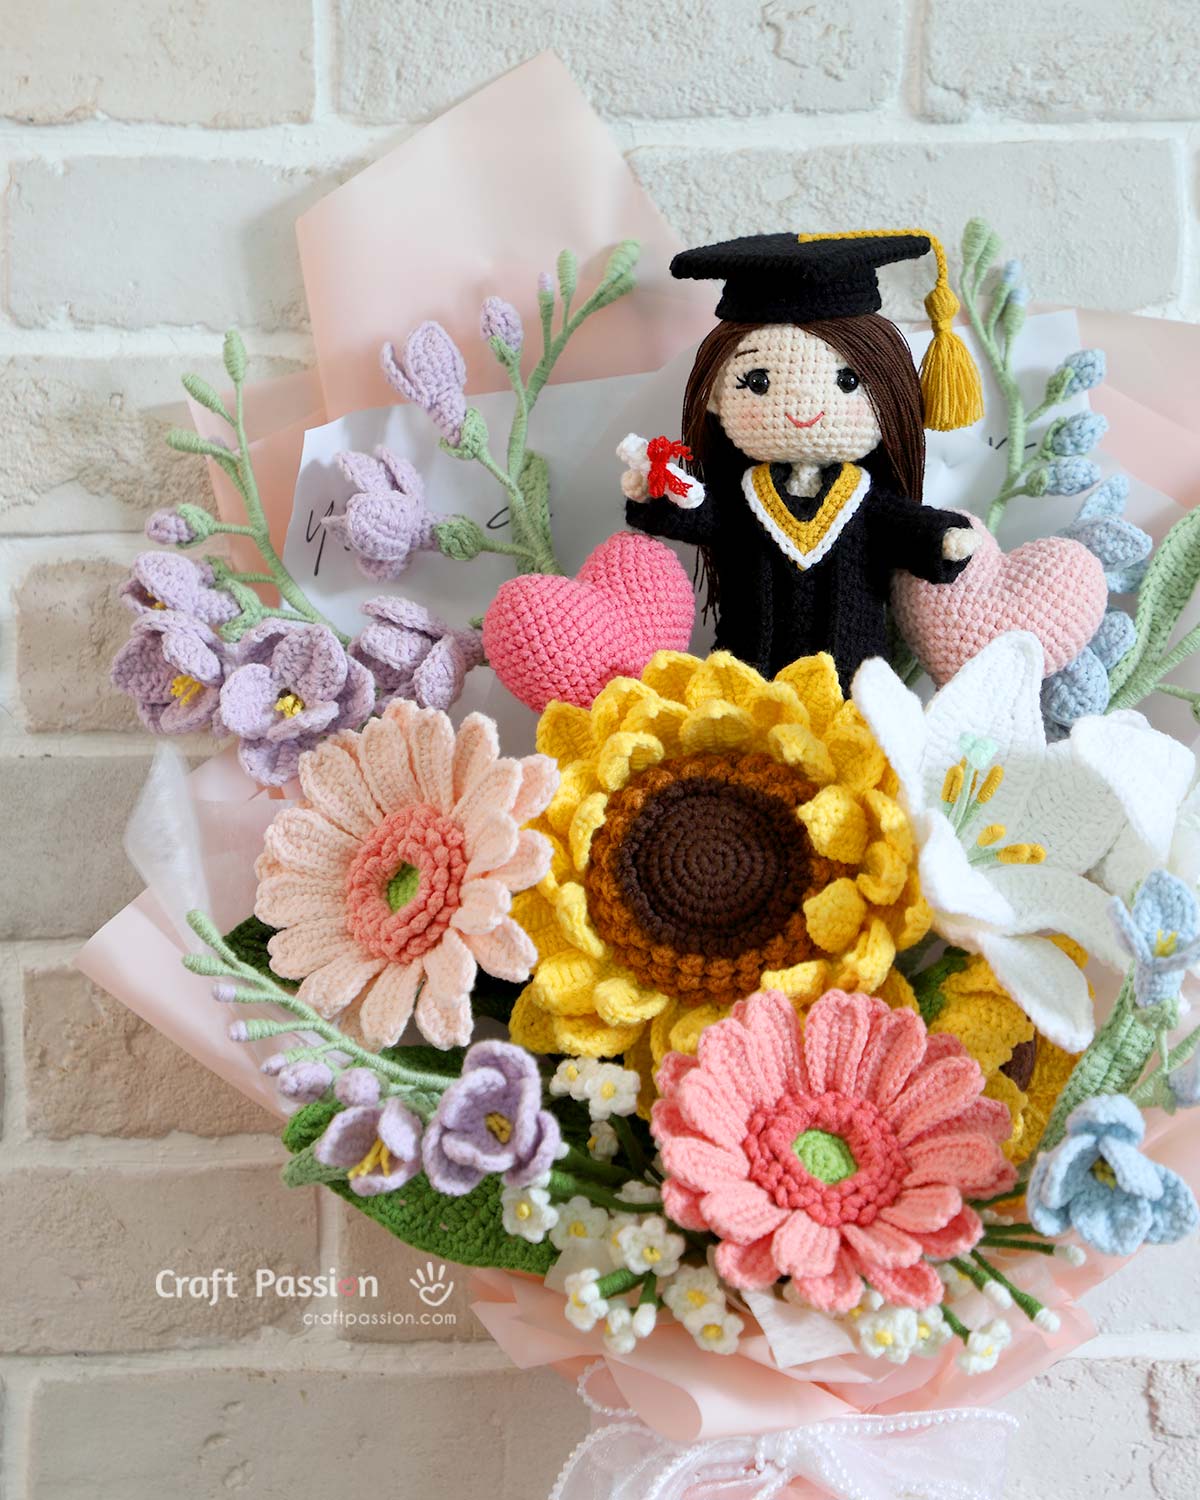
I added this crochet freesia to a graduation bouquet I made for my daughter, along with other handmade blooms, sweet little crochet hearts, and a crochet graduation doll as the centerpiece. The freesia adds a soft, graceful touch to the bouquet, giving it height and a natural flow among the larger flowers. It was such a meaningful keepsake to celebrate her special day. Stay tuned for the rest of the crochet flowers I made for this graduation bouquet!
Wrapping It Up
The crochet freesia makes a lovely addition to any handmade bouquet, especially for anyone who enjoys realistic crochet flower patterns. The different blooming stages create a natural flow, and the wired petals make shaping easy and enjoyable.
A single freesia stalk works beautifully as a simple decoration, while multiple stalks in different colors create a fuller crochet flower bouquet. Soft pastels give a gentle spring look, while brighter shades bring a cheerful handmade feel.
Hope you enjoy making this crochet freesia flower. Happy crocheting!
What’s Next
- Start crocheting and share your completed handmade freesia flower on Facebook and/or Instagram. Remember to tag us, @craftpassion, so that we are able to see them.
- If you love making crochet flowers, you may also like our easy crochet flower pattern, crochet tulip pattern, crochet baby’s breath pattern, and Crochet Sunflower Pattern. They are lovely projects to mix and match with this crochet freesia for a handmade bouquet.
- Want to make more handmade gifts? Browse our free crochet patterns for more ideas, from quick embellishments to amigurumi and home decor projects.
- Don’t forget to save this free crochet freesia pattern to your Pinterest board so you can come back to it whenever you are ready to make another flower stalk.
Downloadable Crochet Pattern Sheet
Freesia Flower Crochet Pattern
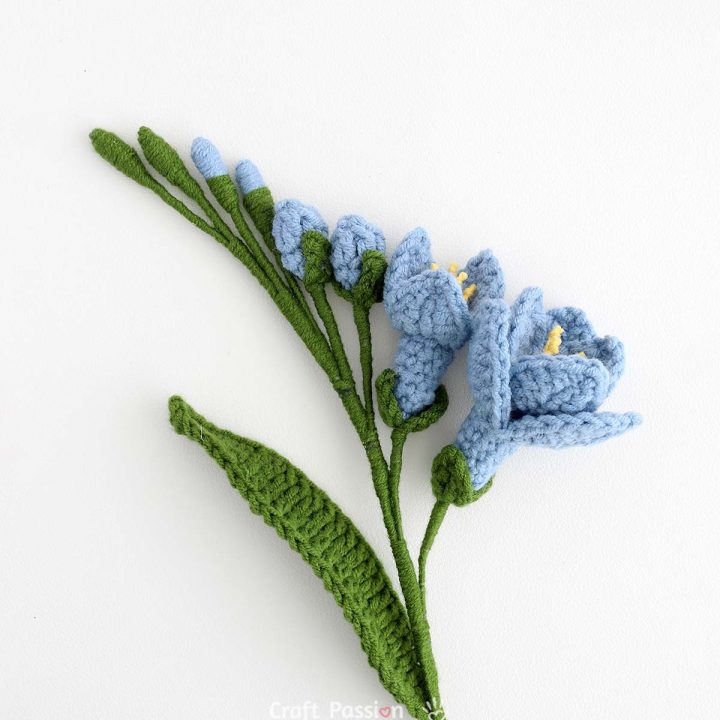
The freesia flower is made in four blooming stages: bud, opening bud, half-bloom, and full-bloom. Crochet and prepare each flower stage according to the quantity needed, then assemble them into a realistic freesia stalk with a crochet leaf.
Materials
Yarn - Sport-Weight/Baby-Weight/Fine/Category 2 in CYC's standard
- Blue - For Flower Petals (I used #47 in this brand)
- Yellow - for Stamens (I used #24 in this brand)
- Green - For Buds, Sepals, Leaf and Stems (I used #40 in this brand)
Wires
- 0.3mm silver color copper wire (For petals)
- 24 AWG floral wire (for buds, flowers and leaf's stems)
- 2mm floral rod (for stalk stem)
Tools
- 2.5 mm Crochet Hook (I used Tulip brand)
- Stitch Markers
- Tapestry Needle
- Plier
- Scissors
- Clear All Purpose Glue ( I recommend UHU)
Instructions
Pattern Notes
- This pattern is written in US crochet terms.
- One freesia stalk has 2 green buds, 2 blue buds, 2 to 3 opening buds, 1 half-bloom flower, 1 full-bloom flower, and 1 leaf.
- The full-bloom and half-bloom flowers are worked from the bottom to the top, beginning with the small cone-shaped holder, then continuing into the petal foundations and petals.
- Soft fine wire is carried along the petals of the full-bloom and half-bloom flowers to help shape them. After crocheting, gather and wrap the wire ends with the yarn tails, then hide the wrapped wire inside the holder.
- The full-bloom and half-bloom flowers each include stamens. Prepare the stamens before assembling the flowers.
- Crochet and prepare all flowers, buds, and the leaf before assembling the full freesia stalk.
- When the pattern says Join, join with a slip stitch to the first stitch of the round. The joining slip stitch and the beginning chain are not counted as stitches. Pull the joining slip stitch tightly to make it smaller and less visible for a neat finish.
Abbreviations
MR: magic ring or magic circle
sl knot: slip knot (to begin the crochet)
st: stitch
BLO
FLO
Stamens
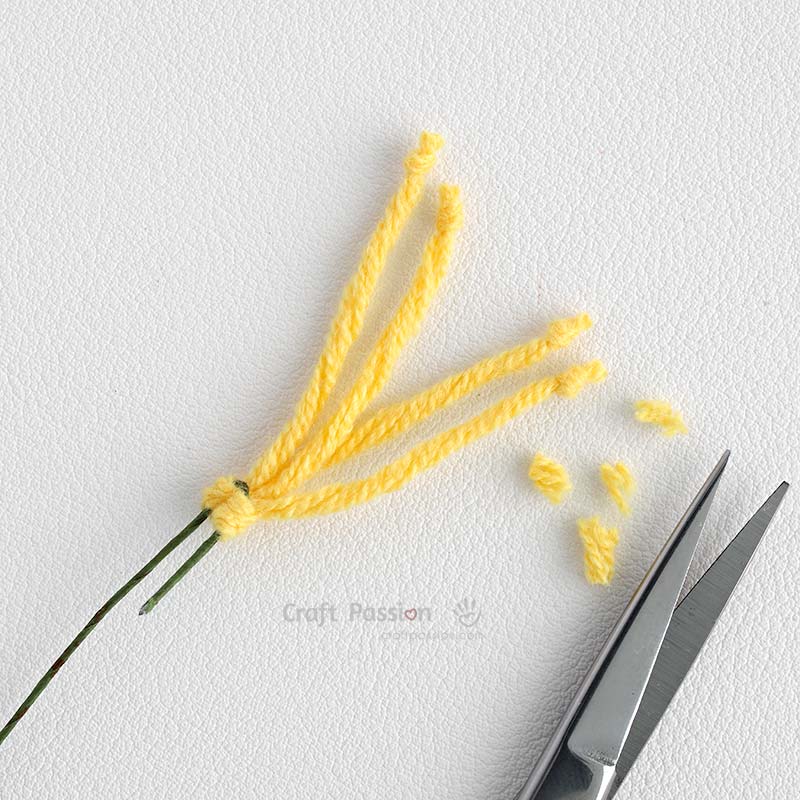
Make 2 with yellow yarn and 24 AWG wire.
Before you begin crocheting the flowers, prepare the stamens for each full and half bloom freesia.
Cut 2 strips of yellow yarn to about 5" length.
Cut wire to about 6" length.
Fold the yarn strips in half and knot them to the wire about 1/2" away from one of the ends. Bend the wire at the knot.
On each yarn end, tie a knot at about 1.5" from the wire, and trim away the excess near the knot.
Full-Bloom Freesia
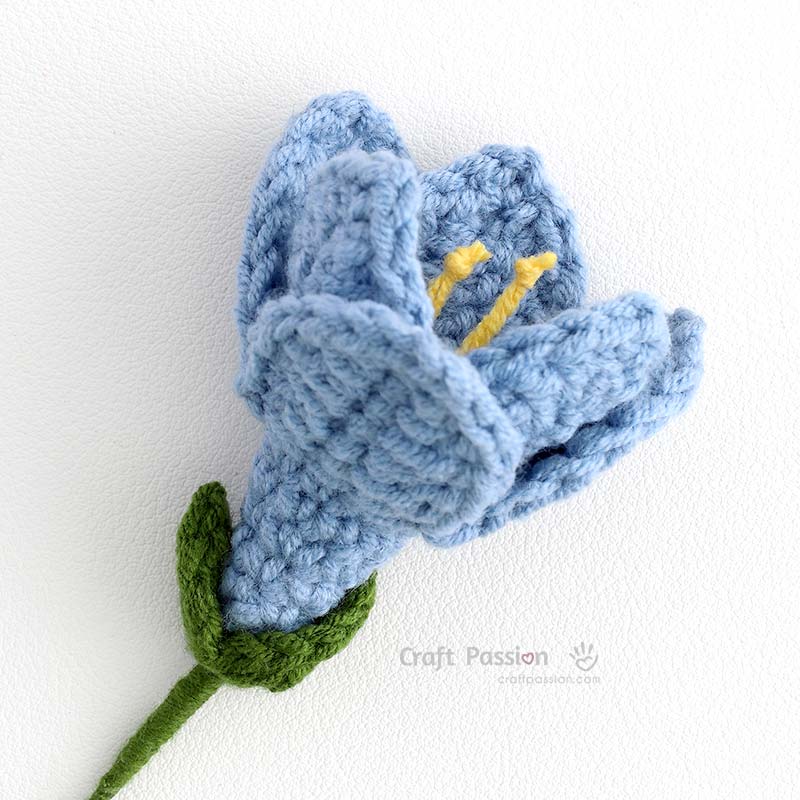
Make 1.
Flower Holder
With Blue yarn, make an MR.
Round 1: sc 6 in MR. Join. {6}
Round 2 - 3: ch 1, sc around. Join. {6}
Round 4: ch 1, [sc, inc] around. Join. {9}
Round 5: ch 1, sc around. Join. {9}
Round 6: ch 1, [inc, sc 2] around. Join. {12}
Round 7: ch 1, sc BLO around. Join. {12}
Continue to crochet the top petals
Top Petals
- Round 1:
[Create petal foundation: ch 6, place a stitch marker in the last ch to mark it as the turning ch, starting in the 2nd ch from hook, sc 5. Continue on the holder: sk 1, sl st 3] repeat 2 times.
Create petal foundation: ch 6, place a stitch marker in the last ch to mark it as the turning ch, starting in the 2nd ch from hook, sc 5. Continue on the holder: sk 1, sl st 2, sk 1.
You should now have 3 petal foundations extending from the holder.
- Round 2, carry along 0.3mm wire:
[Work around each petal foundation: hdc, dc 3, hdc, (sc, ch 2, sc) in the marked turning ch, hdc, dc 3, hdc. Continue on the holder: sk 1, sl st, sk 1] repeat 3 times.
fo.
Bottom Petals
With a new strand of blue yarn, work into the FLO of Round 7
- Round 1:
Starting at the 3rd st of Round 7 to position the first bottom petal between 2 top petals:
[Create petal foundation: ch 7, place a stitch marker in the last ch to mark it as the turning ch, starting in the 2nd ch from hook, sc 6. Continue on the holder: sk 1, sl st] repeat 3 times.
You should now have 3 bottom petal foundations extending from the holder.
- Round 2, carry along 0.3mm wire:
[Work around each petal foundation: hdc, dc 4, hdc, (sc, ch 2, sc) in the marked turning ch, hdc, dc 4, hdc. Continue on the holder: sk 1 st, sl st, sk 1] repeat 3 times.
fo.
Sepal
With Green yarn, make an MR.
[(ch 3, tr, ch-1 picot, tr, ch3, sl st) to MR] repeat 2 times.
fo and leave a long tail for wrapping the stem.
Assemble the Full-Bloom Freesia
- Gather the wire ends from the petals. Wrap the wire ends with the yarn tails and hide them inside the flower holder.
- Insert one stamen through the MR opening of the flower and sepal.
- Position the sepal at the bottom of the flower.
- Apply a small amount of glue to secure the sepal in place.
- Wrap the stem with the green yarn tail from the sepal.
Half-Bloom Freesia
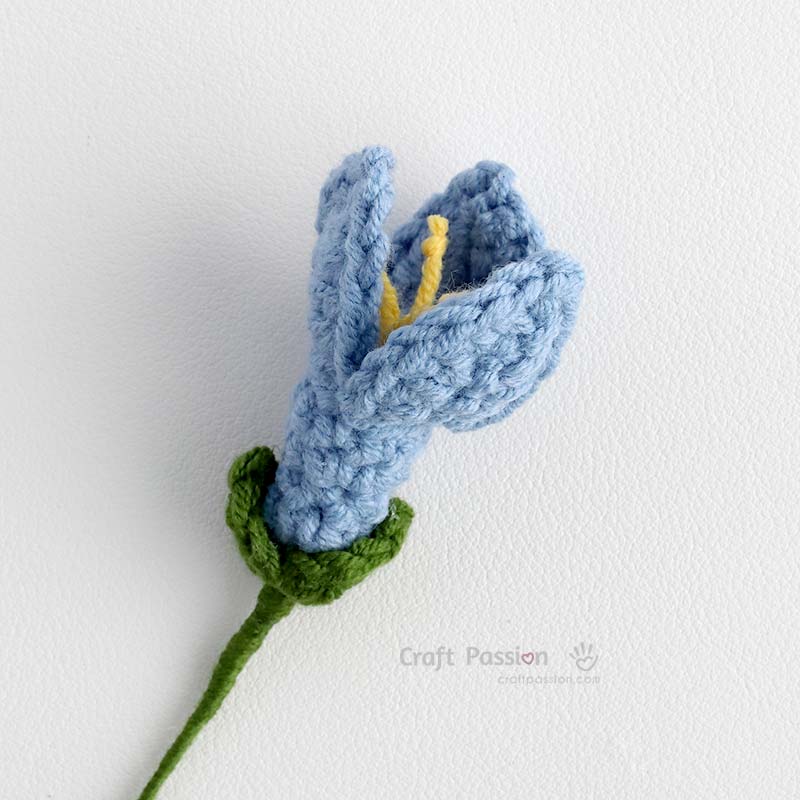
Make 1.
Flower Holder
With Blue yarn, make an MR.
Round 1: sc 6 in MR. Join. {6}
Round 2 - 3: ch, sc around. Join. {6}
Round 4: ch, [sc, inc] around. Join. {9}
Round 5: ch, sc around. Join. {9}
Continue to crochet the top petals
Petals
- Round 1:
[Create petal foundation: ch 6, place a stitch marker in the last ch to mark it as the turning ch, starting in the 2nd ch from hook, sc 5. Continue on the holder: sk 1, sl st 2] repeat 2 times.
Create petal foundation: ch 6, place stitch marker in the last ch to mark it as the turning ch, starting in the 2nd ch from hook, sc 5. Continue on the holder: sk 1, sl st, sk 1.
You should now have 3 petal foundations extending from the holder.
- Round 2, carry along 0.3mm wire:
[Work around each petal foundation: sc, hdc 3, sc, (sc, ch 2, sc) in the marked turning ch, sc, hdc 3, sc. Continue on the holder: sk 1, sl st] repeat 3 times.
fo.
Sepal
With Green yarn, make an MR.
[(ch 2, dc, ch-1 picot, dc, ch2, sl st) to MR] repeat 2 times.
fo and leave a long tail for wrapping the stem.
Assemble
- Gather the wire ends from the petals. Wrap the wire ends with the yarn tails and hide them inside the flower holder.
- Insert one stamen through the MR opening of the flower and sepal.
- Position the sepal at the bottom of the flower.
- Apply a small amount of glue to secure the sepal in place.
- Wrap the stem with the green yarn tail from the sepal.
Opening Bud Freesia
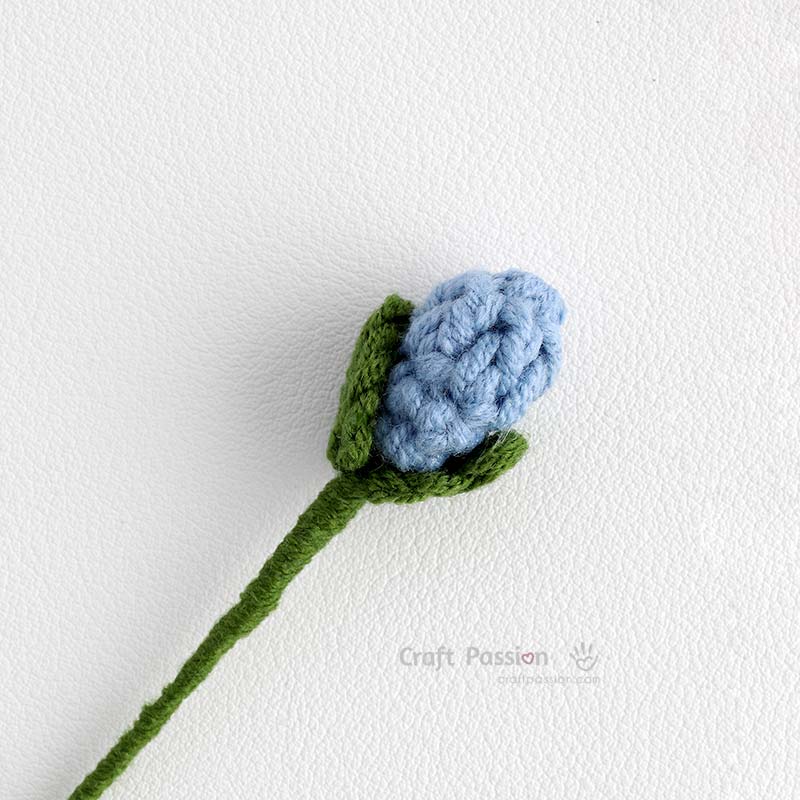
Make 2 to 3.
Bud
With Blue yarn, make an MR.
Round 1: sc 6 in MR. Join. {6}
Round 2: ch, sc around. Join. {6}
Round 3: ch 2, dc 6. Join. {6}
fo and leave a long tail for closing the opening.
Sepal
With Green yarn, make an MR.
[(ch 4, sl st to the 2nd ch from hook, ch2, sl st) to MR] repeat 2 times.
fo and leave a long tail for wrapping the stem.
Assemble the Opening Bud
- Bend one end of the 24 AWG wire to make a small loop. Insert the looped end into the bud.
- With a tapestry needle, thread the yarn tail through the front loops of every stitch in the last round. Pull tight to close the opening.
- Insert the wire through the MR opening of the sepal.
- Position the sepal at the bottom of the bud.
- Apply a small amount of glue to secure the sepal in place.
- Wrap the stem with the green yarn tail from the sepal.
Buds
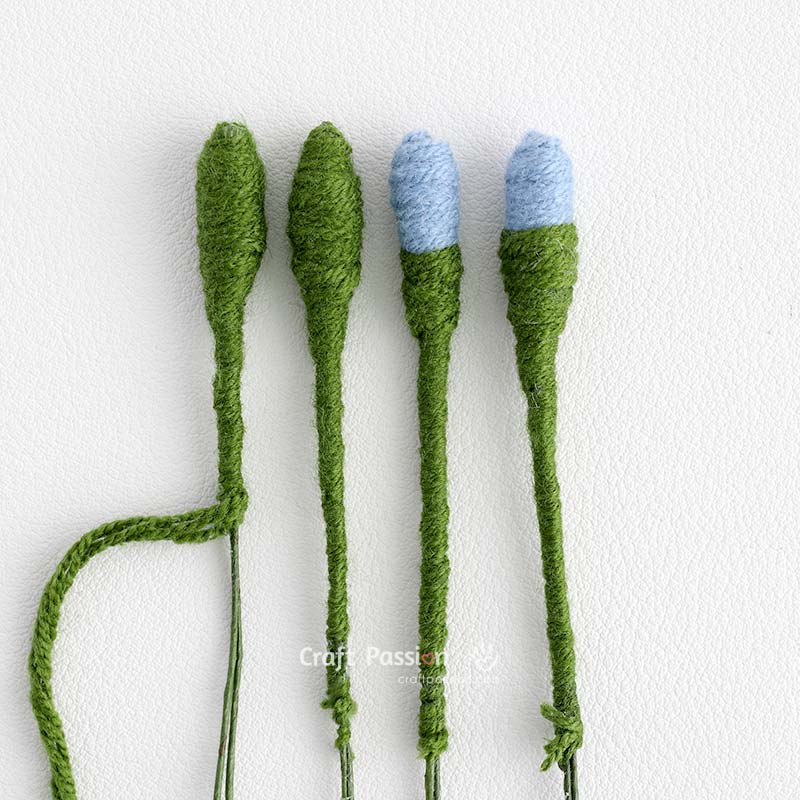
Make 2 green buds and 2 blue buds.
Using blue and green yarns and 4 pcs of 5" long 24 AWG wire.
Blue buds
- Fold one piece of wire in half.
- Tie blue yarn at the folded middle section of the wire.
- Wrap the blue yarn around the folded wire to form a small bud.
- Trim the yarn once the desired bud size is achieved.
- Apply a small amount of glue to secure the yarn.
- Wrap green yarn from the middle of the bud down toward the stem.
- Trim the yarn and apply glue to secure it in place.
Green buds
Repeat the same process as the blue buds, but wrap the entire bud with green yarn only.
For the second green bud, do not cut the green yarn after completing the bud. Continue with the same green yarn for the freesia stalk assembly.
Leaf
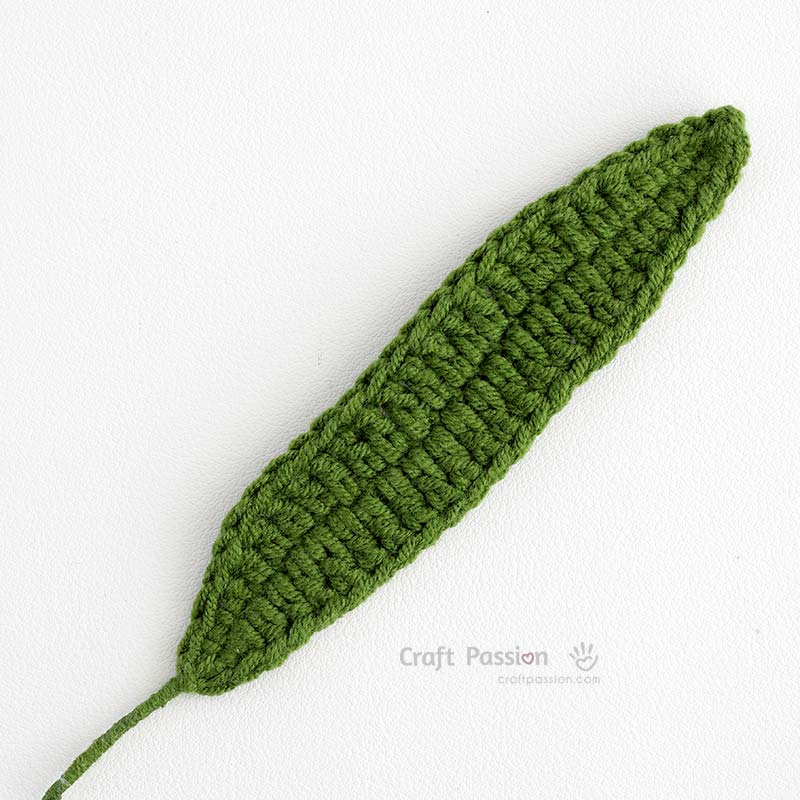
Make 1.
With Green yarn, make a sl knot and place it on the hook.
Foundation chain: ch 25.
Carry along a 24 AWG wire. Starting in the 2nd ch from hook: sc 2, hdc 2, dc 15, hdc 2, sc 2, (sc 2 ch-1 picot, sc) in last ch.
Continue working on the opposite side of the foundation chain: sc 2, hdc 2, dc 15, hdc 2, sc 2. Join.
fo and leave a long tail for wrapping the stem.
Freesia Stalk Assembly
Prepare the 2 mm floral wire for the main stalk.
Begin with the second green bud, keeping the green yarn attached. Use this yarn to wrap the main stalk as you assemble the flowers and buds.
Arrange the freesia pieces from the top of the stalk downward in this order:
- Green bud
- Green bud
- Blue bud
- Blue bud
- Opening bud
- Opening bud
- Half bloom freesia
- Full bloom freesia
- Leaf
As you add each bud or flower, place its wire stem against the main stalk, apply glue to secure it, and wrap the green yarn firmly around the main stalk. Continue wrapping downward after each attachment to cover the wires and create a neat stem.
Adjust the angle of each bud and bloom as you wrap so the stalk curves naturally like a real freesia. Apply a small amount of glue where needed to secure the yarn wrapping.
After attaching the leaf, continue wrapping to the bottom of the stalk. Fasten off, trim the yarn, and secure the end with glue.
Shape the petals, buds, and leaf gently with your fingers.
Notes
The total time required is an estimate and may vary depending on your crochet speed and experience level.
You may crochet and sell the finished freesia flowers in small batches at maker markets. However, the pattern and images may not be reproduced, republished, or distributed in any form without prior written permission from Craft Passion.
This downloadable crochet pattern is intended for easy offline use and quick reference. For extra detailed instructions and additional information, visit the full article at:
https://www.craftpassion.com/crochet-freesia-flower-pattern/