
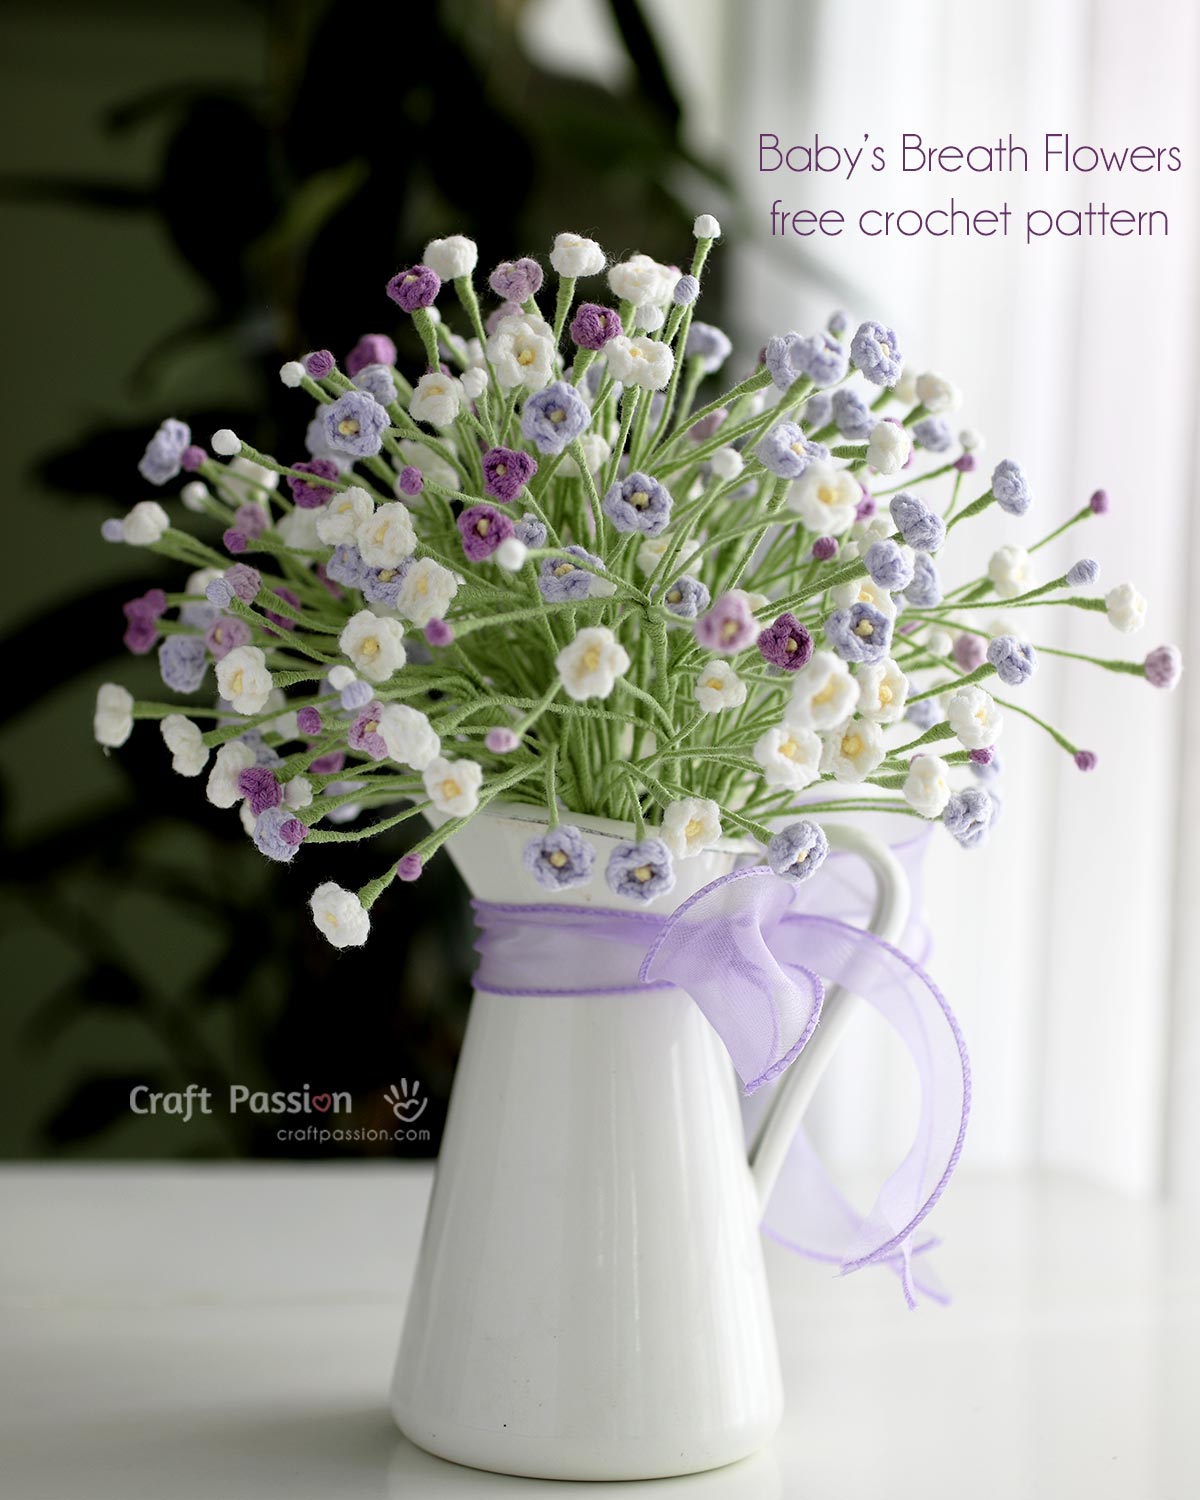
This free crochet Baby’s Breath pattern makes delicate little flowers that are perfect for handmade bouquets and floral arrangements. Baby’s Breath, also known as Gypsophila, is commonly used as a filler flower, and its airy clusters pair beautifully with larger crochet blooms.
This post may contain affiliate links, and we may earn a commission on purchases made through them at no extra cost to you. ❤️ Thank you!
Baby’s Breath symbolizes purity, everlasting love, and new beginnings, making these delicate flowers especially meaningful for weddings, celebrations, and handmade gifts.
About the Pattern
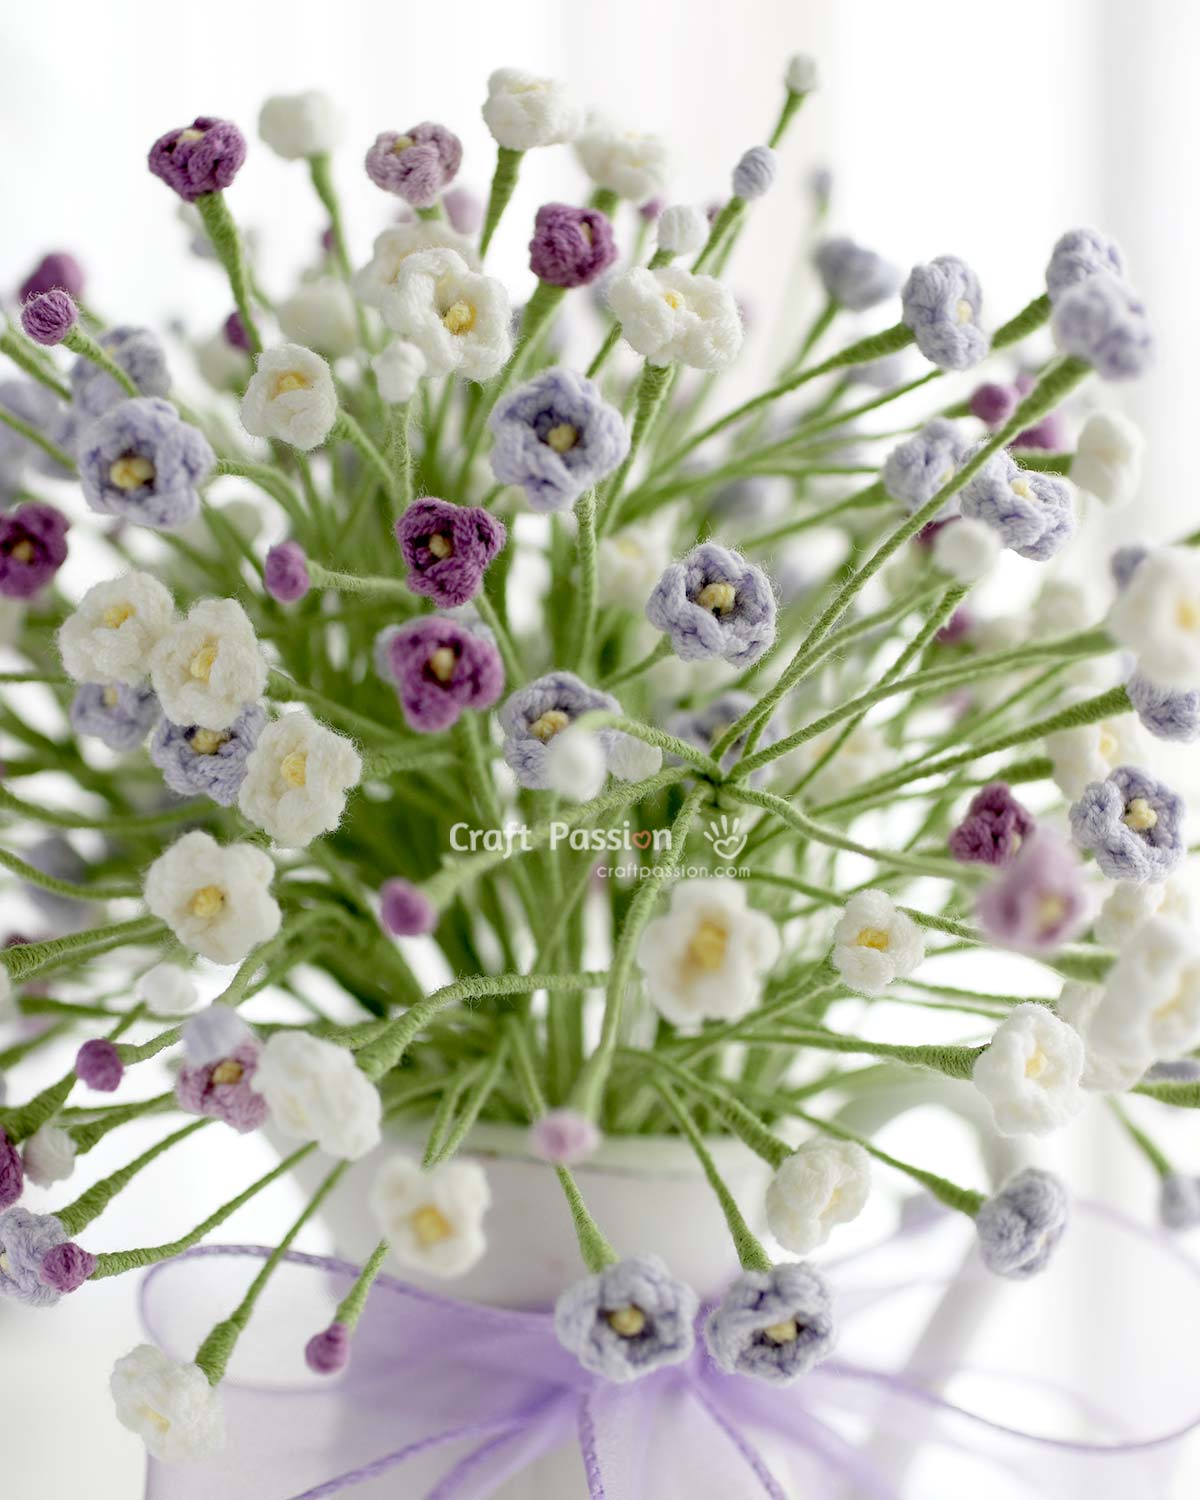
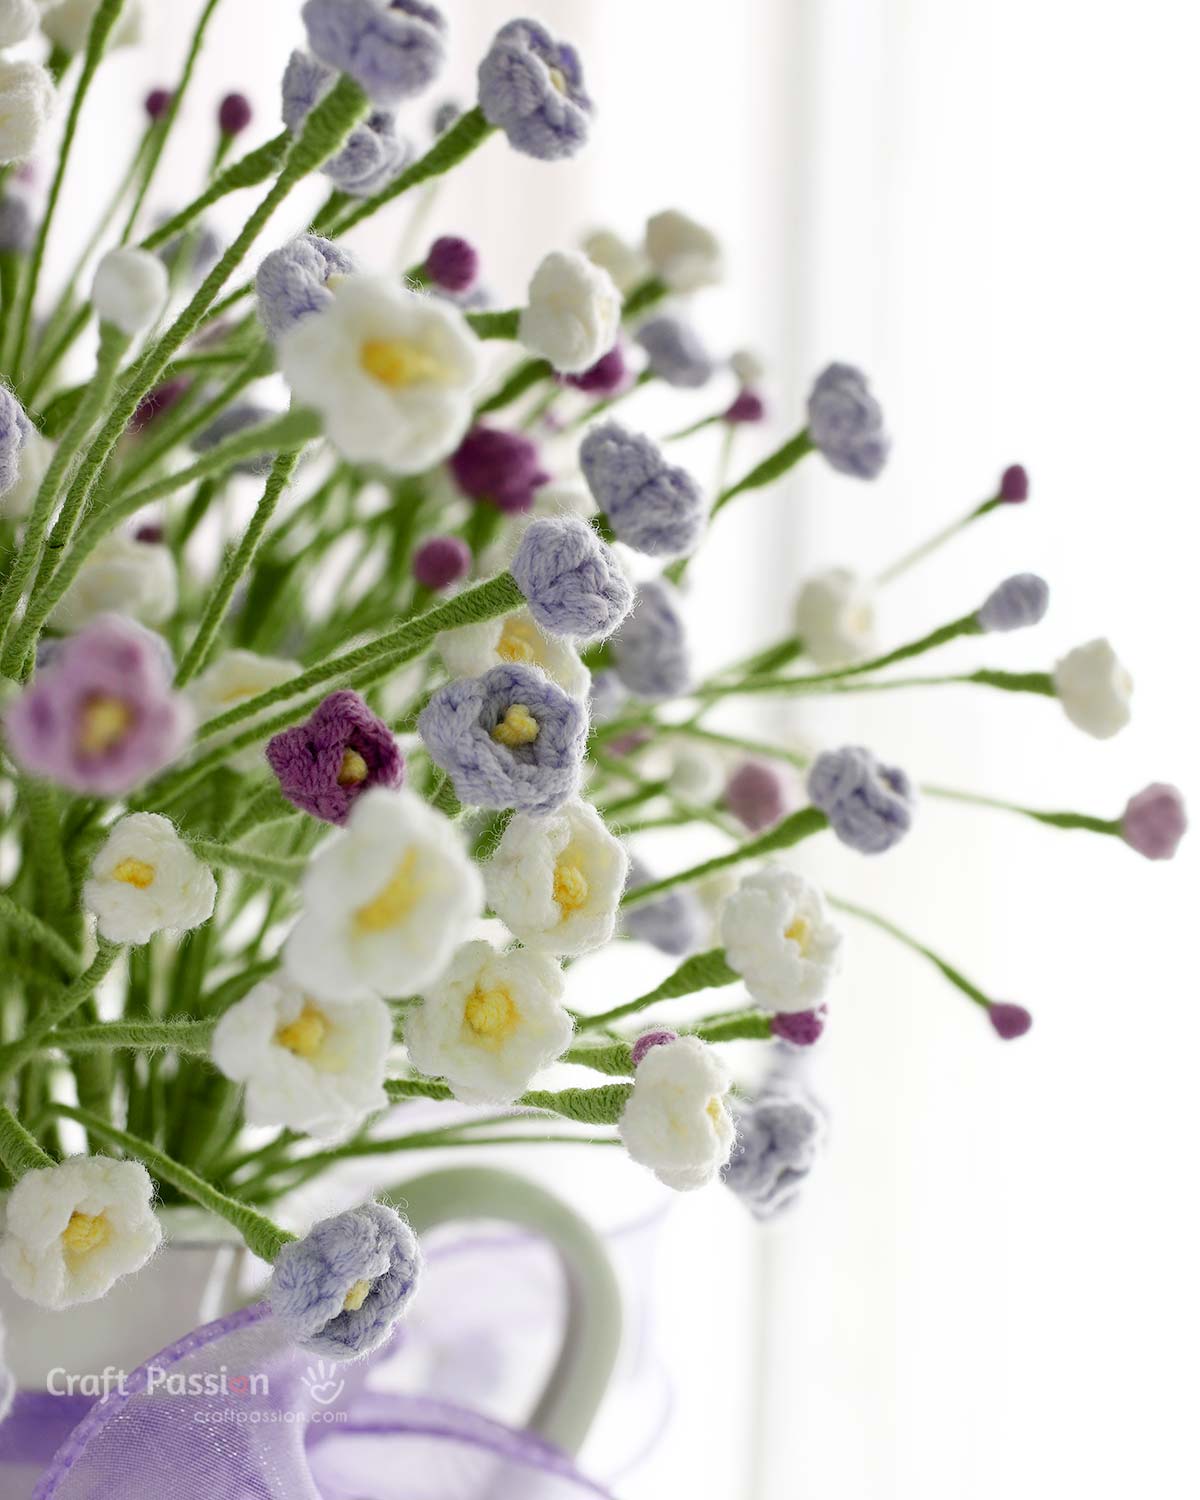
Each Baby’s Breath stalk is made with a mix of buds, small 3-petal flowers, and larger 5-petal blooms. Combining different stages of flowering along the wired stems helps create the light, airy look that makes Baby’s Breath so pretty in bouquets.
Each stalk contains approximately:
- 4 buds
- 4 small flowers
- 7 large flowers
You can vary the quantities slightly to make each stalk look different. The small and large flowers are worked into a magic ring, with the only main difference being the number of petals.
Individual blooms are attached to 24 AWG floral wire, grouped into small branches, and then secured to a stronger 18 AWG main stem.
Skill level: Beginner
Crochet terms: US terminology
Approximate time: 1 hour per stalk
Yarn
I used Category 2 Sport/Baby/Fine yarn (this yarn) for this pattern.
Choose:
- Your preferred colors for the flower petals
- Pale yellow for the flower centers
- Mint green for the stems
Fine yarn works well for Baby’s Breath because it keeps the flowers small and delicate.
I used white with several shades of purple for one arrangement, and blue with white for another. Feel free to mix colors to suit your bouquet, or use small amounts of leftover yarn from other flower projects.
Crochet Hook
Use a 2.5 mm crochet hook for the flowers.
If you substitute a different yarn, make one flower first to check that you are happy with the size and appearance.
Floral Wire
You will need two wire sizes:
- 24 AWG floral wire for the buds and individual flower stems
- 18 AWG floral wire for the main stem
The thinner wire keeps the small stems flexible, while the thicker wire provides better support for the finished stalk.
Tools and Supplies
Prepare:
- Pliers
- Tapestry needle
- Scissors
- Stitch markers
- Clear all-purpose glue; I recommend UHU
Only a small amount of glue is needed to secure the flowers and yarn wrapping around the wire.
How to Make Crochet Baby’s Breath
The full Baby’s Breath crochet pattern is available in the pattern sheet at the bottom of this post. The tutorial here explains how the different parts come together.
Make the Buds
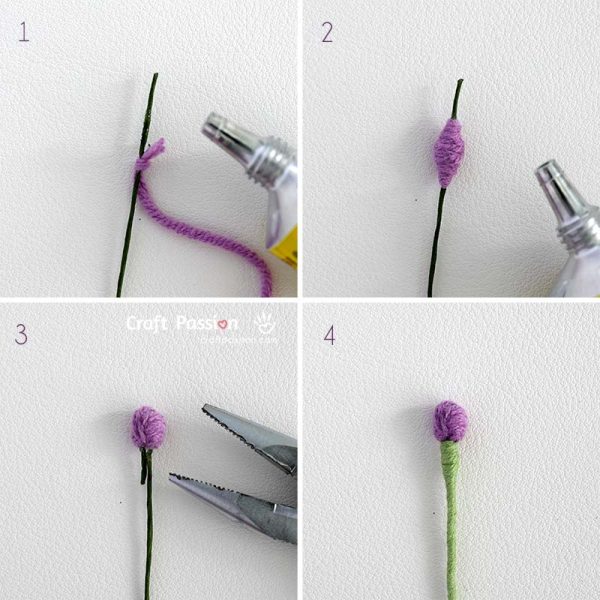
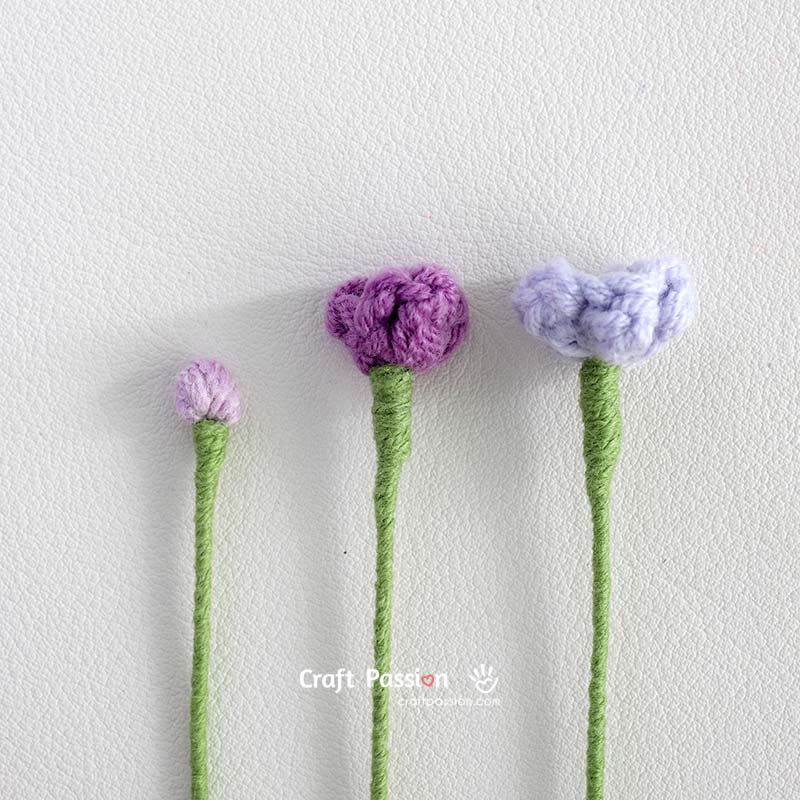
The buds are made by wrapping yarn around a short piece of 24 AWG wire. Once a small padded section is formed, bend it gently with pliers to create the rounded bud shape.
Wrap green yarn below the bud and continue down the wire to form the stem.
Slight differences in size are fine and can make the finished flower look more natural.
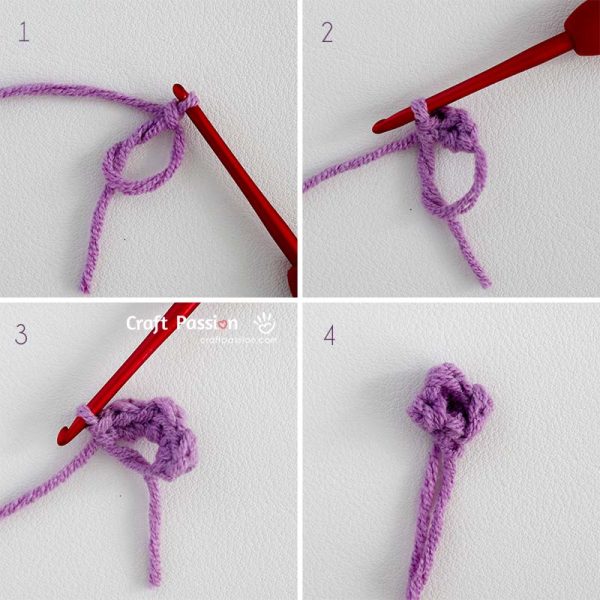
Crochet the Small Flowers
Small flowers are worked into a magic ring with 3 petals.
After the petals are completed, pull the magic ring closed so the flower forms a small cup rather than lying flat.
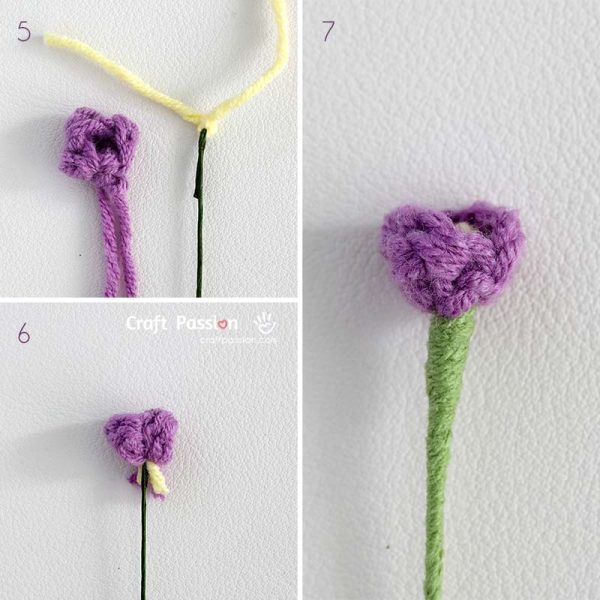
A pale yellow yarn knot forms the center. Insert the wire center through the flower, tighten the magic ring around it, and wrap the wire with green yarn to finish the stem.
Crochet the Large Flowers
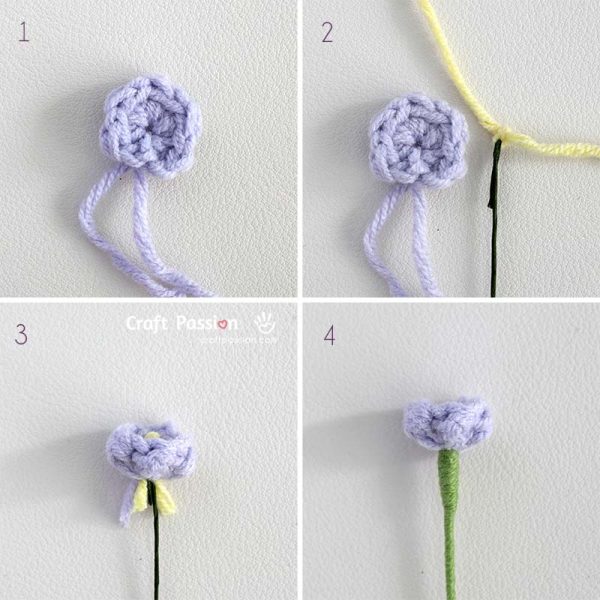
The large flowers are made in the same way, except they have 5 petals instead of 3.
The fuller flowers mixed with smaller blooms and buds create the variation seen in real Baby’s Breath.
Assemble the Flower Stalk
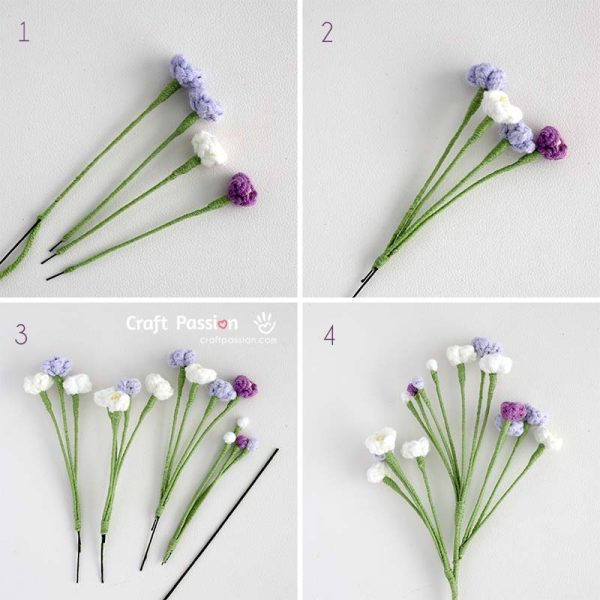
Mix 3 to 4 small and large flowers together and arrange them at slightly different heights. Wrap the wires together to form a small branch.
Repeat until you have about three flower branches, then group the buds into another branch.
Use an 18 AWG wire as the main stem. Attach a flower branch and the bud branch near the top, then continue wrapping downward with green yarn.
Add the remaining branches one at a time at different heights to create a cascading shape. Finish wrapping the stem and secure the yarn with a small amount of glue.
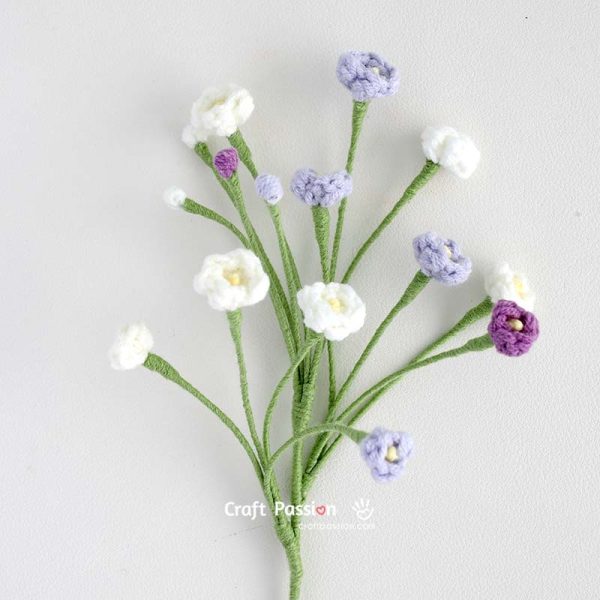
Once assembled, gently bend and spread the wired branches. Avoid making both sides perfectly even—the irregular spacing gives the flowers their airy look.
Using Baby’s Breath in a Crochet Bouquet
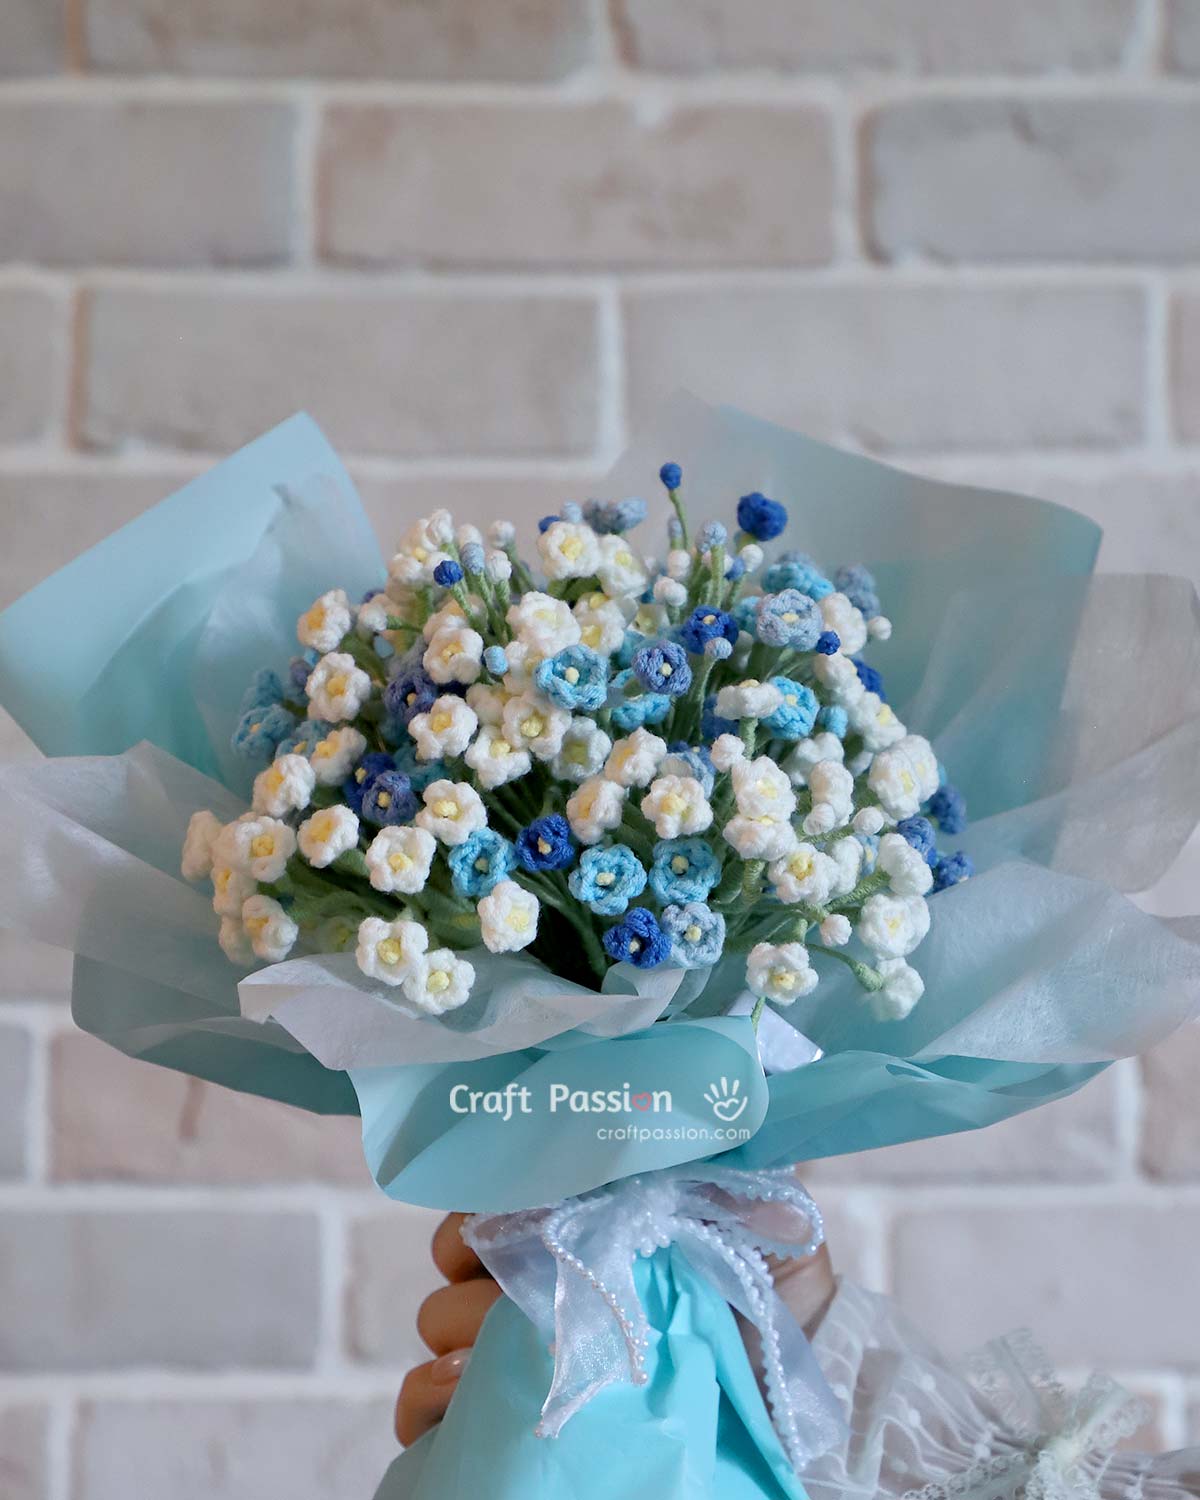
Baby’s Breath works especially well as a filler flower in a crochet bouquet, filling the spaces between larger blooms and softening the overall arrangement.
For a bouquet made mainly from Baby’s Breath, the pattern suggests making about 10 or more stalks.
For a mixed bouquet, fewer stalks may be enough.
Try pairing them with my Crochet Freesia Flower Pattern or Crochet Tulips Pattern.
Frequently Asked Questions
1. Is Baby’s Breath Easy to Crochet?
Yes. The flowers are quick and easy to crochet, using basic stitches: magic ring, chain stitch, slip stitch, single crochet, and double crochet.
The assembly takes a little more time because each flower is attached to floral wire and wrapped with yarn, but the process is simple once you get used to it. This makes the pattern suitable for beginners who are comfortable with basic crochet stitches and willing to try a little wire work.
2. What Are Crochet Baby’s Breath Flowers Used For?
Crochet Baby’s Breath flowers are mainly used as filler flowers in handmade bouquets, where their small blooms fill gaps and soften the arrangement around larger flowers.
They also work well in vase displays, wedding and graduation bouquets, table arrangements, gift decorations, and keepsake floral displays. Because crochet flowers do not wilt, they are especially suitable for arrangements you want to keep and enjoy for a long time.
3. What Crochet Flowers Pair Well With Baby’s Breath?
Baby’s Breath pairs beautifully with larger flowers that provide contrast in size and shape. Good choices include crochet freesia, crochet tulips, and other statement flowers.
For a balanced arrangement, place the larger flowers first, then tuck the Baby’s Breath between them and around the outer edges to add softness and volume.
4. How Can I Make Crochet Baby’s Breath Look More Realistic?
Use a mixture of buds, small flowers, and fully opened blooms instead of making every flower identical. After assembling the stalk, gently bend the wired branches so the flowers sit at different heights and angles.
Avoid arranging them too evenly. Slight differences in spacing, direction, and flower placement will give the finished stalk a more natural, airy appearance.
5. How Many Crochet Baby’s Breath Stalks Do I Need for a Bouquet?
The number depends on whether Baby’s Breath is the main flower or used as a filler.
For a bouquet made mainly from Baby’s Breath, start with around 10 stalks and add more until you achieve the fullness you want.
For a mixed bouquet with larger flowers, you will usually need fewer stalks because they are mainly used to fill gaps.
6. How Do I Care for and Maintain Crochet Baby’s Breath?
Keep the flowers away from moisture and prolonged direct sunlight to help preserve the yarn color and shape.
To remove dust, gently use a soft brush, a clean makeup brush, or a hair dryer on a cool, low setting held at a distance. Because the stems contain floral wire and glue, avoid soaking or machine-washing the flowers.
If the arrangement becomes slightly misshapen, gently bend the wired stems back into position.
7. Is There a Faster Way to Make Several Baby’s Breath Stalks?
Yes. If you are making a bouquet, working in batches can save time.
Crochet all the small flowers first, followed by the large flowers. Then prepare several wired flower centers at once before moving on to wrapping the stems with green yarn.
This assembly-line approach reduces the amount of switching between crochet, wire work, and assembly, making it easier to produce several stalks efficiently while still allowing small variations for a natural look.
What’s Next?
If you enjoy making crochet flowers, you may also like:
- Crochet Flower Patterns – browse the growing collection of crochet flower patterns for more blooms to add to bouquets, gifts, and floral arrangements.
- Crochet Freesia Flower Pattern – another delicate flower that pairs beautifully with Baby’s Breath.
- Crochet Tulip Pattern – ideal for adding larger blooms to a handmade bouquet.
- Easy Flower Crochet Pattern – a quick pattern with several petal variations.
If you make your own Baby’s Breath flowers, share them on Facebook and/or Instagram and tag @craftpassion so we can see your creation. You can also save this pattern to Pinterest for later.
Happy crochet!
Downloadable Crochet Pattern Sheet
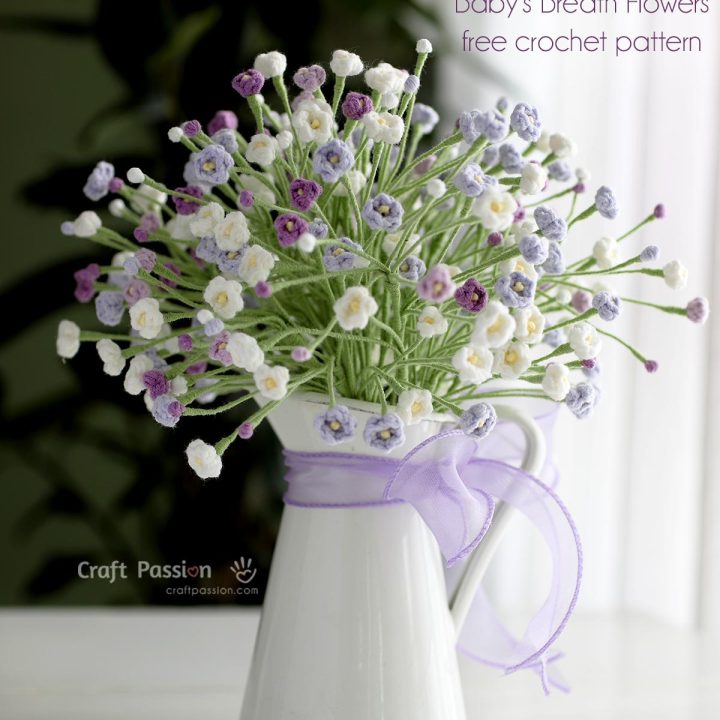
Baby's Breath Crochet Pattern
Crochet delicate Baby’s Breath flowers with this free pattern. Make the tiny buds and blossoms, attach them to wired stems, and assemble them into a realistic filler flower for handmade crochet bouquets.
Materials
Yarn - Sport-Weight/Baby-Weight/Fine/Category 2 according to Craft Yarn Council yarn-weight standard
- Your choice of colors for the flower petals (I used several shades of Purple from this brand)
- Pale Yellow for the stamens
- Mint Green for the stems
Wires
- 24 AWG floral wire - for the buds and individual flower stems
- 18 AWG floral wire - for the main stem
Tools
- 2.5 mm Crochet Hook (I used Tulip brand)
- Stitch Markers
- Tapestry Needle
- Pliers
- Scissors
- Clear All Purpose Glue ( I recommend UHU)
Instructions
Pattern Notes
- This pattern is written in US crochet terms.
- One Baby’s Breath stalk consists of approximately 4 buds, 4 small flowers, and 7 large flowers. Feel free to vary the number of each to create a fuller or lighter stalk.
- The small and large flowers are crocheted in the same way. The small flower has 3 petals, while the large flower has 5 petals. Both are worked directly into a magic ring.
- The stamens for the small and large flowers are made by tying a double knot of pale yellow yarn around the floral wire.
- The buds are grouped into one branch. The small and large flowers are mixed randomly and divided into approximately 3 flower branches before the branches are assembled into the finished stalk.
- Use only a small amount of glue where needed to secure the flowers and the yarn wrapping around the wires.
When the pattern says Join, join with a slip stitch to the first stitch of the round. The beginning chain and joining slip stitch do not count as stitches. Pull the joining slip stitch snugly so it is small and less noticeable.
Abbreviations
MR: magic ring or magic circle
st: stitch
Buds
Make 4.
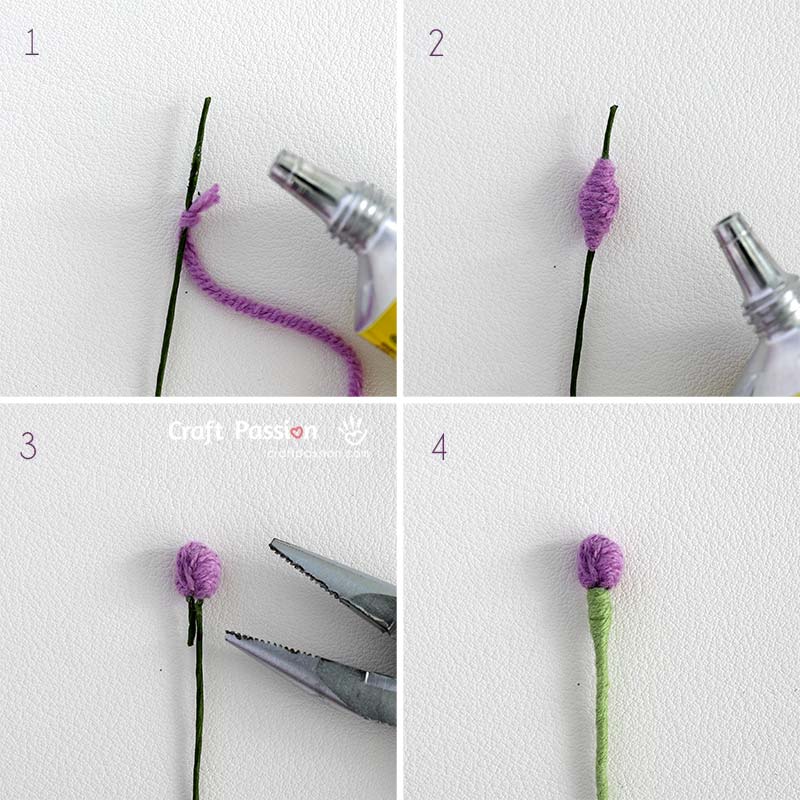
You will need: your chosen bud-color yarn and one 4" length of 24 AWG floral wire for each bud.
1. Tie the yarn around the wire approximately ½" from one end. Apply a small amount of glue to the wire.
2. Wrap the yarn repeatedly around the wire to build up a small bump approximately ½" long. Cut the yarn and secure the end with a small amount of glue.
3. Using pliers, carefully bend the wrapped section at its center to form a small bud.
4. Beginning directly below the bud, apply a small amount of glue and wrap the wire with green yarn to form the stem.
Small Flowers
Make 4.
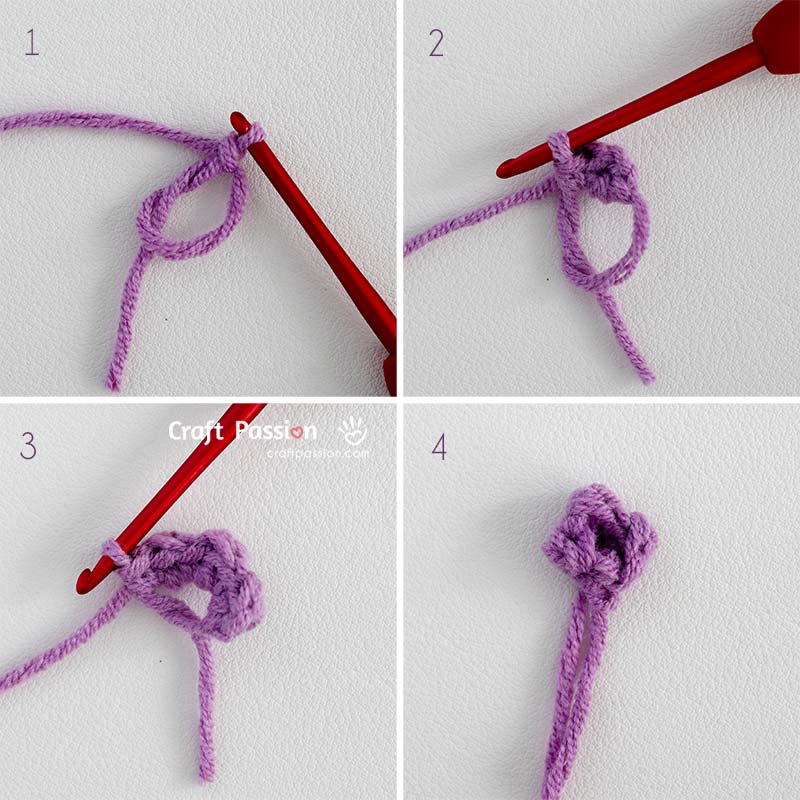
Crochet Pattern
With your chosen yarn color for the flower:
Round 1: Make an MR. Ch 1, [dc, sc] in MR 3 times. Join with sl st to first dc. Fasten off.
Pull the yarn tail firmly to close the MR and bring the three petals together to form the small flower.
Assembly
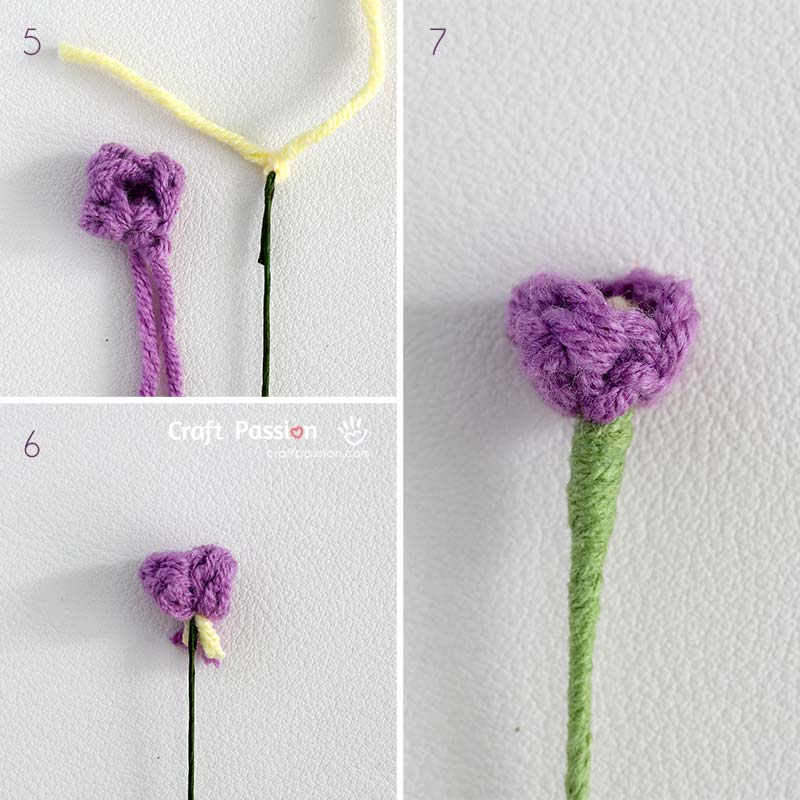
For each flower, cut one 4" length of 24 AWG floral wire.
With pale yellow yarn, tie a double knot around the wire approximately ½" from one end to form the stamen. Bend the short end of the wire downward at the knot.
Insert the stamen from the bottom of the flower through the MR. Pull the MR yarn tail firmly to close the center around the stamen. Trim the excess yarn tails.
Apply a small amount of glue below the flower and wrap the wire with green yarn to form the stem.
Large Flowers
Make 7.
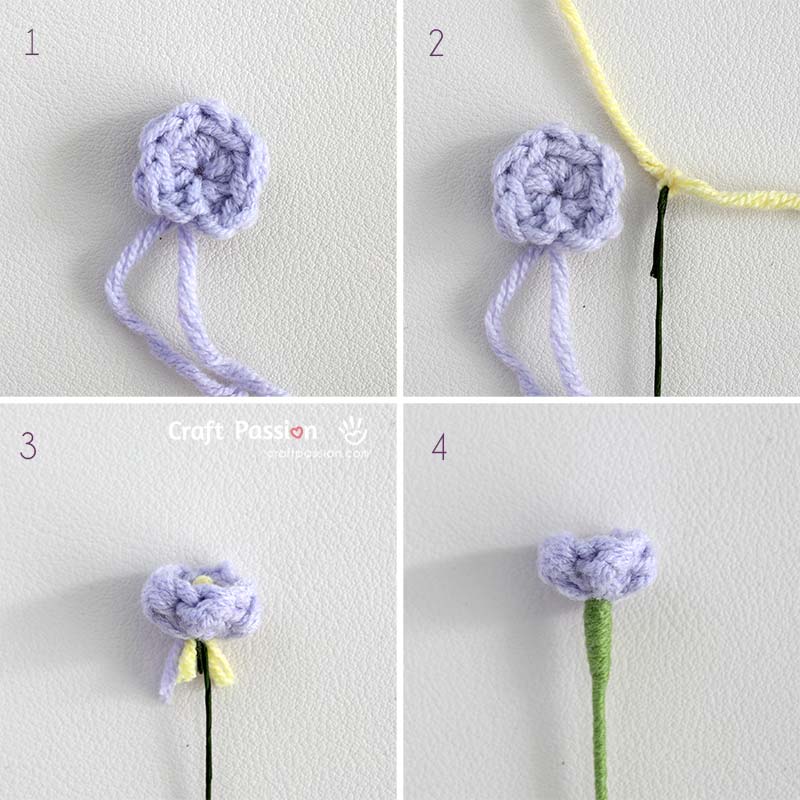
The large flower is made in the same way as the small flower, except it has 5 petals instead of 3.
Crochet Pattern
With your chosen yarn color for the flower:
Round 1: Make an MR. Ch 1, [dc, sc] in MR 5 times. Join with sl st to first dc. Fasten off.
Pull the yarn tail firmly to close the MR and bring the five petals together to form the large flower.
Assembly
Assemble the stamen and wired stem in the same way as for the small flower.
Baby's Breath Stalk Assembly Instructions
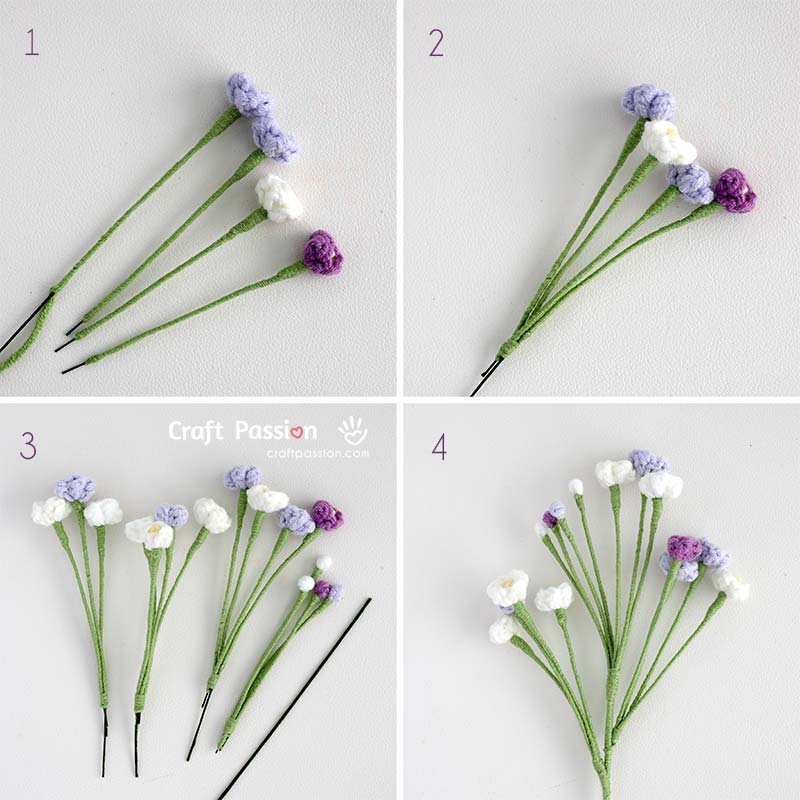
- Randomly mix 3 to 4 small and large flowers in each group. Arrange them at slightly different heights for a more natural appearance.
- Wrap the wires together near the bottom to form a flower branch.
- Repeat until you have approximately 3 flower branches. Group the 4 buds together in the same manner to form a bud branch.
Use a full-length 18 AWG floral wire as the main stem. The thicker wire provides support for the assembled branches. - Apply a small amount of glue near the top of the main stem.
Position one flower branch and the bud branch near the top, and wrap them securely to the 18 AWG wire with the green yarn.
Continue wrapping downward, adding the remaining flower branches one at a time at staggered heights to create the cascading appearance.
Continue wrapping the green yarn to the bottom of the main stem. Cut the yarn and secure the end with a small amount of glue.
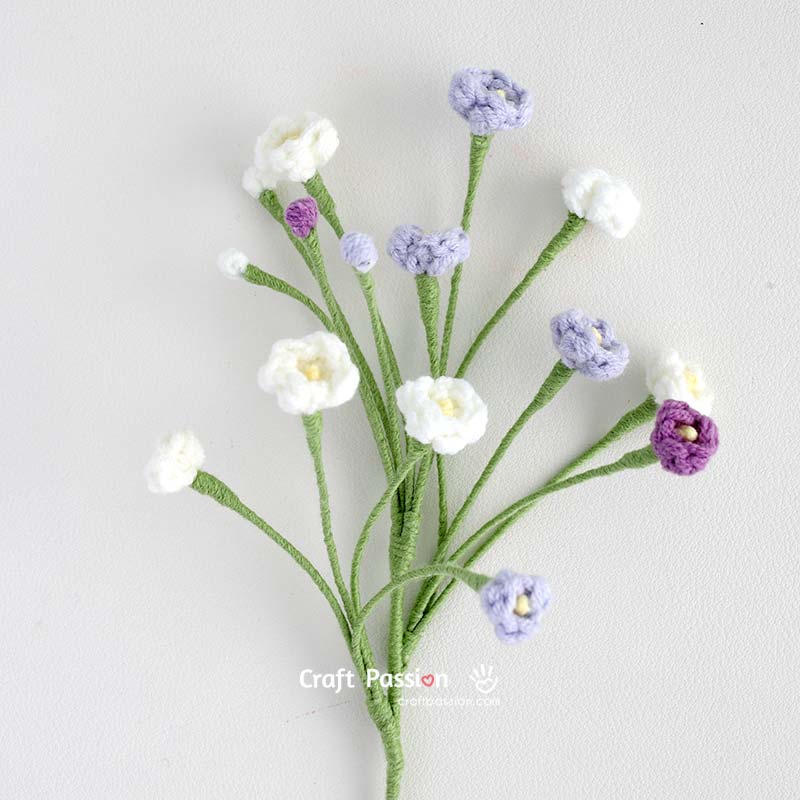
After assembly, gently bend and spread the wired branches so the flowers sit at different heights and angles.
Bouquet Quantity
For a full bouquet made primarily with Baby’s Breath, make approximately 10 or more stalks. Use fewer stalks when adding Baby’s Breath as a filler alongside larger crochet flowers.
Notes
The total time required is an estimate and may vary depending on your crochet speed and experience level.
You may crochet and sell the finished baby's breath flowers in small batches at maker markets. However, the pattern and images may not be reproduced, republished, or distributed in any form without prior written permission from Craft Passion.
This downloadable crochet pattern is intended for easy offline use and quick reference. For extra detailed instructions and additional information, visit the full article at:
https://www.craftpassion.com/crochet-babys-breath-pattern/