
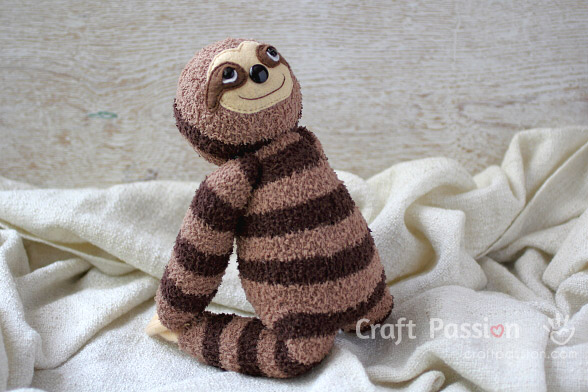
Isn't it cool to have your very own handmade stuffed sloth? Let's get started on making your own sloth stuffed animal out of socks. Smie, the sock sloth measures 16 inches from head to toe and is made from chenille socks; it has three claws on each limb, large sleepy eyes, and a lovable grin.

We now have three sloths at home! Yes, three stuffed sloth that I've always wanted to make. I've always wanted to own a sloth, not a real one (which, by the way, is an endangered species), but a plush sloth stuffed animal that is cute and cuddly and requires less upkeep.

When I saw a baby sloth for the first time in a television documentary a few years ago, I immediately fell in love with this creature that moved very slowly and with great lethargy.
The expressions on its face, particularly its eyes and smiles, as well as the way it moved, immediately won my heart. The sloth exemplified the definition of adorable.

Because sloths move so slowly, people want to carry them so they can get them to their destination sooner rather than letting them take their sweet time on the ground.
Did you know that sloths are a helpless and vulnerable species? That is why we must save them before they become extinct!

Smie, the three toed sloth stuffed animal, is a plush toy that measures 16 inches in length and is created by sewing together a pair of striped chenille socks.
You may follow our option of using brown/khaki stripes or black/gray stripes for the stripes on Smie. Or choose your preferred colors of socks to sew them.
The sock sloth has three felt toes on each of its limbs, and the felt is a beige color.
Smie's face is characterized by a wide grin and a pair of large, goggle-like eyes that are marked with brown.
Putting magnets on his limbs will give him more ways to pose, making him so much more fun to play with.

This cute little guy, Smie came into my life on a warm sunny day. Amidst the sounds of happy children playing and birds singing, there is another rather peculiar, dragging sound. Where could it be coming from? Wait, there's another sound, this time of leaves rustling together as if they are chattering about how beautiful today's weather is. The scraping and rustling sounds seem to be coming from somewhere high up in the trees, but it’s hard to tell. After all, what else is up there other than bird nests and leaves, right?

And then, from behind a curtain of leaves, Smie emerges with his family.
Sew Smie and start playing with your own stuffed sloth!
His mother never lets him or his brothers leave the tree. The reason for it as its leaves keep them away from the prying eyes of humans who live in the outside world. Mom always says that sloths can only go out as a family, so it’s safer and more fun.

As a little wild animal in the woodland, Smie has always been curious about humans, and today the sloth family left their tree home to come into mine. Now, Smie and his brothers are snuggled in their blankets where it is nice and warm.
Smie has magnets on his limbs and he is able to do all these poses. You can also stick your sock sloth to any metal surface for fun, such as a metal noticeboard, refrigerator door, or whiteboard. Smie and his family make an excellent home and craft room display.
Let’s play with Smie and family!

What's Next:
- Start sewing and share your completed handmade on Facebook and/or Instagram. Remember to tag us, @craftpassion, so that we are able to see them.
- Pin it to Pinterest for a future To-Sew List
- Share with your sewing groups for a sew-along event.
- Learn more about the basics of hand sewing and how to choose a sewing machine for beginners.
- Browse more free sewing patterns and stuffed animals to make, especially animals that are sewn from socks.
- If you know how to crochet, check out Smie's cousin, Sill, the crochet sloth.

Sock Sloth Stuffed Animal Sewing Pattern
Let’s get started on making your own sloth stuffed animal out of socks. Smie, the sock sloth measures 16 inches from head to toe and is made from chenille socks; it has three claws on each limb, large sleepy eyes, and a lovable grin.
Enjoy sewing them!
Download and print separately SEWING PATTERN for the eyes, ears, and pattern for drawing the sock.
Materials
- Microfiber chenille sock, brown stripes, 1 pair
- Button eye 9 mm, black, 2; or equivalent button (eyes)
- Button eye 15 mm, black, 1; or equivalent button (nose)
- White felt – 1″ x 1.5″
- Beige felt, 3″ x 24″
- Brown felt, 1.5″ x 5″
- Brown embroidery floss
- Poly-fill stuffing material
- Super strong round magnets, 0.5″ diameter, 4 pieces (optional)
- Sewing threads (matching colors)
- Sock Sloth Pattern Template
- Paper or card stock for template printing
Tools
- Sewing machine. You can also hand-sew, if you prefer
- Long Sewing Needle (about 2") and pins
- Scissors
- Water Soluble Fabric Marker
- Iron
- Printer
Instructions
How To Sew Sloth Stuffed Animal
- Preparation.
Get together all of the things on the list above. Before you sew your socks, you should always wash them first. Turn the sock inside out and iron it.
I used a strong circle magnet instead of the black hook-and-loop strips (Velcro) to the left of the circle magnet. Socks don't work well with the hooks on Velcro strips, so please don't use it for this project.
- Trace, Sew & Cut.
Download and print out the Sock Sloth Pattern Template. Make templates for the face, claws and eye markings with card stock.
Flip the socks inside out and lay them flat, like the picture shows.
If you are using stripe chenille socks, line up the stripes and pin them.
Trace the pattern on the socks and felts, one at a time.
Cut out the pieces of felt for the face and eyes.
Leave the rest of the beige felt for the claws and do what the next step says.
Sew the socks together along the red dashed lines in the templates to form your sock sloth's head, arms, body, and legs.
Cut the pieces along the blue lines.
Keep the remaining sock fabrics to wrap the magnets if you choose to use them.
- Make Claws
To make sewing up the 12 claws easier, I traced only 12 claws (rather than the 24 stated in the template) and laid the balance of the felt under it, sewing around the traced line of the claws except the opening.
Cut out the claws with a 1/16′′ seam allowance.
Turn the claws with blunt-point tweezers or leave them as-is if you find it difficult.
Stuff them tightly with Poly-fill stuffing. Fill the tip of the claw before stuffing it completely.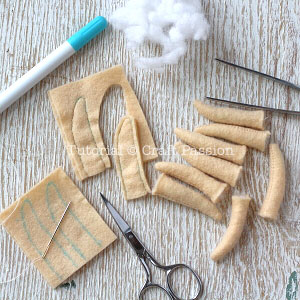
Pin the claws together as shown in the picture, and hand-stitch along the red zig-zag lines.
Keep in mind that the sock sloth's claws are arched. Make sure the claws are arched the right way before you put them in the opening of the legs and sew them (next step). With the body and legs piece still wrong-side out and the back facing up, place the arched claws on the leg with the claw-tip arched up.
Put the claws through the opening in the leg, line them up, and sew them to the leg. Repeat these 2 steps for the other leg.
Sew the claws to the arms too.
When you look at the sock sloth from the front, the claw should be curved down after you turn the body right side out.
- Stuffing
Now, turn the head, arms, and body pieces right-side-out and stuff them with poly-fill until the lower arms, lower body, and legs are firm and dense. Lightly firm in the upper arms and upper body.
Stuff and round out the head.
Close the openings with stitches.
Massage and roll the parts with both hands to smooth out the lumps in the poly-fill stuffing material and give the parts a nice shape.
- Sew Face Features
Place the face felt piece on the head, slightly lower than the center of the head. Hand-stitch it on.
Place the white eye felt pieces on the template's markings, pin or sew a small stitch around the top edge.
Sew the black eye button to the white half of the eye at the top.
Repeat the same steps to attach the other eye.
Place the brown part of the eye on the face, so that the cut slit shows the bottom half of the white and button eye. Use pins and brown thread or embroidery floss to sew around the edges.
Stitch a line along the top to give the sock sloth a double eyelid and a "chill out and take it easy" look.
After that, sew the nose button on and embroider the smiling mouth to complete the sock sloth's head.
- Sew Head To Body
Before you sew the head to the body, draw two circles of the same size at the bottom of the head and the top of the body.
You will then make slip stitches along these lines to connect the head to the body.
Keep the circle small so the head can move around it easily.

- Sew Arms To Body
To finish the sock sloth, sew the arms to the body, which is the last part of sewing.
Spray water on the finished sock sloth to get rid of the marker marks.
- Add Magnet (Optional)
Cut a circle out of the sock fabric (must be larger than the magnet).
Wrap the sock around the magnet, then sew it together. Cut away any extra sock to make it look better.
Sew the magnet with the cover onto Smie.
Repeat for the other 3 magnets.
Tip: Pay attention to how the magnets are oriented and put them together so that the palms and feet attract each other.
Notes
Seam Allowance: Allow yourself about ⅛" or ¼" (you need bigger seam allowance for loose-knit and thinner sock materials because they can be ripped off easily)
Socks will be stretched after being stuffed, so thick, close-knit socks make a better sloth stuffed animal.
Always massage the stuffing to break up lumps. Long tubular parts should be rolled with both hands to smooth out any lumps and make the parts longer and firmer.
Get the full articles at https://www.craftpassion.com/how-to-sew-sock-sloth/
Recommended Products
As an Amazon Associate and member of other affiliate programs, I earn from qualifying purchases.


Bonjour,
J'ai commencer un paresseux, mais j'ai mal fou à retourner les griffes une fois cousu (même en m'aidant d'un crayon). Pouvez vous m'indiquer comment faire.
Merci.
Translation (by Google):
Hello, I start a lazy, but I have a hard time getting the claws back when sewn (even with a pencil). Can you tell me how? Thank you.
Using a pencil could be too big for turning it right-side out, use a pair of tweezer would be better in doing the job. Or, you may sew it with blanket stitch from right-side to avoid the need to sew and turn.
Absolutely loved this pattern. I made 14 at one time. All different colors...so much fun.
I am confused by step one, securing the thread with a knot. It's not mentioned again in the instructions. Where is this knot placed? And do I leave the thread hanging?? I see a line drawn where you put the knot. Where is the line placed on the sock? I'm so confused!
You can do this at the inner side of the sock or at the seam allowance that is going to hide inside after sewing up. The photo is from the sock elephant I shared before the Sock Sloth pattern and tutorial.
Is page 2 of the sloth pattern supposed to be printed as actual size or is it to be enlarged 167% like it says to do on page 1 of the pattern?
Page 2 doesn't have to enlarge. You may measure the 2" scale to check if your print out is 2" too. If yes, then you are on the right scale.
Otters! We need others.! I love sloths...but obsessed with Otters!
Hi Marie, We have sock Beaver, you may alter the pattern a little to make it into otter. Just modify the tail shape and get rid of the 2 front teeth. 🙂 I hope this will give you a quick pattern to make while we put it down to our to-do list.
Why did you make a separate pocket for the magnet? Why not put it inside the bottoms of the arms and legs? I'm wondering about aesthetics. Would a mysterious bump under the skin look better or worse than a circle on top of the hand/foot.
This technique has helped me to turn small or tight items right side out: take a drinking straw and insert into sewn item, next from the outside take a narrow tool for instance a chopstick and insert into the top of the straw pushing softly to help turn right side out. Hope this helps!
Thank you for the useful tip 🙂
Wonderful! This Sloth project will make the perfect gift! It has easy instructions that definitely help an amateur like me. This has been a fun project!
Working on these right now! So cute! I got the pesky toes turned out and am wondering the type of stitch used to sew the toes together. I am a beginner and am having a hard time with this step.
I used ladder stitch to join them up.
Hi I might make this as a Christmas present how long might it take?
It really depends on the skill and speed. I am able to finish 2 in 2 days, average about one each day.
Hi there, I'm making your sloths but I'm a bit stuck on how to turn the nails inside out once they are sewn and cut from the felt. Any tips? Thanks a lot!
Hi Beckie, turning the tiny claws are tricky and need some patient to do it. I did it with a pair of blunt point tweezer and some strength from my fingers. Turn the top edge of the opening then slowly push the claw right-side out.
Thank you for your reply! I will get cracking with it! 🙂
I, too, have had much difficulty turning & stuffing the claws. (I'm a seamstress with nearly 60 years sewing experience, but still found this part of your pattern to be challenging.) I enlarged the pattern to proportionately match the women's size microfiber socks. Still, the claw template only measures 3/8" across widest point. With 1/8" tied up in the seams, there was no way to turn it. So, I decided to trim the already sewn seam as narrow as I could & re-sew with blanket-stitch seam. Turning problem resolved. However, even with several different types of tweezers I use with my beaded jewelry, stuffing is impossible. My next try is to create a new claw template to account for all 3 claws (combined per foot), sew, turn & stuff. Then, I'll sew in the definition for the 3 claw parts per foot & defining the tips for each individual claw. Hopefully, this will resolve these issues. I would suggest expanding this area of your pattern to describe this part of your pattern - perhaps with more than just the 1 picture.
Update for anyone having difficulty with the claws: I created a new template for the claws - use the pattern's claw template, drawing 3 claws lined up side-by-side & with claw points heading in the same direction. Be sure to leave space between the side-by-side claws (about 1/2 the size of 1 claw) - this artificially creates a curve in finished piece. Then, sew around the outside, except for the straight edge, just as instructed in the pattern. Turn & stuff - stuffing the points firmly first. Sew parallel lines on outside (I used transparent nylon thread) to define the separate claws. Make 4 of these modified claws for each sloth. Proceed with pattern. This step is much easier & far less frustrating than trying to turn the very narrow single claw. Hope this helps any other frustrated person making this adorable sloth.
Try using a bamboo skewer blunt side not pointy side. I use them a lot for turning small things.
How I did it is I put the tweezers inside the claw then took a big flat needle and pushed it into the tweezers and then pulled up on the claw and it turned inside np
@Craft Passion, I always used a needle hook to turn mine! You can get them at Amazon they really come in handy for a lot of projects…makes it easier on the fingers!
Hello!, would love to make the sloth for a couple of new Mum's to be, but unfortunately the template shows up as a blank page. Is there anything you can do?
Thanks.
Try again with this link http://www.craftpassion.com/wp-content/uploads/2017/03/sock-sloth-pattern-template.pdf, Jeanie. It works well from my browser. It could be that your browser is blocking adobe script. If you still have this problem, please right-click your mouse and save the pdf into your computer, open it with acrobat PDF reader.
Beautiful pattern. After reading the comments of everyone wanting to buy them, would you give permission for someone to make these from your pattern and then sell them, like at craft fairs and such?
I am fine with anyone who make and sell from my pattern, just need to give proper credit to Craft Passion 🙂
He is so cute I'm going to give it a try I'll let you know how it goes . If it works great baby or birthday, Xmas giftd
Love the sloth. Can you tell me where you bought the socks? Thank you.
I used to have them in my online shop but they are currently out of stock. We are searching for the stock from other sources. Please do check back in a while.
I am interested in buying two, would that be possible? These are absolutely adorable.
I wish I can sew more for sale, Bailey, time just doens't permit me to do that. However, I do not mind if someone can sew and sell to you.
If you are ever selling the sock sloths i would love to purchase one.
let me know. thanks kellie
I wish I can sew more for sale, Kellie, time just doens’t permit me to do that. However, I do not mind if someone can sew and sell to you.
Hello, I am sorry... I am not understanding the pattern template... do I enlarge it to 100% or wait until I have the sock and then re-draw, or do I just use the pattern as is? Thanks for clarification.
Hi Nancy, You may either set your printer to enlarge it with 167% or you may refer the template and an sketch them on the socks. Since the template is simple to re-draw directly onto the sock, I would suggest to re-draw rather than enlarge with printer.
I would love to see a Lemur pattern . Would be similar to the but with a long tail .