Face Mask Sewing Pattern
Since the recent pandemic virus outbreak, I have been perfecting and improvising this reusable fabric face mask pattern to include all the features needed to fight against the Covid disease’s spread.
Many hospitals and authorities have recommended the printable face mask sewing pattern because it is the best fit homemade fabric face mask. Here are the patterns and tutorials on how to sew these three types of double-layered fabric face masks. You may add more layers on the lining pieces to make a multi-layer face mask for better effectiveness.
It comes in 4 sizes, small kids, young kids, teenagers & Women, and Men.
Type A: Normal face mask
Type B: Face mask with a POCKET for filter insert or as a surgical mask cover.
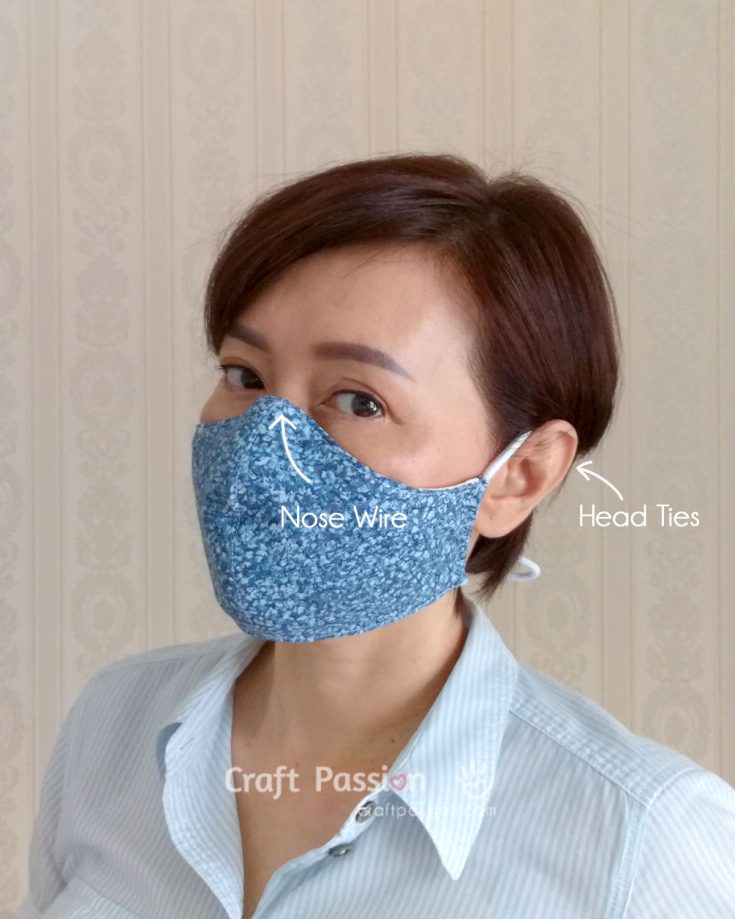
Type C: Add on a removable NOSE WIRE to Type A and Type B (as shown in the video). It comes with a sleeve to insert nose wire for a better seal and an anti-fog to glasses wearer.
Materials
Fabrics
- Main Fabric (cotton), 13" x 7", prewashed
- Lining Fabric (cotton or flannel), 12" x 7", prewashed
Nose Wire
- Bias Tape, 2" wide 6" long (5" for young kids, 4" for small kids), prewashed. (Optional, as nose wire sleeve)
- Wire, 6" (5" for young kids, 4" for small kids). (Optional, as nose wire), bent the ends inward so they won't poke through the fabric.
Fastener
- Elastic cord: for ear loops, 8" x 2pcs., or, for a head tie, 18" x 2pcs., (this is an approximate length, please measure with your own elastic band to judge; as everyone's head and sizes are different)
- or, shoelace/ribbon/cord/t-shirt yarn with at least 44" length for the head tie
Face Mask Sewing Pattern & Templates
Tools
- Sewing essential
- Sewing Machine or hand sew
- Iron
- Seamstress tracing wheel and paper
- Pencil or soluble fabric marker
Instructions
1. Decide which type and size you want to sew, choose the correct pattern from the list, download and print out the template of Face Mask Sewing Patterns separately.
2. Base on the choice of face mask you want to sew, follow the sewing instructions accordingly. Watch the sewing video if needed for the instruction of Type C face mask or as a reference for other types.
3. Add ties to the face mask, either with elastic ear loops, elastic band, or head tie.
4. Wash the face mask with warm water of at least 60 °C or 140 °F, dry it properly before wearing it. Add filter insert if required.
HOW TO SEW FABRIC FACE MASKS
1. DOWNLOAD TEMPLATE
Decide which type and size you want to sew, choose the correct pattern from the list, download and print out the template of Face Mask Sewing Pattern separately.
Don’t "scale" the printing and DON'T print to "fit the paper", either. It is in letter size paper (8.5″ x 11″), so you should have no problem printing it in 100% size. There is a 2″ scale marking for you to check if you are printing it in the right size.
Cut out the pattern of your size.
[NOTE: You may do a quick enlarge on the printer if you find the pattern is still a little smaller than you needed. ]
[Remark: It is a pdf document and will open in a new tab or window or asking you to download it. Please make sure your computer has the supported software for it to open correctly. Unblock your computer “pop-up blocker” for this site if you have it enabled.
[IMPORTANT: Don’t print the pattern from the browser. The size might not correct. Please open the pdf pattern in Adobe Reader or Adobe Pro and print the actual size (100% scale) from there, DO NOT set to "print to fit paper".]
[With Printer]
[Without Printer]
TRACE - You may trace the pattern out from your monitor. Download the templates and open them in Adobe Reader. Zoom the template till the 2" guide measures 2" on your ruler, set the screen to the highest brightness. Place a piece of white paper on the monitor and trace the outline with a pen or a marker.
OR
SKETCH - Here is the template (without seam allowance reference on a 1/2" grids, you may hand sketch it on a graph paper or a self-constructed 1/2" gird paper. 
2. SEW
Choose from Type A, Type B, or Type C to sew
Type A: Normal face mask
Type B: Face mask with a POCKET for filter insert or as a surgical mask cover.
Type C: Add on a removable NOSE WIRE to Type A and Type B (As shown in Video). It comes with a sleeve to insert nose wire for a better seal and as an anti-fog to glasses wearer.
TYPE A - NORMAL FACE MASK
- Step A-1.
Fold the main fabric into halve with the wrong side facing each other, pin the paper pattern onto the double-layered fabric. Cut the fabric with 1/4″ allowance, except the ear side. Cut the fabric at the ear side with 1″ seam allowance (1.5" if you are using t-shirt yarn as the head tie).
Insert the tracing paper between the layer, trace sewing lines with the tracing wheel.
Remove pins and paper pattern, get set to sew.
NOTE: If you are using templates that already have seam allowances included, you do not need to add any more seam allowance. The same applies to the lining in the next step.
- Step A-2.
Repeat the same as the main fabric, except the ear side seam allowance. Cut the fabric at the ear side with zero seam allowance.
- Step A-3.
Turn the face mask main piece with the right side facing each other and sew the face mask's centerline.
- Step A-4.
Clip curve along with the seam allowance; be careful and don’t accidentally clip on the stitches.
- Step A-5.
Press seam allowance to one side, topstitch near to the seam line on the side where the seam allowance is.
- Step A-6.
Repeat the sewing on the lining part.
- Add step C-7 to C-11 if you want to add nose wire to the face mask.
- Step A-7.
Flip the lining and place onto the main face mask, align the center seam line, pin and sew the top and bottom lines.
- Step A-8.
Turn the face mask right side out. Press seam neatly and topstitch near the edge.
- Step A-9.
This is how it looks like from the inside at this stage. The main fabric of the side ear area is longer than the lining piece. This is going to be the pocket of the elastic band.
- Step A-10.
Fold in 1/4″ at the raw edge of the side ear, fold again so that the first fold edge is 1/4″ from the lining raw edge.
Sew a straight line down, don’t forget to perform a few back stitches to lock the thread end.
- Step A-11.
Measure and cut the length of the elastic band needed (usually around 6″-8″ depending on the size of the face).
Insert the elastic band through the pocket and tie a dead knot to the ends.
- Step A-12.
Repeat the same to the other side. Pull the elastic band until the knots are hidden in the pocket.
Wear and breathe normally!
TYPE B - FACE MASK WITH POCKET FOR FILTER INSERT
- Step B-1.
Get ready for all the materials, as stated in the material list above.
- Step B-2.
Fold the fabric with the wrong side facing each other, place the paper template on it, pin.
Cut the fabric out with ⅜” seam allowance (you can use ¼" seam allowance), except the side of the face mask: 1″ for the outer layer (1.5" if you are using t-shirt yarn as the head tie), ½” for the inner layer.
Trace the sewing lines with the tracing paper and tracing wheel.
NOTE: If you are using templates that already have seam allowances included, you do not need to add any more seam allowance.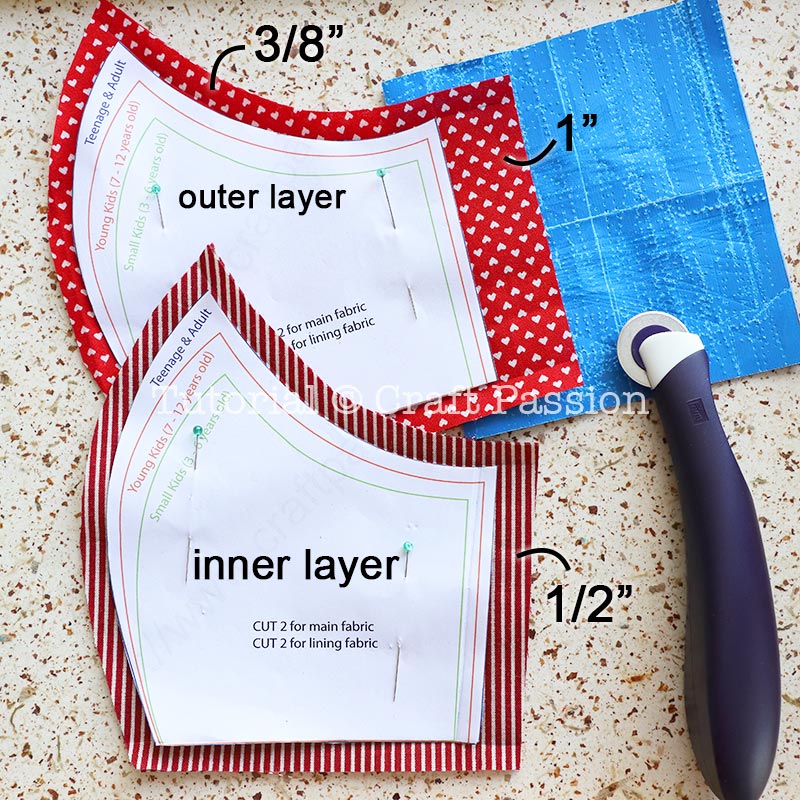
- Step B-3.
Turn the pieces over and pin the pair together with the right side facing each other. Sew the curved lines as shown in the picture.
Draw a line ¼” from the original side sewing line of the inner layer, do the same to the other side of the inner layer.
- Step B-4.
Clip the seam allowance about ½” apart. This will let the fabric’s raw edge stretch without pulling the seam when you turn it right side out. Repeat this on both the outer layer and the inner layer.
- Step B-5.
Turn the pieces right side out, press the seam allowance to one side, topstitch near the seam line. Repeat the same to the inner layer.
- Step B-6.
Fold the side at the second line drawn next to the original sewing line of the inner layer. Fold the raw edge and hide inside the fold. Topstitch to sew it on. Repeat on both sides of the inner layer.
- If you want to add nose wire, add step C-7 to C-11 here.
- Step B-7.
Place the inner layer on top of the outer layer, with the right side facing each other.
Sew the top and bottom seam lines.
You may notice that the edge of the inner layer is now ¼” away from the outer layer's sewing line. If it is not the case, please check if you are sewing it correctly in the previous step.
- Step B-8.
Clip curve on the seam allowance where the 2 layers meet. Leave about 1/2″ from the ends un-clip.
Turn the face mask right side out. Press seam flat.
- Step B-9.
Double fold the top and bottom raw edges of the outer layer (both sides). Topstitch near the edge, as shown in the picture. Repeat the same to the bottom seam line.
To make the pocket for the elastic band, fold the side raw edge 1/4″ from the edge, then fold again so that the edge meets the edge of the inner layer.
- Step B-10.
Topstitch a vertical line to sew it on. The top and bottom have an opening for you to insert your elastic band.
I added my label while sewing it.
- Step B-11.
This is the opening for the filter insert.
- Step B-12.
Add elastic bands to the pocket face mask the way you like, and it is really to be worn.
TYPE C - FACE MASK WITH NOSE WIRE (WITH OR WITHOUT POCKET)
- Step C-1 to C-6: Follow step A-1 to A-6 for a non-pocket face mask, or step B-1 to B-6 for a pocket face mask (As shown in the video).
- Step C-7.
Cut a bias strip of 2” wide and 6” long or use store-bought bias tape if you can find it from the shelf.
How to cut bias strip:
Fold the fabric diagonally, draw a line along the crease of the fold, measure 2” from the line and draw a line parallel to it. Cut the strip into 6” length.
- Step C-8.
Fold ¼” from the 2” ends.
- Step C-9.
Fold the strip into half, lengthwise.
- Step C-10.
Stitch up both ends.
- Step C-11.
Align the bias tape along the front top edge of the lining.
Topstitch at the bottom edge of the bias tape.
Do not remove the pins until you pin the main piece to this lining piece.
- Step C-12.
Continue to attach the main piece and sew them up into a face mask, as shown above.
- Step C-13 to C-18: Follow step A-7 to A-12, or step B-7 to B-12 to complete the face mask.
- Step C-19.
Cut a piece of pipe cleaner about 6” long, bend the ends in to make the pipe cleaner slightly shorter than the nose wire sleeve. Insert it into the sleeve. Remove the wire before washing the face mask.
Other options of nose wire are twist tie, florist wire, garden bonsai wire, aluminum, or other hardware wires as long as it can be bent and stays there. If the wire is too thin or soft, twist multiple pieces to make a thicker nose wire.
3. WEAR
- Insert Filter Media To The Pocket Type Face Mask
Insert a surgical mask if you are using the face mask as a cover (to make the surgical face mask last longer).
Insert a non-woven fabric if you can’t find any surgical mask in the market. I air-dried a piece of the anti-bacteria wet wipe as the filter insert. Throw away the filter correctly and wash the face mask every day.
Disclaimer: this face mask is not meant to replace the surgical face mask.
- Insert the medium into the pocket from both openings of the face mask. Adjust it nicely so that the medium doesn’t crumple up.

- After the surgical mask is fully inside the cover, push the surgical mask's nose wire to the tip of the cover, bend the wire a little to follow the curve.

- The filter insert must be placed until the face mask's tip, where the nose position is at.

- Different Ways Of Wearing The Face Mask
This is the better way to string the shoelace or cord for the head tie; my video shows the other way round. This is easier to put on and tie, and if you need to take out the mask briefly, untie the bow to release the mask from your face, the mask will hang on the neck.
- If you prefer an elastic band, instead of splitting the elastic band into 2 ear loops, use the full length and insert through the channel as shown in the picture, tie a knot and hide the knot in the channel. The length varies for head sizes and the elastic band's strength. Try with yours to check the best length to cut.

- Wear the face mask with the elastic band sits at the back of the head.

- No more stress on the ears with this method.

Notes
****
For CRICUT users, download the zipped SVG files separately. Notes from Tanya Chilton who is so kind to contribute these files for free:
With the Cricut Maker, you need the Rotary Blade and the purple cutting mat. The setting is: Fabric - Cotton
With the Cricut Explore Air2, all I know is that you have to iron a stabilizer on the back of the fabric first. There are tutorials online on how to do that.
Flip the image to cut the other piece in reverse orientation.
****
For SILHOUETTE users, download the zipped Studio files separately. Notes from Marlene Teter for her kindness to contribute the files for free:
Cut settings are as follows:
Printed cotton fabric ( like the fabric used for making quilts)
Cameo 4
Tool 2
Rotary blade
Force 15
Passes 1
Speed 8
****
This pattern will be updated once we have new resources or ideas coming in. If you get the pattern in pdf file, please check the original pattern for the latest update https://www.craftpassion.com/face-mask-sewing-pattern/