
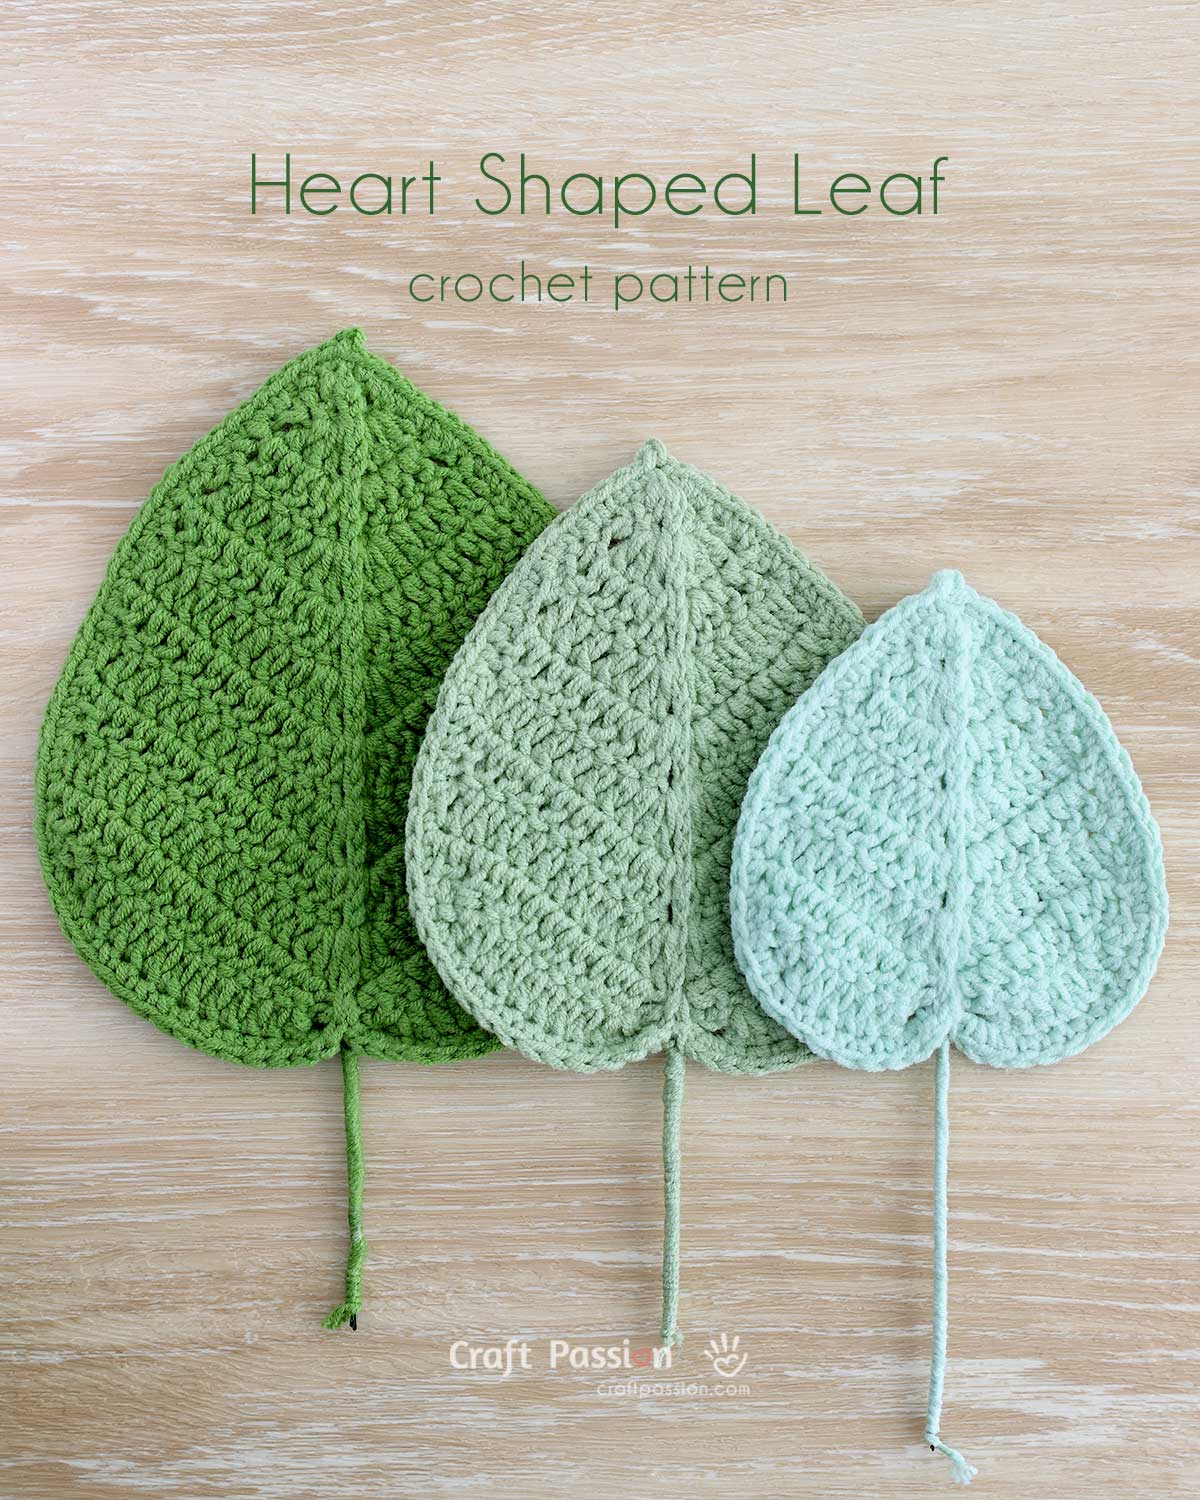
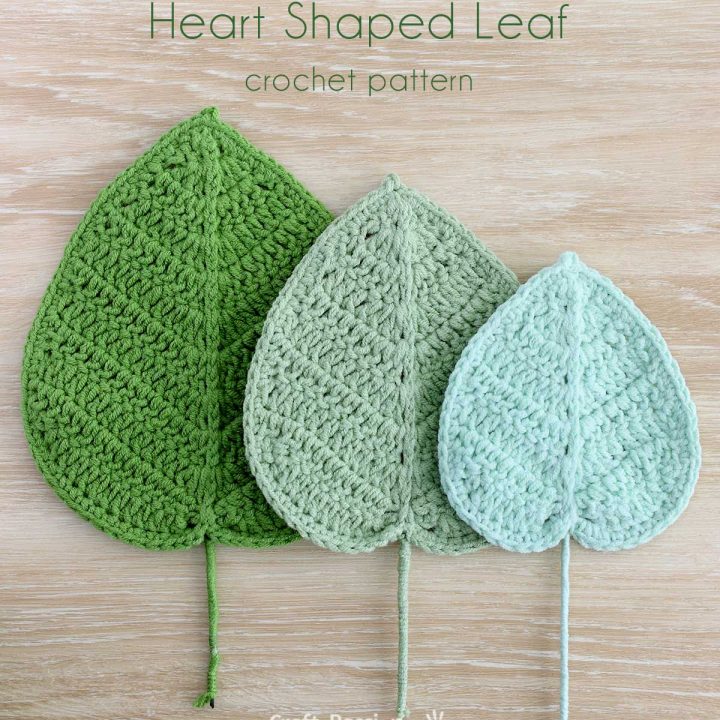
Looking for a heart-shaped leaf crochet pattern with a fuller size for flower stalks and botanical projects? This free pattern comes in three sizes and includes wire around the edge and center, giving each leaf enough structure to hold its shape while still looking soft and natural.
This heart-shaped leaf features a wide, cordate form that makes it both versatile and fun to use. I originally designed it as a crochet sunflower leaf, but it looks beautiful on all kinds of crochet flowers.
This post may contain affiliate links, and we may earn a commission on purchases made through them at no extra cost to you. ❤️ Thank you!
About This Heart-Shaped Crochet Leaf
A heart-shaped leaf is botanically known as a cordate leaf. Similar leaf shapes can be found on sunflowers, pothos, philodendrons, anthuriums, and many other plants.
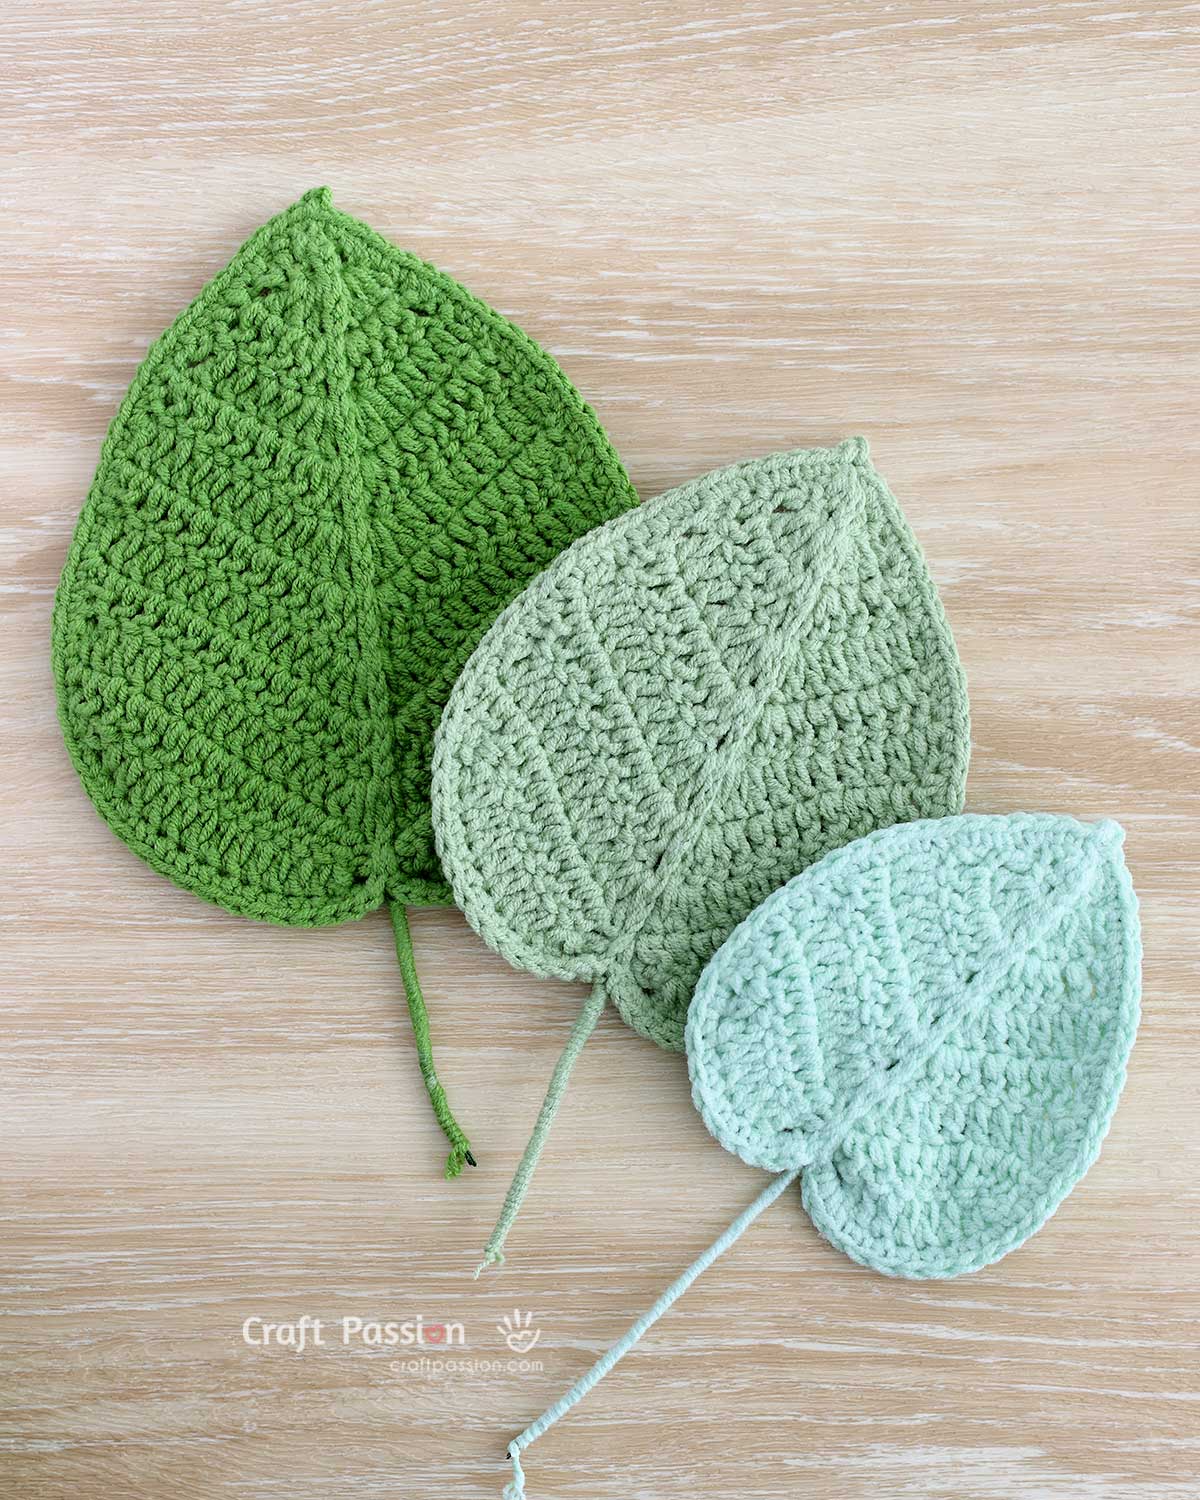
This crochet leaf pattern comes in three sizes:
- Large: 4¾” × 6″
- Medium: 4″ × 5″
- Small: 3¼” × 4″
Their generous size makes them especially suitable for crochet flower stalks, bouquets, and potted plants.
A fine wire is crocheted around the outer edge, while a stronger floral wire supports the center midrib and stem. Once finished, you can gently bend and curve the leaf for a more realistic crochet leaf shape.
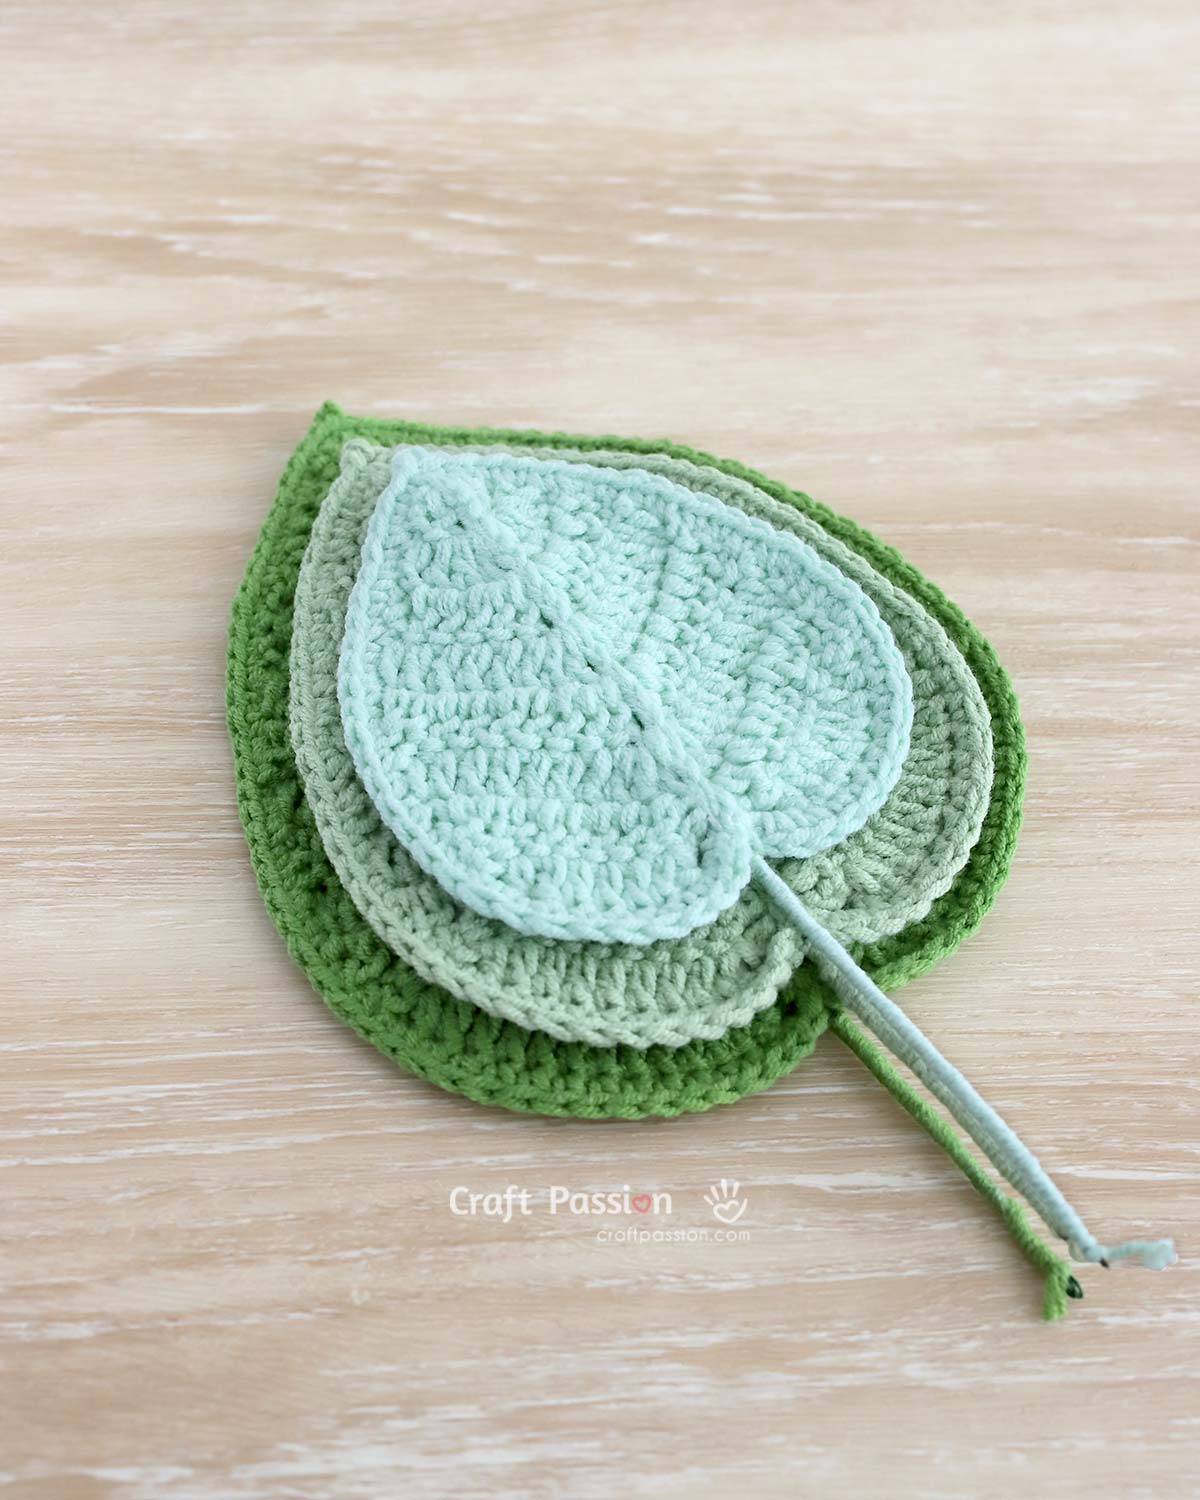
Tools and Materials
To make this crochet cordate leaf, you will need:
- Sport/Baby/Fine (Category 2) yarn
- 2.5 mm crochet hook
- 0.5 mm (24 AWG) copper wire for the edging
- 22 AWG floral wire for the midrib and stem
- Tapestry needle
- Wire cutters
- Scissors
- Clear all-purpose glue or hot glue
You can use one shade of green or mix different tones for a more natural-looking arrangement.
💡 Try a green variegated yarn to add subtle color changes throughout the leaf. The mix of lighter and darker greens can give your crochet foliage extra depth and a more natural, leafy look without changing the pattern.
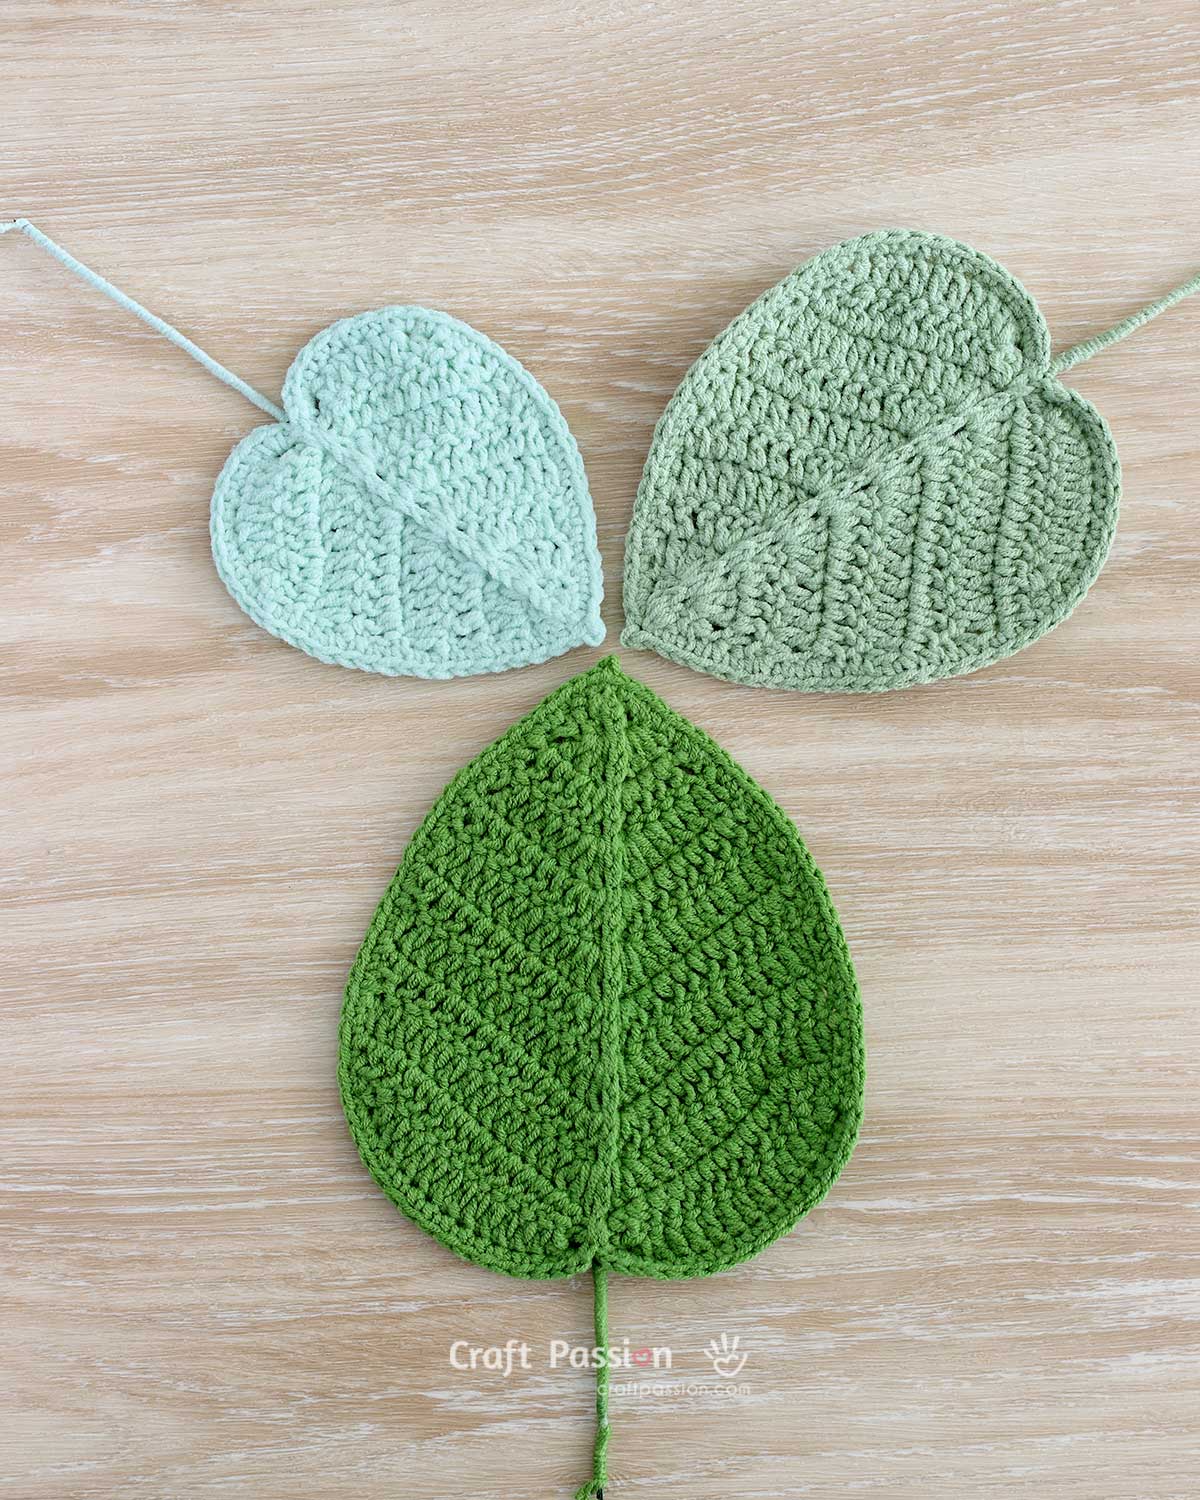
How to Crochet a Heart-Shaped Leaf
This is an easy crochet heart leaf pattern made mainly with basic crochet stitches, including chain, slip, single crochet, half double crochet, and double crochet. Double crochet increases and decreases shape the broad cordate leaf, while single crochet creates a neat wired edging. A simple chain-and-slip-stitch technique forms the raised center midrib.
It is worked in three crochet sections followed by an assembly step:
- Crochet the main leaf
- Crochet the wired edging
- Crochet the front midrib
- Add the back midrib and stem
The photos below show the large leaf, but all three sizes follow the same construction method. Refer to the complete written pattern for the stitch counts of each size.
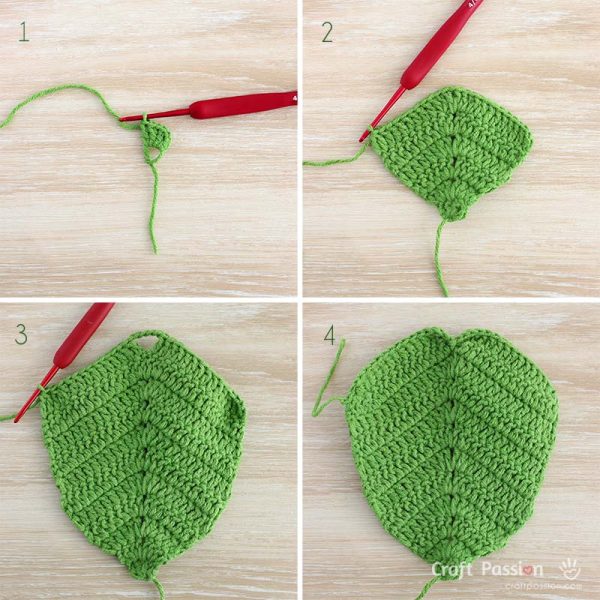
1. Crochet the Main Leaf
1. Start with a magic ring and crochet from the pointed tip toward the base.
2. The pattern increases around the center chain-space to widen the leaf evenly.
3. Continue shaping both sides, then make the chain section that forms the heart-shaped base.
4. Complete the final shaping row and fasten off.
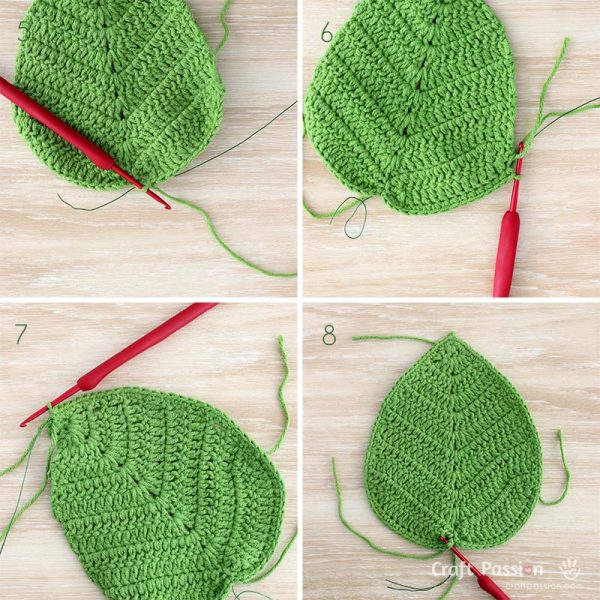
2. Crochet the Wired Edging
5. Join a new strand of yarn at the base and place the 0.5 mm wire along the edge.
6. Crochet over the wire as you work toward the tip.
7. Make the picot at the leaf tip.
8. Continue down the other side to complete the edging. Cut the wire, but keep the yarn attached.
The wired edge lets you gently curve and shape the finished leaf.
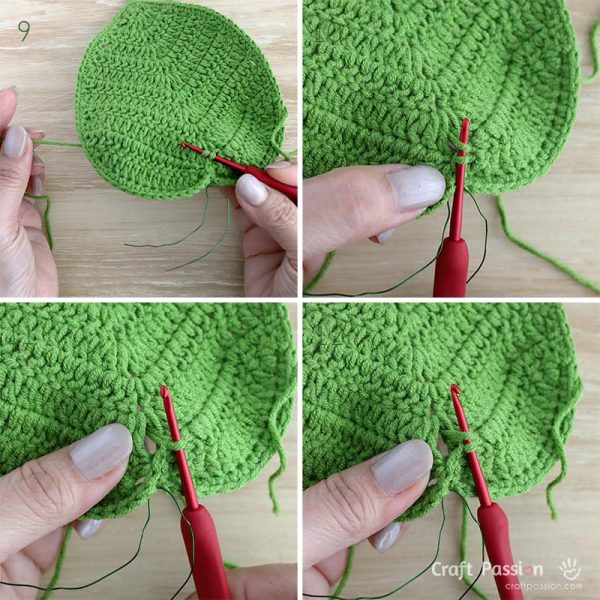
3. Crochet the Front Midrib
9. Crochet the front midrib with the working yarn under the leaf.
10. Insert the hook through the center chain space from the right side, yarn over to make a loop on the hook.
11. Pull through the loop to make a chain stitch. Yarn over again through the space to make another chain stitch, then slip stitch into the center chain of the next row.
12. Repeat toward the tip, then fasten off.
This creates the raised center vein on the front of the leaf.
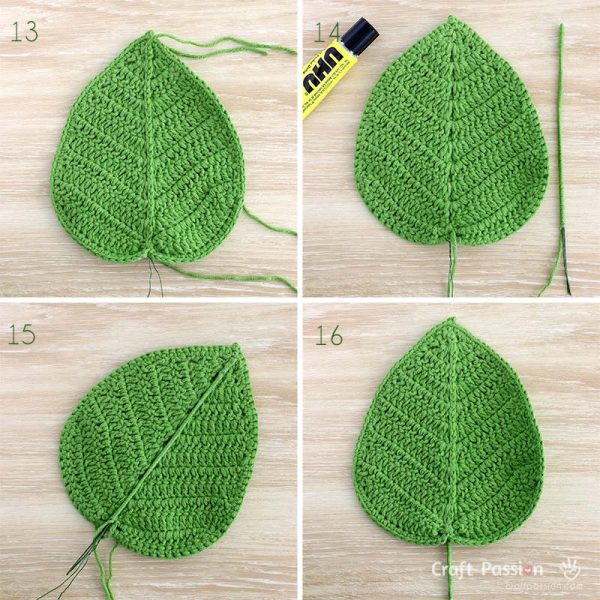
4. Add the Back Midrib and Stem
13. Cut a length of 22 AWG floral wire.
14. Wrap the wire tightly with green yarn.
15. Glue the wrapped wire along the center underside of the leaf.
16. Continue wrapping below the leaf to form the stem and secure the edging-wire ends.
Once the glue is dry, gently shape the leaf as desired.
Which Size Should I Make?
Choose the size that looks best with your project:
- Large: best for larger flowers and statement foliage.
- Medium: a versatile size for bouquets and arrangements
- Small: useful for smaller flowers or mixed foliage
Mixing different sizes can also make a crochet flower arrangement look more natural.
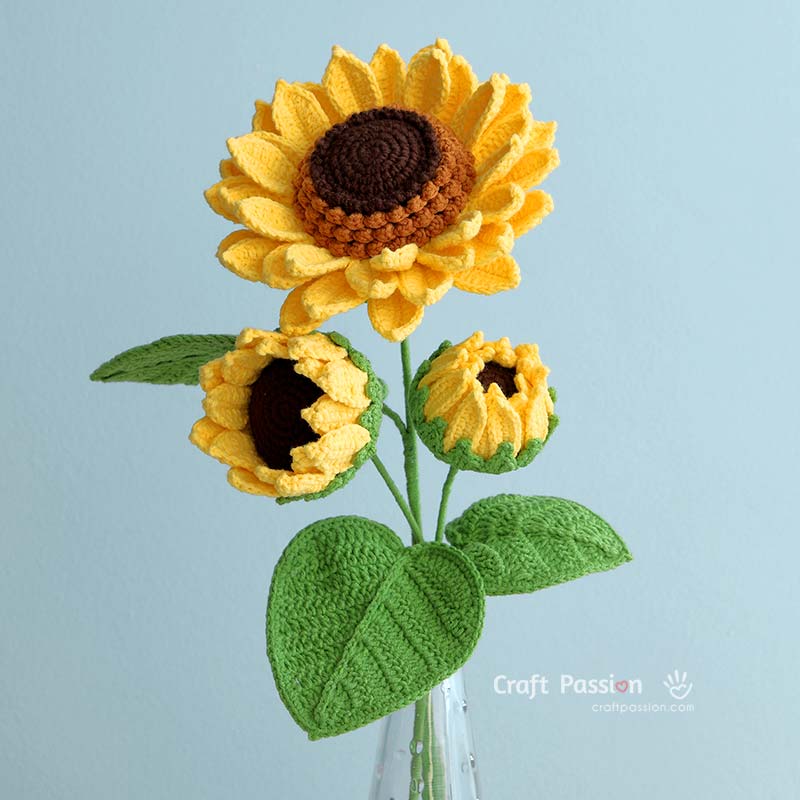
Here’s how the three leaf sizes look when paired with my Crochet Sunflower Pattern. I used the different sizes along the flower stems to balance the large bloom and smaller buds, while giving the whole arrangement a fuller, more natural look.
FAQ
1. What is a cordate leaf?
A cordate leaf is simply a leaf with a heart-shaped form. Sunflowers, pothos, philodendrons, and several other plants have leaves with this familiar shape.
2. Why is wire used in this crochet leaf pattern?
The fine wire around the edge helps the leaf hold its outline and allows you to shape it. The stronger floral wire along the center supports the midrib and crochet flower stem.
3. Can I use a different yarn weight?
You can, but the finished size will change. Thicker yarn will make a larger leaf, while thinner yarn will make it smaller. Adjust your hook size accordingly.
4. What can I use this crochet leaf for?
These leaves work well with crochet flower stalks, bouquets, sunflowers, pothos, philodendrons, and anthuriums. It is the perfect botanical crochet leaf for all your nature-inspired projects!
5. How do I care for the crochet leaf?
Gently dust it with a soft brush or cloth when needed. Avoid machine washing or soaking the leaf because it contains wire and glue. If it becomes flattened or bent, gently reshape the wired edge and stem with your fingers.
What’s Next?
These heart-shaped leaves were designed especially for my Crochet Sunflower Pattern, so once your leaves are ready, head over to the sunflower pattern and crochet the matching bloom to complete the flower stalk.
If you make these crochet leaves, I’d love to see them! Share your project on Instagram and tag @craftpassion so I can find it.
You can also follow Craft Passion on Facebook for more free crochet patterns, and save this heart-shaped leaf crochet pattern to Pinterest for your next botanical project.
Don’t forget to pin this heart-shaped leaf crochet pattern for your next flower or botanical project.
Happy crocheting!
Downloadable Crochet Pattern Sheet
The complete written pattern below includes instructions for the large, medium, and small heart-shaped leaves.
Free Heart-Shaped Leaf Crochet Pattern (Small, Medium, Large)
Crochet a beautiful heart-shaped leaf in three sizes, designed with a full, generous shape that pairs beautifully with flower stalks and larger blooms. Wire around the edge and along the center adds structure, allowing each leaf to be gently shaped for a more natural, realistic look.
Materials
Yarn
- Green - Sport-Weight/Baby-Weight/Fine/Category 2 according to Craft Yarn Council yarn-weight standard. I used this yarn.
Wires
- 0.5mm or 24 AWG green color copper wire - for shaping the leaf edge
- 22 AWG floral wire – for the center midrib and stem
Tools
- 2.5 mm Crochet Hook (I used Tulip brand)
- Stitch Markers
- Tapestry Needle
- Wire cutters
- Scissors
- Clear All Purpose Glue - I recommend UHU
Instructions
Pattern Notes
- This pattern is written in US crochet terms.
- The main leaf is worked in rows, beginning at the tip of the leaf and working toward the heart-shaped base.
- After completing the main leaf, crochet around the outer edge while carrying a strand of 0.5 mm (24 AWG) wire along. The wire helps the leaf hold its shape.
- After completing the edging, do not cut the working yarn. Continue crocheting the front midrib along the center of the leaf.
- A separate piece of 22 AWG floral wire is wrapped with yarn and glued along the underside of the leaf to form the back midrib and stem.
- Use only a small amount of glue where needed to secure the yarn wrapping and wire.
- ch 3 at the beginning of a row counts as 1 dc.
- ch 1 at the beginning of a row counts as 1 st.
- [ch 2, dc in next st] at the beginning of a row, forms a beginning dc2tog decrease and counts as 1 dc.
- Stitch counts are shown in { } at the end of each row. Chains and slip stitches are included in the stitch count where applicable.
Abbreviations
MR: magic ring or magic circle
ch1sp: 1-chain space
ch2sp: 2-chain space
2dc: dc increase, work 2 dc in the same stitch
dc2tog: double crochet decrease
sk: skip
st(s): stitch(es)
RS: Right Side
WS: Wrong Side
Finished Size (W x H):
Large Leaf: 4¾" x 6"
Medium Leaf: 4" x 5"
Small Leaf: 3¼" x 4"
Large Leaf
Main Leaf
With green yarn, make an MR.
Row 1 (WS): [ch 3, dc, ch 1, 2dc] in MR. Turn. {5}
Row 2 (RS): ch 3, 2dc in next st, [dc, ch 1, dc] in ch1sp, 2dc in next st, dc in last st. Turn. {9}
Row 3: ch 3, dc in next 2 sts, 2dc in next st, [dc, ch 1, dc] in ch1sp, 2dc in next st, dc in next 3 sts. Turn. {13}
Row 4: ch 3, dc in next 4 sts, 2dc in next st, [dc, ch 1, dc] in ch1sp, 2dc in next st, dc in next 5 sts. Turn. {17}
Row 5: ch 3, dc in next 6 sts, 2dc in next st, [dc, ch 1, dc] in ch1sp, 2dc in next st, dc in next 7 sts. Turn. {21}
Row 6: [ch 2, dc in next st], dc in next 7 sts, 2dc in next st, [dc, ch 1, dc] in ch1sp, 2dc in next st, dc in next 7 sts, dc2tog over last 2 sts. Turn. {23}
Row 7: [ch 2, dc in next st], dc in next 8 sts, 2dc in next st, [dc, ch 1, dc] in ch1sp, 2dc in next st, dc in next 8 sts, dc2tog over last 2 sts. Turn. {25}
Row 8: [ch 2, dc in next st], dc in next 9 sts, 2dc in next st, [dc, ch 1, dc] in ch1sp, 2dc in next st, dc in next 9 sts, dc2tog over last 2 sts. Turn. {27}
Row 9: [ch 2, dc in next st], dc in next 10 sts, 2dc in next st, [dc, ch 1, dc] in ch1sp, 2dc in next st, dc in next 10 sts, dc2tog over last 2 sts. Turn. {29}
Row 10: [ch 2, dc in next st], dc in next 11 sts, 2dc in next st, [dc, ch 1, dc] in ch1sp, 2dc in next st, dc in next 11 sts, dc2tog over last 2 sts. Turn. {31}
Row 11: [ch 2, dc in next st], dc2tog over next 2 sts, dc in next 11 sts, ch 5, sk the center ch1sp, dc in next 11 sts, dc2tog over next 2 sts twice. Turn. {31}
Shaping the heart-shaped base
Row 12: ch 1, sk next st, hdc in next st, dc in next 10 sts, 2dc in next st, ch 2, sl st in the center ch of Row 10, ch 2, 2dc into next dc st, dc in next 10 sts, hdc in next st, ch, sk next st, sl st in last st. {34}
fo.
Edging
With the RS facing, join a new strand of the same green yarn and the 0.5 mm (24 AWG) green wire at the center base of the leaf.
Hold the wire along the outer edge of the leaf and crochet over the wire throughout the edging.
First Side - Base to Tip:
Join with a sl st in the right ch2sp of Row 12.
Ch 1, work 2 sc in the same ch2sp.
Sc in next 14 sts of Row 12.
Working along the side edge, work 5 sc evenly over each 2-row section, from Rows 11–2.
Work 2 sc along the edge of Row 1.
Leaf Tip:
Work (sc, ch1picot, sc) in the MR.
Second Side - Tip to Base:
Working down the opposite side of the leaf, work 5 sc evenly over each 2-row section, from Rows 1–10.
Work 2 sc along the edge of Row 11.
Sc in next 14 sts of Row 12.
Work 2 sc in the remaining ch2sp, ch 1, then sl st in the same ch2sp.
Cut the edging wire, leaving a short end that can be secured later.
Do not cut the yarn. Continue with the Front Midrib.
Front Midrib
With the working yarn at the WS of the leaf, work toward the tip, inserting the hook through the center chains from the RS.
Sl st into the center sl st of Row 12.
Ch 2, sl st into the center ch of the next row.
Repeat this along the center of the leaf until you reach the tip.
Fasten off and weave in the yarn end.
Medium Leaf
Main Leaf
With green yarn, make an MR.
Row 1 (WS): [ch 3, dc, ch 1, 2dc] in MR. Turn. {5}
Row 2 (RS): ch 3, 2dc in next st, [dc, ch 1, dc] in ch1sp, 2dc in next st, dc in last st. Turn. {9}
Row 3: ch 3, dc in next 2 sts, 2dc in next st, [dc, ch 1, dc] in ch1sp, 2dc in next st, dc in next 3 sts. Turn. {13}
Row 4: ch 3, dc in next 4 sts, 2dc in next st, [dc, ch 1, dc] in ch1sp, 2dc in next st, dc in next 5 sts. Turn. {17}
Row 5: [ch 2, dc in next st], dc in next 5 sts, 2dc in next st, [dc, ch 1, dc] in ch1sp, 2dc in next st, dc in next 5 sts, dc2tog over last 2 sts. Turn. {19}
Row 6: [ch 2, dc in next st], dc in next 6 sts, 2dc in next st, [dc, ch 1, dc] in ch1sp, 2dc in next st, dc in next 6 sts, dc2tog over last 2 sts. Turn. {21}
Row 7: [ch 2, dc in next st], dc in next 7 sts, 2dc in next st, [dc, ch 1, dc] in ch1sp, 2dc in next st, dc in next 7 sts, dc2tog over last 2 sts. Turn. {23}
Row 8: [ch 2, dc in next st], dc in next 8 sts, 2dc in next st, [dc, ch 1, dc] in ch1sp, 2dc in next st, dc in next 8 sts, dc2tog over last 2 sts. Turn. {25}
Row 9: [ch 2, dc in next st], dc2tog over next 2 sts, dc in next 8 sts, ch 5, sk the center ch1sp, dc in next 8 sts, dc2tog over next 2 sts twice. Turn. {25}
Shaping the heart-shaped base
Row 10: ch 1, sk next st, hdc in next st, dc in next 7 sts, 2dc in next st, ch 2, sl st in the center ch of Row 8, ch 2, 2dc into next dc st, dc in next 7 sts, hdc in next st, ch, sk next st, sl st in last st. {28}
fo.
Edging
With the RS facing, join a new strand of the same green yarn and the 0.5 mm (24 AWG) green wire at the center base of the leaf.
Hold the wire along the outer edge of the leaf and crochet over the wire throughout the edging.
First Side - Base to Tip:
Join with a sl st in the right ch2sp of Row 10.
Ch 1, work 2 sc in the same ch2sp.
Sc in next 11 sts of Row 10.
Working along the side edge, work 5 sc evenly over each 2-row section, from Rows 9–2.
Work 2 sc along the edge of Row 1.
Leaf Tip:
Work (sc, ch1picot, sc) in the MR.
Second Side - Tip to Base:
Working down the opposite side of the leaf, work 5 sc evenly over each 2-row section, from Rows 1–8.
Work 2 sc along the edge of Row 9.
Sc in next 11 sts of Row 10.
Work 2 sc in the remaining ch2sp, ch 1, then sl st in the same ch2sp.
Cut the edging wire, leaving a short end that can be secured later.
Do not cut the yarn. Continue with the Front Midrib.
Front Midrib
With the working yarn at the WS of the leaf, work toward the tip, inserting the hook through the center chains from the RS.
Sl st into the center sl st of Row 10.
Ch 2, sl st into the center ch of the next row.
Repeat this along the center of the leaf until you reach the tip.
Fasten off and weave in the yarn end.
Small Leaf
Main Leaf
With green yarn, make an MR.
Row 1 (WS): [ch 3, dc, ch 1, 2dc] in MR. Turn. {5}
Row 2 (RS): ch 3, 2dc in next st, [dc, ch 1, dc] in ch1sp, 2dc in next st, dc in last st. Turn. {9}
Row 3: ch 3, dc in next 2 sts, 2dc in next st, [dc, ch 1, dc] in ch1sp, 2dc in next st, dc in next 3 sts. Turn. {13}
Row 4: [ch 2, dc in next st], dc in next 3 sts, 2dc in next st, [dc, ch 1, dc] in ch1sp, 2dc in next st, dc in next 3 sts, dc2tog over last 2 sts. Turn. {15}
Row 5: [ch 2, dc in next st], dc in next 4 sts, 2dc in next st, [dc, ch 1, dc] in ch1sp, 2dc in next st, dc in next 4 sts, dc2tog over last 2 sts. Turn. {17}
Row 6: [ch 2, dc in next st], dc in next 5 sts, 2dc in next st, [dc, ch 1, dc] in ch1sp, 2dc in next st, dc in next 5 sts, dc2tog over last 2 sts. Turn. {19}
Row 7: [ch 2, dc in next st], dc2tog over next 2 sts, dc in next 5 sts, ch 5, sk the center ch1sp, dc in next 5 sts, dc2tog over next 2 sts twice. Turn. {19}
Shaping the heart-shaped base
Row 8: ch 1, sk next st, hdc in next st, dc in next 4 sts, 2dc in next st, ch 2, sl st in the center ch of Row 6, ch 2, 2dc into next dc st, dc in next 4 sts, hdc in next st, ch, sk next st, sl st in last st. {22}
fo.
Edging
With the RS facing, join a new strand of the same green yarn and the 0.5 mm (24 AWG) green wire at the center base of the leaf.
Hold the wire along the outer edge of the leaf and crochet over the wire throughout the edging.
First Side - Base to Tip:
Join with a sl st in the right ch2sp of Row 8.
Ch 1, work 2 sc in the same ch2sp.
Sc in next 8 sts of Row 8.
Working along the side edge, work 5 sc evenly over each 2-row section, from Rows 7–2.
Work 2 sc along the edge of Row 1.
Leaf Tip:
Work (sc, ch1picot, sc) in the MR.
Second Side - Tip to Base:
Working down the opposite side of the leaf, work 5 sc evenly over each 2-row section, from Rows 1–6.
Work 2 sc along the edge of Row 7.
Sc in next 8 sts of Row 8.
Work 2 sc in the remaining ch2sp, ch 1, then sl st in the same ch2sp.
Cut the edging wire, leaving a short end that can be secured later.
Do not cut the yarn. Continue with the Front Midrib.
Front Midrib
With the working yarn at the WS of the leaf, work toward the tip, inserting the hook through the center chains from the RS.
Sl st into the center sl st of Row 8.
Ch 2, sl st into the center ch of the next row.
Repeat this along the center of the leaf until you reach the tip.
Fasten off and weave in the yarn end.
Back Midrib & Stem
Cut a 6–8" length of 22 AWG floral wire, depending on the leaf size and desired stem length.
Beginning at one end, wrap the wire tightly with green yarn until the wrapped section is approximately the same length as the leaf.
Apply a small amount of clear all-purpose glue along the center underside of the leaf. Position the yarn-wrapped wire along the center, from the leaf tip toward the base, aligning it with the crocheted front midrib.
Continue wrapping the yarn around the floral wire below the leaf to form the stem. As you wrap, enclose and secure the short ends of the 0.5 mm edging wire.
Add a small amount of glue where needed to secure the yarn wrapping.
Notes
The total time required is an estimate and may vary depending on your crochet speed and experience level.
You may crochet and sell the finished piece in small batches at maker markets. However, the pattern and images must not be reproduced, republished, or distributed in any form without prior written permission from Craft Passion.
This downloadable crochet pattern is intended for easy offline use and quick reference. For extra detailed instructions and additional information, visit the full article at:
https://www.craftpassion.com/heart-shaped-leaf-crochet-pattern/