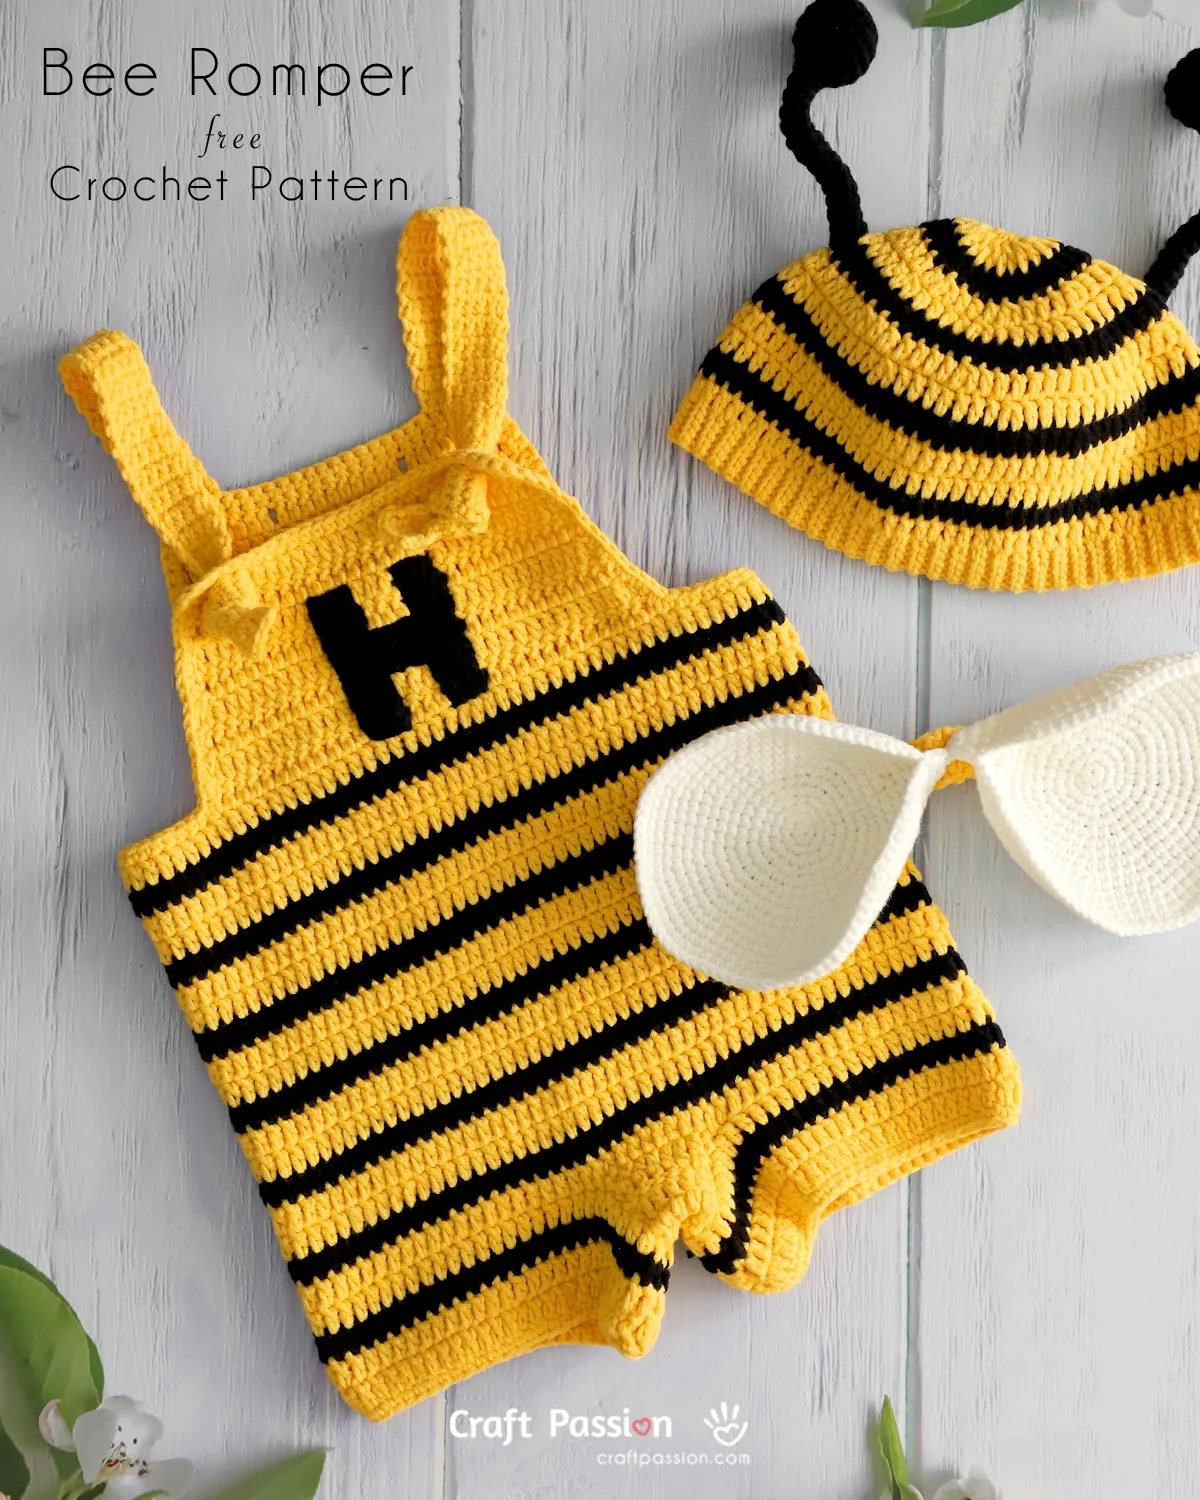
Dress your little one in this sweet Bee Romper Crochet Pattern, an adorable part of the complete Bee Baby Costume set that includes a matching hat with antennae and a pair of detachable wings. This cheerful handmade outfit is perfect for baby photo shoots, first birthdays, Halloween, or simply buzzing around the house in playful style. The bright yellow and black stripes bring instant joy, making every little movement picture-worthy.
Read on to get the full details and step-by-step instructions for this free crochet pattern.
This post may contain affiliate links, and we may earn a commission on purchases made through them at no extra cost to you. ❤️ Thank you!
This bee-themed baby romper is designed with both comfort and practicality in mind. It features adjustable shoulder straps, a roomy crotch panel for diapers, and a seamless one-piece construction that’s worked from the bottom up to minimize sewing.
The fabric is soft, stretchy, and breathable — gentle on delicate baby skin yet sturdy enough to keep its shape through all the wriggling and crawling. Worn alone or paired with the matching hat and wings, it makes an adorable handmade outfit that blends comfort with character.

Romper Sizes
The romper crochet pattern is available in 4 baby sizes:
3–6, 6–12, 12–18, and 18–24 months.
The pattern is written based on the smallest size, with changes for larger sizes shown in parentheses throughout the instructions. This makes it easy to follow along and select the size that best suits your project.
Which size should you pick? A finished size chart is provided below to help you choose based on the baby’s age or body build for the best fit and comfort. If the baby has a larger build, it’s best to go one size up; if smaller, choose the next size down. Each size has been carefully graded to keep the same adorable shape and well-balanced proportions across the entire range.
| Size (months) | Body Length (Neck–Thigh) | Round Thigh | Rise (Front–Back, inc. diaper) | Round Hip |
|---|---|---|---|---|
| 3–6 | 10¼” | 10¼” | 15″ | 18½” |
| 6–12 | 11¾” | 10¾” | 17″ | 19½” |
| 12–18 | 13¾” | 12½” | 18″ | 22″ |
| 18–24 | 15⅞” | 14″ | 19″ | 24″ |
Yarn
For this project, use DK or light-worsted weight yarn in yellow and black to bring out the bee’s cheerful stripes.
Choose a soft, baby-safe yarn that feels gentle on delicate skin and remains durable after washing. I used combed milk cotton yarn, which gives a smooth, cushiony texture that’s comfortable for babies to wear and helps the romper hold its shape beautifully.
Tools
Use a 3.5 mm crochet hook to create a balanced fabric that’s soft and flexible without being too stiff or too airy. If your tension is tight or loose, switch to a different hook size to match the gauge in the pattern sheet for the best fit.
Keep a tapestry needle, scissors, and stitch markers handy for sewing, trimming, and tracking your rounds.
Stitches Used (Beginner-Friendly!)
This pattern is beginner-friendly — as long as you’re familiar with basic crochet stitches and how to increase or decrease. You’ll only need to know a few simple stitches:
Once you’re comfortable with these, you’ll find the pattern easy to follow and enjoyable to make!
How to Crochet the Bee Romper
In this section, you’ll find a step-by-step photo tutorial showing how to crochet and assemble the romper from start to finish.
The complete written pattern with stitch counts and size details is included in the pattern sheet at the end of this post — it’s savable, downloadable, and printable, making it easy to keep an offline reference while you crochet.
Step 1: Crochet the Thigh and Crotch Pieces

Start by crocheting two identical thigh sections and one crotch piece.
Each thigh piece is worked round in yellow and black stripes. A long yarn is reserved for edging in the finishing stage.
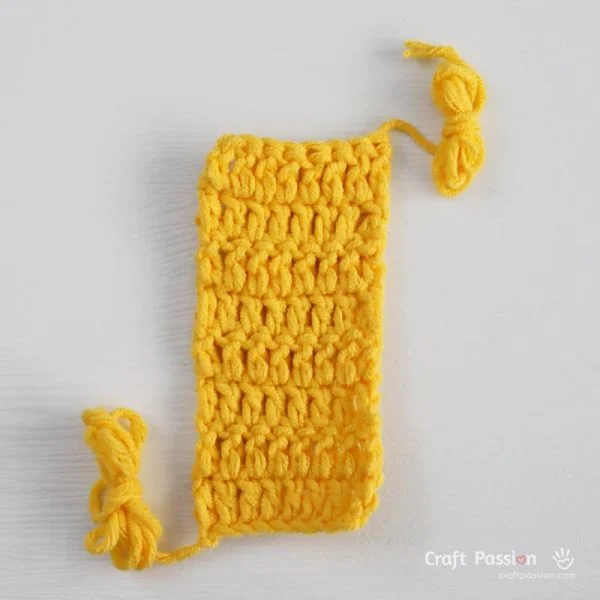
The crotch is worked flat in a yellow rectangle. This piece will later be joined with the thigh pieces to form the leg part of the romper.
A long yarn tail is reserved for joining with sewing.
Step 2: Arrange the Pieces for Joining

Lay both thigh pieces flat, side by side, with the last round facing inward, and position the crotch piece between them.
The seam lines of the thigh should meet at the middle of the crotch (as shown).
Step 3: Sew the Crotch Seam
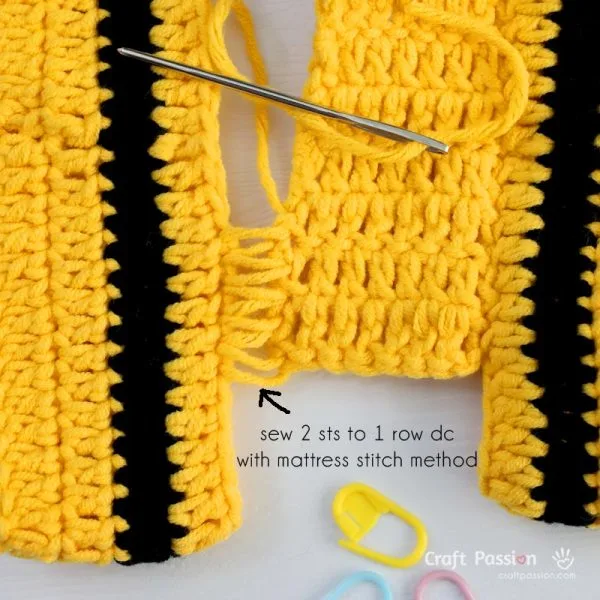
Using the mattress stitch method, sew the crotch piece to the thighs — matching two stitches on the thigh to one row of the crotch piece.
Work slowly and evenly, ensuring both sides are symmetrical.
Step 4: Join the Thighs to Form the Romper Legs

Once both seams are sewn, the romper will form a circular shape — resembling a tiny pair of shorts.
Weave in the ends neatly on the inside.
This base section provides a comfortable, rounded fit for the baby’s legs and diaper area.
Step 5: Continue Crocheting Upward for the Body
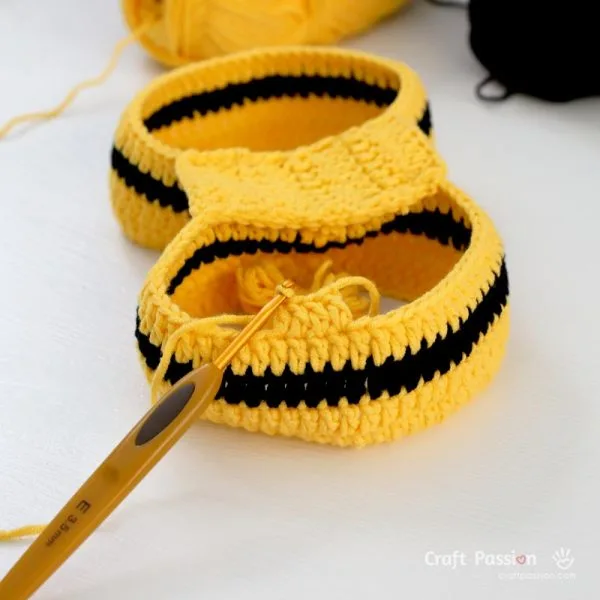
Join the yarn at the top edge of the assembled shorts to start crocheting the body section.
When you reach the four joining points where the crotch connects to the thighs, add one extra stitch in each join to create a smooth, even transition before continuing to work upward.
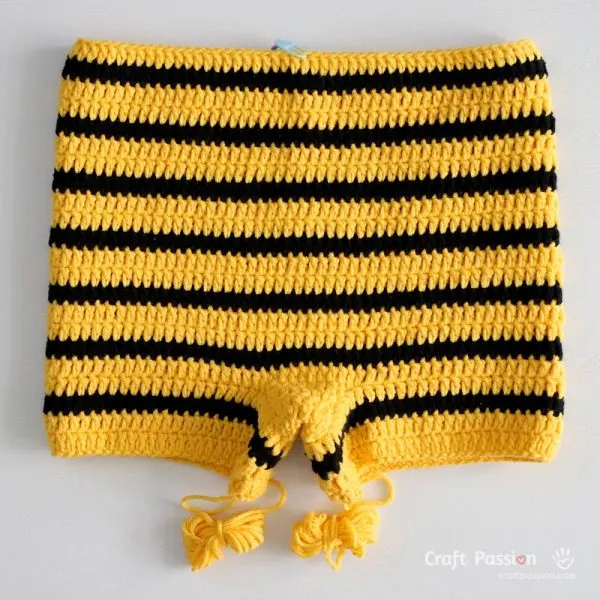
Crochet in continuous rounds, following the bee’s signature color pattern — alternating two yellow rounds with one black round.
The romper will gradually grow taller, forming the torso section.
Step 6: Shape the Front and Back Bibs

Once the body height is complete, divide the stitches evenly to work the front and back bibs separately.
Crochet these bibs in solid yellow, working in rows instead of rounds.

Both bibs taper slightly toward the top for a comfortable chest fit, and two small strap openings are created near the top edge for the fastening ties.
Step 7: Add the Edging for a Clean Finish
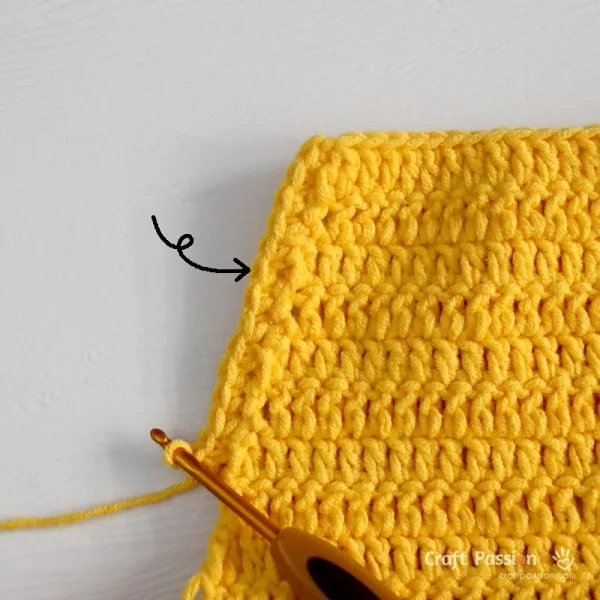
Work a neat single crochet edging all around the bibs and waist.
When crocheting along the side of double crochet stitches, make two single crochet stitches into each dc row to maintain a smooth curve and balanced tension. Work a sc increase (sc inc) at each outer corner and a single crochet two together (sc2tog) at each inner corner to keep the edging even and neatly shaped.

For the thigh edging, use the reserved yarn tail from the beginning of the pattern and simply crochet one single crochet into each double crochet stitch around the opening — this creates a tidy border that reinforces the edge.
Step 8: Crochet the Straps

Next, make two long shoulder straps with the yellow yarn at the edge of the back bib.
Thread each strap through the small holes on the front bib, then tie them into knots to secure — this makes the length easily adjustable as your baby grows.
No buttons or snaps needed!
Step 9: Add the Letter “H” Appliqué

Crochet a bold black letter “H” separately and position it at the center of the front bib. Pin it in place before sewing to ensure perfect alignment. Use small stitches to attach it firmly without pulling the fabric.
The letter “H” stands for “Honey,” completing the playful Honey Bee theme. If you’d like to personalize it with another letter, the Moogly Crochet Alphabet offers similarly sized letters that work well with this pattern.
Step 10: Finishing Touches
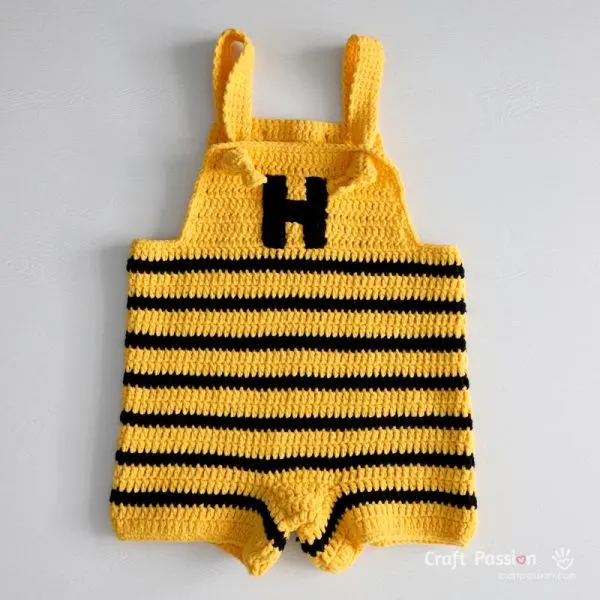
Weave in all yarn ends securely. Lightly block the romper to shape and smooth the stitches.
With all pieces joined and the straps tied up, your crochet romper is complete! Pair it with the matching hat and wings for the complete costume set.
For easier care, use a gentle wash cycle and lay flat to dry.
Ready to buzz into the crochet project? Scroll down to the pattern section, grab your hook, and bring this Bee Romper Crochet Pattern to life!
What’s Next:
- To complete your bee baby outfit, add the matching Bee Wings and Bee Hat.
- Once finished, share your creation on Facebook or Instagram and tag @craftpassion — I’d love to see your little honeybee in action.
- Not quite ready to start crocheting? Save this pattern to a Pinterest board so it’s waiting for you when inspiration strikes.
- Want to explore more wearable projects? Check out these free crochet patterns from our Wearables & Costumes section — Each of these patterns makes a fun companion to your crochet journey.
- Crochet Beanie Pattern – a cozy ribbed beanie available in 9 sizes, from newborn to adult.
- Crochet Halter Top with Granny Squares – a stylish wearable made from colorful granny square motifs.
- Mini Santa Hat Hair Clip – a quick and festive accessory that’s fun for all ages.
Bee Romper Crochet Pattern Sheet
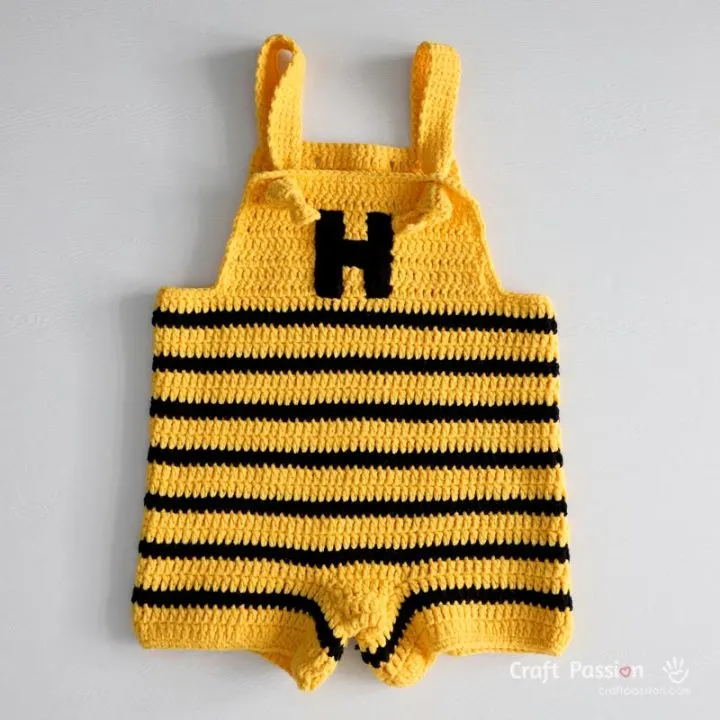
Crochet Bee Baby Romper Pattern (4 Sizes)
The Bee Romper Crochet Pattern provides complete written instructions for four baby sizes (3–24 months). The design features cheerful yellow-and-black stripes, a soft bib top, and adjustable straps — perfectly made to match the Bee Hat and Wings for the full costume set.
Materials
Yarn, Combed Milk Cotton, light-worsted weight
Tools
Instructions
Sizes:
Size: 3-6, (6-12, 12-18, 18-24) months
Note: Instructions are written for the smallest size (3–6 months), with changes for larger sizes shown in parentheses. When only one number is given, it applies to all sizes.
Disclaimer: This bee outfit was originally designed for size 12–18 months, and all other sizes have been graded proportionally (using the 12–18 month pattern as the base) to ensure a consistent fit and shape across all sizes.
Finished Measurements
Size (months): 3-6 (6-12, 12-18, 18-24)
Body Length (Neck to Thigh): 10¼" (11¾", 13¾", 15⅞")
Round Thigh: 10¼" (10¾", 12½", 14")
Rise (Front to Back includes diapers): 15" (17", 18", 19")
Round Hip: 18½" (19½", 22", 24")
Measurements are taken after blocking and may vary slightly depending on yarn, tension, and individual crocheting style.
Abbreviations:
(In US Crochet Terms)
ch = chain
dc = double crochet
dc inc = 2 double crochet into same stitch
dc2tog = double crochet 2 stitches together (dc decreasing stitch)
sc = single crochet
sc inc = 2 single crochet into same stitch
sc2tog = single crochet 2 stitches together (sc decreasing stitch)
sk = skip
st = stitch
sl st = slip stitch
sl knot = slip knot
fo = fasten off
RS = Right Side
WS = Wrong Side
Crochet Gauge
18 sts x 9 rows = 4″ (10 cm) in double crochet (dc).
18 sts x 21 rows = 4″ (10 cm) in single crochet (sc).
Adjust hook size if necessary to achieve the correct gauge.
Construction Notes
- Use the size chart above to determine which stitch counts in parentheses to follow.
- The costume is worked from the bottom up (from thigh to bib) in one piece for minimal seaming.
- The front and back bibs are crocheted in yellow only.
- The stripe pattern is formed by alternating 2 rounds of Yellow and 1 round of Black. Alternatively, for a black-dominant appearance, consider 2 rounds of Black and 1 of Yellow, or 2 rounds of each color for a more balanced contrast.
- A small crotch piece is worked in between the two thigh sections to provide better ease and comfort around the diaper and thigh area, making the romper more comfortable for babies to wear.
- A row of single crochet edging is worked neatly around the thigh and bib edges for a polished finish.
- The edging, straps, and letter H appliquéare made using single crochet stitches. The rest of the bee romper playsuit is worked in double crochet stitches.
- The H appliqué is worked separately and attached after the main body is completed..
- The romper has no front button closure; instead, the straps pass through two hole openings at the top of the bib and are secured with knots, allowing the strap length to be easily adjusted.
- Weave in ends neatly and block lightly to shape if needed.
Stitch Notes
- The first ch 2 at the beginning of a round/row counts as 1 dc stitch unless stated otherwise. When it is counted as a stitch, make sure to work into it in the following round or row.
- The first ch 1 at the beginning of a round/row does not count as a stitch.
- When the pattern says "turn", it means turning your crochet piece to the other side, for example, turning from the right side to the wrong side.
- When the pattern says "Join", it means join with a sl st to the first stitch of the round. The sl st used to join rounds is not counted as a stitch. Pull the sl st tightly to make it smaller and less visible for a neat, seamless join.
- When crocheting or sewing along the vertical side (post) of dc stitches, work 2 stitches evenly into each dc post for a smooth and balanced edge.
Bee Romper Crochet Pattern
Follow the stitch counts listed in parentheses based on your selected size, and use a stripe pattern of 2 rounds of Yellow followed by 1 round of Black unless stated otherwise..
Thigh (make 2)
Crochet the piece in the striped pattern, working on RS only.
Leave a long tail of about 100" (110", 120", 140") to reserve for the thigh opening edging.
Foundation chain: sl knot, ch 45 (47, 55, 63) sl st to form a ring.
Round 1 - 3 (3, 4, 5): ch 2, dc in next 45 (47, 55, 63) sts, Join.
fo.
Crotch
Using yellow yarn only,
Foundation chain: sl knot, ch 5 (5, 7, 7).
Row 1 - 6 (6, 8, 10): ch 2, dc in next 5 (5, 7, 7) sts, turn.
fo. Leave a long tail of about 12" for sewing.
Joining the Crotch Piece to the Thigh pieces
- Place the crotch piece on the table with its stitch side as the width.
- With the right sides facing, press each thigh tube flat so the side edges meet and the last round edge faces inward toward the crotch piece between them. Align the seam of each thigh with the center of the long edge of the crotch piece.
- Using the reserved yarn tail, sew 12 (12, 16, 20) stitches evenly across the 6 (6, 8, 10) rows of the crotch piece, securing it to the last round of both thigh sections. You are now ready to continue crocheting the body of the romper.
- Count the stitches after joining — you should have 80 (84, 96, 104) sts for a round.
Body
Crochet the piece in the striped pattern, working on RS only.
With a new strand of yarn, continue crocheting after joining the crotch piece to the thigh pieces. Begin on either the left or right side of the thigh — this will form the side seam of the romper.
When working on Round 1 (pattern below), at each of the four joint points where the crotch piece meets the thighs, work one additional stitch into the join to smooth the transition — you should now have 84 (88, 100, 108) stitches in total.
Round 1: ch 2, dc in next 16 (17, 19, 21) sts, *crotch: dc inc in next st, dc in next 4 (4, 6, 6) sts, dc inc in next st*, dc in next 34 (36, 40, 44), repeat *, dc in next 17 (18, 20, 22) sts. Join.
Round 2 - 14 (16, 18, 20): ch 2, dc in next 83 (87, 99, 107) sts, Join.
fo.
Front Bib
Lay the romper flat on the table and decide which side will be the front, if necessary.
With RS facing, locate the front center line of the body section, then count 13 (15, 17, 19) stitches to the left of that center line and mark this stitch with a stitch marker — this is where the front bib begins.
Turn the romper so that the WS is facing you (the first row will be worked from the WS).
Using Yellow yarn only:
Row 1 (WS): ch 2, dc in next 25 (29, 33, 37) sts, turn.
Row 2 (RS): ch 2 (do not count as a stitch), dc in next 23 (27, 31, 35) sts, dc2tog, turn.
Row 3 (WS): ch 2, dc in next 23 (27, 31, 35) sts, turn.
Row 4 (RS): ch 2 (do not count as a stitch), dc in next 21 (25, 29, 33) sts, dc2tog, turn.
For 3–6 months only
Row 5 (WS): ch 2, dc in next 2 sts, ch 1, sk 1, dc in next 14 sts, ch 1, sk 1, dc in next 3 sts.
fo.
For 6–12 months only
Row 5 (WS): ch 2, dc in next 25 sts, turn.
Row 6 (RS): ch 2 (do not count as a stitch), dc in next 3 sts, ch 1, sk 1, dc in next 16 sts, ch 1, sk 1, dc in next 2 sts, dc2tog.
fo.
For 12–18 months only
Row 5 (WS): ch 2, dc in next 29 sts, turn.
Row 6 (RS): ch 2 (do not count as a stitch), dc in next 27 sts, dc2tog, turn.
Row 7 (WS): ch 2, dc in next 27 sts, turn.
Row 8 (RS): ch 2 (do not count as a stitch), dc in next 3 sts, ch 1, sk 1, dc in next 18 sts, ch 1, sk 1, dc in next 2 sts, dc2tog.
fo.
For 18–24 months only
Row 5 (WS): ch 2, dc in next 33 sts, turn.
Row 6 (RS): ch 2 (do not count as a stitch), dc in next 31 sts, dc2tog, turn.
Row 7 (WS): ch 2, dc in next 31 sts, turn.
Row 8 (RS): ch2 (do not count as a stitch), dc in next 29, dc2tog, turn.
Row 9 (WS): ch2, dc in next 2 sts, ch 1, sk 1, dc in next 22 sts, ch 1, sk 1, dc in next 3 sts.
fo.
The ch-1, sk-1 spaces at the end of the row for each size form two small holes used for threading and tying the shoulder straps.
Back Bib
The back bib is worked in yellow, mirroring the size and placement of the front bib on the opposite side of the romper.
With the back RS facing up, locate the back center line of the body section, then count 13 (15, 17, 19) stitches to the left of that center line and mark this stitch — this is where the back bib begins.
Turn the romper so the WS is facing you (the first row is worked from the WS). Using yellow yarn only, work as follows:
Rows 1–4: Follow the Front Bib, Rows 1–4.
Row 5 (WS): ch 2, dc in next 21 (25, 29, 33) sts, turn.
Row 6 (RS): ch 2 (do not count as a stitch), dc in next 19 (23, 27, 31) sts, dc2tog, turn.
For 3–6 months only
Row 7 (WS): ch 2, dc in next 19 sts, turn.
For 6–12 months only
Row 7 (WS): ch 2, dc in next 23 sts, turn.
Row 8 (RS): ch 2 (do not count as a stitch), dc in next 21 sts, dc2tog, turn.
For 12–18 months only
Row 7 (WS): ch 2, dc in next 27 sts, turn.
Row 8 (RS): ch 2 (do not count as a stitch), dc in next 25 sts, dc2tog, turn.
Row 9 (WS): ch 2, dc in next 25 sts, turn.
Row 10 (RS): ch 2 (do not count as a stitch), dc in next 23 sts, dc2tog, turn.
For 18–24 months only
Row 7 (WS): ch 2, dc in next 31 sts, turn.
Row 8 (RS): ch 2 (do not count as a stitch), dc in next 29 sts, dc2tog, turn.
Row 9 (WS): ch 2, dc in next 29 sts, turn.
Row 10 (RS): ch 2 (do not count as a stitch), dc in next 27 sts, dc2tog, turn.
Row 11 (WS): ch 2, dc in next 27 sts, turn.
Do not fasten off. Continue next.
Edging
Bib Edge (Front & Back + Waist)
Continue with the same yarn from the last stitch of the back bib; with RS facing, ch 1.
Work sc evenly around the entire bib perimeter, including the waistline stitches between the front and back bibs, as follows:
- sc 1 in each stitch across the top edges of both bibs and across the waistline between the bibs,
- sc 2 along each dc row on the vertical sides of the bibs,
- sc inc in each outer corner of the bibs.
- At each inner corner where a bib meets the waistline, work sc2tog, picking up 1 st from the bib and 1 st from the waist to close the corner neatly. Join.
- fo.
Thigh Edge (Each Leg Opening)
With the reserved yarn tail and RS facing, ch 1.
Work 1 sc in each stitch evenly around the leg opening. Join.
fo.
Straps (Make 2 — worked from Back Bib)
Turn the romper to the back and with the back bib RS facing, begin the straps with a new strand of yarn as follows.
Note: The ch 1 at the start of each row does not count as a stitch.
Right Strap
At the top-right corner of the back bib, locate the sc inc stitches at the corner from the edging; insert the hook in the inner stitch of that corner pair (the stitch nearest the center).
Rows 1–50 (53, 63, 73): ch 1, sc in next 5 sts, turn.
fo.
Left Strap
At the top-left corner of the back bib (still with RS facing), locate the sc inc stitches at the corner from the edging. From the inner stitch (nearest the center), count 5 sts toward the center and crochet with the following pattern.
Rows 1–50 (53, 63, 73): ch 1, sc in next 5 sts, turn.
fo.
Letter H Appliqué
The letter H is crocheted with Black yarn, worked flat in rows with single crochet (sc).
Main Letter
This forms a vertical bar on the right, with a horizontal extension pointing left.
Even-numbered rows are RS, odd-numbered rows are WS
Foundation chain: sl knot, ch 3.
Rows 1–4: ch 1, sc in next 3 sts, turn.
Row 5: ch 1, sc in next 3 sts, ch 7, turn.
Rows 6–8: ch 1, sc in next 10 sts, turn.
Rows 9–13: ch 1, sc in next 3 sts, turn.
fo.
Top Left Leg
With the main letter RS facing, count 3 sts from the left edge of row 8 (the horizontal extension). Insert the hook and start crocheting with a new strand of Black yarn.
Rows 1–5: ch 1, sc in next 3 sts, turn.
fo.
Bottom Left Leg
With the main letter and top left leg RS facing, rotate the piece so the vertical bar is on the left; you will work the next leg at what is now the top-right position. Insert the hook and start crocheting the first stitch with a new strand of Black yarn.
Rows 1–5: ch 1, sc in next 3 sts, turn.
fo, leaving a long tail for sewing the entire H.
Finishing
Sew the H Appliqué:
Center the H appliqué on the front bib of the romper. Pin to secure. Using the long tail, sew neatly around the edges. Avoid puckering.
Weave In Ends:
Weave in all yarn tails on the WS and hide them within stitches for a clean finish.
Block the Romper:
Block the crochet romper to the measurements if needed. Here is the tutorial on how to block your crochet pieces.
Designer note: I prefer to wash and block the romper before handing it to the baby for their first wear.
Thread and Tie the Straps:
Insert each back strap through the 2 ch-1 openings on the front bib of the bib, then tie a knot to set the correct strap length. Adjust as needed for fit.
Notes
Depending on the speed and hours you spend on the project, the total time needed is only an approximation.
This downloadable crochet pattern is perfect for offline reference and convenience. For detailed instructions and additional information, visit the full article at https://www.craftpassion.com/bee-romper-crochet-pattern/
