Are you looking for a versatile crochet pattern to make stylish beanies for your entire family? You’ve come to the right place! We will be sharing a fantastic ribbed crochet beanie pattern that fits the entire family. Let us show you how this crochet beanie pattern works.

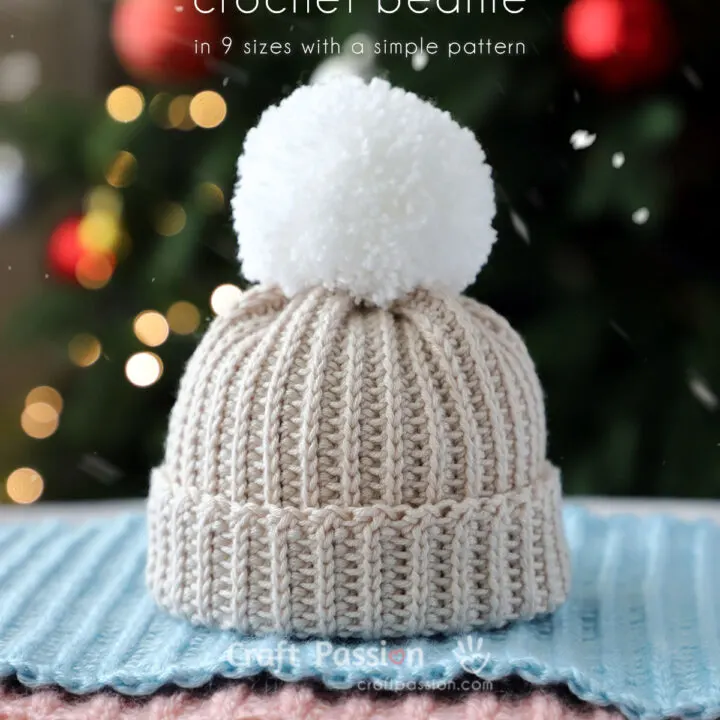
This crochet beanie has a lovely texture and is extremely comfortable to wear. It has a knit-like ribbed stitch texture, a folded cuff long enough to cover the ears, and a cute pom-pom on the crochet hat’s crown. The crochet ribbed stitches create a thick and dense fabric that will keep your head and ears warm and cozy in the cool weather.
How Many Sizes Does This Crochet Beanie Pattern Have?
After some research, we have compiled a list of 9 sizes of crochet beanie hats that will allow you to crochet hats for every member of your family. The sizes are as shown in the chart, and it comes with hat circumference and the total hat length that includes allowance of the folded cuff.

- Preemie: 10″ – 11″ circumference, 4.5″ – 5″ length
- Newborn: 12″ – 13″ circumference, 5.5″ – 6″ length
- 3 – 6mo: 14″ – 15″ circumference, 6.5″ – 7″ length
- 6 – 12mo: 16″ – 17″ circumference, 7″ – 7.5″ length
- 2T – 3T: 18″ – 19″ circumference, 7.5″ – 8″ length
- Kids: 19″ – 20″ circumference, 8″ – 8.5″ length
- Teen: 20″ – 21″ circumference, 9″ – 10″ length
- Adult, Small: 21″ – 22″ circumference, 10″ – 11″ length
- Adult, Large: 22″ – 23″ circumference, 11″ – 12″ length
If you want a smaller crochet beanie for your pet or doll, check out the mini beanie we made for the crochet snowman amigurumi. To find the pattern, scroll down to the pattern section. It uses the same crochet pattern as this one but with fewer stitches.

You might be wondering how the same pattern can be used to make hats in different sizes. The answer is simple:
You can make beanies of various sizes with the same pattern by changing the hook size and the thickness or weight of the yarn.
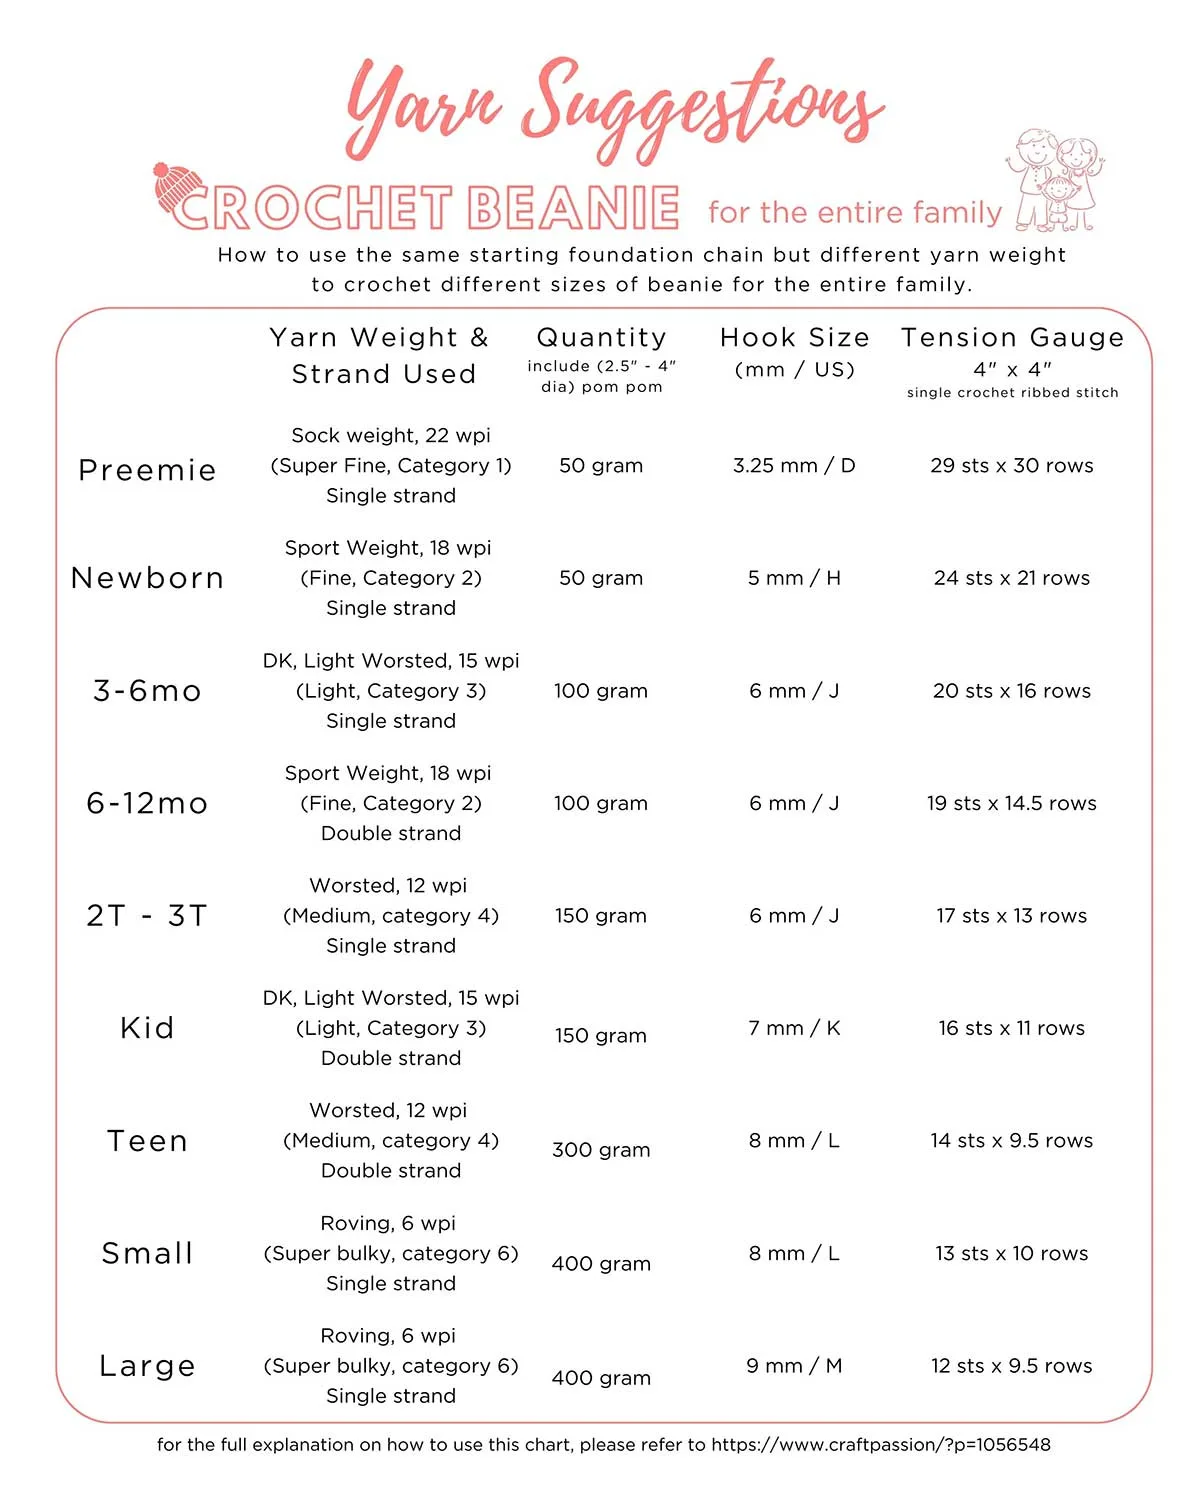
To simplify things, we’ve included a hat size chart below that is scaled to the yarn weight and hook size. Read more on yarn weights and crochet hooks, explore more in-depth information, and learn why they matter in crochet.
Before we get into the crochet beanie tutorials, here are a few details that you might find important.

Is This Beanie Crochet Pattern Beginner-Friendly?
This beanie crochet pattern is perfect for crocheters of all skill levels. Whether you’re an experienced crochet enthusiast or just starting out, with step-by-step instructions and helpful tips, you’ll be able to create cozy crochet beanies for the entire family in no time.
What Are The Crochet Stitches Used?
As this crochet pattern is made with beginner level in mind, we are using basic crochet stitches that are easy to work on. Here is the list of basic stitches you need in this beanie crochet pattern:
- Chain Stitch (abbrev. ch)
- Single Crochet (abbrev. sc)
- Single Crochet Ribbed Stitch – Don’t panic! This can be created by making sc stitches into the third loop.
Before you start making the first crochet stitches, you will have to tie a crochet slip knot onto the hook and find the most comfortable way to hold the crochet hook and yarn. If you need a refresher or want to read more about the basics, you can check out our crochet guide for beginners.

What Are The Crochet Supplies For Crochet Beanie?
First things first, choose the correct yarn weight according to the size chart below, get the crochet supplies, and then find a comfortable place to begin your crocheting.
- Yarn
- Depending on the beanie sizes you are going to crochet, the thickness of the yarn may range in sock weight, sport weight, light worsted, worsted, or super bulky.
- Cotton, wool, acrylic, or their blends are excellent choices for providing warmth and comfort to the wearer.
- Cotton and merino wool are good choices for baby beanie hats because they are soft and won’t irritate the baby’s delicate skin.
- Crochet hook
- The hook sizes vary depending on the size of the hat and include 3.25 mm, 5 mm, 6 mm, 7 mm, 8 mm, and 9 mm.
- Tapestry needle
- Scissors
- Measuring tape or ruler
- A Pom-pom maker or an off-the-shelf pom-pom
Since yarn weight and crochet hook sizes determine the beanie sizes, we are going to talk about it next.
Yarn and Hook Sizes VS Beanie Sizes
Again, the yarn weight and hook size are the two factors that determine the size of your crochet hat beanie. Here is a chart of beanie sizes based on yarn weight, number of strands, and hook sizes used to crochet it. This is how this single crochet pattern beanie works for making beanies for the entire family when combined with the correct tension gauge.

Our recommendation for a specific brand and type is not possible due to the large number of yarn makers in the market. Another reason is that yarns may become outdated and unavailable over time. So, let’s talk more about the yarn and some other names that are frequently used in the market. With this information, you will have more options when shopping for the appropriate yarns.
- Sock Weight:
- It is Superfine/Category 1 yarn and is also known as sock, fingering, baby, and 4-ply yarn.
- This yarn is mostly worked with hook sizes ranging from 2.25 mm to 3.5 mm.
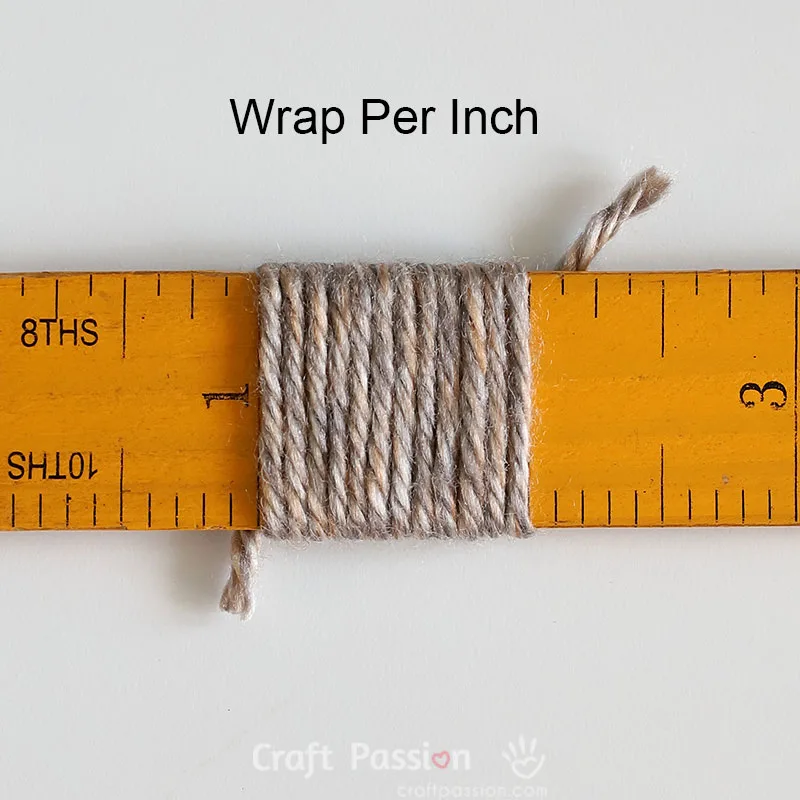
- The one we are using for this pattern is 22 wpi (wraps per inch).
- Sport Weight:
- This yarn is fine/category 2 yarn and is also known as sport, baby, 5-ply, and 6-ply.
- This yarn is typically crocheted with a hook size of 3.5 mm – 4.5 mm.
- The one we are using for this pattern is 18 wpi.
- Light Worsted Weight:
- It is Light/Category 3 yarn and is also known as light-worsted, DK (double knit), and 8-ply.
- This yarn is typically crocheted with a 4.5 mm – 5.5 mm hook size.
- The one we are using for this pattern is 15 wpi.
- Worsted Weight:
- It is a Medium/Category 4 yarn that is also known as Worsted, Afghan, Aran, and 10-ply.
- This yarn is primarily worked with a 5.5 mm – 6.5 mm hook.
- The one we are using for this pattern is 12 wpi.
- Roving Weight:
- It is labeled as Super Bulky/Category 5 yarn and is also known as Super Bulky, Roving, Super Chunky, and 14-ply.
- This yarn is mostly worked with a hook size of 9.0 mm – 15 mm.
- The one we are using for this pattern is 6 wpi.
For more information about yarn weight, you may refer to the standard yarn weight system chart from Craft Yarn Council.
You can also visit Noble Knit for more information on yarn wrap per inch.

How to Make The Beanie In The Correct Size?
Crocheting is a laborious and patient craft, and we need a little more assurance to succeed. You don’t want your hard work to go to waste after you’ve finished the entire hat, only to discover that the size won’t fit.
We now have all of the information about the beanie sizes, yarn weights, and how many strands of yarn to use, as well as the crochet hook size.
Next, if you look at the chart above, you’ll notice a column on the far right that says “Tension Gauge”; this is what we’ll go over next.

After picking the size and determining the yarn weight and crochet hook size to use, make a small test swatch to check if your crochet tension meets what’s called in the chart above.
Take Newborn size, for example; it said that you need to crochet 24 stitches of single crochet ribbed stitches for 21 rows to make a test swatch of 4″ x 4″. You can also make a quarter-size test swatch (2″ x 2″) to save some time and compromise a little on the accuracy.
Always make a test swatch slightly larger than needed for easy measurement by adding a few more stitches and rows as needed. So, using the crochet beanie pattern shown in the crochet pattern section, make a test swatch of 28 stitches and 23 rows for a full swatch or 16 stitches and 14 rows for a quarter swatch. After you’ve finished the test swatch, fasten and cut the yarn.
Block your crochet test swatch and measure if the size meets the requirement. For a quarter swatch, you should have half the amount of the stated number within the 2″ x 2″ swatch. It is alright if the measurement is not exactly the same; 1 stitch off is allowable. The value for the row is less important as you can always crochet more rows or fewer rows to meet the hat circumference.
If it meets, then you may proceed to start the crochet hat project with this setting. Otherwise, you can try again with a slightly larger or smaller hook size to meet the size. If needed, you may also do some math and alter the pattern a little by adding or deducting some stitches at the foundation chain.
Read more about the crochet tension gauge, how it works, and how to measure it.

How To Customize Beanie Crochet Patterns to Other Styles?
Whether you prefer the classic crochet beanie, a trendy crochet hat, or a warm crochet toque, this pattern can be customized to suit your personal style and preferences. Here are some ideas:
- Adding a few rows of a different color to a plain crochet beanie gives it an instant boost.
- Instead of a cinched crown top with a pom pom, make a crochet cat hat beanie by joining the top flat.
- Alternatively, instead of a cat hat, add two tassels at each corner, then crochet two circle pieces to make the owl’s eyes. You now have a crochet owl hat beanie.
The possibilities are endless, from choosing the perfect yarn colors to adding one-of-a-kind embellishments.

Are you ready to begin your beanie crochet hat project? Let’s gather your yarn and crochet hook and embark on a fun and rewarding crochet project.
How To Crochet A Beanie In Various Sizes With Only 1 Pattern?
Let’s begin the real crochet after all the explanations of the theories and concepts of how this pattern works.

First and foremost, this crochet pattern for a beanie is made by crocheting a simple rectangle piece. The foundation chain is the hat’s length, and the rows build the hat’s circumference size. Unlike a typical crochet hat pattern, which is worked top down or bottom up, this ribbed beanie pattern goes around the head.
The short sides of the rectangle will be seamed together to form a tube for the hat. One of the long sides of the rectangle will be the crown, and the other will be the folded cuff.

Since it is a single pattern crochet beanie, each of the 9 sizes will begin with the same 34 foundation chains but with different hook sizes and yarn weights.
We’ll use newborn size as an example to demonstrate. To begin the foundation row, make a slip knot with a single strand of sport-weight yarn on a 5 mm crochet hook and crochet 34 chain stitches. Crochet the foundation chains loosely if your chain stitches are typically tighter.
Make a turning chain and crochet 34 single crochet stitches in the entire row. Crochet a turning chain at the end of the first row and turn your crochet piece for the next row.

On the second round and onwards, skip the first sc stitch and make the entire second row with sc in the third loop only. The last stitch of the row should end at the chain stitch of the previous row. Finish the row with a turning chain and turn your crochet piece for the next row.
Repeat the rows with sc in the third loop for 60 rows or until the height is about 13″ tall. Always end your crochet piece with an even number of rows. Fasten the yarn. Leave a yarn tail about twice the width.
Block your crochet pieces according to the tension gauge by stretching the crochet piece. I prefer to wet block, but you can always do it your favorite way. Read more about why and how to block your crochet piece.

Next, we’ll join the rectangle’s short sides together.
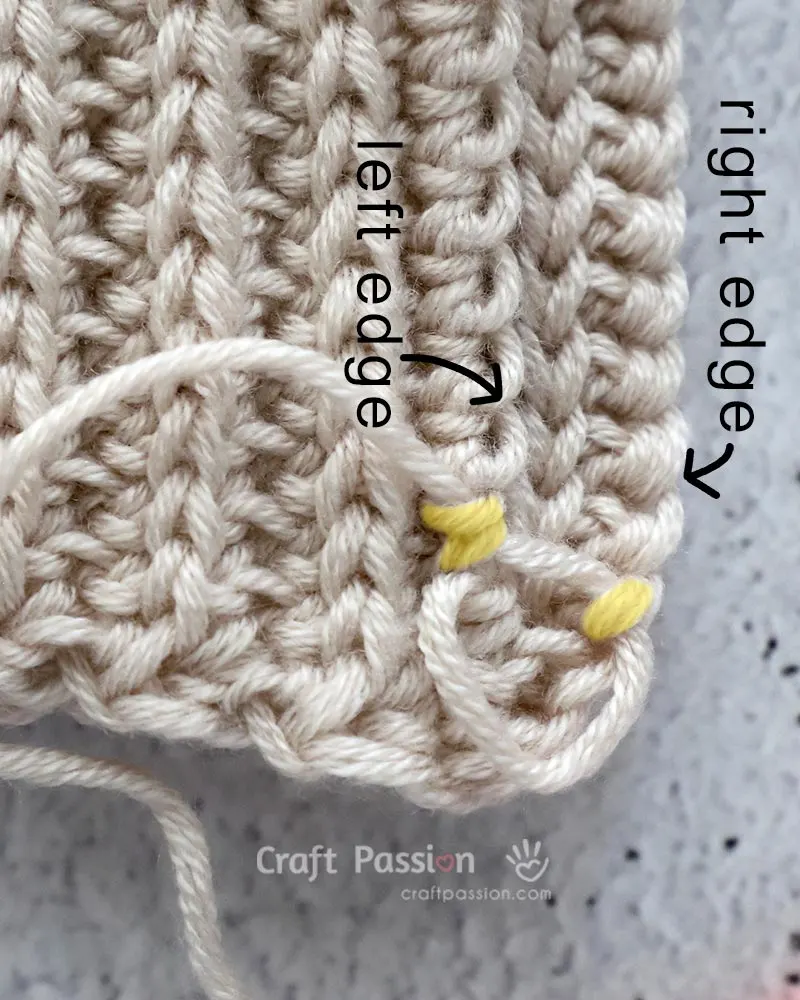
Fold the sides together so that they are side by side. Ensure the stitches are properly aligned so you don’t miss a stitch when sewing them.
To create an invisible join, use a tapestry needle to sew the third loops of the last row to the posts of the sc of the first row with a ladder seam.

This is what it will look like after a few stitches. The join is barely noticeable from the right side.

Make sure the seam tension is similar to the crochet pieces, not overly tight or too loose.
Don’t cut the yarn after you have completed it. Instead, knot it so that you won’t accidentally pull the yarn, which will affect the seam finishing.

Next, you will use the same yarn tail if it is long enough; otherwise, use a new yarn to close the crown of the beanie.
Insert the tapestry needle into the last stitch of every rib and draw yarn through them. Upon completing the whole round, pull the yarn to cinch the top.

Pull the yarn tight enough to close the opening as much as possible. If needed, you may go another round, but this time with fewer stitches. The closing will be covered by a pom-pom, so it is alright if it is not perfect.

Fasten the yarn and hide the yarn tail by weaving it into the crochet stitches.

Attach a pom-pom to the crown of the beanie by sewing it securely. You can make your own pom-pom or buy a ready-made pom-pom. Here is the tutorial on How to make Pom-pom with Pom Pom Maker,
What’s Next:
- Start crocheting and share your completed handmade on Facebook and/or Instagram. Remember to tag us, @craftpassion, so that we are able to see them.
- Pin it to Pinterest for a future To-Crochet List
- Share with your crochet groups for a crochet-along event.
- If you are new to crochet, we have a comprehensive crochet guide for beginners.
- Browse more free crochet patterns to make, particularly other hat patterns:
Happy crocheting!

How To Crochet A Beanie
Crochet beanie hats for the entire family using a simple crochet pattern. A single crochet pattern yields 9 different sizes of crochet beanies. It has a knit-like ribbed stitch texture, a folded cuff long enough to cover the ears, and a pom-pom on the crochet hat's crown.
Choose your size, gather your supplies, and come crochet with us.
Materials
- Yarn (Yarn weight and amount depending on the hat sizes)
Tools
- Crochet Hook (Hook size depending on the hat sizes)
- Tapestry Needle
- Scissors
- Measuring tape or a ruler
- Pom-pom maker
Instructions
Sizes:
Preemie: 10" - 11" circumference, 4.5" - 5" length
Newborn: 12" - 13" circumference, 5.5" - 6" length
3 - 6 mo: 14" - 15" circumference, 6.5" - 7" length
6 - 12 mo: 16" - 17" circumference, 7" - 7.5" length
2T - 3T: 18" - 19" circumference, 7.5" - 8" length
Kids: 19" - 20" circumference, 8" - 8.5" length
Teen: 20" - 21" circumference, 9" - 10" length
Small Adult: 21" - 22" circumference, 10" - 11" length
Large Adult: 22" - 23" circumference, 11" - 12" length

Yarn Weight, Hook Size & Crochet Tension:
Preemie: Sock, 3.5 mm, 29 sts x 30 rows
Newborn: Spot, 5 mm, 24 sts x 21 rows
3 - 6 mo: Light Worsted, 6 mm, 20 sts x 16 rows
6 - 12 mo: Spot (double strands), 6 mm, 19 sts x 14.5 rows
2T - 3T: Worsted, 6 mm, 17 sts x 13 rows
Kids: Light Worsted (Double strands), 8 mm, 16 sts x 11 rows
Teen: Worsted (Double strands), 9 mm, 14 sts x 9.5 rows
Small Adult: Roving, 9 mm, 13 sts x 10 rows
Large Adult: Roving, 10 mm, 12 sts x 9.5 rows

Abbreviations:
(In US Crochet Terms)
ch: chain
sc: single crochet
sc in 3rd loop: single crochet in third loop
sl knot: slip knot
st: stitch
fo: fasten off

How to crochet a beanie
- Choose your size and gather your crochet supplies.
- Crochet the beanie using the pattern provided below. It is finished in the shape of a rectangle, where the length of the hat is the width of the row, and the circumference of the hat is the length of the row.
- Once you've reached the required circumference length for your size, fasten the yarn. Leave a long tail to sew the rectangle piece together to make a beanie.
- Block your crochet rectangle piece according to the tension gauge.
- Sew the short sides together using an invisible seam that looks like a rib stitch. Make a secure knot, and do not cut the yarn.
- Continue to gather the stitches at the top of the beanie with the yarn. Cinch the top of the beanie to close the crown.
- Attach a 2.5" to 4" diameter pom-pom to the crown. Hide all yarn ends.
Crochet Beanie Pattern
Foundation chain: sl knot, ch 34, turn.
Row 1: ch, sc in next 34 sts, ch, Turn. {34}
Row 2: skip the first sc, sc in 3rd loop only for the next 34 sts. ch. Turn. {36}
Note: The last stitch should end on the ch stitch of the previous row.
Repeat Row 2 until you reach the required length of the hat circumference. End the last stitch with sc in 3rd loop only.
fo and hide all yarn ends.
Block your crochet pieces according to the tension gauge given. Leave a long yarn tail for sewing up the beanie.
Notes
The total amount of time required will vary depending on how quickly and how many hours you work on the project.
Get the full article at https://www.craftpassion.com/crochet-beanie-pattern/

Cindy
Saturday 15th of June 2024
Thank you for taking the time to provide all the charts & information for this Free pattern. I normally use blosc for ribbed beanies. I am excited to try it in the 3rd loop. I notice you do not use a turning chain. BTW, Elaine needs to check her own spelling & capitalization.
Mimiado
Monday 18th of March 2024
What is the third loop?
Craft Passion
Monday 18th of March 2024
There is an explanation about the 3rd loop of sc stitch in the article, I have included a link here too.
Elaine Bates
Thursday 21st of September 2023
Hi there! This is a great pattern. I really like the stitch that goes into the 3rd loop. The photos easily explain the process. But I must point out yr misspelling in 2 charts. In the 2 Yarn charts the word "Sport" is misspelled. In the paragraph that starts with "Yarn weights, hook sizes,..." it's also misspelled. In another paragraph further down, it is spelled correctly. I realize that autocorrect might have been in play. But I do intend to keep this pattern. It allows for many variations.Thx for sharing.