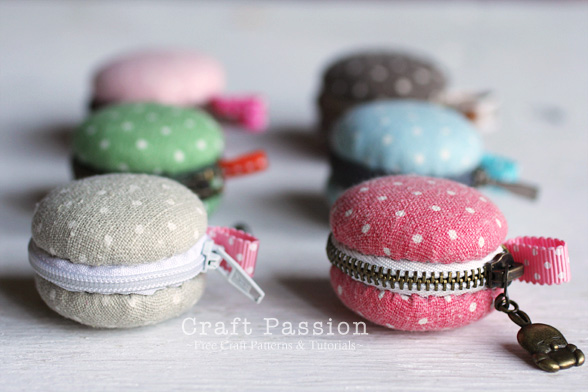
Just can’t help not sewing these sweet little Macaron Coin Purses when one of Craft Passion’s Facebook fans showed them to me. Thanks to XYZZhandmade for her inspiring handmade and some tutorial links in Japanese, this, this, this, and this. No, I can’t read Japanese but I can guess from the pictures how to sew it. Here is the English version of the tutorial on how to sew this macaron coin purse where I have added more details in the sewing.
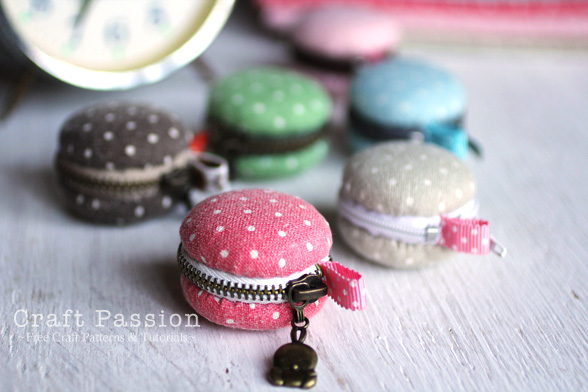
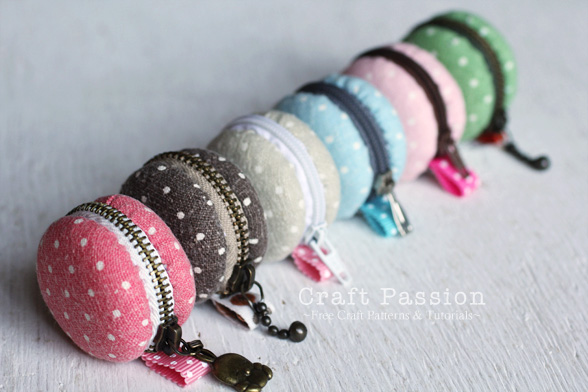
The space inside the coin purse is quite limited but good enough to place some small jewelry like ear rings, rings; maybe to keep some small coins, folded money; a place to keep a small piece of note that wrote your shopping list and reminder, etc. Or, simply use it as a key chain or hanging ornament. Or, turn it into something enormously cute, like this.
I have tried both nylon and metal zipper, each gave a different feel and effect on the macaron coin purse. Nylon zipper is easy to sew since you can just cut the zipper to the correct length. Zipping and unzipping is easier on nylon zipper too. Aesthetic-wise, I like metal zippers though it requires more works to do. If you find zipping on a metal zipper is craggy due to the small circular shape, rub the zipper’s teeth with some wax or candle, then zip and unzip a few times, you will find zipping is smoother after the waxing.
Macaron Coin Purse
Finished Dimension:
1 3/4″ (Dia.) x 1 1/4″ (H)
Materials:
to make 1
1. Cover Button, diameter 1 1/2″ (38mm) – 2 pairs.
2. Fabric – Polka-dot, 5 1/2″ x 3″
3. Fabric – lining, 5 1/2″ x 3″
4. Fabric – zipper seam binder, 1 1/2″ x 1 1/2″
5. Batting – 4″ x 2″
6. Zipper – 5″ ( I used 6″ metal zipper and shortened in to 5″ by using this tutorial)
7. Card stock (for tracing) – 2 3/4″ circle and 2″ circle
8. Ribbon – 3/8″ x 2″
Tools:
1. Sewing kits
2. Pencil and/or fabric marker
3. Wire cutter
4. Scissors
5. Tacky Glue / Mod Podge / Fabric glue
Get ready all the materials and tools needed to sew a macaron coin purse.
Sew to join the zipper tape together above the top stops.
Fold the ribbon into half and sew it on the bottom stop with ends facing zipper end.
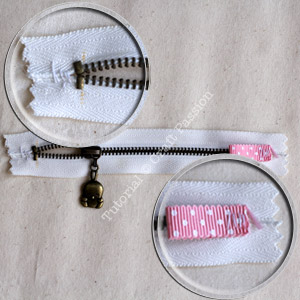
Fold the zipper right side together and sew to join it into a ring.
Trim the zipper ends to 1/2″ seam allowance from the stops.
Fold the 1 1/2″ square fabric into half then fold a seam allowance of 1/4″.
Encase the seam allowance and bind it by sewing the fabric onto it.
Bend the binder to the bottom stop side and sew it on the zipper.
Turn to the right side and this is how your zipper is going to look like.
Make small running stitches along the edges of the zipper. Pull to gather.
Repeat on the other side.
Set aside.
Cut away the button studs from the back plates. Be careful and point the stud away from you and /or anyone while cutting it. This little tiny metal can really shoot far.
Set aside.
Trace circles to the fabrics with pencil or fabric marker.
2 3/4″ circle on main polka-dot fabric and lining fabric, cut 2 from each fabric.
2″ circle on batting, cut 2.
Apply a thin layer of glue on the cover and attach it to the batting.
Make 2.
Let dry or until safe to work on it.
Make small running stitches along the edge of the fabric. Place the cover onto the fabric.
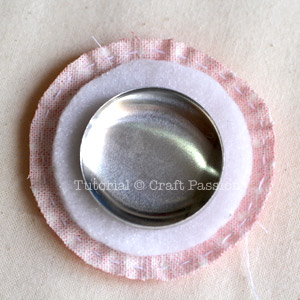
Pull the thread and gather the fabric onto the cover snugly. Knot the thread.
Repeat the same to another cover and 2 back plates.
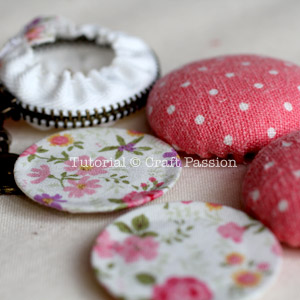
Use an erasable fabric marker to plot a circle along the back of the cover. The line should be on top of the metal edge of the cover.
Slip stitch the cover to the zipper, about 3/16″ from the center line of the zipper.
The further you sew from the zipper, the bigger the coin purse space is.
Completed 1 cover, repeat the same to the other side.
Turn to the inside, place the back plate on and slip stitch it to the zipper.
Repeat the same on the other plate.
A completed macaron coin purse. The storage space is quite small, good for keeping ring, and bracelet. Or, merely use it as a key chain or hanging ornament.
If you can find a small circle mirror of about 1″ to 1 1/4″, glue it on the back plate and turn this macaron coin purse into a small cosmetic mirror.
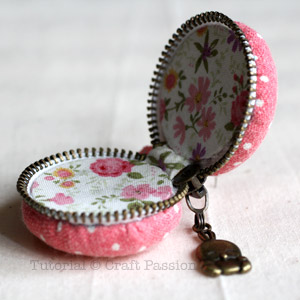
View from the bottom stop of the macaron coin purse.
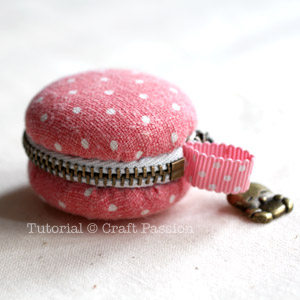
Another view when the coin purse is placed vertically.
Have a nice day & happy sewing 🙂
I cannot thank you enough for the blog post.Really thank you! Really Cool.
Hello, I absolutely love these! I was looking for cute DIYs for girls my age, and this is so adorably amazing! I wonder if mom would let me make them… Probably not! She never lets me do stuff like this! I hope she does though!!!!! 🙂 LOVE THEM!
Hi, i hope you still read this thread. But i was wondering if you can leave off the inside hard backplate (the bottom one) and instead just make it like a lining sewn inside, so that it will be like a deeper pouch on the inside.
Yes Carol, you may leave out the plate but it will not give you any deeper pouch on the inside due to the crossing threads that tightened up the fabrics.
Ahhh Ok, thank you! Now I understand! I actually made one today, I made it a bit larger than yours. What i did was use jar lids with a low lip on them, and for the backplate I used that plastic canvas that is used for cross stitch and i just cut round circles. Mine measures about 3.5″ in diameter and is about the perfect size to hold a pair of earphones, it came out pretty cute, if I do say so myself lol…I used an old zipper that is hard to pull tho, but it was hard to pull before i used it in this., I waxed it a bit, and its a little better….I am going to make more and give them as gifts. So thank you so much for the idea and great instructions and thank you for replying back!
maravilhosos seus trabalhos! obrigada por compartilhar. Deus continue abençoando suas mãos para continuar sempre assim! beijo
Translation (by Google):
Wonderful Your Jobs! Thank you for sharing. May God continue blessing your hands to continue always like this! kiss
What batting did you use? Could I use felt??
yes, you may use felt as alternative to make a surface of the macaron coin purse looks softer.
Could I stuff mine with felt? or could I use fiber-fill?
Hi Lee, yes you could could use felt as an alternative. You may try with fiberfill but I am a bit worried that it won’t be stuffed evenly since you only need a thin layer of cushioning on the metal plate.
Thanks very much. I love all your patterns and you’ve inspired me to start needle-felting once I get the needle.
Thank you, Lee, looking forward to see your handmade made from Craft Passion’s pattern 🙂
Thank you
This would be so cute to use as a tooth farrier case for the tooth
Thank you for the idea, Sharon.
Love this!! I’m engaged and love the idea of making my own ring box! Especially after I ate macarons for the first time in Paris last year!!
I could never make this. Are there any for sale?
Hi Betty,
I plan to make some for sale beginning of next year. Please check Craft Passion Shop for updates.
I know I could never make this. But I would like to purchase one.
Are they for sell?
My darling sister made one for me…it arrived today. I am so impressed. Perfect size for my $2 coin for my sewing group meeting. Jacqui has very bad arthritis in her hands but still
she managed to sew this. Thanks for the tutorial….she said it was easy if a little fiddly 🙂
That is so sweet of her, thank you for sharing your happiness with us 🙂
great!!!!
I’ m very impressed !!! even if you give us the tutorial , i’m not sure to succeed to sew this very very beautiful box !!!
a french admiror .
Can zippers with plastic teeth be used instead of metal teeth zippers? Love these little cases & hoping the plastic teeth zippers will work – since I have a lot of them.
I saw someone sewed the coin purse with small plastic zippers, so it should be workable 🙂
these are too cute for words, I absolutely must make at least one…
GREAT, Meme. Happy sewing!!!
Hi…can u give me qoutation if i want to buy this coin purse for 1000 pcs??
Lovely macarons !
I made two but I’ve already given it as brithdays presents.
I should make a lot and have a huge stock for next birthdays =)
Anyway, thanks a lot for this tutorial !
Hi saw your macaroon purse, went and got all my pieces but I’m missing something as I cannot get it to sit like yours. I think I’m maybe sewing the top button onto the zip incorrectly. Following your instructions but still cannot get it. HELP. I have just found this site and I love it. Have purchased socks for the sock animals.
Hi Athleen, please send me some pictures of your macaron coin purse via the contact form, I will try to solve your problem.
Hi! I made two of these with your directions and they are super cute. I scaled it up because the buttons I found were 2 inches in diameter. Turns out a 7 inch zipper works perfectly with 2-inch buttons. I would use a zipper that is over an inch wide to allow a decent amount of room inside the finished purse. Also, when you are gathering the extra width of the zipper into a circle (which I did after covering all of the buttons), I found it helpful to place the inner button plate inside the circle before you pull it tight so that you can make sure the plate fits in there.
I love the 2″ buttons option!!! Wow, it will make a cute earphone storage pouch! Thanks for the tip 🙂
Wow, it is cute and pretty, so well made, thanks for sharing:)
I fixed my own problem and did my blog post:http://howdidyoudothat-jojo.blogspot.com/2014/02/macaron-coin-purse.html
Thank you so much. Joy Dewhirst
This is so darned cute and I went sailing along thinking how simple it was and then hit a big snag when I went to sew on my zipper – too short. I had taken off 2″ from the bottom of the end of a 7″ zipper and it was then too short. I wanted to blog this cutie and link to you but sadly cannot do that. Does anyone have the EXACT length from the top of the fabric to the bottom of the zipper just how much to cut off a 7″ zipper. Thanks.
You’ve done it again. Love your designs. Ladies the metal part is from a covered button, which can be found in any notion department in any fabric store.
Oh! There is also nothing that is impossible if you want to do it badly enough!!!!
I just had to. Life is what YOU make it — no one else can do it for you, JUST YOU. Take care Joanne — please continue to design and make such cool things. By the way, these little purses would be great for little people. Bye for now.
Hi. I must say that I absolutely love your Macaron coin purse idea and tutorial. However, I am not a big crafter, mainly I make stuff for myself or friends but I liked this idea a whole lot especially as something to put a gift in; I am having trouble understanding some of the steps and am wondering and/or hoping that you would elaborate for me the process in as simplest way as you could for someone whom knows no sewing terms. Most of the steps I understood, I mainly got lost in steps 3-5 whenever you said to “Encase the seam allowance and bind it by sewing the fabric onto it,” and “Bend the binder to the bottom stop side and sew it on the zipper.” I could really use your help. Please and thank you.
Thanks a lot for all the tutorial, going to try making one soon 😉
merci pour toutes ces belles choses!!
thanks!
Elisa
Translation (by Google):
thank you for all these beautiful things!
thanks!
Elisa
Wow Soo cute this is.. ilove it
Beautiful !!! Thanks, this is cute.
this is real cute! and here’s mine……….. 😉
Hello and thank you for the tutorial!! I abosolutely love the macaron idea. Where did you get the fabric and what is the fabric material?
Hi Junmi, the fabric is cotton-mix and I bought it from a local sewing craft shop.
Thanks I’ll try to do it tomorrow.
Muito lindo Adorei. Re
Translation (by Google):
Very beautiful I love it. re
Hi Joanne
I love your homepage . Thank you for posting , teaching and showing your passion 🙂 I love the macaron project .
I am working full time and it is hard for me to be involved in a big project and this one is perfect !!!
unbelievably adorable, will definitely try and make one 😀
Hello! This is really a wonderful tutorial! I hope you don’t mind I’m going to be posting about this on my blog. Rest assured you will be credited properly. Thank you. Stay crafty!
This is SO adorable! Could we not cover the entire inner lid part in fabric and rather than add the flat solid insert, have a concave top and bottom with plenty of room inside to put coins or tiny things in?
Hi Marie, sure you can do that if it can fix well in there 🙂
Yes you can! I could not figure out how to put the little plate in so I just sewed a lining into it. You can read more about my process here:
<a href="http://whatkitdoes.blogspot.com/2013/06/macaron-purse-making-it-work-for-me.html"
sorry this is the link
http://whatkitdoes.blogspot.com/2013/06/macaron-purse-making-it-work-for-me.html
Well done, Kit. Thanks for making the one without the back plate!
Hi, my mimi supply store is here http://www.etsy.com/shop/handmadesource and I stock a range of macaroon aluminium bases as well as short zips and some lovely fabrics. I am a stay at home Aussie Mum who is currently living in Beijing so I have made a micro business from items I can get in this part of the world. I wanted to get your permission to be able to use this link to show people how to make the coin purse. Would it be OK? Please let me know, your work and explanations are lovely. Thanks Helen
Where did you get mashi-maro zip from? It’s soo cute but I can’t seem to find it anywhere – I’d really love to use it for this project 😀
I can’t really remember where exactly I bought it from…. if not mistaken, it should be from local craft shop that source from Taiwan or China.
Can you please make me one if I paid you?!
Thank you so much for sharing.
I´ve just made one and doesn´t look that bad. I wouldn´t believe that. Just little bit hard to open..
A good gliding zipper is a must for this purse. Brush the zipper teeth with candle will help.
I tried soap and it´s fine 😉 thank you very much.
I would love to learn how to do it .. But the metal material where you buy? Thank you for the great idea!
Craft shop like Jo-Ann will have the cover button, but I bought my from a Japanese dollar store, Daiso. I am guessing that you are from Italy, probably you will need to do some asking among your country to find out where to get locally. Amazon would be another alternative if they ship to your country. Hope this help.
Hope to hear more from you why you think it is impossible 🙂
Hi Joanne! For a long time I was thinking about making this little Macaron coin purse. Then my friend sent me a kit to make one. I was so happy and immediately turn to your tutorial. You could see the result here – http://irishagold.blogspot.com/2013/01/macaron-coin-purse.html Thank you very much for your help!
~ Iryna
I wish there was a way to print out the instructions and pictures. I had to hand-write them and it took so long.
I love the purse and am planning to give it as a gift with a small heart necklace & earrings inside.
There is a printing icon below the post, just click it to print. You can even click to choose and delete which ever content or picture you don’t want to print out.
How anything can be so cute and so clever and so well made! Congratulations and thanks for sharing!
These macaron purses are so cute!! 🙂
Hello ! I would say that this macaron coin purse is such a magical cute DIY thing i’ve ever saw.. really nice work!
btw do you have any video of the tutorial ? thanks
Soooooooooo cute! I will file for future fun. ;). Thanks for a great idea!
These are just wayyy too adorable! They will make the perfect gifts for my girlfriends. Thanks for such a great tutorial.
What a wonderful idea – as soon as I get the materials, I will be making some! Just a suggestion – use beeswax on your thread to make the sewing easier! Mahalo for the great directions!
These are adorable!!! If I can get the supplies in time, I’ll be making a few of these for Christmas. Thanks for sharing the tutorial. I’m pinning this one…
hello, i’m french, and i love your crafts, but i would buy the complet kit, is it possible ? and what internet site ? thanks
pass a good day
isabel
Wow, how cute it thak 🙂
Thank you for sharing and this great tutorial, love it!
Thanks for the great instructions! I am a novice to sewing and this is basically my second project. It was not expensive or hard to make – just took a few hours (which hardly felt like work). I live in Toronto and I was able to find all the supplies at Fabricland (including the buttons and all). Once again, thanks for the tutorial! I’m sure I’ll be making many of these to hold my jewelry.
That’s great, Fiona. Happy to know that you have great access for the materials 🙂
me encanta esta pagina. gracias por estos tutoriales tan bine explicados. mil gracias
Translation (by Google):
I love this product. thanks for these tutorials as well explained. thank you
Cute idea! I’m working on one right now, but I don’t understand how to attach the back plate on the inside. Maybe you could help me? Also it doesn’t really fit….
Due to the zipper, the plate can’t fit into the button like it should be. you will have to sew it on.
These are very cute! BUT I was disappointed because of the cost of the supplies and sewing the zipper onto the buttons was VERY difficult. The instructions were very vague and the gathering of the zipper doesn’t work. The zipper will not shut. Very Disappointed as as experienced sewer. The macaroon ended up looking like a HAMBUGER!
Barb, what type of zipper are you using? As you can see from the tutorial, I sewed it without any problem and they still look like macaron. Would you mind to share your material used so that other reader won’t have the same mistake you have made? Thanks.
I don’t know if this is the same problem Barb had, but with the zipper I used, the tape was quite stiff and didn’t gather well. I think it’s important to use zippers with a cotton tape rather than polyester. My first attempt kind of looks like a hamburger too which I think is because the batting I used has a low loft, so the covered buttons ended up to be quite flat. I glued in the plate in the end because I didn’t have enough wiggle-room for sewing.
It’s a lovely project and I’m now off to my second attempt ;o) thank you for the great tutorial Joanne!
Merry Christmas and greetings from Switzerland
Great input, Manu! I wouldn’t have known that it was the zipper tape that caused the problem. I used cotton tape, so this problem hasn’t come across my mind.
Please keep me update on your second attempt.
Thank you 🙂
it’s so cute 🙂
I found these via pinterest and am UBER EXCITED about making one. If if turns out well, I’ll make a few more to add to the door-prize collection for our annual up coming quilt camp.
These are utterly amazing! Thank you so much for sharing this through your tutorial; I can’t wait to give them a try.
Such a lovely purse , May i know what kind of fabric do you use ? Is it 100% linen or cotton ? and where do you find the fabric ? Thx.
Hi Alia, the fabric is cotton-linen mixed. It has the texture of linen but the softness of cotton. I bought them from HaHa Plaza but I don’t think they have any more stock for it.
Hi Joanne!
These macaron pouches you made are adorable <3
I'd really like to try making these but I was wondering what kind of buttons you used for the top and bottom? If you ordered them can you possibly give me a link to the site, I'd be super grateful for that.
Thanks and keep posting your adorable craft projects! 🙂
I bought these metal cover buttons from a local Daiso store but it was out of stock ever since this macaron purse tutorial is published. You can try Etsy online store. If you are in USA, Jo-ann, Michaels, Hobby Lobby should have these 38mm [1 1/2″] cover button. If you are in Australia & Singapore, Spotlight should have it too.
Hello, friend!
Their crafts are beautiful!
It is a delight to learn from your blog.
Thank you for sharing ideas with us.
A big hug for you.
Tânia – Brasil
teardesonhosbytania.blogspot.com
Obrigada adorei este trabalho obrigada
Translation (by Google):
Thank you thank you love this job
You can use larger or continuous chain zipping by adding extra pullers; just make sure you stitch across the end!
Hello these are so lovely!
I would like to make some macarons and sell them is it allowed? I would take my own ideas with fabrics.
We have no problem of you selling your own handmade but credit the tutorial to Craft Passion will be grateful :). Thank you.
Such a cute idea!
So amazing and creative. I love this project, WOW!
Thank you, Abbey.