Looking for a flower crochet pattern to make for a special occasion? Let’s make some tulip flowers with this easy crochet tulip pattern. It is a beginner-friendly pattern, so whether you’re a seasoned pro or just dipping your toes into the world of crochet, this free pattern is a breeze to follow. Now, grab your yarn and crochet hook, and let’s start creating a gorgeous tulip that will make your day.
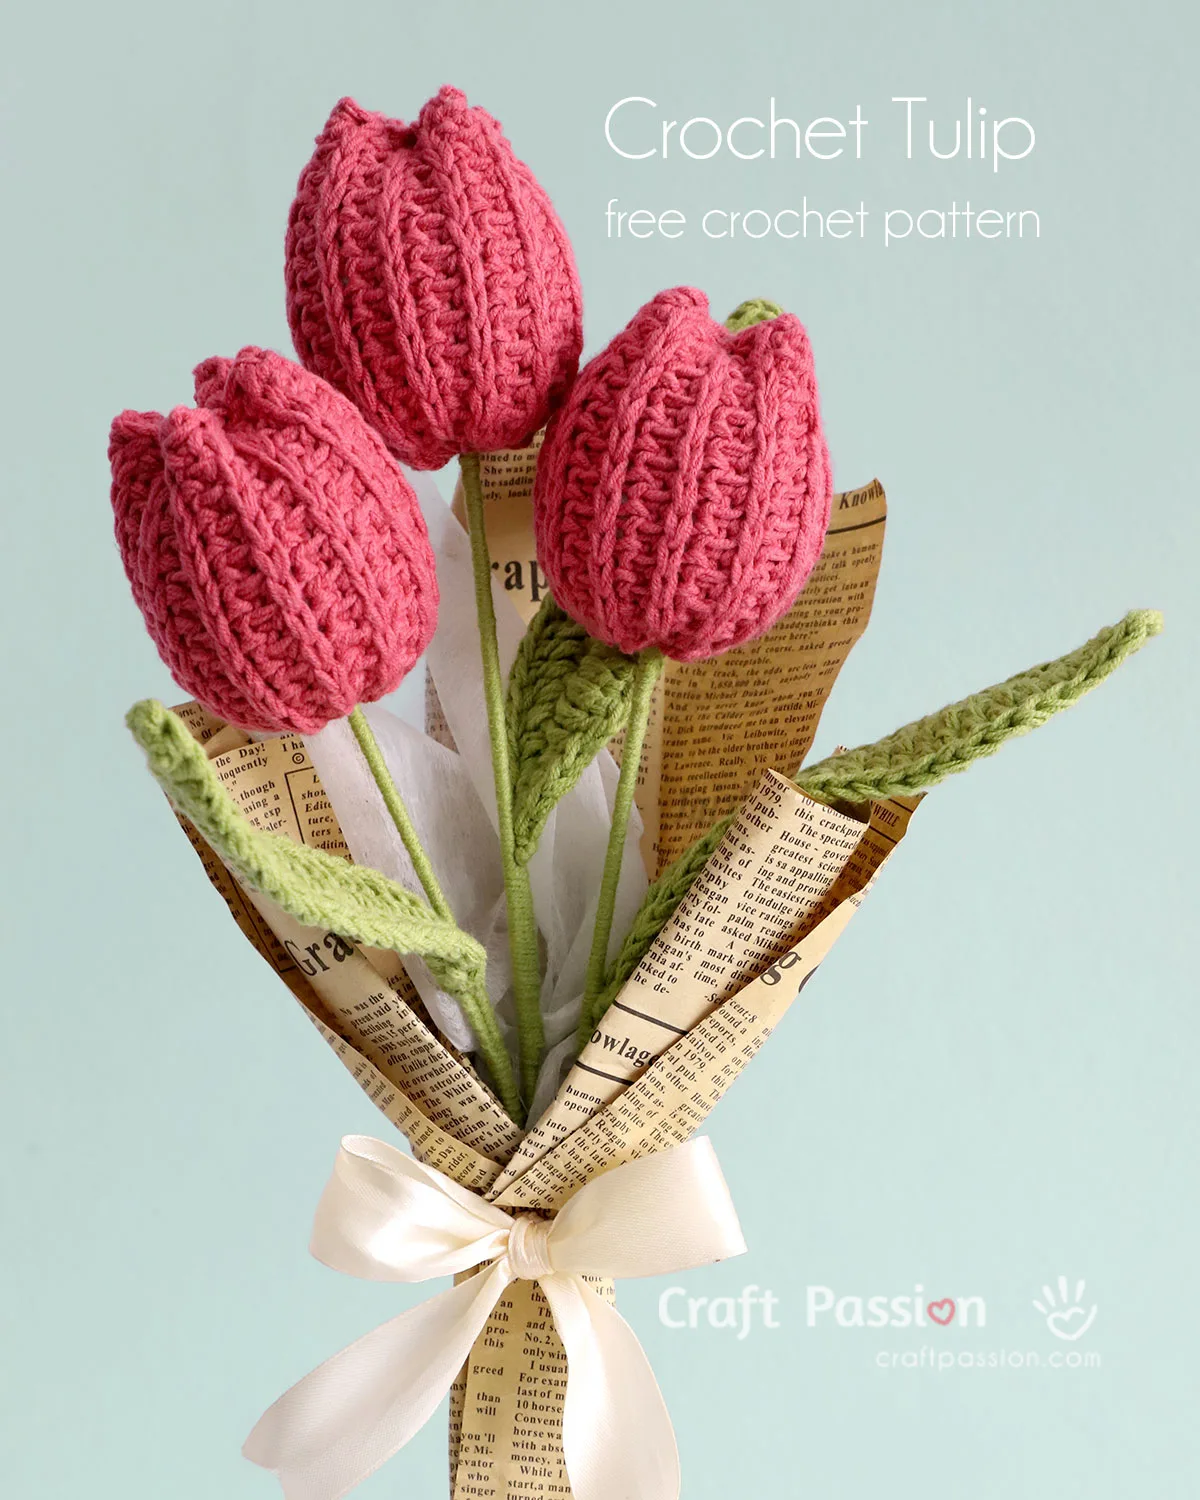
The inspiration for designing and crocheting this lovely tulip flower came from the 40+ crochet flower patterns shared by ‘Made From Yarn’. After seeing these lovely crochet flowers, I just had to make one using a crochet rib stitch design. And, if this ribbed stitch texture appears familiar, it’s because I used it in the recent crochet beanie pattern. It comes in 9 sizes with a single pattern and can be crocheted for your family. It was a big hit on Google Discovery, so add it to your to-crochet list right away!
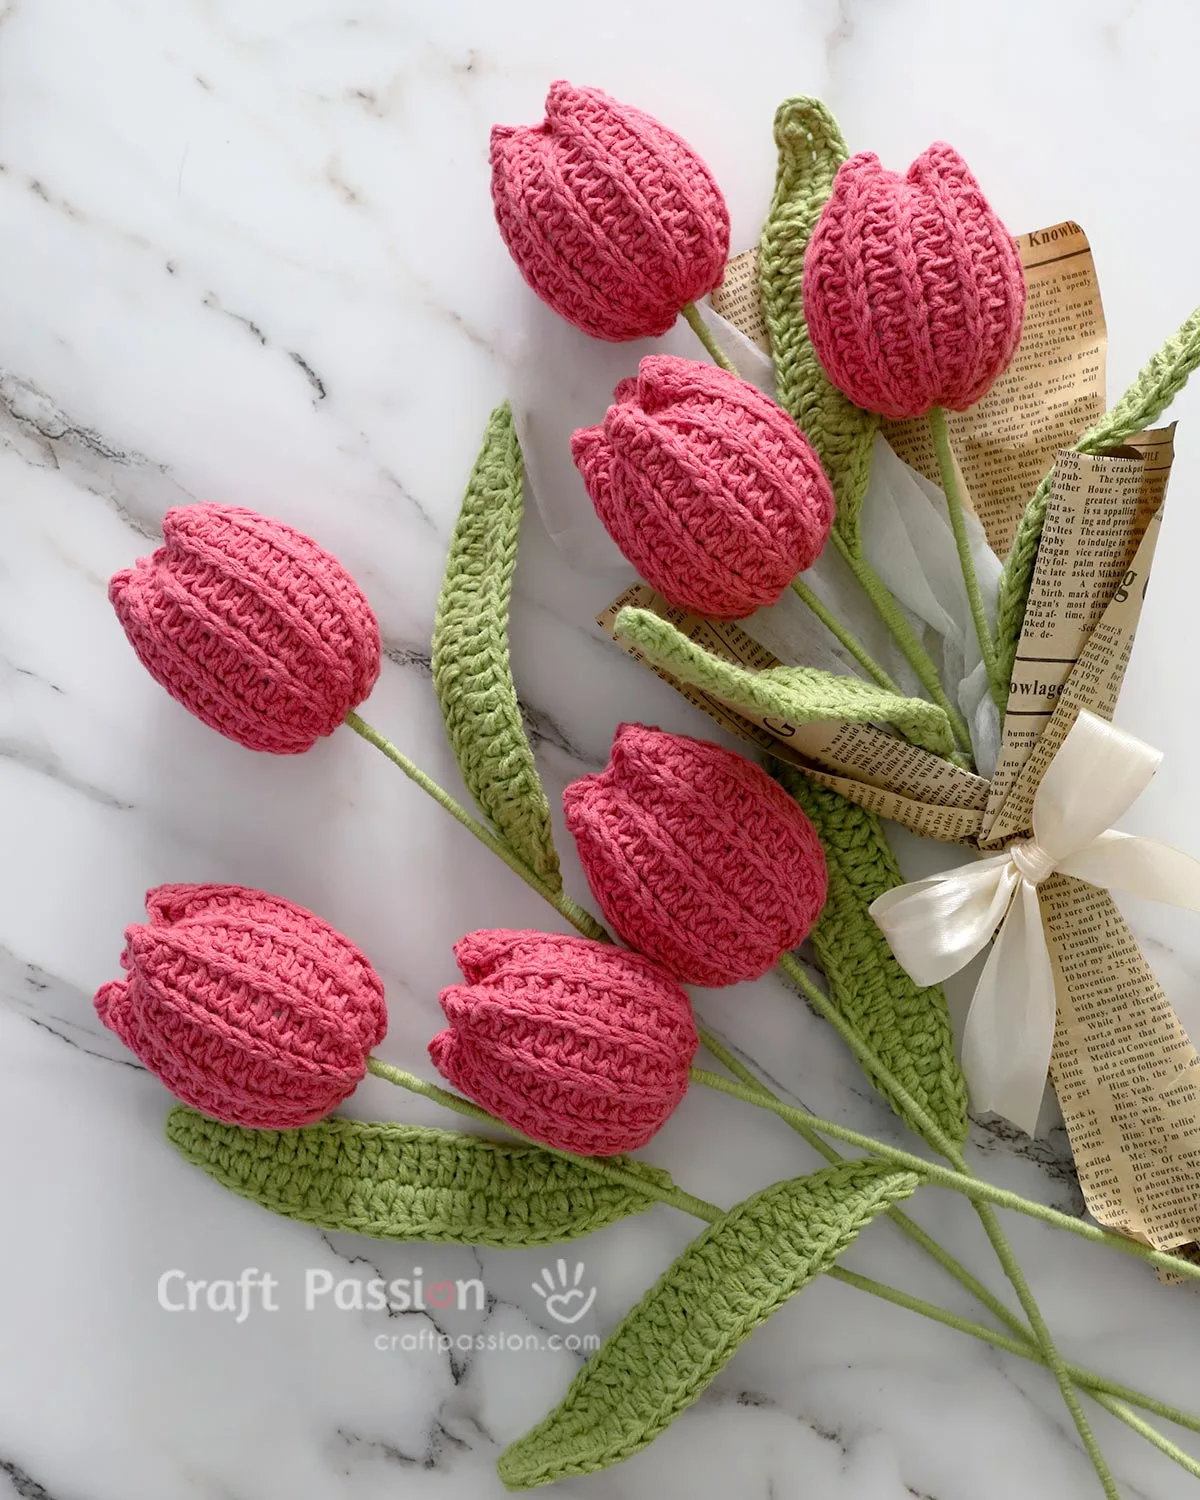
Why crochet tulips?
Tulips have a significant cultural and historical significance in the Netherlands. They are a cultural emblem that represents the splendor of the land. Different colors of tulips can convey various sentiments, but as a whole, tulips are often associated with love and passion. They can also represent elegance, grace, and prosperity.
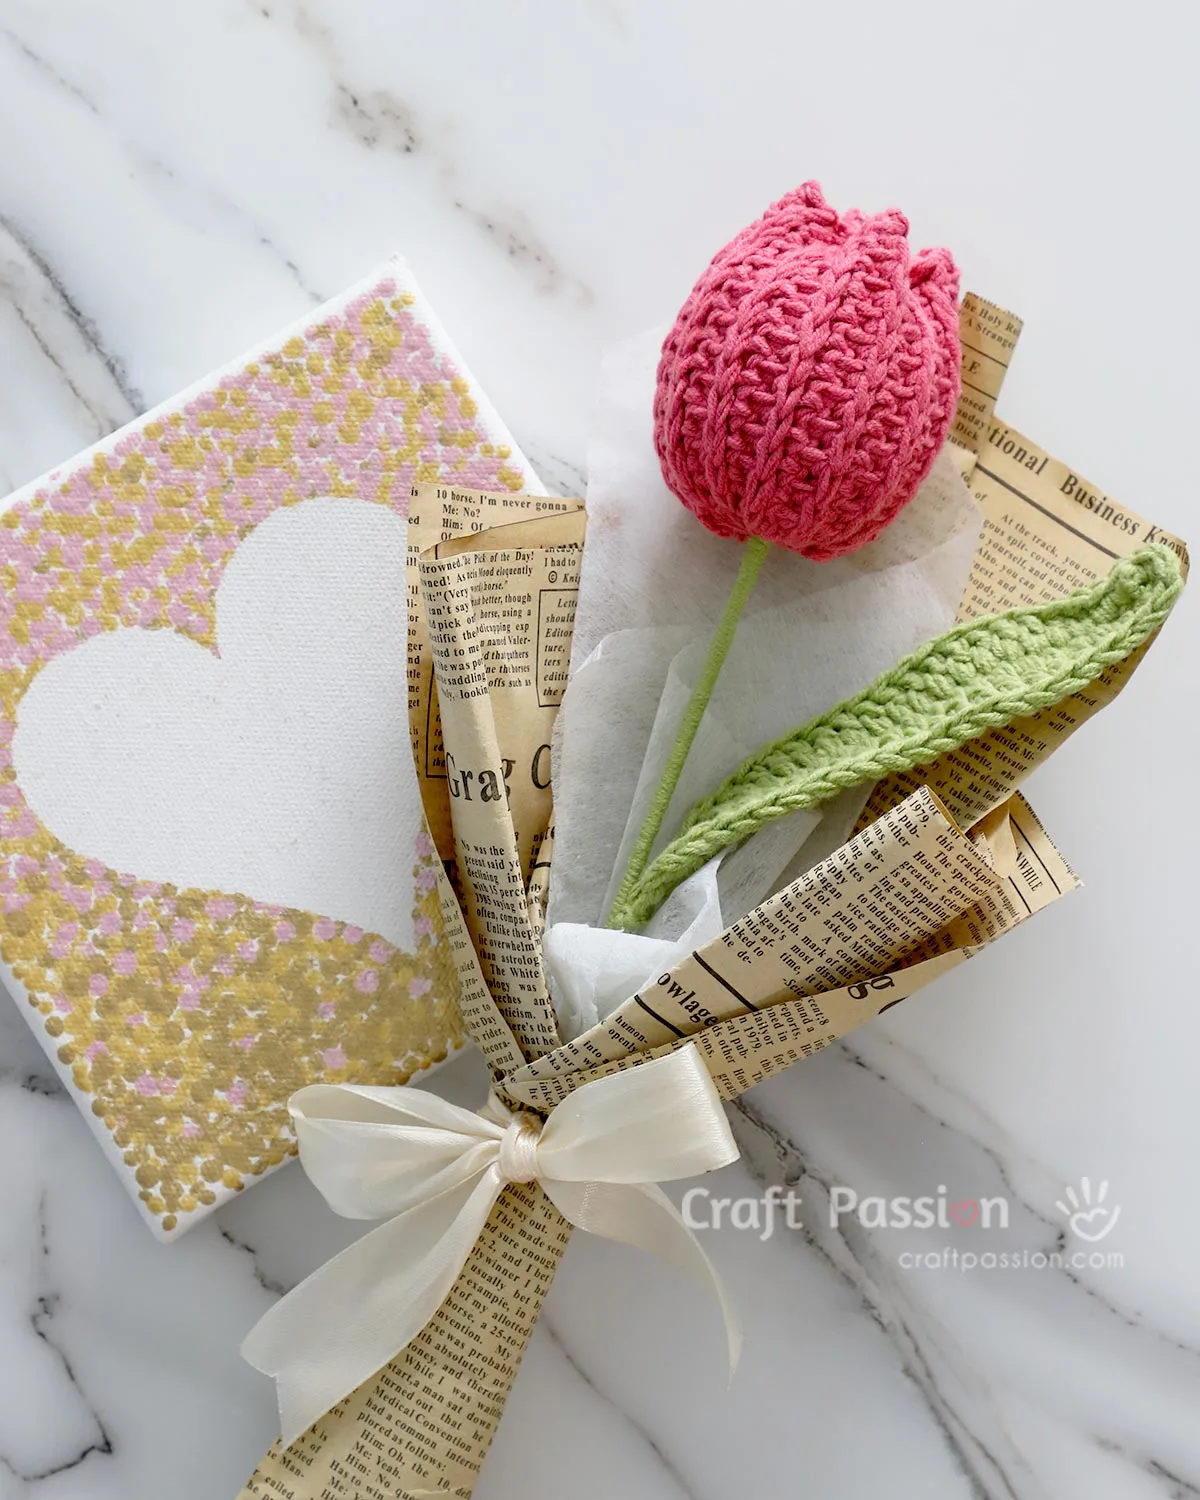
These crocheted tulips will be a lovely token of affection for those you care about. They convey thoughtfulness and can brighten someone’s day with a handmade touch. In addition, crocheted tulips don’t need any special care or watering. They stay beautiful year-round and can be cherished for a long time.
Is this a beginner-friendly crochet pattern?
While the tulip crochet pattern may appear intricate, you will be surprised to learn that it is a simple crochet project that even beginners can complete. As long as you know how to do the following basic crochet stitches, you will be able to complete this project:
- Slip Knot (sl knot)
- Chain Stitch (ch)
- Slip Stitch (sl st)
- Single Crochet (normal sc and sc in 3rd loop)
- Half Double Crochet (hdc)
- Double Crochet (dc)
If you need a refresher on the basics of crochet in general, we have a guide for beginners in crochet.
The next thing you will need to know after completing the crochet piece is how to assemble it into a stalk of tulip. We have this detail covered in the tutorial section below with easy step-by-step photos and instructions.

What crochet supplies do I need to crochet tulips?
The supplies for the tulip crochet pattern are as follows:
- Yarns for flowers and leaves.
- Worsted-weight or double-strand sport-weight (16 wpi), this yarn weight will produce a real-size tulip flower about 3″ tall.
- Crochet hook, 5 mm or H size.
- If you use different yarn weights, you can experiment with different crochet hook sizes to find the one that works best for you. Usually, it follows the recommended hook size by the yarn manufacturer.
- Floral wires, 12 AWG (for stem) and 22 AWG (for leaf), 15″ long.
- Polyfill stuffing material
- Tapestry needle
- Scissors
- Quick-dry Clear adhesive or hot glue
- A pair of pliers or a small styrofoam ball.
- Pliers are used to bend the 12 AWG floral wire to keep the wire end inside the flower buds. Alternatively, you can glue a styrofoam ball to the end of the wire.
How to make the crochet flower more unique?
Add Colors
There are several ways to make your crochet tulips stand out. The simplest and most common way to make your creations unique is to add colors to the tulip flower. Here are some ideas on how to give the tulips more color.
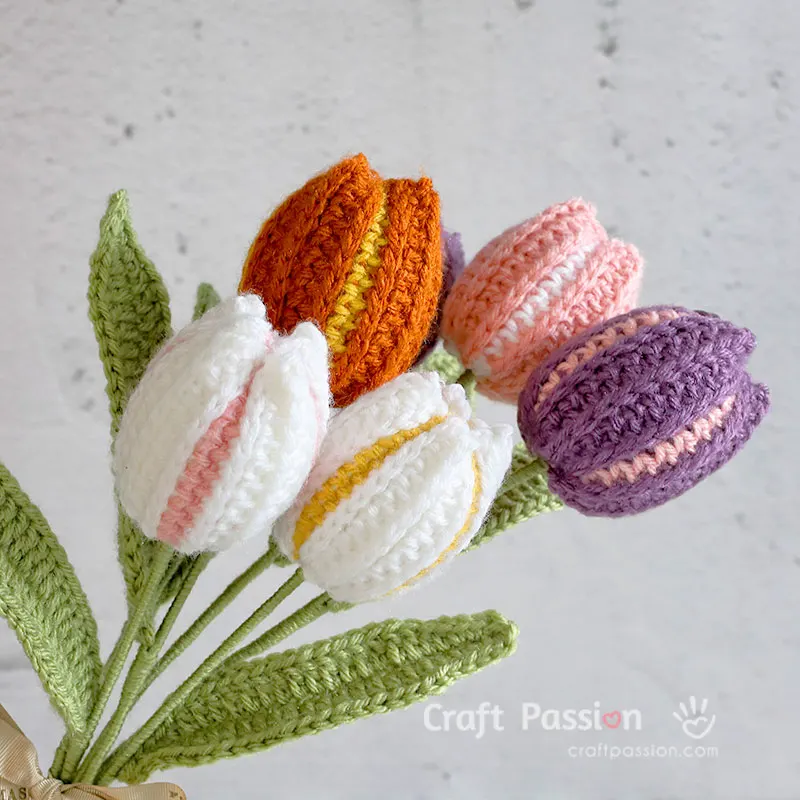
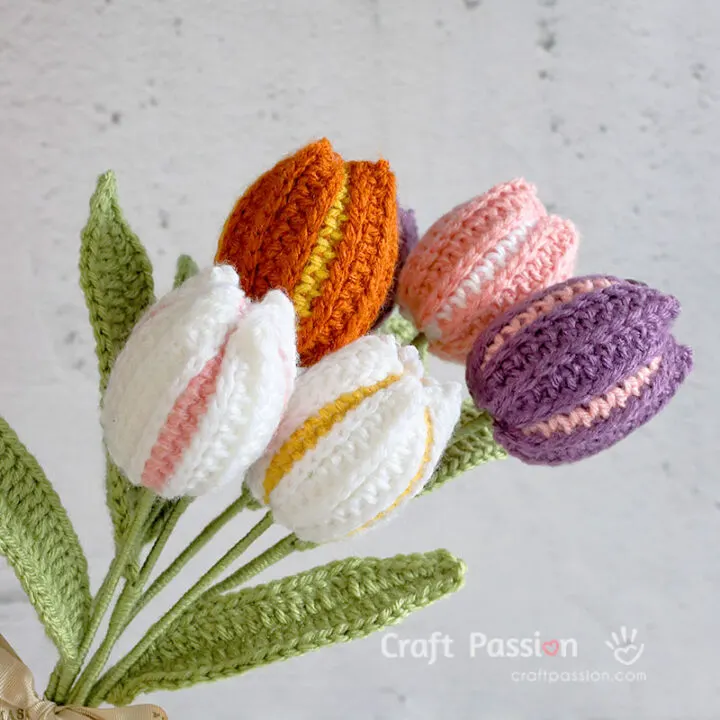
- With this simple crochet pattern, you can add different yarn colors to specific rows to create a unique petal-like design on the tulip flowers as they bloom from the buds (as shown in the image above). This method is covered in the tutorial section.
- You can add shading to the crocheted tulip by using a permanent marker and diffusing the ink with rubbing alcohol (or hand sanitizer spray) to create a watercolor ombre effect from a dark to a lighter shade. This method works best for coloring the ridges, top, or bottom of the tulip. Read on for more information on how to stain paint your crochet, but skip the rinsing steps.
- Dry brushing with paint.
- Dabbing stamp inks or blusher powder onto the desired area with a Qtip also works well.
- If you know how to use an airbrush, you can use this method to spray color where you want it.
Add Textures
Another option to add essence to your crochet tulip is to crochet it with different yarn types, such as variegated, metallic, or textured yarn, which can add depth and uniqueness to your crochet flower.
Add Varieties
You can personalize your crocheted tulips by combining them with other crochet flowers & leaves to make a crochet flower bouquet. This allows for endless creativity and the chance to tailor your project to your taste.
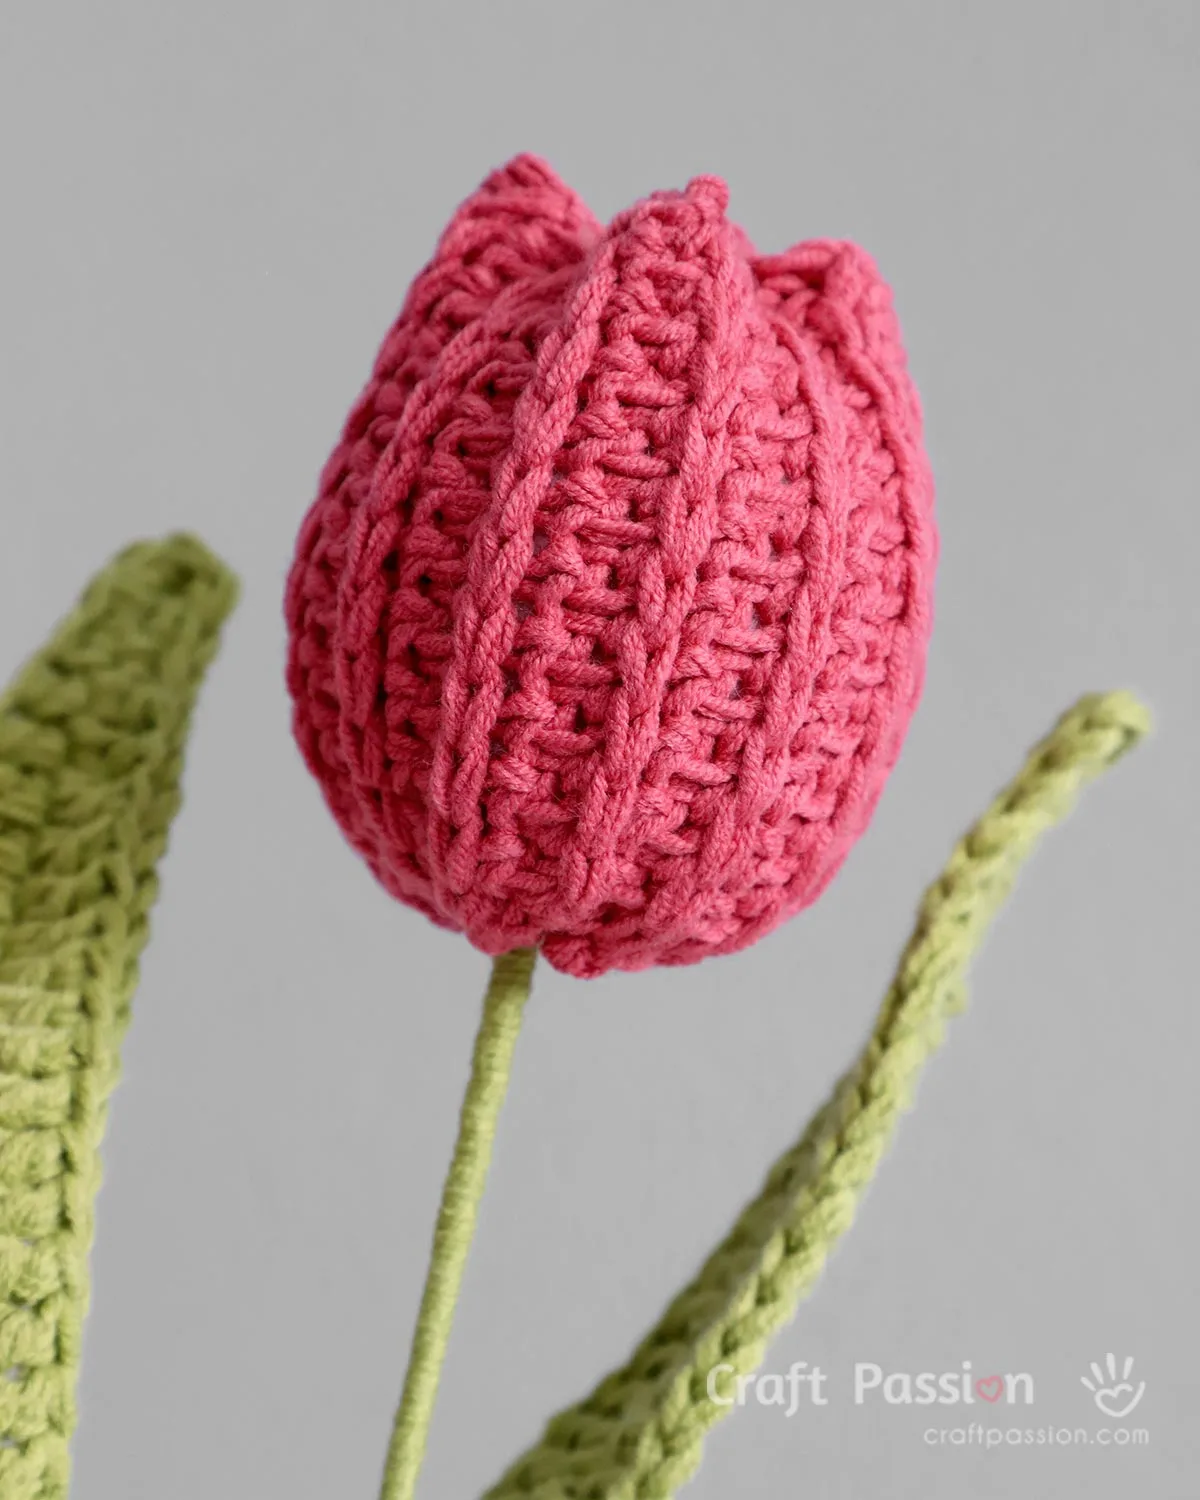
How to crochet a tulip flower
Now you have all the ideas on the crochet tulip, let’s go into the details on how to crochet it. The crochet pattern consists of 3 parts:
- crochet flower bud,
- crochet leaf, and
- how to assemble them together.
Crochet The Tulip Flower Bud
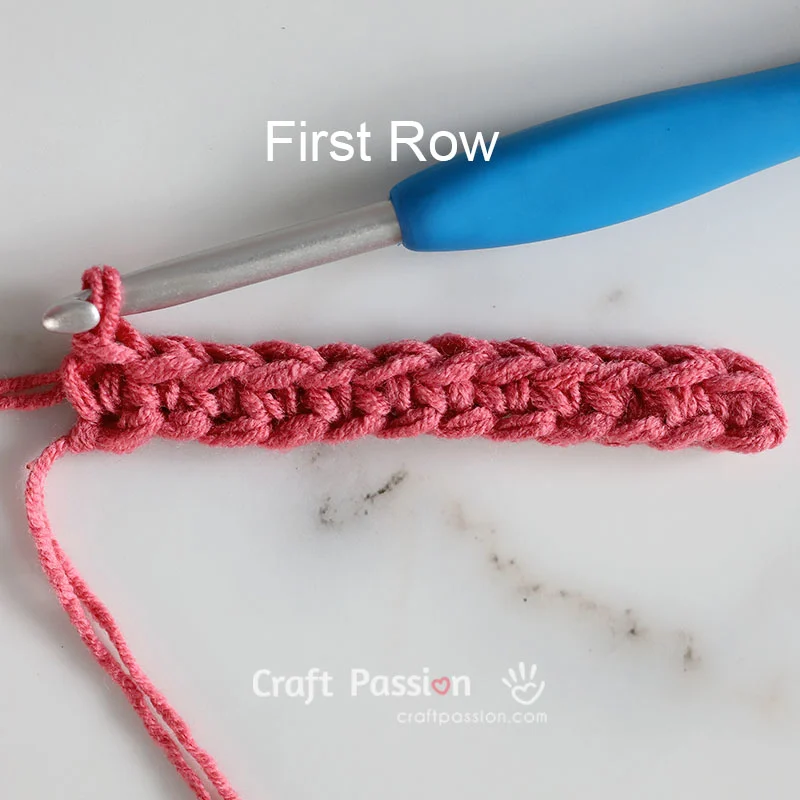
With your usual way of holding the yarn and hook in your hands,
- Make a slip knot with your preferred yarn on a 5 mm crochet hook. We used double-strand sport weight yarn, which is similar in thickness to single-strand worsted weight yarn.
- Chain 12 stitches as the foundation chain base, then make 1 turning chain for the next row. Now you have altogether 13 chain stitches as the foundation.
- Make 12 single crochet stitches on Row 1, starting from the second chain from the hook. Turn.
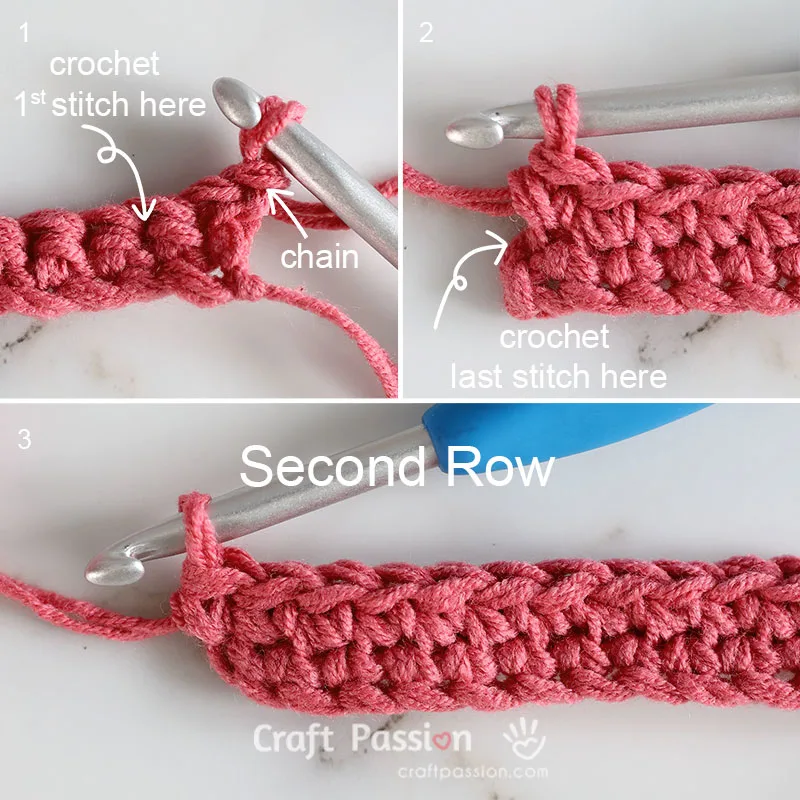

From the second row on, all single crochet stitches will be made on the 3rd loop of the previous row’s sc stitches. In order to keep the edges straight, skip the first stitch of each row and make the last stitch in the turning chain of the previous row. The steps are as follows:
- Make a turning chain by chaining once, skip the first stitch, and begin the first sc in 3rd loop on the second stitch. Continue to sc in 3rd loop of each stitch until you reach the end of the row. Turn.
- The 12th sc stitch should be made on the chain stitch of the previous row, as shown in the picture.

- Repeat the same crochet pattern until you reach row 24, fasten, and leave a long tail of at least 8″ for sewing.
You have now completed the rectangle ribbed stitch crochet piece for the tulip flower. The right side will have the horizontal V ribbed on the even row number. You can check the image above to ensure you’ve identified the correct side.
Sew To Join Crochet Piece

With the wrong side together and a row 24 yarn tail on the tapestry needle, bring the short-length edges together and sew them together with ladder stitches. To obtain a clean and consistent ribbed stitch design, we will stitch row 1 to the 3rd loop of row 24 to create an invisible join. Here’s how to do it:
- Insert the tapestry needle into the first 3rd loop of row 24, then the first stitch of row 1, and pull the yarn to bring the short sides together. It doesn’t have to be tight right now.

- Repeat the sewing with the next pair until the row is finished. After a few stitches, pull the yarn to close the gap.
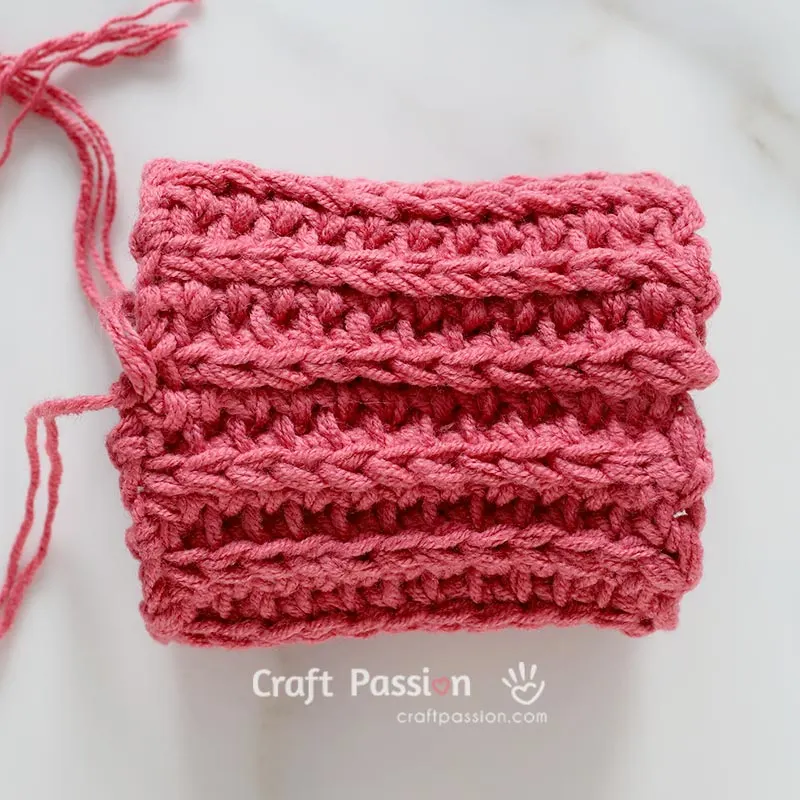
- Once you’ve finished sewing and seaming the short sides with the proper tension, tie a knot to secure the yarn.
Continue with the next step without cutting the yarn.
Cinch The Base
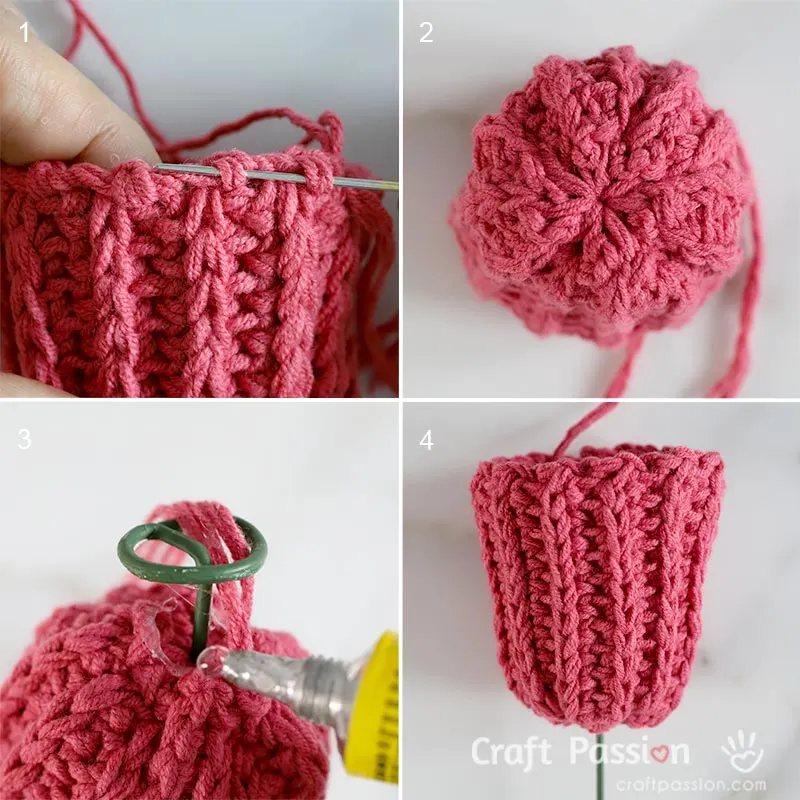
Next, we will cinch the base and close the bottom of the crochet tulip.
- Using the same yarn, insert the tapestry needle into the last stitch of each rib and draw yarn through them. After finishing the round, pull the yarn to cinch the bottom. Go around again so you can pull more tightly to close the hole.
- Make a knot from the inside of the tulip to secure the yarn.
- Bend one of the floral wire ends and insert it from the inside through the tiny hole that you just closed. Apply some glue to the bottom to keep the wire in place.
- After turning the tulip back over to its right side, move on to the next step.

Aside from bending the end of the floral wire with pliers, you can also glue a small Styrofoam ball by inserting the wire into the ball. Other methods are acceptable as long as they keep the wire from coming loose from the tulip.
Stuff The Flower
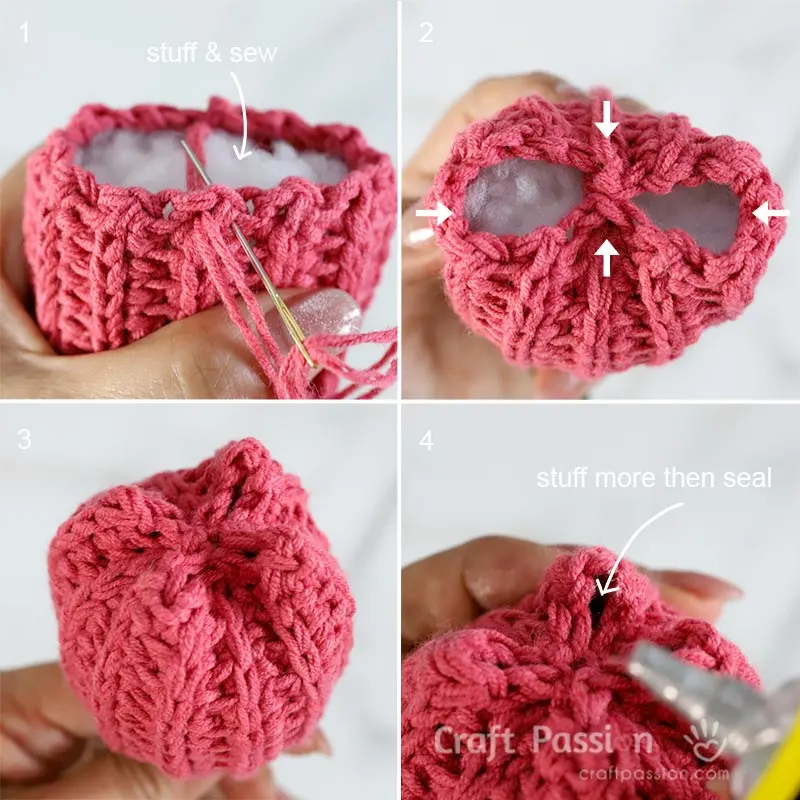
- After inserting the wire, stuff the tulip with polyfill stuffing materials. Make sure the filling reaches the bottom.
- Sew to close the top opening of the tulip. Sew the 1st rib to the 7th rib on the opposite side. This results in a top-to-bottom pinch in the center of the opening.
- Then, sew the 4th rib to the 10th rib. This results in another pinch, but this time from the sides. Hide the yarn tail inside the crochet tulip.
- If needed, stuff more polyfill stuffing from the gaps at the top of the opening. Glue or sew to seal the gaps.
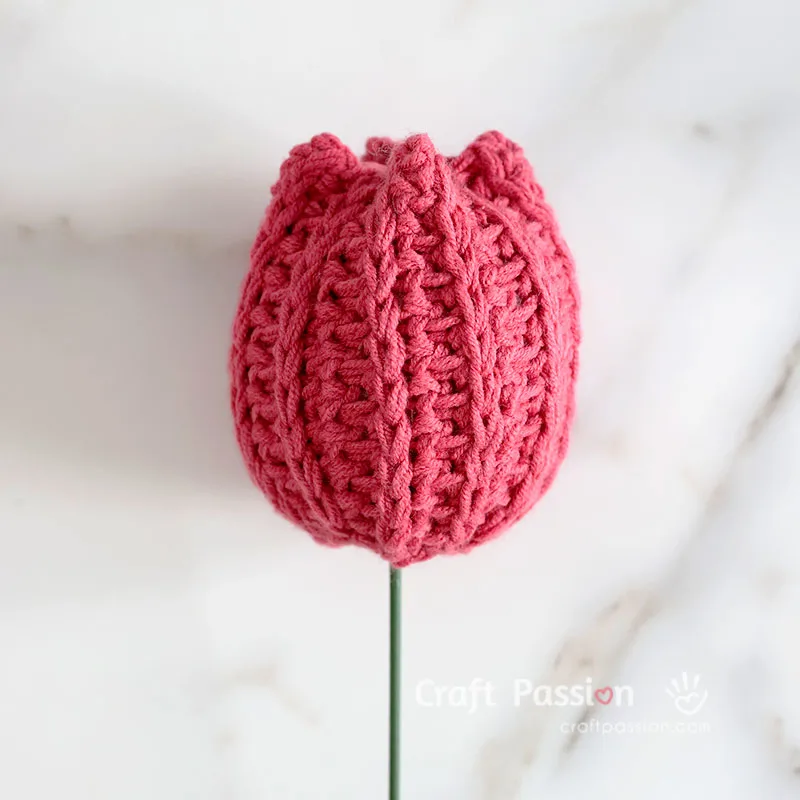
- Massage the tulip flower to give it a final shape to resemble a real tulip.
Crochet Leaf For Tulip
Let us now crochet the tulip leaf.
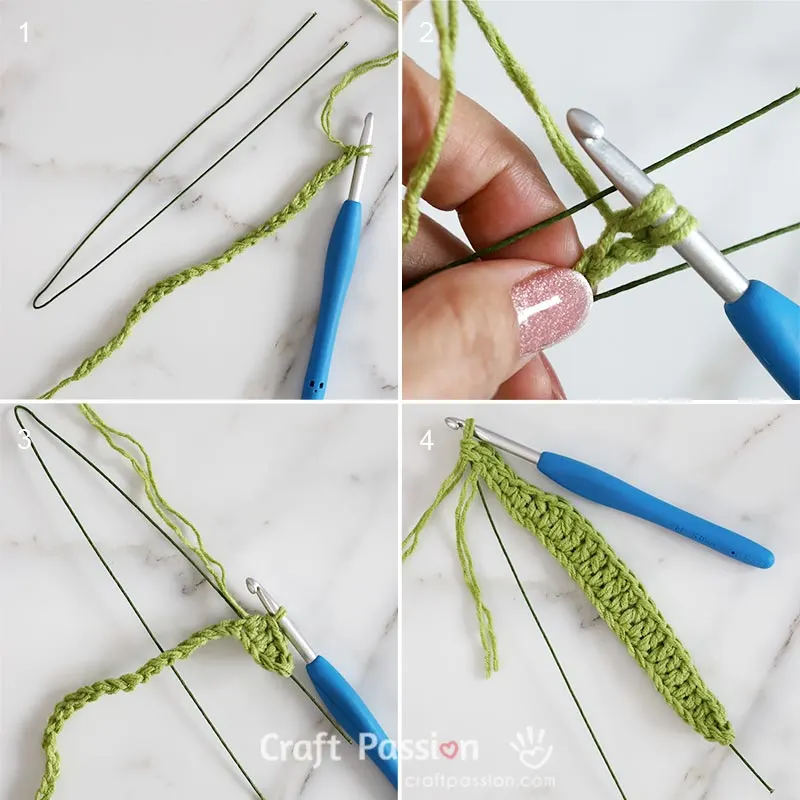
- Fold the 22 AWG wire in half.
Make a slip knot with green yarn, then crochet 24 foundation chain stitches plus 1 turning chain, for a total of 25 chain stitches. - Crochet the following row onto the wire by inserting the wire between the crochet stitches.
- Starting with the second chain from the hook, crochet 2 sc, 2 hdc, 15 dc, 2 hdc, 2 sc stitches into the next 23 chains.
- Before crocheting the other side of the foundation chain, make 3 sc stitches into the last chain stitch.
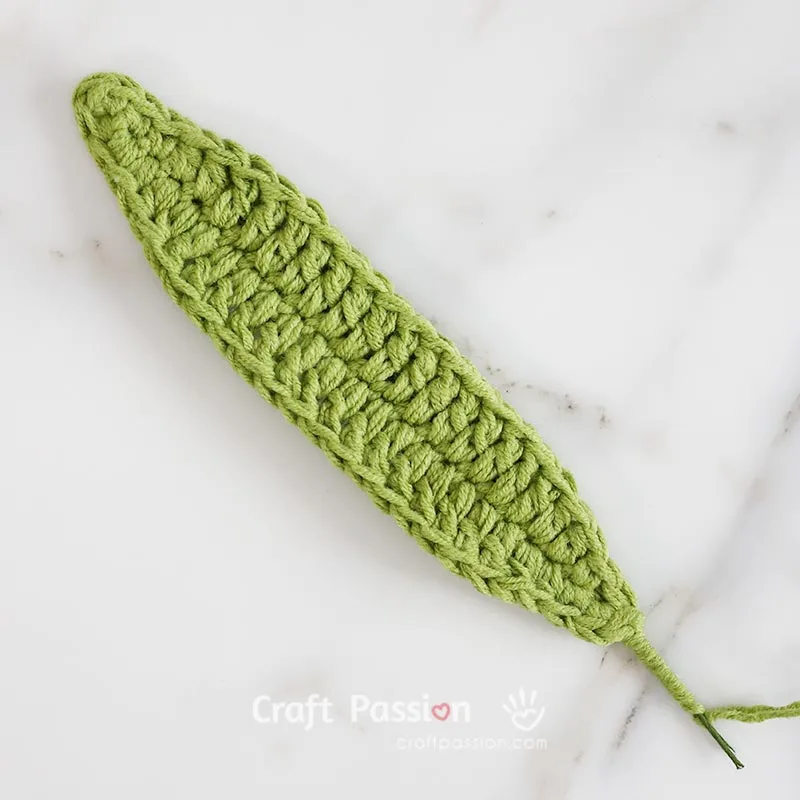
- Repeat the same pattern on the other side of the foundation chain, i.e. 2 sc, 2 hdc, 15 dc, 2 hdc, 2 sc into the next 23 stitches. Slip stitch into the turning chain. Fasten off.
- Apply some glue to the wire and wrap the yarn end around it.
Assemble Crochet Tulip
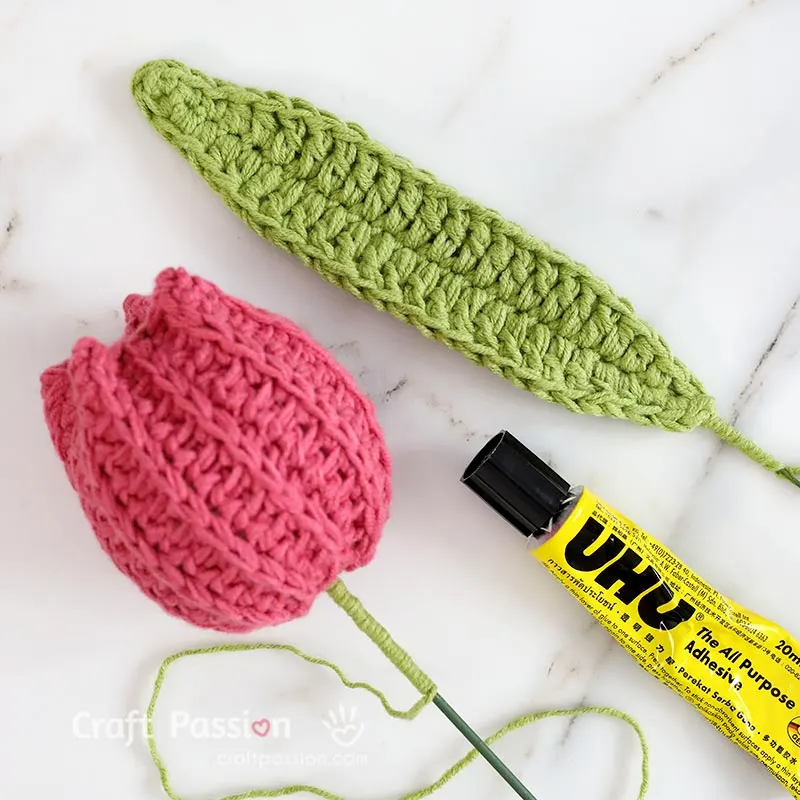
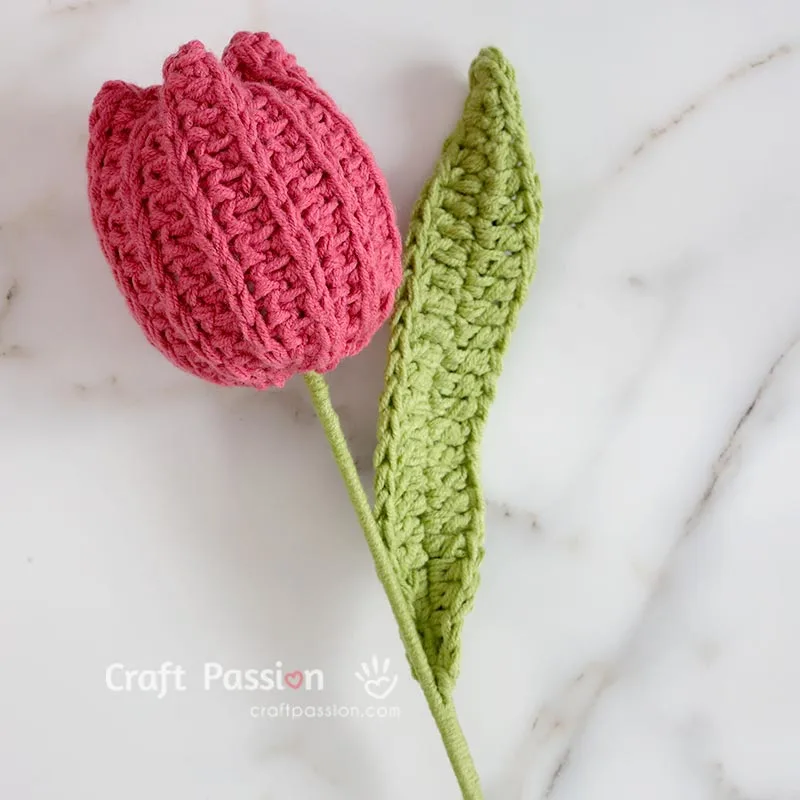
Now you have completed the tulip bud and leaf, let’s put them together to complete the crochet tulip.
- This is the simplest step. Apply glue to the floral wire near the tulip bottom and wrap the green yarn around it. Apply glue occasionally as you wrap. After adding the leaf, keep wrapping it until you reach the end of the floral wire.
How to Crochet 2-tone tulip
Once you have gotten the hang of crocheting the basic tulip, you can now explore the variation to make a 2-tone tulip with the following simple adjustment.

- Crochet your rectangle rib piece in the same pattern as before, but this time, change the yarn to your second color on rows 3, 9, 15, and 21. You may carry your first color yarn into the stitches when crocheting your second color to avoid having too many yarn ends at the edges.
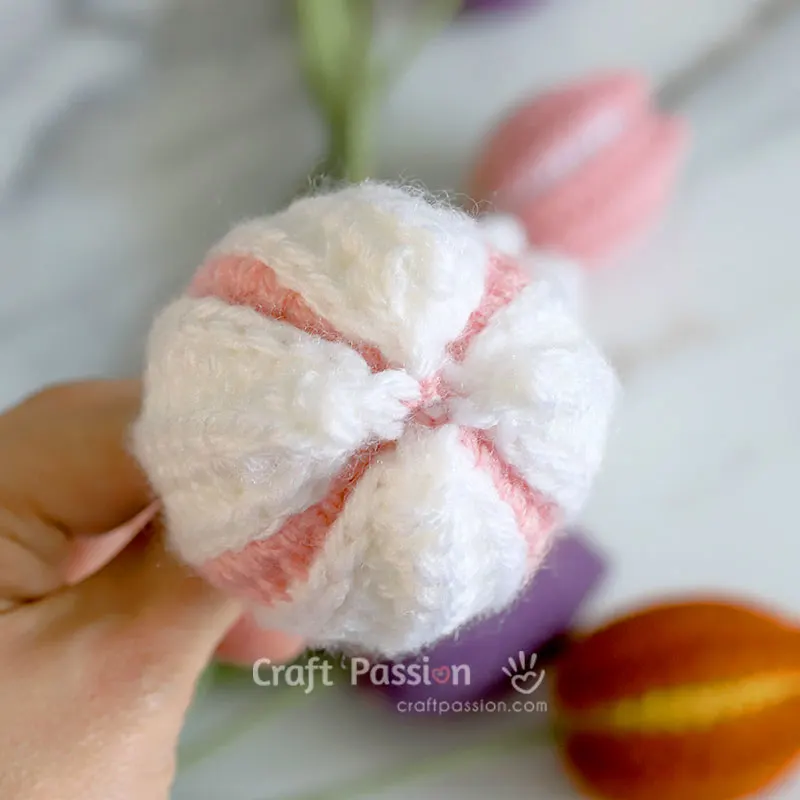
- Assemble the tulip flower in the usual manner. Tie the yarn ends together to pinch the second color together at the top of the tulip.
What’s Next:
- Begin crocheting and share your finished work on Facebook and/or Instagram. Remember to tag us @craftpassion so that we can see them.
- Save it to Pinterest for future crochet projects.
- Share with your crochet groups in preparation for a crochet-along event.
- Browse more free crochet patterns to make, particularly these free crochet patterns for home decor.
How To Crochet A Tulip
Make warm and sentimental gifts for friends and family with this free crochet tulip pattern. It is an easy pattern for crocheters of all skill levels, including beginners.
Choose your favorite yarn colors and get started with this pattern.
Materials
- Yarns, Worsted Weight.
- Floral wires, 12 AWG (for tulip) and 22 AWG (for leaf), 15" long.
- Polyfill stuffing material
Tools
- Crochet hook, 5 mm or H size.
- Tapestry Needle
- Scissors
- Clear Quick Dry Adhesive or Hot Glue
- Pliers
Instructions
Abbreviations:
(In US Crochet Terms)
ch: chain
hdc: half double crochet
dc: double crochet
sc: single crochet
sc in 3rd loop: single crochet in third loop
sl knot: slip knot
sl st: slip stitch
st: stitch
fo: fasten off
RS: right side
Crochet Tension:
Not important
How to Crochet a Tulip
- Gather your crochet supplies and choose your yarn colors.
- Crochet the tulip flower according to the pattern below. The pattern ended up being a rectangle form with ribbed stitches.
- Sew the short sides together with an invisible rib stitch. Make a secure knot but do not cut the yarn.
- Continue gathering the stitches at the bottom of the tulip with the needle. Close the base of the tulip by cinching the bottom.
- Insert a 12 AWG floral wire into the tulip's bottom, bend the end, and glue it in place.
Fill the tulip with stuffing. - To close the crochet tulip top, sew the following 4 points together: Start with 1st and 7th ribs, then sew the 4th and 10th. However, for the 2-tone tulip, you just need to tie the second color yarn end together.
- If needed, add more stuffing before gluing or sewing the gap shut.
- Crochet the leaf pattern onto a 22 AWG floral wire. Glue and wrap the yarn tail of the leaf around the floral wire.
- Glue and wrap the green yarn on the tulip floral wire. Add the leaf and continue to wrap till it reaches the end of the floral wire.
Crochet Tulip Pattern
Foundation chain: sl knot, ch 12, ch turn. {13}
Row 1 (RS): skip the first ch, sc in next 12 sts, ch, Turn. {12}
Row 2 - 24: skip the first sc, sc in 3rd loop only for the next 12 sts. ch. Turn. {12}
Note: The last stitch should end on the ch stitch of the previous row.
fo and leave a long tail for sewing.
To make the Tulip flower in 2 tones, change the yarn color on rows 3, 9, 15, and 21.
Crochet Leaf Pattern
Foundation chain: sl knot, ch 24, ch turn. {25}
Crochet the following on a 22AWG floral wire.
Skip the first ch, sc in next 2 sts, hdc in next 2 sts, dc in next 15 sts, hdc in next 2 sts, sc in next 2 sts, 3sc in the ch st.
Rotate the leaf to crochet around the foundation ch.
sc in next 2 sts, hdc in next 2 sts, dc in next 15 sts, hdc in next 2 sts, sc in next 2 sts, sl st to the ch st at the beginning of the round.
fo.
Notes
The total amount of time required will vary depending on how quickly and how many hours you work on the project.
Get the full article at https://www.craftpassion.com/free-crochet-tulip-pattern/

Sue
Thursday 18th of April 2024
How do you get a third stitch in a single crochet?
Sue
Friday 19th of April 2024
@Craft Passion, Thank you!
Craft Passion
Thursday 18th of April 2024
There is a detailed tutorial with photos in the post on where to find the 3rd loop of a single crochet.
Chantel
Wednesday 21st of February 2024
Do you recommend 100% cotton yarn or acrylic yarn? Thank you.
Joanne Loh
Wednesday 21st of February 2024
I like cotton yarn for this crochet tulip, but acrylic yarn also works beautifully. The only drawback is the frizziness of the acrylic yarn, which I dislike; otherwise, acrylic yarn is much easier to crochet with.
emma
Sunday 11th of February 2024
these are so confusing i have no idea how to make the pattern work and look like that. for me it just gets smaller since im skipping one stitch every time. i think im reading it wrong but also its pretty confusng
Joanne Loh
Sunday 11th of February 2024
You could have read it wrongly, we still maintain the same stitch count for every row so it will maintain the same width and won't get smaller. Let me know if you are still confused after trying out the crochet tulip pattern.
Mary Dawn
Monday 29th of January 2024
I love making flowers and birds I haven’t made a tulip yet so after supper to the craft room. Thank you for the patterns
Nafisa
Sunday 28th of January 2024
They're just beautiful !! Planning to make a bunch for valentine's !! Thanks a lot for the extensive tutorial !! You actually made it simple !!