Another tutorial to help in saving our Mother Earth by turning unwanted items into something useful. This is the T-shirt yarn ball I made out of an old T-shirt which I have been wearing for 10 years day-in day-out, wash-in wash-out. It finally broke down and tore at the collar and sleeves. Waste not, want not, I decided to recycle it.
The T-shirt yarn is perfect to crochet and knit into a basket, bag, rug, scarf, etc… I have finished making the T-Shirt yarn drawstring bag as shown below. Please click here to have a look and you can download the simple pattern I created.

Other than crochet project, you could use the T-Shirt Yarn to make purses, handbags, rag rug, stripy scarf, knit a rug, braid a rope, etc….
Sometimes, people will call T-Shirt Yarn as T-arn or Tarn, which is a short form word of the combination of T-shirt and Yarn.
T-Shirt Yarn
Recycle Tutorial
Tools & Materials:
1. T-shirts (those without side-seam)
2. A pair of sharp scissors
Place the T-shirt flat on the floor or working table.
We only need the bottom-halve portion of the T-shirt. Cut horizontally from sleeve to sleeve as shown above. Cut away the end border of the T-shirt too. This useful” portion must be plain and free from printing, embroidery and any joints or seams. Any motifs will be too hard for the T-shirt to turn into tubular yarn.
Fold the T-shirt from side to side, leaving an inch allowance as shown.

Cut into strips as shown, remember not to cut the 1-inch allowance. Leave it there as we are going to use this to form a continuous strip.
The width of the strip will determine the thickness of your yarn, but the minimum is 15mm, anything less than this, the process will fail. The width shown here is 15mm.

Finish cutting the T-shirt from top to bottom evenly.
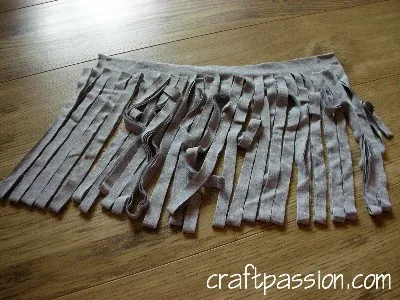
Unfold the 1-inch allowance and it will look as shown below.
The red lines are the cutting lines to be explained below.
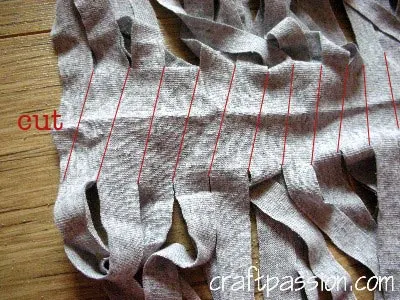
The next process is to make a slant cut from strip 1 to strip 2, strip 2 to strip 3 and so on in order to create a continuous strip for the whole T-shirt. Please refer above picture for the slant cut.

I purposely leave the first strip uncut until I have finished all. No catch, just my preference to show you better how the slanting looks like.

Now, I have a long strip of continuous T-shirt yarn waiting for the next process.

Next is to turn the strip into a tubular yarn. All you need to do is tug the strip as shown below. Remember I told you that the minimum width of the strip is 15mm? The secret is…. if you have anything narrower than this, it will break once you pull.

See, the strip will curl and form a tubular shape after the tug. This process will lengthen the yarn too, which is good, so you have more yarn to work on your project.
….tug…
….tug…
….tug…

The strip has now turned into tubular yarn, from Fettuccine to Spaghetti ***wink***. You can roll your yarn into a ball and it is ready for your next project.
HAPPY YARNING!!!
Excellent, easy-to-follow instructions! I got 25 meters of t-shirt yarn from one t-shirt, and I made the cuts 20 mm wide.
Oh boy, I just cut up a tank top for nothing. When it came to the tugging part rather than curl up, the edges just stretched and frayed. I’m guessing the knit of the fabric was too coarse? Or it works only on fabric that has some elastane in it. Ah well, I’ll try again with something else.
Anyway, the tutorial was really easy to follow, thank you!
Nope don’t use elastine, it falls apart, especially with the overlock stitching and trust me I made sure it was a couple of mm over 15. But it was therapeutic doing it and got some long pieces so not all fail. Thanks for the tutorial. The instructions were really good.
A mans large Tshirt will make about 30-36 yards cutting at 1″ intervals…
Thank you for the great tip I’m making mask now for the Corona Virus, as they now! suggest everybody wear one…. this type will work much better than elastic, making it more adjustable.
Hi Denise. Thanks! I’m doing the same. Do you find the 1″ intervals to make the right thickness for the mask cord as opposed to 15mm?
Hi! Thank you for making this video!
To clarify, when you cut the shirt, the last step of cutting slants means you wind up with one long piece instead of pieces from circumference? Not picking that detail up how to cut stants. Thanks!
For those of us that are not crafty, I don’t understand the slant cutting part. It seems like this will cut the strips off? are you cutting all the way through the slant?
I want to do this for use on face masks. Thank you!
I tried this and the seam of the tshirt makes a big bump in the yarn…I’m thinking after cutting the sleeves of the shirt off I didn’t fold my working t-shirt fabric correctly. Any tip you can offer i welcome!
I used XL t-shirts with a seam…since I’m making ties…I just smooth shirt flat on my cutting mat, cut strips 3/4″ to 1″ wide with rotary cutter…stretch the piece…holding the seam helps to cut the strip into two equal lengths…my strings are plenty long enough and don’t have to measure again…
Gail, that is a brilliant idea! It doesn’t matter if it has seams, since you are just making ties for masks, and not a continuous ball of yarn! This way, you can use any old t-shirt.
She said to find a shirt that does NOT have seams.
If you are just making short ties for masks, it does not matter if the t-shirt has seams or not!
You need to use a tee shirt that doesn’t have side seams for a perfect outcome.
My Mom born in 1912 showed me as a kid to rip under shirts (t-shirts) and stretch them and then braid together. Once that is done then take one braid and start going around & around tightly and hand stitching each individual round to the previous one until you have a rag rug that fits your needs. She called it the “circle of life” rug as during hard times it came in handy during the winter and for young babies not yet crawling. *A thought about seamed tees-couldn’t you miter the seam at a 45 degree, stitch and it would stretch and roll? Similar to how bias tape is made.
Sharon, what a wonderful story/memory, an extension of the “circle of life” your mother referred to. My mother did almost the same with rags. She tore strips of cloth about an inch wide. Then folding them like bias tape, she zig-zaged down the middle attaching the strips as she went. I would begin rolling the rags into a ball of “ragarn” from one end as she began crocheting her oval rug from the other end.
Would you mind if I quoted you in some writing projects I am working on?
Can you use an old jersey sheet to make this kind of yarn? how would you fold it and cut it?
I am a little confused, you say 15 mm for width of strips, but that is almost 6 inches. What am I missing? thank you
it is 15 mm not 15 cm. 15mm is roughly 0.6″.
That is a very helpful tutorial.
If you don’t mind, I am giving this link to the tutorial on my blog. If you wish otherwise please let me know.
Do I leave the sides uncut. It’s hard for me to tell in the picture
Please leave one side uncut when you are cutting the t-shirt in horizontal direction, that uncut side is reserved for the slant cut.
Thank you, thank you, thank you.
The tutorial is so clear…! Thank you for take the time to explain so clearly. A big hug.
Thanks for a great tutorial! ^_________^
Thank you! I have so many old Shirts here, now I have something to do 😀
Thank you so much for sharing your pattern.
It’s a great reycle idea. I always feel sad that I can’t use old T-shirt for any diy prject cuz it’s stretched while the color’s still good.
A rotary cutter and a metal ruler are much easier on your hands than scissors. Lots quicker, also.
It sure is easier, I bought a rotary cutter after I made this tutorial.
Thanks so much for the tutorial that makes sense! I have read about five tutorials about this but none of them made sense. Yours explains it perfectly!
this is very interesting.
This is great idea – wonderful structure, and useful.
Hi… this awesome information, i love it easy to try…..
Hi, I made yarn with my jogging and I made a new slippers! I love it! I would like to use link on your article in my blog where I show the slippers. Can I have your permission to talk about this page for make a yarn and add a link? Thank you!
thanks for this information.
Love it 🙂 Thank you sooo much!!!
Fabulous tutorial! I just cut up one t-shirt and will now do more! The instructions were clear but it probably helps that I have cut many milk bags to crochet into “milk bag mats”. The process of cutting into one long continuous strip is the same. Thanks!
How do you get rid of all the linty balls? When I did this there was a lot of cotton lint which stick to whatever shirt or sweater you wear the scarf with knitted from the tshirt yarn? Did anyone else have this issue?
Yes, I’ve just made some face mask cords and am finding the same problem. If there is a solution I’d be grateful to hear it? Or does the material simply stop producing the balls over time?
I just tried this with and old jersey knit flat sheet in a Full size. I did sew the 2 short sides together to make a tube, like the shirt, and did everything else the same as your instructions. With it being a Full size, my seams are only every 3 yards or so. I dont think I will have any problem working with this! Thanks so much for the instructions!
Thank you, Brenda, for the alternative instead of cutting the T-shirt. I have a few yards of cotton knit and have been planning to do a bigger roll of T-shirt yarn for a new project.
Help. Am using old tee shirts to make ties for mask. How do I tell if the knit of the tee shirt will work? Out of 5 I tried 3 worked. The other Two stretched A little but did not create yarn/ curl
Hi Craft Passion! Wonderful tutorial for making this t-shirt yarn. It reminds me of making seam binding. I a similar method to cut my fabric. I was wondering if you think this idea would work for the making of fabric strips. 1.take a piece of fabric & fold it in 1/2 side seams together. 2. sew the side seams together to make a tube. 3. cut up to the 1 inch allowance and then do the diagonal cuts.
How I did this before was square up my fabric & cut it. Then mark off the width I wanted in strips. Next I numbered the strips on one side and then on the other side, but offset the numbers by one. Now I fold the fabric matching the 1’s, 2’s etc. The bad part is that it becomes a twisty tube. So… it works great otherwise. You end up with a REALLY long strip for seam binding etc. Thanks for listening & reply when you can. Thanks! 🙂 Michelle
It’s such a great idea and I really want to try it. I have so many t-shirts that I no longer wear and would love to use them up in this way. However, every single one is seamed at the sides, so they’re no good for this! Aaagghhh!!!
Ho Theresa, sorry to tell you that those t-shirt with seams at side aren’t work.
Try men’s t-shirts. They have no side seams, but women’s do have side seams.
Thanks for the tutorial! Very simple to follow 🙂
Have you (or anyone here in the comments) washed a finished t-shirt yarn rug in the washer? Did it work out ok?
I think the video would of helped explain the continuous cut but it isn’t there any longer. Any help would be appreciated. :o)
I went to Goodwill and found many t-shirts in beautiful colors for very little money! Now how is that for recycling!! I’m making the purses for my grand daughters for Christmas.
This is amazing. Now I have something to do with that bag of old t-shirts. Have you tried making a blanket or anything else?
Bada$$! This is so awesome. I was worried that there would be some kind of sewing involved (I can’t sew but I can cut, knit, and crochet). I absolutely have to try this with my husband’s old t-shirts.
How do you have a t shirt without any side seams? I’ve never seen one of them before. Also, would it be fine if I did it with a t shirt with side seams, or would it ruin it?
The tutorial was awesome and I can’t wait to try it!
There are T-shirts without side seam in the market but not very common in some country.
The seaming lines cannot be stretched, if you are making T-shirt yarn with T-shirt that has side seam, you will have bumps along the way (just like you are joining yarn with a knot).
Thanks for this wonderful idea! Is there a good way to connect several t-shirts? I utilize crocheting too and can do a color change, but is there a less bulky way to change color or add additional strands of t-shirt? Also do you have a popular crochet pattern that you use?
For chunky yarn like T-shirt yarn, it is close to impossible to join ends that can hide away. I think the best way to reduce the “bump” is by sewing the ends together instead of making a big knot. Hope this help.
Hi Joanne!
Just wanted to reinforce your comment that the least bulky way to join ends for recycled fabric “yarn” is by sewing the ends together. I’ve been crocheting with recycled fabric “yarn” for the last couple of years and it quickly became apparent to me that sewing the ends together is the absolute best way to keep the bulk down.
It’s really not that hard and when my sewing machine died last month, I was able to keep going on a rug project for my son by hand sewing the ends together. It didn’t have to be super spiffy and would take me all of 5 minutes to do the joining by hand.
Btw, thanks awfully for this tutorial because now I have another source of materials to make goodies for my children and their friends.
This is a great tutorial! I was searching for this and stumbled across your wonderful blog. I love it! I was wondering- how would you ménage a T-shirt with side seams? Most of mine are and I still want to recycle them. I tried this technique without the 1 inch part and now have a few 1 yard strings to attach to one another. I saw how you attached two cords in another tutorial, is that what you would do with T shirt strings too? Thank you !!!! I love this recycling and crafty spirit so much:))
Thank you, Milena. The T-shirt yarn is best done with no side seams. That joining method is not very strong provided you crochet or sew the Tarn, otherwise, I wouldn’t recommend to have so many joins in a long length of yarn.
The new picture makes it so much easier to see what you did. Now I understand. Thanks so much for doing this so quickly. You are wonderful.
I am glad that just a little tweak on the picture will make such a big different. No wonder people always said, picture speak a thousand words 🙂
I can’t wait to try this. Thanks for the updated photo.
Can you please include photos of how to cut the slant cut? With lines drawn in red as to how you want me to cut it. It is very difficult to understand what you mean by making a slant cut between Strip 1 & 2. Which one is Strip 1 & which one is Strip 2 etc? Sorry if these seem like dumb questions, but I really want to make this as it is cost effective & saves more junk in the landfill.
Hi Gamma930,
I have edited the picture on the slant cut by adding the red lines as the cutting lines. I hope you can now make the T-shirt yarn. 🙂
Loved the tutorial showing how to make t-shirt strips. It was all going well until I reached the diagonal cut bit. I cut across from strip 1 to strip 2, but it didn’t work for me. I suspect I have folded the fabric incorrectly. Please can you help?!
Please share a picture or 2 for me to see what’s wrong with it. Please send it through contact form. Thanks.
That looks great! Did you make that bag with only 1 t-shirt?!? How long was the strand/weight? thanks!
Hi Hannah,
I made it with 2 T-shirts (grey and green)…. I am not sure about the length though, sorry.
Thanks! I will try as soon as i have some t-shirts…….
In this video im going to show you how to make a new style of your old unused Shirts. http://www.youtube.com/watch?v=ITGu7wNQAwM
Please bring back the video!!
now that a lot of us are making your face masks because of coronavirus and elastic is getting hard to find, your t-shirt video would be most helpful for those of us who are visual learners. Thanks!
What size crochet hook did you use for the 15mm strips.
I used 8mm crochet hook.
Hi, just made my first handbag today. Really came out great, but I did have an issue. Well my bag seemed to never have a straight color line. What I mean is that when moving from one color to the next, there was a clear break in the continuity of the line, when you completed the circle. It never ended where it started, always ended the line above from where it started. Do you have any idea why this was happening? I took it all out and redid it, but still had the same results. I am thinking it must be the first circle, but I really can’t figure out why. I was very careful with my stitching, but still was unclear how to fix the problem. Any thoughts?
Beedee, the only way to avoid that “stepped” look is to work flat, then sew the seam. Any time you knit or crochet in the round with color changes, the beginning of the round will always be a “step up” from the previous round. You camouflage that step when working in a single color, but it’s always there. You could try using that to your advantage, and working color spirals – work one or two stitches past last color change, then changing colors again.
Hi – thanks for a very nice tutorial 🙂 I have one question: I have tried to make the tshirt yarn once from only a childs tshirt as an experiment, and I found that it was the wrong side of the tshirt that became the outer side of the yarn once I tugged at it for it to curl. Is there any way I can get it to curl the right side out? Do you have any experience with this?
I am not sure, Mette, it curls up that way due to the knit structure. If I found a solution for the right side out curl, will sure update the method here.
Mette, there is no way to make this type of yarn curl right-side-out. T-shirt material is knitted in super-small stockinette; a narrow strip of stockinette will always curl this way when stretched.
Can you use yards of cotton instead of a seamless shirt? Does that ruin being able to have one continuous string? If you can use yards, how would you cut it do it would be continuous?
Do you know how many yards of yarn 1 shirt will make?
I am not sure, Susan. I didn’t measure. It also depends how big your t-shirt is and how wide you cut the strips.
simply amazing. would love to get updates of any other stuff you have made. just loved the idea.
You should enter the contest on Instructables.com for either the “Reuse” or “Fiber Arts” contest! Great idea!
I just wanted you to know I featured your t-shirt to yarn tutorial on my recent post about 10 ten ways to re-purpose t-shirts: http://thedomesticatedprincess.blogspot.com/2012/10/from-t-shirt-to-treasure-part-1.html.
I just finished my first ball of T-shirt yarn. Looks pretty good. I found that you hve to tug pretty hard to make it curl but it still looks pretty good. Thanks so much.
Thank you so much, I just made 30 yards of string from my sons old shirts, they were size 6x so was a lot of cutting, but I’ve already started my rug for my kittens litter box. I love recycling old clothes of my kids into something for around the house. This is much sturdier for a rug, I didn’t make one before because it would have cost too much. So thanks a bunch
Ma
Thanks, will try to find some without. Still would like pattern suggestion(s) to knit.
All of my t’s are steamed at sides~solution? Pattern suggestions?
Thanks
T-shirt with side seam can’t be done with this tutorial provided you cut the strip and join it up into a straight length yarn, but that will be a lot of knots and joints.
Thanks! I have used this way of cutting plastic grocery bags to crochet rugs and bags with. Most of my husband’s T-shirts have writing and pictures on the front or back. I’ll have to see what shirts I can find without that crazy rubbery printing on them. Great idea.
hello,i like this idea a lot,and i do cut one t-shirt this morning,but i have one question that how to deal with the connection of two side?I felt this two place let me hard to use……..
Cut diagonally from line 1 to line 2 of the other side, it will go spiral and form a continuous strip.
Great idea! I’ve never thought about it.. A really ingenious way =) Can I quote this post on my blog? Let me know 🙂
Kerook
Thanks for sharing this! I actually made some and I love that it’s more sturdy than most yarn I can find at the store.
Loved the tutorial – it was good to see pictures. I have been collecting T-shirts. Like the idea of making one long piece. I have been cutting individual pieces to make necklaces – so creative!! Love it!!
Call me crazy but I can’t figure out how to cut this material! I have tried every way possible (I think) and still can’t get it. Can you help?
I have described the instruction my best in the tutorial. I think I should come out with a video tutorial soon.
I cut it a different way and purposely made it uneven then knitted it into a scarf…It turned out awesome! T shirt yarn is definitely warmer and more skin friendly than a lot of other stuff. you’ll get lots of compliments too!
I wish I can have a glance on the scarf you have knitted with the different way of T-shirt yarn. I like creative projects. Show me show me!!!
Hola, acabo de conocer tu blog y me he quedado alucinada, está super interesante y las cosas que haces y nos enseñas estan muy bonitas. Enhorabuena, ah lo del ovillo a partir de una camiseta me ha dejado sorprendida.
Besos.
Translation (by Google):
Hello, I just know your blog and I was amazed, it is super interesting and the things you do and teach us are very nice. Congratulations, ah what the ball from a tee shirt has left me surprised.
Kisses.
lovely idea
I have really been enjoying crocheting a kitchen rug with my new tshirt yarn! One thing, I ran out of t-shirts and bought some jersey material from the scraps section at my fabric store and it did not work! I tried cutting the material both ways and could not get it to stretch and curl in like the t-shirt material does. What is the difference? It feels like the same stuff!
ingenious way to cut ONE long strip with NO seams!!!!! LOVE IT!!
This is probably the coolest idea ever! I am truly obsessed with your site!!!!
Thank you! I appreciate your tutorial. Easy to follow and it’s fun to end up with a ball of yarn in your hands. 🙂
You. are. out. of. control. LOVE this site!!!! I found your site linked on another blog when I was searching for “old sheets for handkerchiefs”:-) That got me to your awesome woven rug. I can’t WAIT to find enough sheets at Goodwill to make that one. I have been wanting an easy doable rug pattern made from old scrap for the LONGEST time. I hate the way you buy rugs from the store, and they have that horrible plasticky backing that always comes apart in the washer/dryer…. And now this coolest t-shirt project! THANK YOU for this website:)
Hi again,
This has been such an inspiration for me, thanks again ! I’m still collecting Tshirts, which I buy at my local Oxfam charity shop. Only disappointing and difficult thing is that they ALL have side seams…..bit of a challenge !
Would LOVE to show off my first finished basket bag but do not know how to go about it. Help!?
Kiki x
I am still collecting too, it is the same as the no-seam T-shirt cant be found in my country.
At this point of time until I have the community site set up, please upload it to facebook page if you have an account. Otherwise, will have to wait until I have the community site set up probably end of this year or probably early next year.
Great !
Thanks for the info and good luck with the work on the community site ! Can’t wait for that because it will be yet another inspiration for my creative ‘Bag Lady’ life, just like this wonderful blog has been.
Kiki x
sorry to beo so dumb but what is 15mm in inches??? Can’t wait to get started….
Hi mildred lane, 15mm is about 5/8″.
i was so happy to see the tutorial and then bummed, here they do not sell seamless t-shirts. all have seams on the sides 🙁
It’s true… I got mine from USA and are still looking for more.
Great tutorial. Never thought of cutting the fabric in this way. Very clever. Thanks for sharing 🙂
Birgitte
Thanks Birgitte 🙂
Hi,
I’ve been looking a lot at your blog a lot recently, I really like what you do! Very pretty and very nicely presented. Thanks a lot for your ideas and patterns =)
Best wishes,
Wow. Fantastic idea. I have dozens of old t-shirts. I hate to through thing out. I use them for cleaning windows or things like that. Now I will give them a better use 🙂
Don’t get what u mean by slant cut – how does it become one single strand
I LOVE this!
will it work with a stretchy tshirt? I checked the tshirt label it says 95% cotton 5% spandex. will this work? I thought I’d ask before cutting up the tshirt.
Thank you
Should be OK 🙂 I cut a poly knitted jersey interlock and it woks too.
I think I’ve found another favorite website! What a fabulous idea to recycle old t-shirts. I always feel bad throwing them away when there is still so much good fabric. Thank you, thank you for a practical solution.
OMG! That is fantastic! Thank you for the tutorial!
Yarn from a t shirt-well I never… I love this idea! We have a clothing pantry and many of the t shirt we get have small holes or stains in them. THey are not much good for anything but rags but am wondering if they might work to do something like this. What do you think?
Looking forward to seeing projects using this t shirt yarn!
I love this, I have always wanted to make a rag rug, Thanks so much this for this blog, wanting to see more. Thanks again kay
I know you posted this over a year ago, but it’s so cool!!!
My cousin, WEndy, gave me this link (wendyandadam.blogspot.com) since I saw a belt she made from recycled tshirts. I have a HUGE stack right now (probably at least 50 shirts). I am going to be a cutting crazy woman today, LOL!!!
Thanks for sharing this!!!!
Just found this absolutely brilliant and so well presented tutorial…. THANK YOU!
I already know a friend who will also be really pleased about the idea.
Saving Tshirts from landfill is such a good idea. My only problem so far is that most T’s seem to have sideseams….. must put my thinking cap on for that one….
Another brilliant thing, isn’t the tutorial by the rare male crafters? x
I love your tutorial. I linked to it in a recent post on my blog, you can look at it here http://www.makinmesses.com/2011/03/rag-rug/. Thanks again for the tutorial.
hey there, love this blog! i would love to try this but i get lost at the 1 inch allowance part and the cut across section. is there a video?? thx
Sorry, I don’t have any video yet for this tutorial.
After you have finished cutting all the parallel way with the 1″ allowance, just cut across slantly from strip 1 to strip 2 in order to make it the strip continuous.
This is fantastic! 🙂 I just made some yarn from an old t-shirt…and now it’s a skinny scarf! 🙂
Hi, thanks for your tutorial. I used it to make my first ball of tarn and I made a trivet with it which I will give to my sister for her birthday.
It took me about 3 of my salvation 29 cent army shirts to figure out to do this. Now I’m sooooooooooooooo excited and have YOU to thank!! Now I don’t want to go to work tomorrow. I want to stay home and make Tshirt yarn LOL. Thank you so much for sharing your gift with people like me.
Hi! As a Navy wife, my hubby has a lot of old undershirts that are worn and dingy from being on an aircraft carrier (the laundry system is not the best..) so this will be a great project to recycle all those shirts instead of throwing them out, and I have also passed it along to all my Navy wife friends so that they can try it out, or give me shirts. 😉
I’ll be checking back often for more awesome projects!!
Love this idea! Thanks for sharing. I was given a HUGE trashbag of old T’s today and can’t wait to make them into yarn. I have a question tho… what happens if you use T’s with side seams? Is it still possible, but just looks messy where the seams are? Or isn’t it possible? I guess I could try one and see, but thought I’d ask if you have firsthand knowledge of the results. Thanks!
Please, keep up the awesome work and continue to post topics like this. I am old fan of your page!
I tried this before from a different site and it was not so easy and the results were not good. This way was GREAT. I got 42 yards out of one shirt. took less than 15 minutes. I used the rotor cutter and did not go all the way to one edge. I have about 30 shirts from my boys that I am going to make a quilt out of just the logos. Now I have a good use for all the left over bottoms. And I love cotton yarn, Thank you.
Glad to know that!!!! Thanks, Kris 🙂
this is great – I’m linking to your tutorial if that’s okay. If it’s not okay let me know and I will remove it – but come on over to my site and see what i made with it!
thanks!
I have to say, as soon as I saw this I went and found a t-shirt to cut up. It is hard to find shirts that don’t have side seams, if not then they have silly logos, etc on them that mess with the roping. I now need to learn how to crochet! I have one rope ball and am in the process of trying more, I did mess up with the slant cuts but want to practice it somemore. Now, what can we do with the tops of all the shirts we cut up? : )
Good try!!! Practice makes perfect 🙂
I saved the top part of the T for my sewing project. They are perfect for embellishment, and they can be put together and make a quilt blanket 😉
I make them into cloths for my husband, he likes to polish up his car. I use them for dustrags etc.
Glad to know that, Angela 🙂
I just did some house keeping in my craft room and found some more no-sideseam T-shirts. Going to wash them, make them into T-shirt yarn, and this time I am going to crochet them into floor rug 🙂
awesome… I’ve been wanting to use my old t-shirts but didn’t know how to go about it… thanks for sharing this technique in such a simple way.
This is so awesome! My boyfriend is sweet enough to let me use one of his old shirts to try this out on. 🙂 I hit a few snags, but, I think I will do it better next time. Thanks for sharing this with us 🙂
this tutorial is really fantastic, I love to crochet and definitely need to reuse old t-shirts that no-one would wear, thank you for the idea
You are welcome, Izabela!!!!
Awesome! Made two balls of t-shirt yarn! The first is much smaller, because I made plenty of mistakes trying to figure out the slant cut lol. 🙂 And besides that completely wasted one shirt because I forgot that you can’t use tee’s with side seams! Ah well, I’ll find some other craft for it!
Hope to hear from you soon and see what you did with the T-shirt yarn 🙂
Wow, amazing!
I’ll try, of course.
Thank you!
very beautiful, recycling of old T-shirt.
I just cut up my first shirt. The new ‘yarn’ looks great. I’m looking for my crochet needle now…
This is the best thing I’ve run across today. I have so many shirts that have been worn to death but I don’t just want to throw out. Now to just wonder what to make!!
This idea is so fabulous, that I just made my first t-shirt ball.
This is great! I love to knit, crochet, weave and braid….and I have a ton of old t’s….thank you!
Hi…. is there a video of this? call me an idiot haha i do but I kinda got lost when i got to the part where it was time to open thr inch fold and cut the strips…. I got tangled and messed up please help 🙂
What a brilliant idea! I’m doing an article on usual yarns for a textile magazine and I’m going to include a link to this page so our readers can see how cool it is!
Wowwww! You are so crafty and earth friendly. I never thought of doing this. I need to find an old T-shirt and try this. Thanks so much for sharing your talent!
Great idea! Thanks for sharing the step-by-step photos, which help a lot.
HI, I’m very interested in crafting with recycled materials and just loved this idea of turning old T-shirts into yarn! I just had one problem: Brazilian T-shirts have seams on the side so they tore apart when I cut the strips! I tied knots from strip to strip because I was too lazy to use the glue (as you suggested in your tutorial for the drawstring bag…) I might then crochet a bag out of it, this way I can hide the knots under the lining! Next time I’m thinking about cutting the two parts (front and back) separately, this way I’ll have to tie only one knot.
Anyways, thanks for posting this tutorial and as soon as I crochet something out of my recycled yarn I’ll let you know!
Hello! Thanks for the post. It is really amazing! I will definitely share it with my friends.
I love this idea! Will be going through my closet to see if I have any seamless T-shirts.
I placed a link to this page on my free Arts and Crafts Directory and with your permission I would love to include a picture. For now, I’ve included a placeholder image.
Please let me know if I have your permission and I will add a picture.
Regards,
Michele
Thanks for asking. Go ahead and put a photo in your blog as long as you are linking it to this post.
Hi Garykp,
First of all I would like to thank you for leaving a comment here. I am taking feedback and comment very seriously as it is very important to keep on improving the quality of Craftpassion.com.
Referring to your question, can you please tell me what exactly you want to know more? I need to know so that I can create more post related to it, eg. recycle projects.
Thank you and please do come back for my crafts updates.
Please try it out and if you have any question please feel free to ask me.
Latinboop – I am using hook size 8/0.
There will be a free pattern coming up next, so stay tune.
This is so cool! I can’t wait to go cut up a T-shirt! I’m passing this along to my buds. Thanks a ton. ckb
Clever Idea and good instructions. Will have to try it. /;)
What size hook do you use?
It never come across my mind that an old T-shirt can be recycled into another interesting items. You really have a “green” mind!
This is great- I’m going to try it next time I have an old tee to get rid of. Thanks!
Now that is totally cool…
Stay Cozy, Carrie