Searching for an easy crochet top pattern to make? Look no further! Let’s pick up your hook and yarn to create your very own stylish top! We designed this crochet top in 7 sizes (XS, S, M, L, XL, 2XL, 3XL) based on bust measurements. This project is perfect for beginners. With the detailed instructions and helpful tips provided, you’ll be able to whip up this crochet top in no time at all.

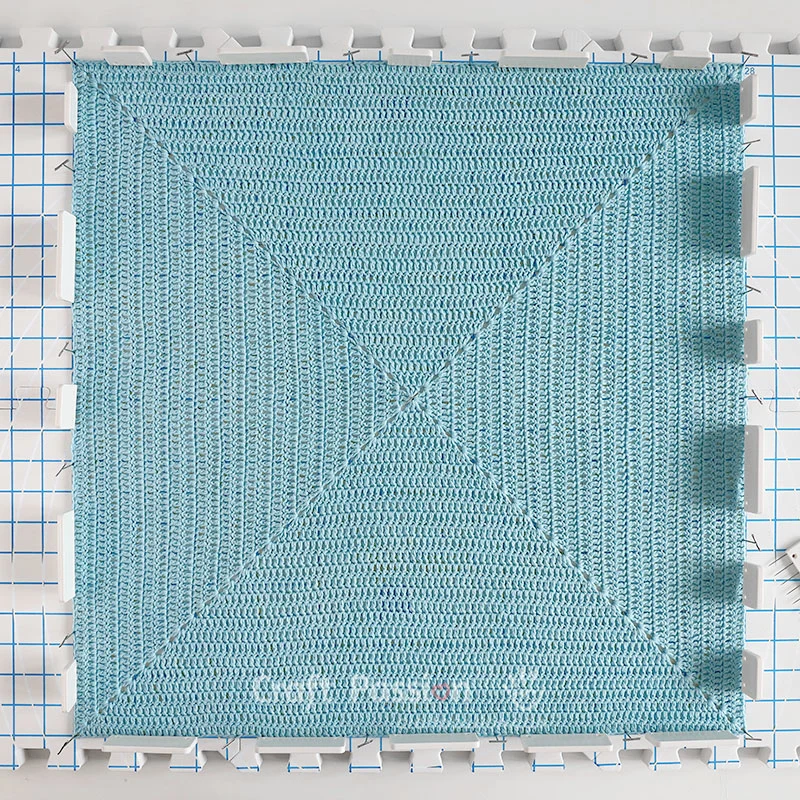
This idea for an easy crochet top came to me while I was working on a solid granny square crochet pattern and tutorial. For the tutorial, I made a large crochet square to demonstrate how to solve the “skew” problem that occurs when crocheting rounds after rounds of a solid square. That’s how I ended up with a large crochet square on my tabletop.
Since I’ve already made a big crochet square, I just need to make another one and sew them together to make an XS-size crochet top for my daughter. Nothing goes to waste when you embrace resourcefulness and creativity.
Make this beautiful crochet bucket hat and crochet bucket bag to be the perfect outfit of the day for a completely weekend laid-back look.


Skill Level
This easy crochet top pattern is simple to make, and with step-by-step photos and written instructions, even a beginner should be able to complete it. The pattern calls for a few simple stitches, like:
- crochet magic ring or magic circle
- chain stitch
- slip stitch
- half double crochet stitch
- double crochet stitch
We have a beginner crochet guide where you can learn more about this craft if you need a refresher or want to read more on the basics.

Crochet Supplies
Aside from the basic knowledge required to make this crochet top, the craft materials and tools required are also quite basic. The primary supplies required for any crochet project are yarn and a hook.
- Yarn – Cotton blend yarn, fine or fingering yarn weight, 18 wpi (wraps per inch). Check the pattern to see how much yarn you’ll need for your size.
Different brands of yarn have different yardage, buy extra so you don’t have to rush to the yarn store when you realize you’re out of yarn. Another reason to buy extra yarn is to avoid receiving yarn from a different dye lot that may have a slight color difference.
I purchased my yarn from a local shop several years ago and have since lost the label; however, it appears to be similar to Comfy Fingering. - Crochet Hook – 3.5 mm
You will also require the following items:
- Tapestry Needle – Used to sew crochet pieces together and hide yarn ends.
- Scissors – cutting the yarn.
- Stitch Markers – These are used to mark the stitches that will be used to join the crochet pieces.
- Blocking tools – Blocking tools are optional but useful to have. Otherwise, lay your damped crochet piece on a dry towel to air dry before piecing it together.
- Measuring tape – Used to determine the wearer’s bust size and to check the crochet tension of the test gauge.
Crochet Top Fit & Style
This square crochet top is designed to be a loose fit. If you prefer an oversized fit, select a pattern that is one or two sizes larger.
Different ways to style this top:
- You can make it a sexier crochet top by sewing the shoulder a little further down to create a larger neck hole. This will result in an off-shoulder top that will highlight your collarbone and sexy shoulder.
- As you can see from the image, we designed a slit sleeve style for this crochet top. You can make a full sleeve by seaming the shoulders all the way to the sleeve edge if you prefer.
Construction Of Crochet Top
As previously stated, this crochet top is made up of two large solid granny square pieces. Thus, all you need to do is crochet two squares large enough for your size. Block them to the proper size before sewing up the shoulders and side seams to create a crochet top. It really is that simple. Let’s go over it in detail:

- Crochet the squares
Hold your yarn and crochet hook in your preferred manner, and crochet the solid granny square following the crochet pattern provided in the pattern section.
As already mentioned, we must turn the crochet piece after each round to obtain a straight and symmetrical square for a larger granny square. Working on the alternate right and wrong sides evens out the way the crochet stitches sit on the previous round.

This is how the square appears halfway through. After each round, double-check your stitch count to ensure it is correct. Continue crocheting until you reach the desired size.

Continue crocheting the second piece with a new yarn once you’ve finished the first. Given that the second piece is just a repeating pattern, you’ll discover that you can crochet it more quickly.

- Block the crochet piece
After you’ve finished the two crochet pieces, hide all of the yarn ends and block them. To begin, soak them in room-temperature water for 15 to 30 minutes, or until they are completely saturated. Squeeze the excess water from the crochet pieces (do not wring and twist). Place them on a dry towel and roll them up. Press the towel to absorb more water from the crochet pieces.
- If you have a blocking mat and pins, place the pieces on the mat, stretch them out evenly on four corners to form a square, and pin to hold the position.
Or
- If you don’t have a blocking mat, simply stretch the corners to form a square and lay them on a dry towel.
Allow them to dry for a few days before sewing them together to make a crochet top.

- Join the pieces to complete the top
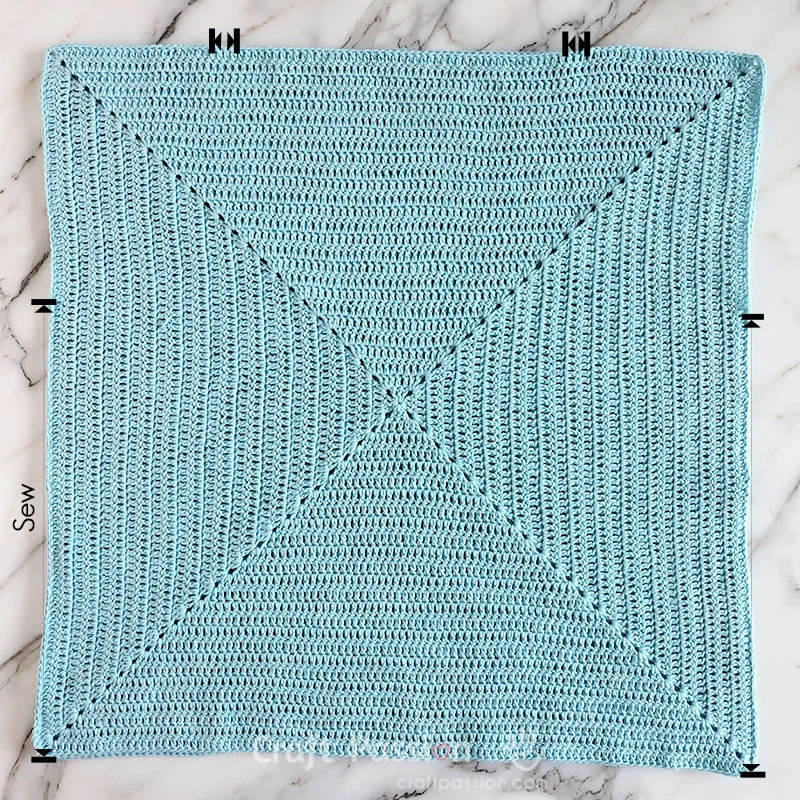
Once they’ve dried, decide which sides will be the right sides of your crochet top if necessary. Stack them right sides together and mark the stitch positions for the shoulders and side seams.

To complete the crochet top, sew the pieces together using your preferred method.
I slip stitch on the back loops (the two center loops between the crochet pieces) to join them. You can use mattress stitches or one of these granny square joining techniques.

What’s Next:
- Start crocheting and share your completed handmade on Facebook and/or Instagram. Remember to tag us, @craftpassion, so that we are able to see them.
- Pin it to Pinterest for a future To-Crochet List
- Share with your crochet groups for a crochet-along event.
- If you are new to crochet, we have a comprehensive crochet guide for beginners.
- Browse more free crochet patterns to make, particularly clothing and wearables.
- How about matching it with one of these crochet shorts?
- Get more Free Crochet Top Patterns.
Happy crochet!

Easy Crochet Top Pattern
This is a super simple crochet top pattern that even a beginner can make. All you need to make this loose-fitting crochet top is two large solid granny squares.
Choose your size, gather your supplies, and join us in crocheting.
Materials
- Cotton blend yarn, fine or fingering yarn weight, 18 wpi (wraps per inch). Or, use Comfy Fingering. Check below for the amount you need based on your size.
Tools
- Crochet Hook, 3.5 mm
- Stitch Markers
- Tapestry Needle
- Scissors
- Bucket of water and towel (for blocking)
- Block foam and pins (optional, for blocking)
- Measuring tape (To measure your body and the crochet tension)
Instructions
Sizes:
Size: XS, (S, M, L, XL, 2XL, 3XL)
Bust Measurement: 32" (34", 36", 39", 42", 46", 50")
Finished Size:
Top Width: 21" (22", 24", 26", 28", 30", 33")
Top Length*: 21" (22", 24", 26", 28", 30", 33")
Fitting:
Loose Fit.
If you prefer an oversized fit, select a pattern that is 1 or 2 sizes larger.
Yarn Needed:
5, (6, 7, 8, 10, 11, 13) balls of 50g/ball
Abbreviations:
(In US Crochet Terms)
ch = chain
ch2sp = chain 2 space
dc = double crochet
hdc = half double crochet
hdcsp = half double crochet space
st = stitch
sl st = slip stitch
mr = magic ring
fo = fasten off
Crochet Tension:
4" x 4" Gauge Swatch (blocked) = 20 sts x 10 rows in dc stitches

How to Make a Square Crochet Top
- Choose your size and crochet according to the pattern given.
- Block your crochet pieces according to the tension gauge given to achieve the desired size.
- When the crochet pieces are ready to be joined, lay two squares right sides together and align the corners.
- Count the stitches for the armhole and neck opening positions based on your size.
- Mark the stitches with stitch markers so you can see where to stitch the seam.
- Join the shoulders and side seams using slip stitches into the back loop only of both pieces or one of these granny square joining methods.
Important Note:
The first ch3 in a row is counted as a dc stitch.
Square Crochet Top Pattern
Crochet 2 pieces
Round 1: crochet the following in the magic ring: ch3, 2dc, [ch2, 3dc] repeat 3 times. Pull the yarn end to close the magic ring. Join with hdc in the first st. Turn. {20}
Round 2: ch3, dc in the hdc sp, dc in each dc stitch {3 sts}, [(2dc, ch2, 2dc) in ch2sp, dc in each dc stitch {3 sts}] repeat 3 times, 2dc in hdcsp. Join with hdc in the first st. Turn. {36}
Round 3: ch3, dc in the hdc sp, dc in each dc stitch {a total of 7 sts, which is an additional of 4 stitches compared to the previous round}, [(2dc, ch2, 2dc) in ch2sp, dc in each dc stitch {7 sts}] repeat 3 times, 2dc in hdcsp. Join with hdc in the first st. Turn. {52}
Round 4: ch3, dc in the hdc sp, dc in each dc stitch {7+4=11 sts}, [(2dc, ch2, 2dc) in ch2sp, dc in each dc stitch {11 sts}] repeat 3 times, 2dc in hdcsp. Join with hdc in the first st. Turn {68}
Round 5: ch3, dc in the hdc sp, dc in each dc stitch {15 sts}, [(2dc, ch2, 2dc) in ch2sp, dc in each dc stitch {15 sts}] repeat 3 times, 2dc in hdcsp. Join with hdc in the first st. Turn. {84}
To increase the size of the square, continue adding 4 sts at each side i.e. a total of 16 sts every round, until it reaches the desired number of rounds of your size: 26, [28, 30, 32, 35, 37, 41].
The total number of stitches at the last round is: 412, [444, 476, 508, 556, 588, 652].
Fasten and hide all yarn ends.
Wet block your crochet pieces according to the tension gauge given.

Crochet Chart
If you’re a visual learner or prefer Japanese crochet patterns, use the crochet chart below to help you understand the written pattern. The pattern displays only 5 rounds, but you can follow the same crochet technique to create additional rounds.

Assembly
Slip Stitching the 2 pieces together with the following stitch counts based on your size.
Neck Opening Width
Neck width: 55, [57, 59, 63, 65, 71, 77].
You may make a bigger neck opening to achieve an off-shoulder style.
Armhole Opening Length
Armhole length: 40, [42, 45, 48, 50, 55, 60]
Shoulder
Shoulder: 5 sts on each side next to the neck hole.
You may make a full shoulder by stitching all the way from the neck to the armhole.
Notes
The total amount of time required will vary depending on how quickly and how many hours you work on the project.
Get the full article at https://www.craftpassion.com/solid-square-crochet-top/
