Have you ever looked at those beautifully made crocheted decorations or crocheted animals and wondered, “Man… I wish I knew how to make one of those!” Our Crochet for Beginners tutorial will help you take your first step into the world of crochet.
Join us to learn about this wonderful craft; we’ll discuss crochet basics, important tools and materials, essential crochet techniques, and basic crochet stitches. Read to the end to find free crochet patterns for beginners! We guarantee that you won’t let go once you start this fantastic hobby!
- Learn The Basics Of Crochet For Beginners
- Essential Crochet Supplies For Beginners
- Yarn Weight Conversion Chart
- Additional Crochet Supplies
- How To Hold Crochet Hook
- How To Hold Yarn For Crochet
- How To Start Crochet
- Types Of Basic Crochet Stitches
- Basic Crochet Terms Conversion Chart
- Other Basic Crochet Terms
- Anatomy Of Crochet Stitches
- Crochet Tension Gauge
- How To Change Yarn Color
- Yarn Over VS. Yarn Under
- Free Crochet Patterns For Beginners
LEARN THE BASICS OF CROCHET FOR BEGINNERS
Crochet is derived from a French word that means “small hook.” It is a type of needlework that involves interlocking yarn loops with a hooked needle. Using only one tool, you can make Bags & Purses, garments, drink coasters, baskets, pillowcases, blankets, and stuffed dolls by using only one tool.
It’s important to note that using different weight yarns with different crochet hook sizes changes the outcome of your project. As a result, even if you and your friend use the same crochet pattern, you may get different results!
One of the best things about crochet is that you only need to know a few basic stitches to work on beginner-level projects. We’ve included a list of beginner-friendly crochet patterns at the end of this article for you to try.
ESSENTIAL CROCHET SUPPLIES FOR BEGINNERS

Note: All our patterns and terms are based on the US letter & number system.
As with any other crafting project, you’ll need the right tools to help you along the way. A crochet hook and a ball of yarn are the most basic materials required for this craft. There are many different crochet hooks and yarn types available on the market, but some are better suited to absolute beginners.
Hooks
Crochet hooks are the primary tool for creating stitches from yarn. They come in various sizes, and the terminology and measurement systems vary depending on where you live. Refer to the image below to better understand the components of a crochet hook.

The material of the crochet hook is an important consideration. They are made of various materials such as plastic, wood, steel, bamboo, and aluminum. Aluminum hooks are widely used for learning how to crochet for beginners because they are more durable and lighter in weight.
Most crochet hooks are measured in millimeters (mm). Beginners should start with a hook size of between 4 mm and 6 mm. If you’re just starting out, these medium-sized crochet hooks are ideal. They are useful for familiarizing your hands with crochet motions and stitches.
Each crochet hook manufacturer labels its hooks differently. Crochet hooks sold in the United States are typically labeled with the letters B through S, with the rest in millimeters. Some even include the letter as well as the number. Here is a crochet hook size conversion chart for the United States, the United Kingdom, and Japan that you can use as a reference:

Yarns
If you are familiar with knitting yarns, then you are no stranger to crochet yarns. There are yarns in different weights that you can use to create different crochet projects. The weight of the yarn does not refer to how heavy it is, but how thick it is.
The best yarns for absolute beginners are medium-weight yarns that are smooth yet strong and create even stitches. Thinner yarns can be more difficult for beginners because it is harder to gauge the stitches correctly. To get started in crocheting, start with light-colored yarns; the darker the color, the harder it is to see where to insert your hook.
Acrylic and cotton yarns are the two most recommended yarns to crochet for beginners. They are available in many colors, including bright and bold colors. These yarns are lightweight, soft to the touch, and yet strong enough to hold up your crochet projects.
Because of their weight, acrylic and cotton yarns have excellent stitch definition, so you can see your stitches clearly. Although it varies from yarn to yarn, these materials are usually machine washable, which is ideal for household projects like doilies, coasters, rugs, and baskets (refer to the yarn labels for details).
Another type of yarn Craft Passion likes to use is raffia yarn, which is often used to make summer accessories like beach tote and summer hats. Other raffia yarn projects you can make include baskets, plant hangers, bags, and purses.
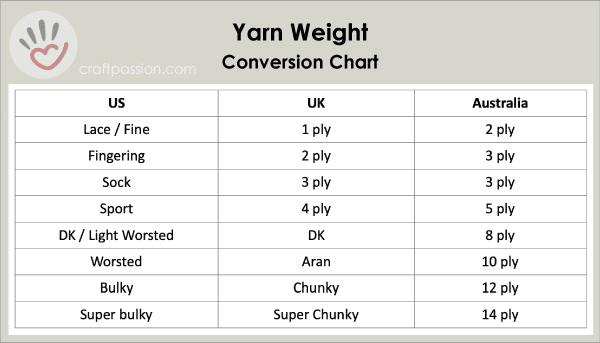
YARN WEIGHT CONVERSION CHART
If you are not from the US or are using material from another country, here is a chart to convert yarn weight!
Even if it’s not exactly the same weight, you can use it as a proximity guide. For example, if a crochet pattern calls for a light worsted weight yarn, you can replace it with DK or an 8-ply yarn, depending on where your yarn was made (check the yarn label).
ADDITIONAL CROCHET SUPPLIES
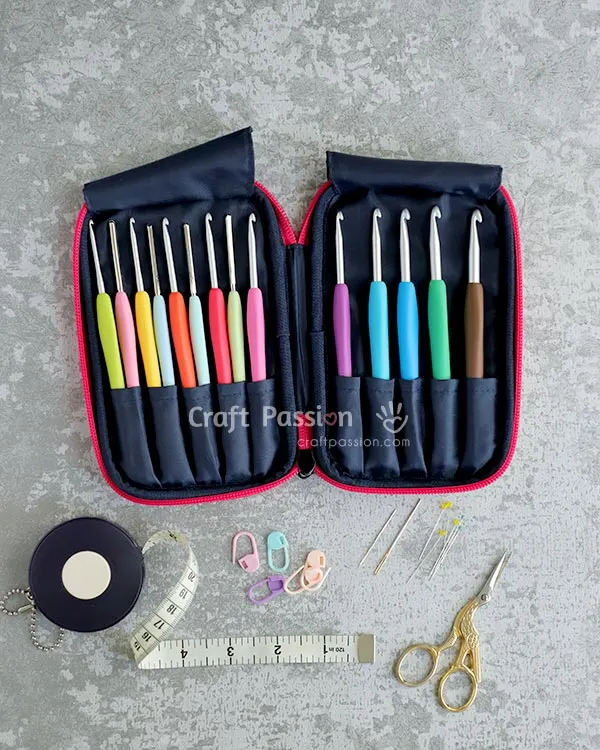
We learned that the first things you need for your crochet journey are a crochet hook and a ball of yarn. However, you may have noticed that you need more than just these two basic tools for some beginner crochet patterns. Below are more tools you’ll need to make your first crochet project easier!
Tapestry / Darning Needle
Tapestry needles and darning needles are the same things; both are a type of yarn needle with a blunt point and a large eye into which yarn can be inserted.
Like crochet hooks, these needles come in different sizes to fit different projects. For example, use a small needle if you’re using thin yarns for your crochet project. Similar to crochet hooks, yarn needles are also marked with numbers (smaller number = larger needle size).
Stitch Marker
This little tool comes in handy when you’re working on crochet projects with repeating patterns. It looks a bit like a paper clip but is usually made of high-quality plastic that won’t ruin your yarn. This little marking tool helps you keep track of stitches or rows to avoid mistakes.
If you’re halfway through your project and find you’ve run out of stitch markers, replace them with a short skein of yarn.
Otherwise, you can also mark your stitches with paper clips or safety pins. However, be as careful as possible when doing this, so they don’t pull on your yarn.
Scissors
At some point, you will need to “cut” your crochet project from the ball of yarn. Therefore, a good quality pair of scissors is very useful for the job, especially if you are working with thicker yarns.
Yarn scissors come in many shapes and sizes; make sure you buy sharp and durable ones! Check out the beautiful Stork scissors or Beaditive 2pc scissors set: Both are small, handy, and made of high-quality stainless steel for precise cutting.
Crochet Hook Organizer
Not exactly an essential item for beginners, but certainly a useful one! Once you’ve invested in more tools, it would be nice to have everything in one place. A simple pencil case or storage box will do, but these organizers have special compartments for different sizes of hooks, tapestry needles, and stitch markers. Take a look at the Teamoy Organizer Case or Damero Crochet Hook Case.
HOW TO HOLD A CROCHET HOOK
Pencil Grip
The first thing you need to learn is how to hold the crochet hook while crocheting. There are two different ways to do this, but the most common method is the pencil grip.
This involves placing your thumb on the flat section of the crochet hook and pinching the other side with your index finger so that the throat is facing you. Then close the remaining fingers in the palm and let the crochet hook rest on the middle finger.

Knife Grip
Another method is to hold the crochet hook as you would hold a knife while eating.
Extend your index finger and place it on the crochet hook, just a few inches from the tip. Then place your thumb on one side and the remaining three fingers on the other side of the crochet hook.
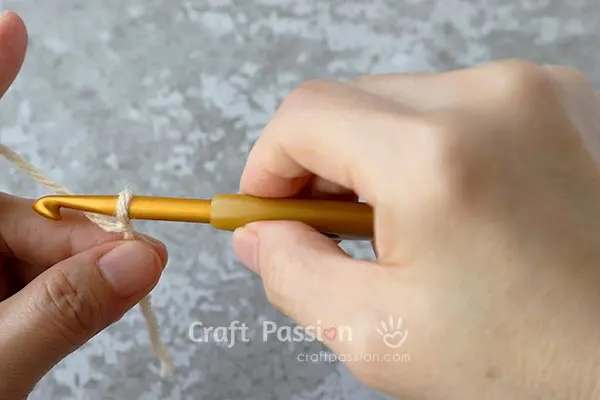
The main difference between these two methods is that with the pencil grip, you use your fingers to control the movement, while with the knife method, you use your wrist. Try both methods to see which one works better for you; they work equally well for right- and left-handed crocheters.
There are more variations of holding a crochet hook that you might be interested.
HOW TO HOLD YARN FOR CROCHET
Your hand plays an important role in controlling thread tension. With proper control, you can determine how loose or tight the stitches of your crochet project will be.
There are several ways to hold the thread while crocheting, but it always depends on which method you like best. Here’s how we do it:
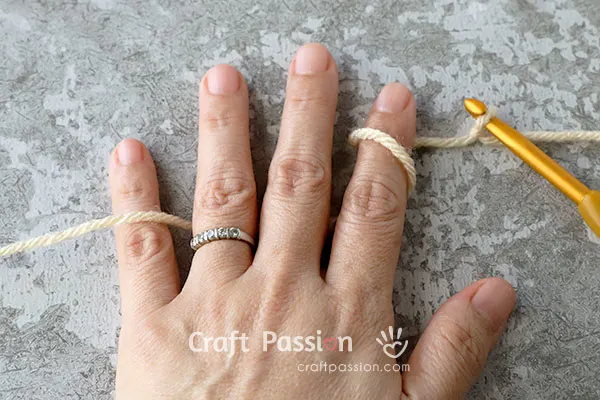
- Place the strand of yarn on your palm, in your less dominant hand;
- Place the yarn between your pinky and ring finger;
- Pull the tail end of the yarn over your index finger;
- If you feel that the thread tension is too loose, wrap it around your index finger again.
If you’re working with smooth yarn like cotton yarn or lace thread, you can even try wrapping the yarn around your pinky and index finger for added security! Read more on how to hold the yarn in various ways and find the one that suits you.
So, try all the methods until you find something you’re happy with; if none of the suggested methods work, come up with something of your own. Remember that the yarn should flow evenly when crocheting, and avoid pulling too hard!
HOW TO START CROCHET
Now that you know how to hold your crochet hook and yarn, let’s learn how to create a starting point for your crochet piece.
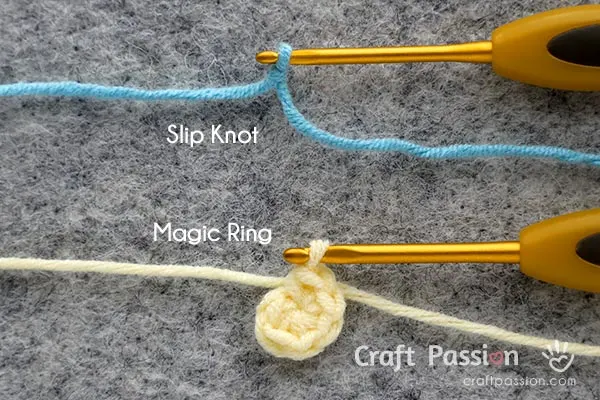
The slip knot and the magic ring are two basic techniques known as the first steps for beginning crochet. Without these techniques, you’d have difficulty pulling the yarn through the loops to crochet the first stitch.
Slip Knot
Before we turn to the list of basic stitches, we must first connect the crochet hook to the yarn by making a slip knot.
This is done by tying a simple loop at the end of the yarn, which is then placed on the crochet hook and tightened. There are several ways to make a slip knot, and here is the tutorial that shows 3 methods on how to make a slip knot.
Once you have done the slip knot, depending on the crochet pattern, the next stitch is usually crocheting chain stitches to make a foundation chain.
Magic Ring
Unlike the slip knot, which is a common starting stitch in crochet, the magic ring is commonly used when crocheting circles.
A magic ring is sometimes called a magic loop or magic circle. It is an adjustable loop with a “drawstring”. This technique is often used as a starting point for amigurumi projects and some granny square patterns.
Basically, you need to make as many single crochet stitches into the ring as your pattern calls for, and then tighten the yarn end to close the ring. The beauty of the magic ring is that it makes a gapless center of the crocheted circle. Watch the video on how to make a magic ring.
BASIC CROCHET STITCHES FOR BEGINNERS
Time to crochet your first stitches! Below are six basic crochet stitches with recommended crochet patterns for beginners.

Chain stitch (ch)
The chain stitch, abbreviated in patterns as “ch”, is the easiest stitch to learn!
It is referred to as a foundation chain when it serves as a base for other stitches to be crocheted in the next row or round. The foundation stitch is formed by a series of chain stitches following a slip knot.
It also appears between other stitches to create a “space”, often called a chain space in the Granny Square patterns.
In many projects, the chain stitch is used as a starting chain or turning chain (tch) at the beginning of a row or round. We will talk about this in detail in the next section.
Get more details on how to crochet chain stitches. Watch the video on how to crochet a chain stitch.
Written instruction on chain stitch:
- Yarn over by looping the working yarn over the hook from back to front;
- Pull to draw the yarn through the loop;
- Repeat to create more chain stitches as requested in the pattern.
Slip Stitch (sl st)
The slip stitch, abbreviated as “sl st” in patterns, is most commonly used as a slip stitch joint to finish the round.
Since it is the shortest stitch of the basic stitches and is rarely used to build “height” in crochet, it is used mainly as a decorative stitch in surface crochet.
The slip stitch can be used to join two crochet pieces together, especially in the joining of Granny Squares.
Get more details on how to crochet slip stitches. Watch the video on how to crochet a slip stitch.
Written instruction on slip stitch:
- Insert the crochet hook into the next stitch;
- Yarn over by looping the working yarn over the hook from back to front;
- Pull to draw the yarn through the loop. Now you have 2 loops on the shaft.
- Pull the loop nearest to the hook through the second loop to make a slip stitch.
- Repeat to crochet slip stitches as requested in the pattern.
Single Crochet stitch (sc)
The single crochet stitch, abbreviated “sc” in patterns, is the most commonly used crochet stitch found in almost all crochet projects.
A single crochet stitch is a short stitch that creates a tighter stitch in crochet pieces. It is also the basic stitch in crochet animal patterns (amigurumi in Japanese) because its tight stitches hold the filling material in place.
Get more details on how to crochet single crochet. Watch the video on how to crochet a single crochet stitch.
Written instruction on single crochet stitch:
- Insert the crochet hook into the next stitch;
- Yarn over by looping the working yarn over the hook from back to front;
- Pull to draw the yarn through the loop to form a second loop;
- Yarn over again;
- Pull to draw the yarn through both loops to make a single crochet stitch.
- Repeat to make single crochet stitches as requested in the pattern.
Half Double Crochet stitch (hdc)
The half double crochet stitch, abbreviated as “hdc” in patterns, is slightly higher than a single crochet stitch. It is between the single and double crochet stitches in height.
The half double crochet stitch makes looser stitches than the single crochet stitch. It is great for making warm crochet fabric for sweaters and blankets. The stitches are quick to make and are great when you are in a hurry to finish a project!
Learn how to made half double crochet stitch with more details. Or, watch the video on how to crochet a half double crochet stitch.
Written instruction on half double crochet stitch:
- Yarn over by looping the working yarn over the hook from back to front;
- Insert the crochet hook into the next stitch;
- Yarn over again;
- Pull to draw the yarn through the loop to form a third loop on the shaft;
- Yarn over again;
- Pull to draw the yarn through all three loops to make a half double crochet stitch.
- Repeat to make half double crochet stitches as requested in the pattern.
Double Crochet stitch (dc)
The double crochet stitch, abbreviated as “dc” in patterns, is another popular basic stitch found in many crochet projects.
This stitch is slightly larger than the half double crochet stitch. It is most often used in projects like granny squares, crochet blankets, filet crochet, corner-to-corner crochet, and many others
Learn more info and how to make double crochet stitches in step-by-step details. Watch the video on how to crochet a double crochet stitch.
Written instruction on double crochet stitch:
- Yarn over by looping the working yarn over the hook from back to front;
- Insert the crochet hook into the next stitch;
- Yarn over again;
- Pull to draw the yarn through the loop to form a third loop on the shaft;
- Yarn over again;
- Pull to draw the yarn through the first two loops;
- Yarn over again;
- Pull to draw yarn through both loops to make a double crochet stitch.
- Repeat to make double crochet stitches as requested in the pattern.
Treble Crochet stitch (tr)
The treble crochet stitch, abbreviated “tr” in patterns, also known as the triple crochet stitch, is the tallest stitch among the 6 basic stitches.
The tall stitches are perfect for crochet projects to produce a loose fabric texture, such as light and lace patterns.
Learn more about treble crochet stitches and step-by-step instructions for crocheting them. Watch the video on how to crochet a treble crochet stitch.
Written instruction on treble crochet stitch:
- Yarn over by looping the working yarn over the hook from back to front;
- Yarn over again to make another loop; now you have 3 loops on the shaft;
- Insert the crochet hook into the next stitch;
- Yarn over again;
- Pull to draw the yarn through the loop to form a fourth loop on the shaft;
- Yarn over again;
- Pull to draw the yarn through the first two loops;
- Yarn over again;
- Pull to draw the yarn through the first two loops;
- Yarn over again;
- Pull to draw yarn through both loops to make a treble crochet stitch.
- Repeat to make treble crochet stitches as requested in the pattern.
BASIC CROCHET TERMS CONVERSION CHART
Without prior knowledge of crochet terms and abbreviations, the crochet pattern will look like a bunch of Morse code. Therefore, it is essential to read a crochet pattern before choosing a project to work with.
It takes time and patience to interpret a pattern for absolute beginners, but once you are familiar with the flow and sequence, you will crochet like a pro!
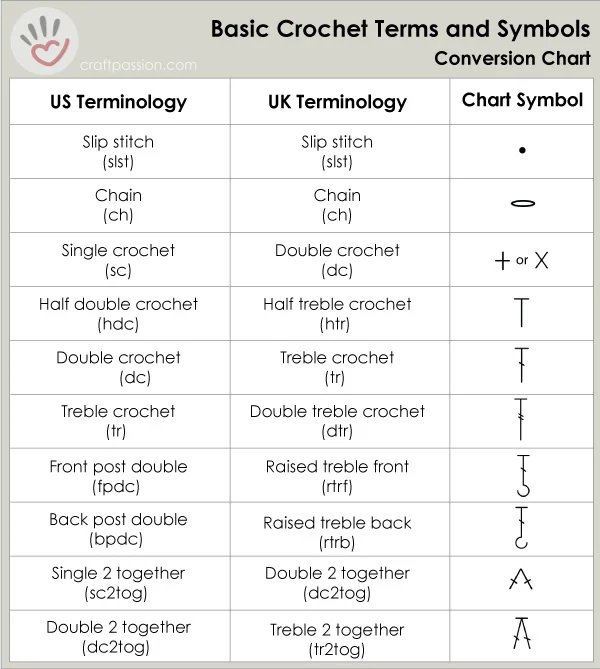
As mentioned earlier, all of our patterns use US crochet terms. If you are from other countries that use UK crochet terms or Asian crochet symbols and charts, we have the conversion chart for you.
Please refer to the conversion chart below for popular crochet stitches, including the first six basic crochet stitches mentioned above.
OTHER BASIC CROCHET TERMS
Stitch
A loop of yarn on a crochet work that usually has a specific name, such as single crochet, double crochet, slip stitch, etc.
Fasten off
When you’ve completed the last stitch of your project, use this technique to secure the yarn. First, cut the working yarn, leaving a 4-6″ long end. Then wrap the yarn around the hook, pull it all the way through the loop (remove the hook) and pull it tight.
Hide Yarn
Now we need to hide the rest of the yarn tail! Thread the yarn with a tapestry needle, pass it under the top row of stitches to the end of your crochet project, and weave it into the stitches to hide it.
Increase (inc) & Decrease (dec)
In a beginner crochet pattern, you may not need to increase or decrease, but it is good to know the purpose of these stitches
Essentially, “increase” (INC) means that you add stitches, and “decrease” (DEC) means that you decrease stitches in a row or round.
The crochet pattern indicates where you need to increase or decrease. For example, for an increase stitch, crochet two stitches in the same stitch. On the hand, for a decrease stitch, you crochet 2 stitches together.
When you use the stitches INC and DEC in a crochet pattern, they change the shape of your crochet piece, such as a slanted edge or a three-dimensional shape in crochet animals/amigurumi projects.
Turning chain (tch)
The purpose of a turning chain is to bring the yarn to the desired height before you crochet the first stitch of the next row.
The number of stitches needed for the turning chain depends on the type of stitch you’re crocheting. For example: sc = 1 chain stitch, hdc = 2 chain stitches, dc = 3 chain stitches and so on.
Once you reach the end of a row, and before you start the next row, work the turning chain; then turn your crochet over to work on the other side. Remember that you don’t crochet into the turning chain after turning over.
The turning chain for dc, hdc, and tr is counted as one stitch in the row by default unless stated otherwise in the pattern.
ANATOMY OF CROCHET STITCHES
Knowing the anatomy of a stitch is important so you know where to insert your crochet hook when prompted. Here are the four main parts of a crochet stitch that you need to know once you take a step beyond the level of an absolute beginner.
- Post – The body of the stitches.
- Front Loop – The top loop of a stitch closest to you, where the top loop is the v-shaped stitch that sits at the top of the post of a stitch.
- Back Loop – The top loop of a stitch farthest from you.
- Third Loop – Located below the back loop on the wrong side of the crochet piece. This may not apply to most beginner projects, but it is good to know that there are other loops in a crochet stitch for future projects.

CROCHET TENSION GAUGE
What is a crochet tension or a crochet gauge? The simplest answer is: it is a measure of how big your crochet stitches are.
Everyone crochets with a different tension, some looser, some tighter. To standardize the outcome of a project, especially for patterns that require a certain size, such as clothing patterns, where crochet pattern designers specify the tension required.
Most crochet patterns for beginners do not require this specification, but you should also know this information for your future crochet project.

How to measure the crochet tension? You will need to make a crochet gauge swatch or a test swatch. A gauge swatch is a square piece of crochet fabric with a specific crochet stitch. Using the gauge swatch, you can measure the size of your crochet stitches with specific yarn weights and crochet hook sizes.
How to make a crochet swatch? Take the crochet hook and yarn specified in the project and crochet the specified number of stitches until you reach at least 4″ horizontally and 4″ vertically. Count the number of stitches and rows of this square pattern of 4 inches. You should try to achieve the same number of stitches and rows as in the crochet pattern to keep the finished size the same.
HOW TO CHANGE YARN COLOR
As you progress through your crochet projects, you will want to try out more interesting patterns. One of them is to create vibrant crochet works. Though not for a complete beginner, we cover this information in this crochet for beginners tutorial as well.
Here, we’ll show you how to make colorwork crochet projects with two or more yarn colors, such as the heart coasters pattern shown in the image. You can either watch the video or read on for our written method, which includes a third method that is not mentioned in the video.

Important rule: When changing yarn colors, always yarn over the new color when you have the last 2 loops on the crochet hook and pull the new color to complete the last stitch of the old color.
Method 1 (at the end of a row):
- When you reach the last stitch of the row, crochet till you are at the last two loops on the hook (do not complete the stitch)
- Drop your yarn, then pick up the new yarn color and fold it in half to create a loop
- Use the crochet hook to pull the new yarn through the two loops on the hook, leaving about 4 – 6 ” yarn tail.
- Turn your work and continue to crochet with the new yarn color
- Crochet over both loose ends until you reach a comfortable point, then cut off any loose strands
Method 2 (middle of the row)
Your pattern will indicate when to change the color. For example, if you want to change colors in the 7th stitch, crochet the previous color to the 6th stitch of the row, leaving two loops on the hook. Then pull the new yarn through both loops and continue crocheting.
If you intend to use the old yarn again in the next few stitches, carry it into the stitches until your next color change.
Method 3 (at the beginning of a row):
This method is similar to method 1, except that instead of leaving your last stitch open at the end of a row, you would complete and fasten the last stitch. Then incorporate the new color at the first stitch of the next row.
To continue crocheting the next row, make a slip knot with the new color, insert the hook into the slip knot and then into the first stitch. Continue crocheting as normal.
YARN OVER VS. YARN UNDER
Traditionally, yarn over (abbreviated as YO) is used in most crochet projects, whereas yarn under (abbreviated as YU) is a variation of crochet stitches. One should use the method specified by the pattern since the two methods yield different results.
Does it matter whether you yarn over (YO) or yarn under (YU) in a crochet pattern? Yes, it has an impact on the project’s outcome. However, no matter which method you choose, there is no definitive right or wrong; they simply produce a different appearance. It depends on the nature of the project or your personal preferences.
Most modern Amigurumi patterns, for example, employ the yarn under method, which results in denser and neater-looking stitches. Sometimes, you can even combine both methods to create something unique.

Yarn Over (YO)
For a Yarn Over, you’d place the hook under the strand of yarn, wrap it around your hook from below, and into the loop.
- Bigger stitches
- Looser tension (may leave “holes” in fabric)
- Uses more yarn
- Produce a V-shaped stitch in Single Crochet

Yarn Under (YU)
Yarn Under works by placing the hook over the strand of yarn, hooking the yarn from above, then pulling it into the loop.
- Smaller stitches
- Tighter tension (No holes in fabric)
- Uses less yarn
- Less slant in stitches
- Produce X shaped stitch in Single Crochet

FREE CROCHET PATTERNS FOR BEGINNERS
Get started with our novice crochet patterns to improve your new skill. The simplest way to learn a new skill is to practice it; practice until you get it right, practice until you’re comfortable with the method, practice until you can crochet and watch TV simultaneously! Let us know if you found this guide to crochet for beginners useful 🙂
Disclaimer: Please note that we may earn a commission if you purchase an item through the links above. It doesn’t change the price you pay, and it supports us to create more craft projects for you!

How To Crochet For Beginners
If you are an absolute beginner in crochet, follow our basic crochet for beginners tutorial.
Practice makes perfect, so lot lots of crocheting to prefect the skill.
Materials
- Yarns
Tools
- Crochet Hooks
- Tapestry Needle
- Stitch Marker
- Scissors
Instructions
- Get the basic crochet materials and tools listed above from a crochet supplies shop. Usually, a crochet starter kit is good enough to include all the items you need to begin your crochet journey.
Beginners are recommended to use acrylic and cotton yarns of medium weight and crochet with a 5 mm crochet hook. - Form a loop by making either a slip knot or a magic ring to begin your first crochet stitch.
- On your less dominant hand, hold the yarn in place by looping the yarn around your index finger to allow the yarn to slip through while you crochet.
Hold the crochet hook in a pencil or knife grip with your dominant hand. - Use the basic motions of yarn-over and pulling the yarn through the loop to crochet the basic stitches such as the chain stitch, slip stitch, single crochet stitch, half double crochet stitch, double crochet stitch, and treble stitch.
- Practice, practice, practice to perfect each stitch or at least those stitches you need to make your first crochet project.
Once you are ready for a beginner project, you can tackle it. - As you progress and explore different beginner crochet projects, you may be able to crochet a simple crochet fabric and include increase and decrease stitches to it.
Learn how to change different colors of yarn to create more interesting patterns. - Cut the yarn, fasten the last stitch, and finish your crochet piece by weaving in the yarn ends with a tapestry needle at the end of your crochet project.
Notes
The full articles can be found at https://www.craftpassion.com/guide-to-crochet-for-beginners/, where we explain each section in detail.
Recommended Products
As an Amazon Associate and member of other affiliate programs, I earn from qualifying purchases.







Barbara L
Saturday 27th of January 2024
I love your patterns. I just hope i can get bears And outfits made I'm a little slow at 86 . You are a very good teacher .I thank you
Joyce E. Munchel
Saturday 4th of December 2021
Very informative with pictures and word descriptions. A great learning guide or review. I have crocheted for years and hadn't heard of the yarn over or yarn under stitch. It is always nice to learn something new. Thanks!
Craft Passion
Monday 6th of December 2021
You are most welcome. We have put some effort to make the articles useful and updated. Enjoy!
Sharon R Lovering
Saturday 4th of December 2021
I love your website, thank you for sharing all of your talent and patterns.
Craft Passion
Monday 6th of December 2021
Thank you. Sharing is caring :)