Crochet bucket hats are not always available in stores, and even when they are, they are significantly more expensive than fabric bucket hats.
Why not make your own with our lovely crochet bucket hat pattern? You can create one by following our step-by-step tutorial on how to crochet a bucket hat. It could be the only thing you need to complete your summer look. They’re also excellent gifts for friends and family.

This wardrobe staple has been popular for decades due to its practicality. People have been incorporating fun crochet bucket hat designs as a fashion statement, and it has become an essential accessory.
Bucket Hat vs. Sun Hat
This is an easy bucket hat crochet pattern you can work up in a day. Given the material we used, this entire pattern may resemble the yellow and blue crochet sun hat we made a few years ago, with the exception of the little extra stitches design we made on this shorter brim crochet bucket hat. However, bucket hats and sun hats are typically worn in different situations.
Sun hats are made with light and breathable materials like wheat straw or raffia yarn for leisure, such as gardening or chilling on the beach. On the other hand, bucket hats are often made out of durable fabric like cotton, canvas, or polyester for outdoor activities like fishing or camping. One similarity is that both the bucket hat and the sun hat provide coverage for the face and neck. What about this crochet bucket hat made out of raffia yarn? It serves both activities as a multi-purpose hat!
Besides being a summer hat by crocheting it with raffia yarn, you can easily adapt this pattern to crochet bucket hats for winter. How? Simply crochet the hat with a warmer yarn of similar yarn weight. A sport-weight yarn in wool fiber can be a great choice in this case.
Keep reading to find the photo tutorials and the written crochet pattern. Since this is a crochet wearable, make a swatch to ensure you get the correct gauge before starting the free bucket hat pattern.
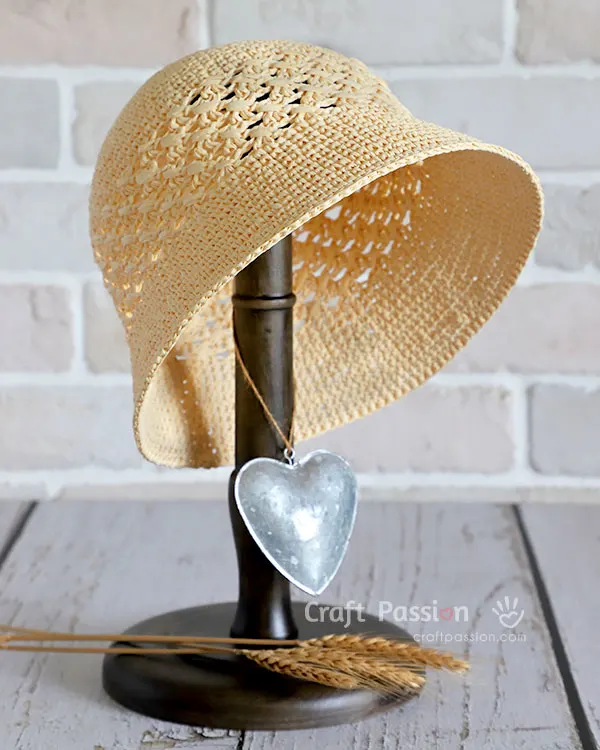
Features Of This Bucket Crochet Hat Pattern
The finished hat fits a head circumference of 22″ to 23″. It has a crown depth of 6.5″ and comes with a slightly longer front brim (2.5″) than the rear (2″). The crochet bucket hat has a beautiful design around the crown band, which not only presents its uniqueness but also makes it more “breathable” for the summer.
Materials & Tools
The main supplies required to make this easy crochet bucket hat pattern include raffia yarn and a 3 mm crochet hook. I used an Oatmeal color for this crochet hat; however, feel free to choose a different color to suit your outfit or personal style. You will need a fishing line, adhesive tape, and stitch markers as you progress. Then, make a crown block from our last sun hat tutorial and prepare a warm iron to finish this project.
How To Crochet A Bucket Hat
This free crochet bucket hat pattern works in continuous rounds, starting from crown to brim. Knowledge of basic crochet stitches is needed for the crochet project, including the magic ring (mr), slip stitch (sl st), chain stitch (ch), single crochet stitch (ch), and double crochet stitch (dc) in US terms.
Begin from the crown of the hat by working eight single crochet stitches into a magic ring, then follow the written crochet pattern to increase the stitches at each round as you progress. To keep track of your rounds, insert a stitch marker at the beginning of every round.
Next, we will be forming the body of the hat with crochet cable stitches. We are using a simple long cross double crochet stitch instead of those textures that resemble twisted ropes where you’d normally crochet between front-post double crochet stitches and back-post double crochet stitches. In the long cross double crochet/cross-over long double crochet, you will be crossing the double crochet stitch diagonally across some stitches from the bottom right to the top left (for right-handers). For those who prefer easy stitches, you may replace this multiple 4 stitches pattern with all double crochet stitches. And, for those who are experienced enough, I believe you can modify the pattern to your liking.
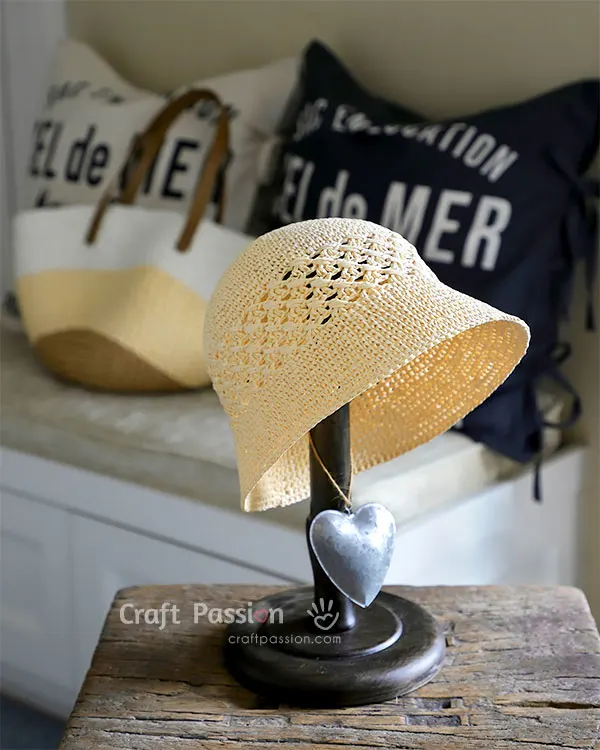
Finishing the Crochet Bucket Hat Pattern
The last section of this free crochet pattern requires you to crochet a fishing line into the last two rounds of the brim. This is for additional structural support to ensure the brim stays open. If you prefer a stiffer brim, use a thicker fishing line. Some would prefer spraying the hat with a stiffening agent, e.g., fabric stiffener or laundry starch.
Finish off blocking and ironing the crown and the brim for a more well-rounded shape. This crochet bucket hat is made for an adult head. Nevertheless, the measurement of the crown size can be adjusted slightly according to the size of the crown block. With a condition where you need to reduce the head size to fit a smaller head, you may use this product without altering the crochet pattern. You may also add a sweat liner to the hat during hot days to keep the hat dry and comfortable.
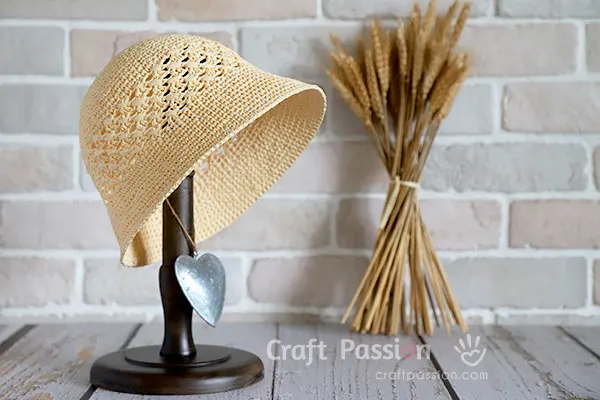
WHAT’S NEXT:
- Start crocheting and share your completed handmade on Facebook and/or Instagram. Remember to tag us, @craftpassion, so that we are able to see them.
- Pin it to Pinterest for a future To-Crochet List.
- Share with your crochet groups for a crochet-along event.
- Browse more free crochet patterns to make, particularly for wearable patterns and summer-themed crafts.
- Make one of these crochet bralettes and crochet shorts for the summer as well. Probably adding a small crochet bucket bag to your summer OOTD will be a good idea.
Happy Crocheting!

Crochet Bucket Hat Pattern
You can make this beautiful crochet bucket hat with a unique cable stitch design in 1 day. Free pattern includes thorough how-to-crochet with step-by-step photos.
Materials
- Crochet raffia yarns, 1 roll.
- Fishing Line, Nylon, size: 100 lbs. Diameter is roughly 1 mm, 3 yards
- Adhesive tape
Tools
- Crochet hook, 3 mm
- Stitch marker
- Tapestry needle
- Warm iron
- Crown Block
Instructions
Finished dimension:
Crown Depth: 6.5"
Crown circumference: 23″
Brim Depth: Front 2.5″, Back 2″
Fit Head circumference 22″ to 23″ (Depending on the size of the crown block)
Crochet Gauge (4 inches square):
Single Crochet: 17 sts x 18 rows
Cable Stitch Pattern: 4 cable stitch pattern = 3.75", 5 rows = 2.75"
Abbreviations:
in American crochet terms
ch: chain
dc: double crochet
MR: magic ring or magic circle
Rnd: Round
sc: single crochet
sl st: slip stitch
sk: skip
st: stitch
Crochet Bucket Hat Pattern
This pattern begins from the crown and works toward the brim.
IMPORTANT: Cut a length of approximately 10 yards of yarn and reserve it for the partial rounds (Round 5a & 8a) at the Brim pattern below.
HAT CROWN
Rnd 1: 8sc in MR {8}
Rnd 2: Inc around {16}
Rnd 3: (sc, Inc) around {24}
Rnd 4: (sc 3, Inc) around {30}
Rnd 5: sc 2, (Inc, sc 4) 5 times, Inc, sc 2 {36}
Rnd 6: (sc 5, Inc) around {42}
Rnd 7: sc 3, (Inc, sc 6) 5 times, Inc, sc 3 {48}
Rnd 8: (sc 7, Inc) around {54}
Rnd 9: sc 4, (Inc, sc 8) 5 times, Inc, sc 4 {60}
Rnd 10: (sc 9, Inc) around {66}
Rnd 11: sc 5, (Inc, sc 10) 5 times, Inc, sc 5 {72}
Rnd 12: sc around {72}
Rnd 13: (sc 11, Inc) around {78}
Rnd 14: sc around {78}
Rnd 15: sc 6, (Inc, sc 12) 5 times, Inc, sc 6 {84}
Rnd 16: sc around {84}
Rnd 17: (sc 13, Inc) around {90}
Rnd 18: sc around {90}
Rnd 19: sc 7, (Inc, sc 14) 5 times, Inc, sc 7 {96}
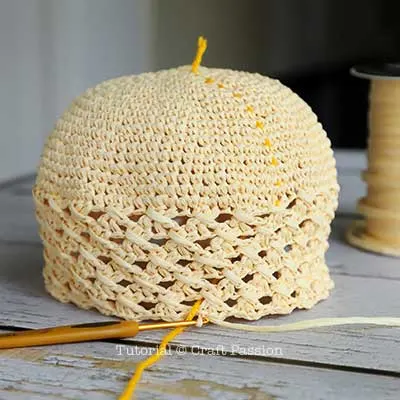
Rnd 20: sc 94, sl st 2. {96}
Refer PIC. 1
Continue to work on Crochet Cable Stitch Pattern
Cable Pattern: sk 2, dc 2, ch, long cross dc to first skip stitch.
Refer to the "More Details" section for an explanation of how to crochet this 4-stitch cable/1 front crossing variation - 2dc1ch/1dc.
(This crochet cable stitch can be replaced with any crochet pattern in a multiple of 4 sts.)
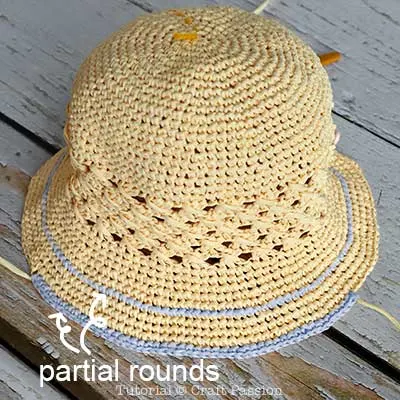
Rnd 21 - 25: ch3 (count as 1 dc st), dc, ch, long cross dc into the second last stitch of the previous round, [Cable Pattern] 23 times, sl st in the 3rd ch at the beginning of the round. {96}
Refer PIC. 2
HAT BRIM
Rnd 1 - 2: ch, sc 96, sl st to first st. {96}
Rnd 3: ch, sc 4, [inc, sc 7] 11 times, inc, sc 3, sl st to first st. {108}
Rnd 4: ch, [inc, sc 8] 12 times, sl st to first st. {120}
Rnd 5: ch, sc 120, sl st to first st. {120}
Pull the loop out further and set it aside while you crochet the partial round below with a new strand of yarn.
Rnd 5a (Begin at stitch 21): sl st, sc 5, inc, [sc 9, inc] 7 times, sc 2, sl st, fasten. {88}
Insert the hook back to where we pause on round 5, and pull to shorten the loop.
Rnd 6-7: ch, sc 128, sl st to first st. {128}
Rnd 8: sc 11, inc, [sc 15, inc] 7 times, sc 4, sl st to first st. {136}
Pull the loop out further and set it aside while you crochet the partial round below with a new strand of yarn.
Rnd 8a (Begin at stitch 46): sl st, sc 4, inc, sc 9, inc, sc 13, inc, sc 9, inc, sc 5, sl st, fasten. {50}
Refer PIC. 3
Add a fishing line to the next 2 rounds of the pattern. This is optional, but highly recommended. The fishing line will reinforce the brim's structure, keeping it nice and steady. Refer to PIC. 4 - PIC. 8
Rnd 9 - 10: ch, {140}
Rnd 11: sl st around {140}
PIC. 9
MORE DETAILS ON HOW TO CROCHET A BUCKET HAT
- Get ready with the materials and tools to begin the Bucket Hat crochet project. Follow the crochet pattern to first crochet the Crown, followed by the simple crochet cable stitch at the end of the crown. Lastly, complete the hat with a brim that is longer at the front and short at the back.
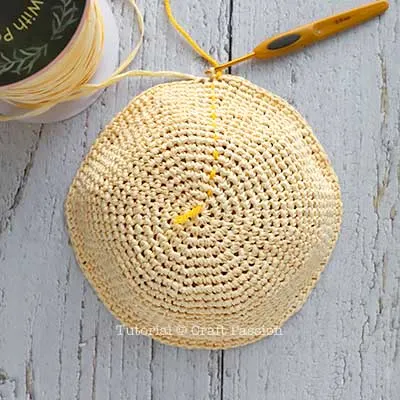 PIC. 1
 PIC. 2
 PIC. 3
 - Add a fishing line to the last two rounds of the brim to reinforce the structure and keep it wide and open. The pattern calls for a 100 lb fishing line with a diameter of about 1 mm, but you can use a slightly larger size line to make a stiffer brim.
Prepare the fishing line by creating a loop at one end, bending approximately 2 inches of the line, and securing it with adhesive tape.
 PIC. 4
Insert the hook through the top loops of the next stitch and the fishing line loop, then yarn over and draw the yarn through the loops. Continue to complete the sc stitch.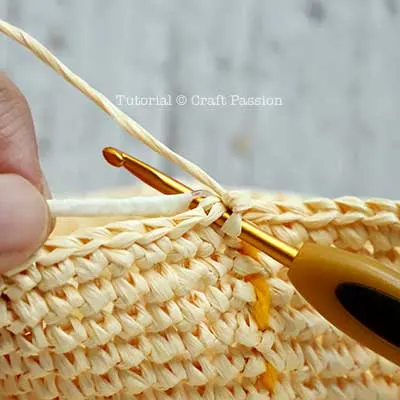 PIC. 5
Carrying the fishing line along with the stitches simply means placing the line on top of the previous round's stitches and continuing to crochet as usual. This will naturally cover up the line in the stitches.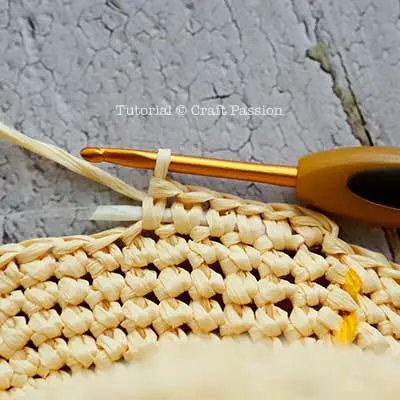 PIC. 6
To finish the crochet with the fishing line, simply make a second end-loop to end the fishing line in the same way it was started.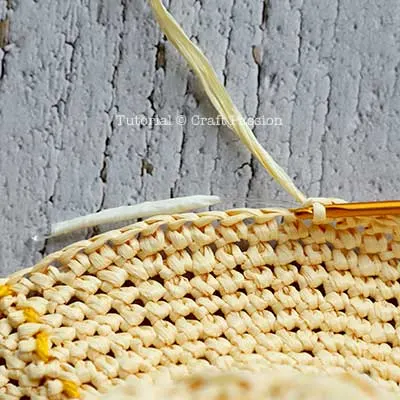 PIC. 7
 PIC. 8
This is the finished crochet hat before blocking.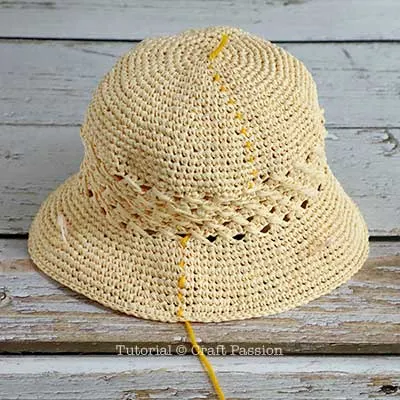 PIC. 9
 - Block the crown with a crown block. I DIY the crown block with newspaper and tape. Click the link to read more about the process in my crochet Sun Hat Pattern.
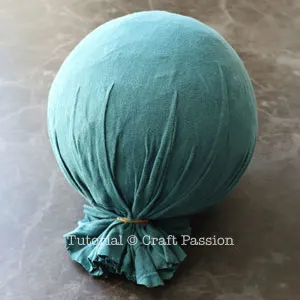
Fit the crown block into the crown of the hat. Just push it in if you find it a bit tight; it is normal that the “unblock” hat is slightly smaller than the crown block. Set your iron to medium heat, with one hand holding your DIY crown lock, and one hand with your iron, press the iron to block the crown. You may introduce some steam if you find it works better in this way.
Leave the hat to cool down on the crown block.
Continue to iron and block the brim to complete the bucket hat.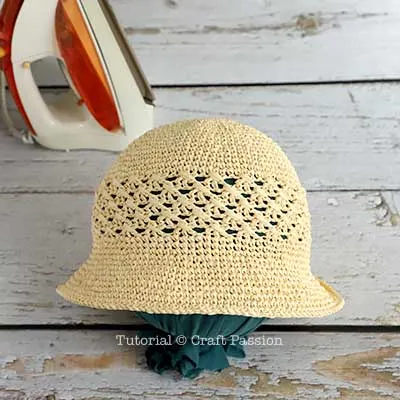 PIC. 9
MORE DETAILS ON HOW TO CROCHET CABLE STITCH PATTERN
4-stitch cable/1 front crossing Variation: 2dc1ch/1dc cross-over
Written Pattern: sk 2, dc 2, ch, long cross dc to first skip stitch.
Explanation: Skip 2 stitches, double crochet the next 2 stitches, followed by a chain stitch, yarn over, and insert the hook into the first skip stitch. Pull up a loop to the height of the double crochet stitches, [yarn over and pull through 2 loops] 2 times to complete the long cross double crochet.
Note: "Long Cross double crochet" is sometimes called "Cross-over long double crochet" in other crochet patterns.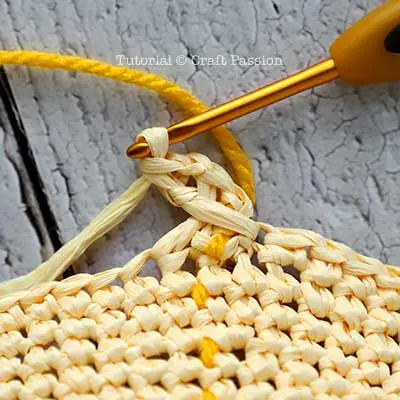 PIC. A
Begin the cable stitch with a modified cable stitch: instead of skipping sts, we crochet the long cross dc into the preceding round.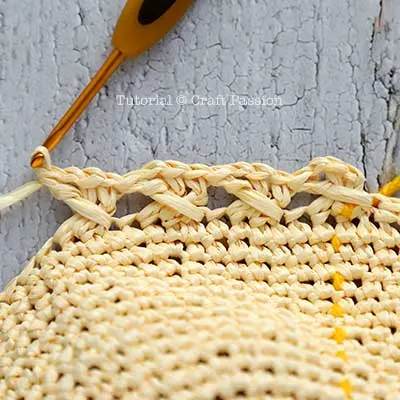 PIC. B
Followed by the Cable Stitch mentioned above. PIC. C
After 5 rounds and turn upside down.

Feel free to try out our other free patterns and tutorials on summer-themed crafts.
Notes
Depending on the speed and hours you are spending on the project, the total time needed is only an approximation.
Get the full article at https://www.craftpassion.com/free-crochet-bucket-hat-pattern/
Recommended Products
As an Amazon Associate and member of other affiliate programs, I earn from qualifying purchases.


Mimosa
Saturday 25th of June 2022
Thank you for sharing such beautiful bucket hat pattern. But I don't quite understand how to remove the yarn using in the partial rounds. Pic. 3 shows two grey yarns but I don't see the gray yarns showing in Pic. 9. Are the partial rounds necessary?
Craft Passion
Thursday 30th of June 2022
That "grey" color is actually my highlight to show on the partial round, it is still using the oatmeal color yarn. Sorry for the confusion. You definitely can omit the partial round with slight modification to the brim pattern but we highly recommended to follow the original pattern as this will give you a slightly wider brim at the front of the hat.
Louise
Tuesday 14th of June 2022
Hello Can we make this hat with cotton yarn
Craft Passion
Wednesday 15th of June 2022
Yes, only if you can get the tension gauge correct. That's to make sure that it is sized correctly.
Peg
Monday 30th of May 2022
I need to learn to crochet!!! you have the best patterns, hats,totes and all the sweet Amigurumi <3 I've saved so many,hope to learn when I retire next year. Thank you
Glenda
Sunday 29th of May 2022
Is a video available for this Crochet Bucket Hat Pattern? Thank you for the pictures and narrative, but PLEASE send me a link to video as I am a visual learner. I will be gathering the supplies that are needed. THANK YOU SO MUCH!