
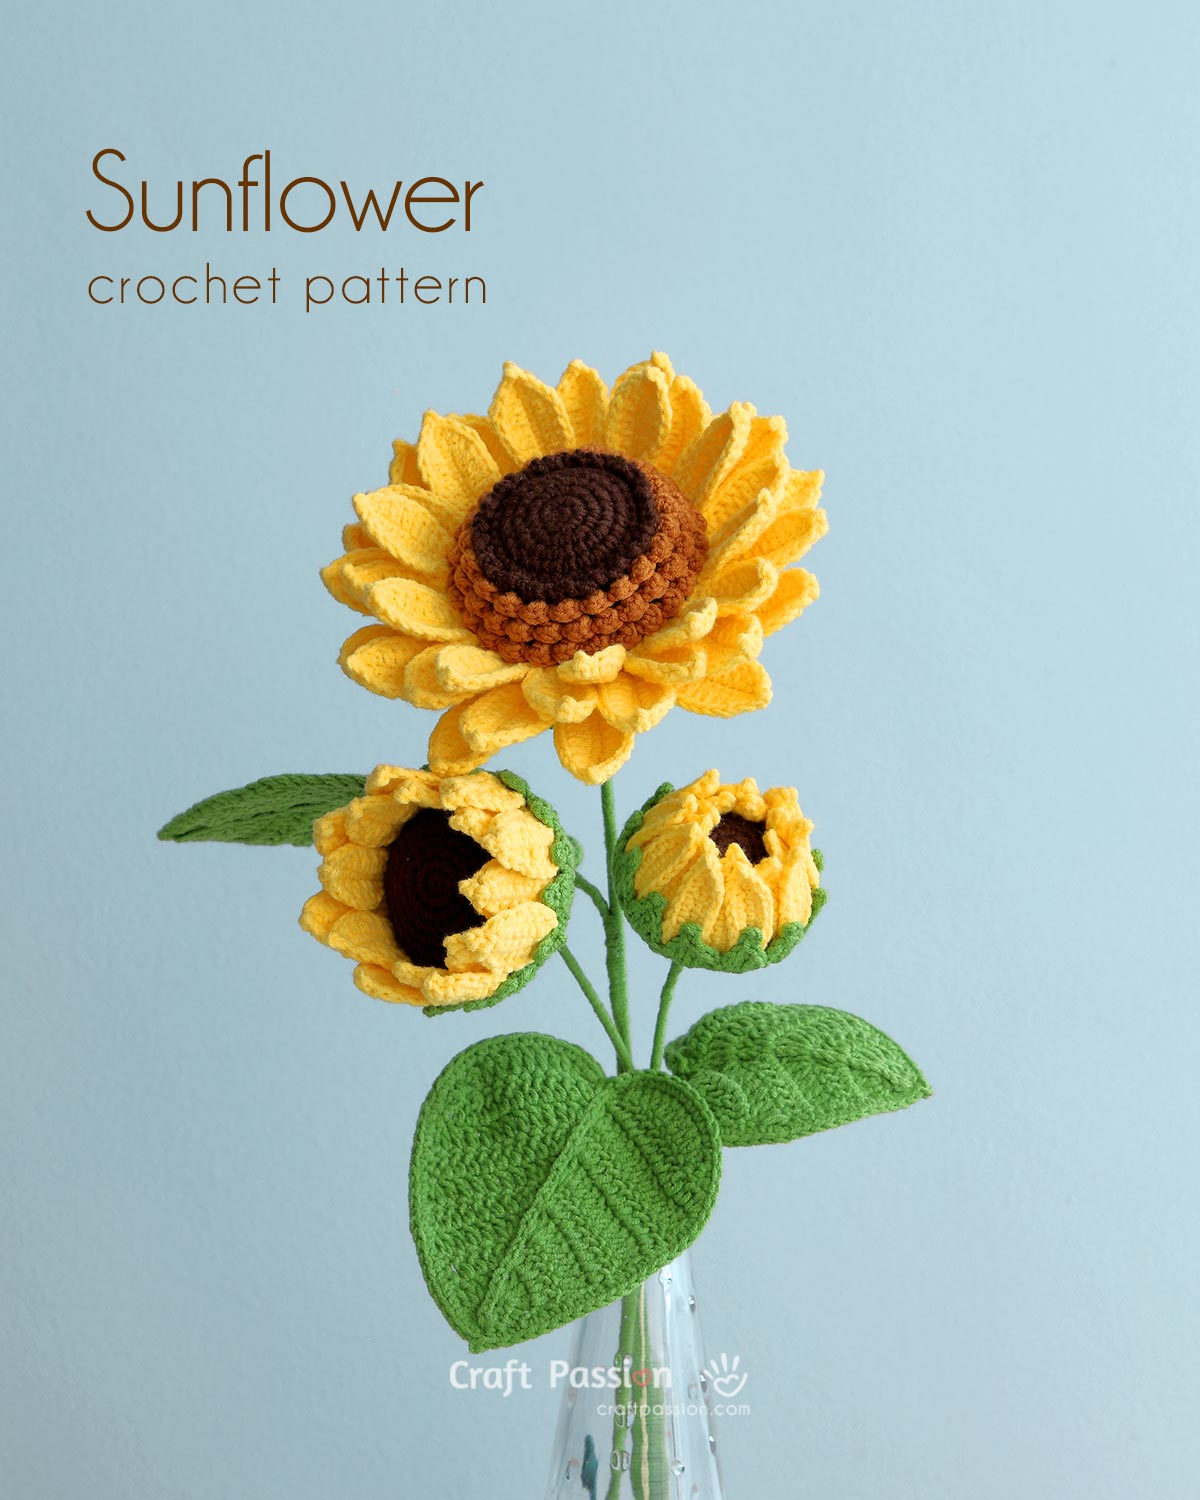
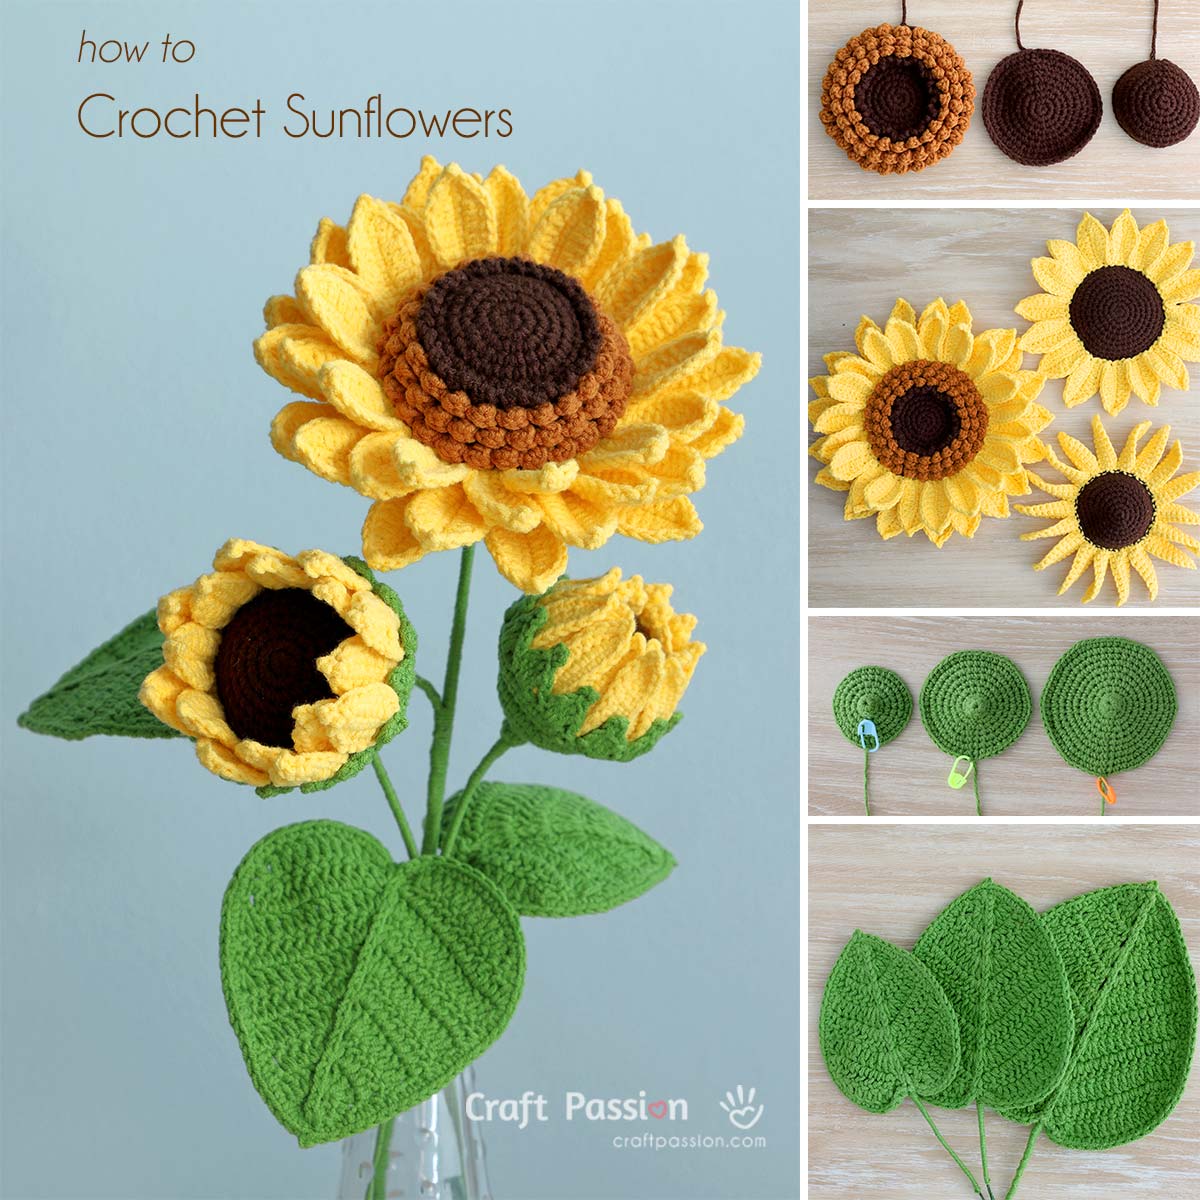
Bring a little sunshine into your crochet with this crochet sunflower pattern! Instead of making just one flower, you’ll crochet a sunflower in three blooming stages: full bloom, half bloom, and opening bud.
Each one captures a different moment of the sunflower’s life cycle. Add sturdy stems and matching leaves, and together they make a cheerful, realistic sunflower arrangement that lasts all year round.
This post may contain affiliate links, and we may earn a commission on purchases made through them at no extra cost to you. ❤️ Thank you!
About This Crochet Sunflower Pattern
I wanted this sunflower crochet pattern to look more like a real flower arrangement, where blooms don’t all open at the same time.
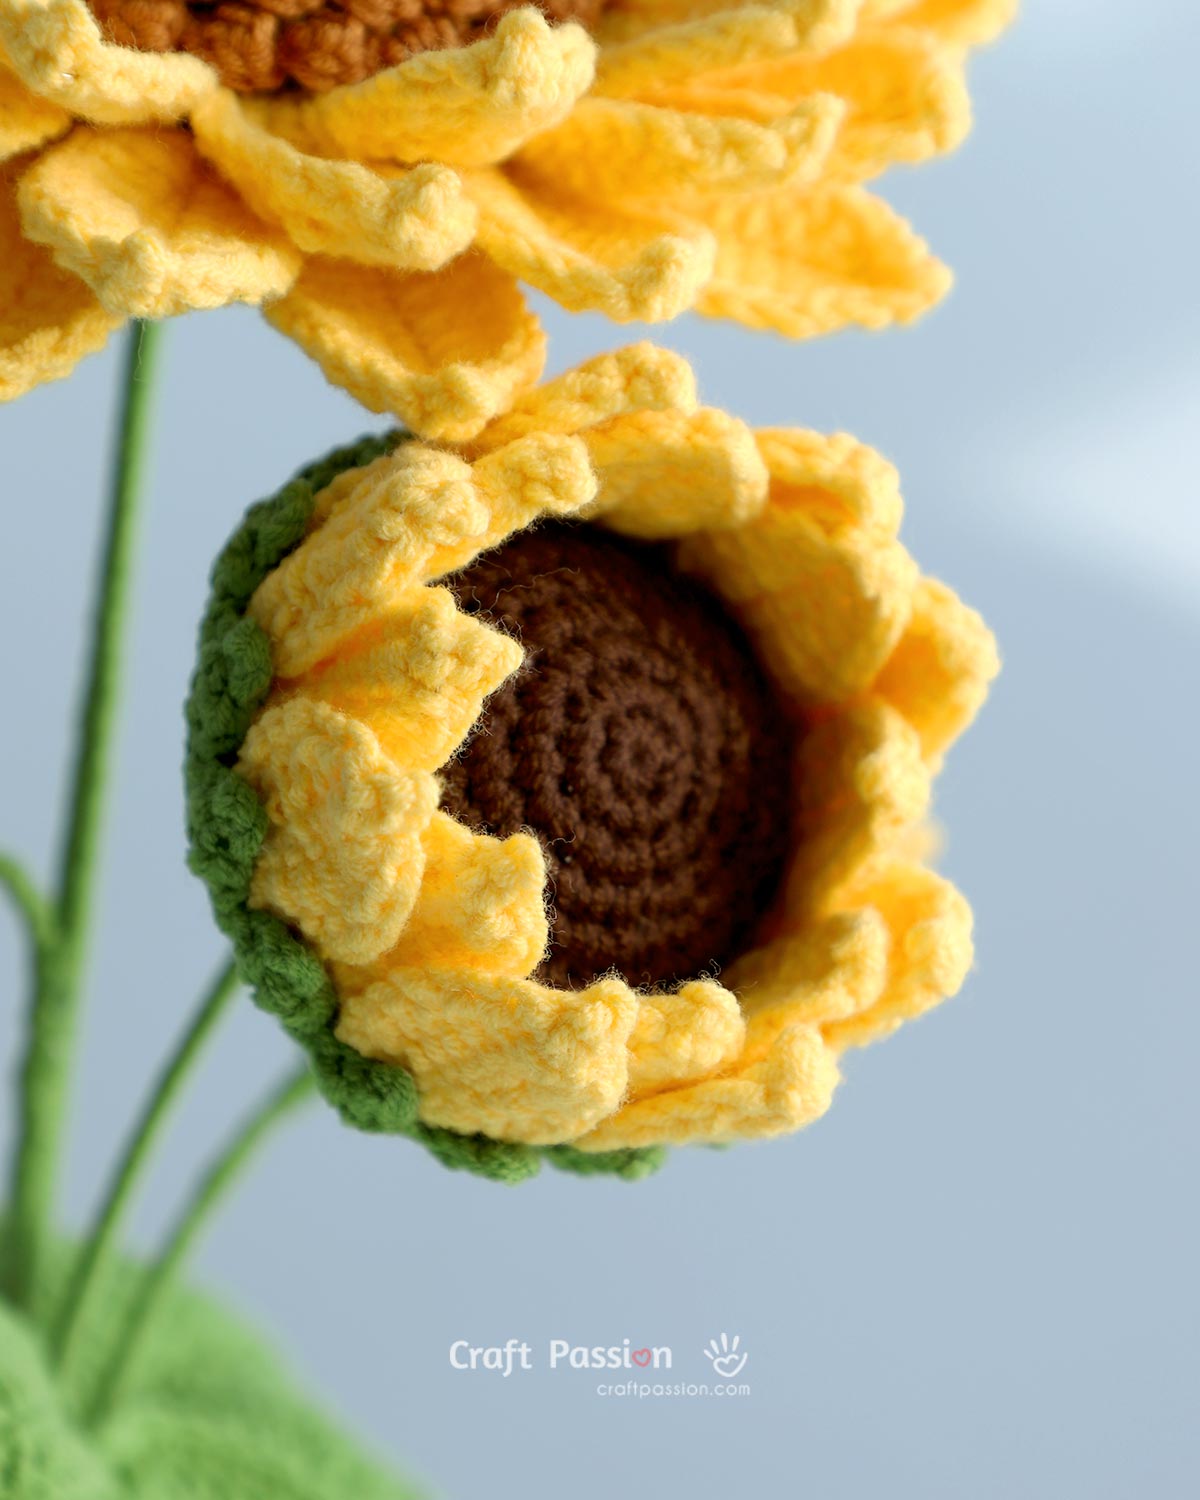
The full-bloom has two layers of golden petals and textured seed rings. The half-bloom has wired petals that gently curl around the center, while the opening bud keeps its petals closer together as they begin to unfold.
Fine wire helps the full and half blooms hold their shape, and a floral rod gives each flower a sturdy stem. A crocheted receptacle and sepals finish the back neatly.
Pattern at a Glance
This pattern is rated Intermediate, mainly because of the wire work, shaping, and assembly. The crochet stitches themselves are familiar. If you’re still learning the basics, my Complete Beginner’s Guide to Crochet is a helpful place to start.
You’ll use:
- Magic ring or magic circle
- Chain stitch
- Slip stitch
- Single crochet
- Half double crochet
- Double crochet
- Treble crochet
- Crochet increases
- Front loop only (FLO)
- Back loop only (BLO)
- Picot stitches
Crochet Sunflower Materials & Wire Sizing
For the flowers, I used Sport/Baby/Fine (Category 2) yarn with a 2.5 mm crochet hook.
You’ll also need:
- 0.3 mm copper wire for the full- and half-bloom petals
- 2 mm floral rods for the flower stalks
- 22 AWG floral wire for the matching leaves
- Polyester fiberfill
- Clear all-purpose glue or hot glue
- Pins and basic crochet tools
The finer yarn keeps the petals neat, while the wire and floral rods give the finished flowers enough structure to hold their shape.
How to Crochet a Realistic Sunflower (Step-By-Step)
All three flowers follow the same basic construction:
center disk → petals → receptacle and sepals → stem → finishing
The stitch counts and finishing details vary slightly for each blooming stage, but the overall method stays the same.
1. Crochet the Sunflower Center
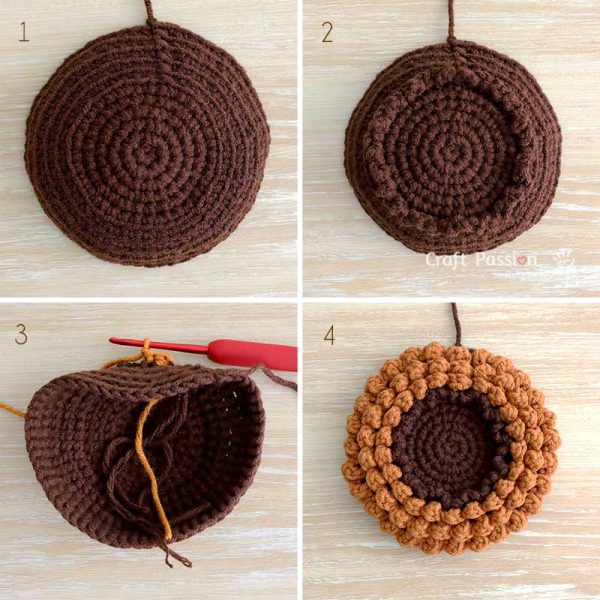
Start with a dark brown center disk worked in rounds.
The full bloom gets extra texture from seed rings crocheted into the unused front loops. The half bloom and opening bud keep their centers plain for a younger-looking flower.
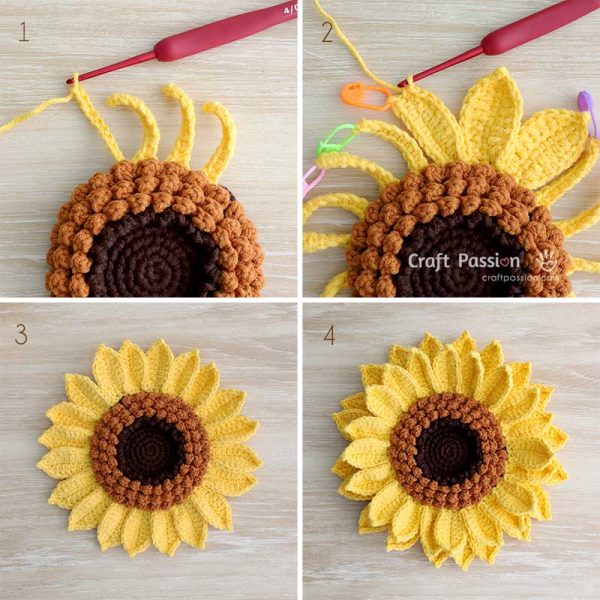
2. Crochet and Shape the Petals
Crochet the petal foundations directly from the center disk, then work around both sides to form each pointed petal.
The full bloom has two petal layers, while the half bloom and opening bud have one. Fine wire is added to the full- and half-bloom petals so you can shape them afterward.
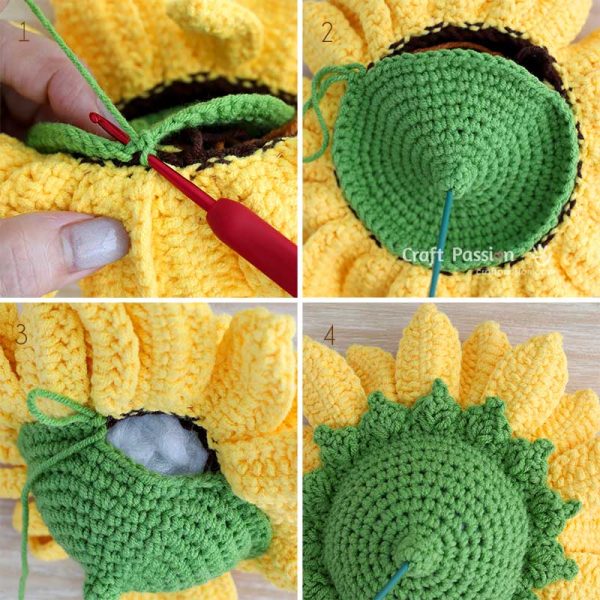
3. Crochet the Receptacle and Sepals
Crochet the green receptacle separately and place it onto the floral rod. Lightly stuff it with fiberfill before joining it to the flower.
Finish with the pointed sepals around the back.
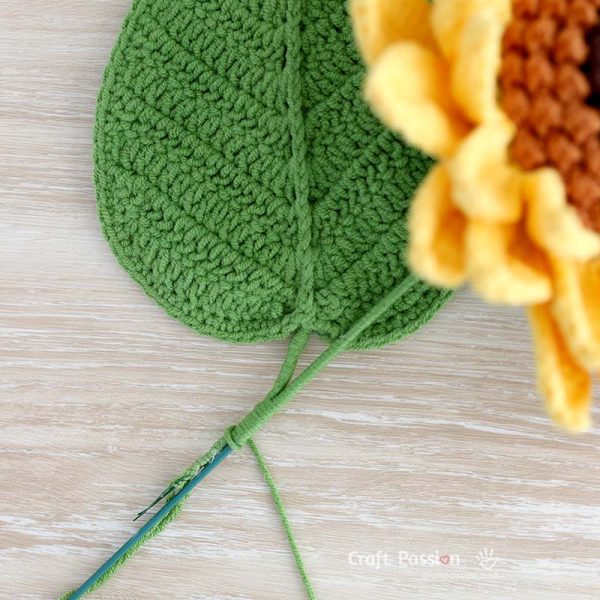
4. Add the Stem and Shape the Flower
Wrap the floral rod with green yarn, adding the matching leaf as you go.
Once everything is secure, gently bend and curve the petals. A little variation from petal to petal gives the sunflower a softer, more natural look.
Three Sunflower Blooming Stages
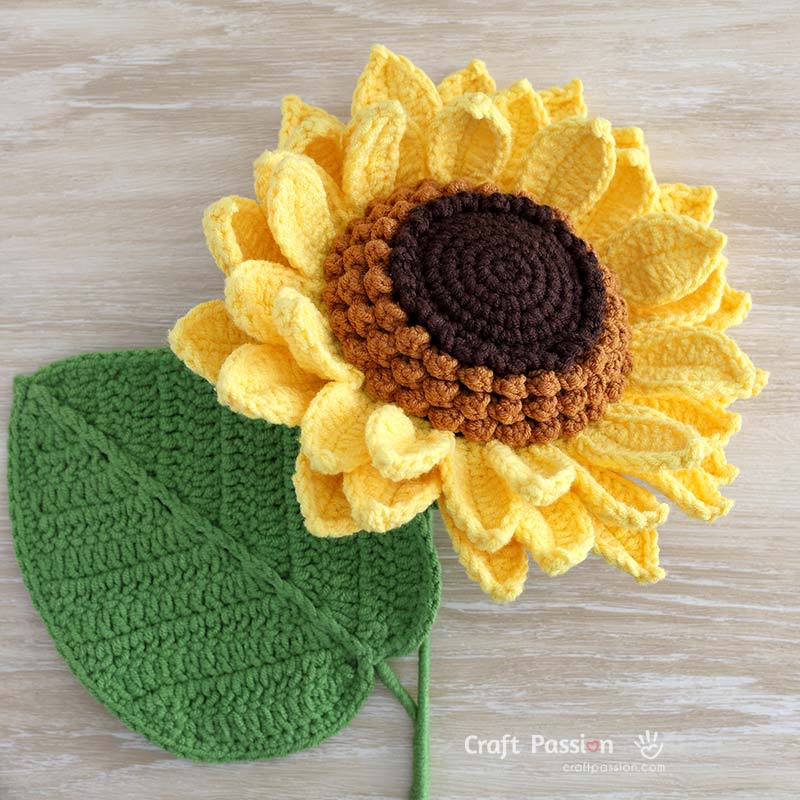
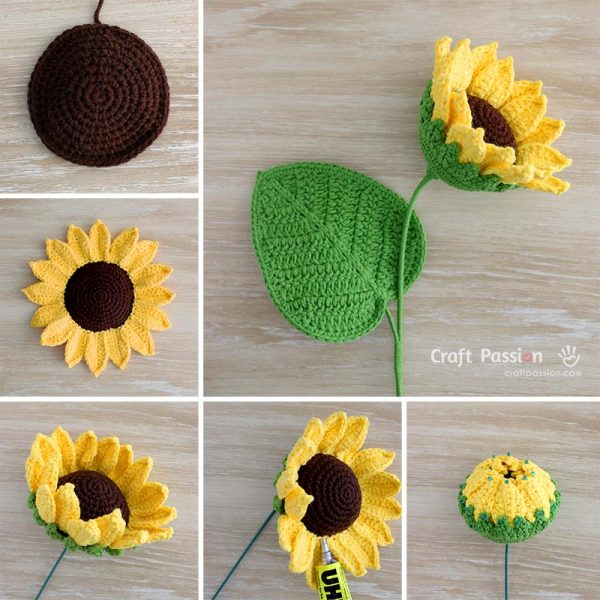
Full-Bloom Sunflower
The full bloom is the largest and most detailed, with two layers of wired petals and four textured seed-ring sections.
Gently spread and curve the petals for an open, lively look. I paired it with a Large Heart-Shaped Leaf.
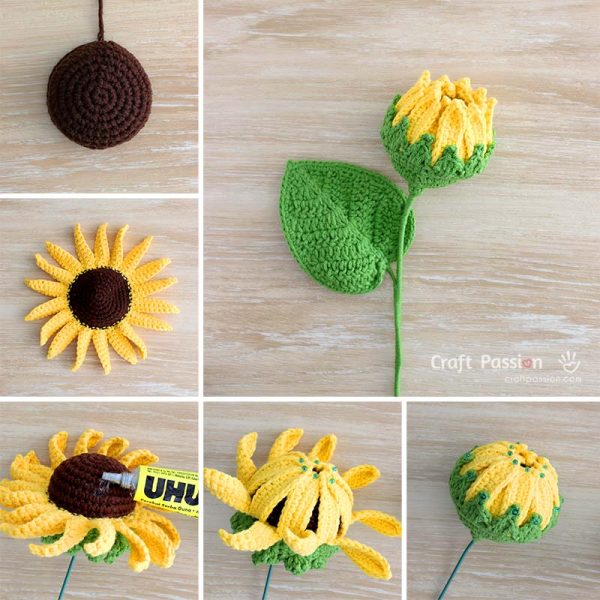
Half-Bloom Sunflower
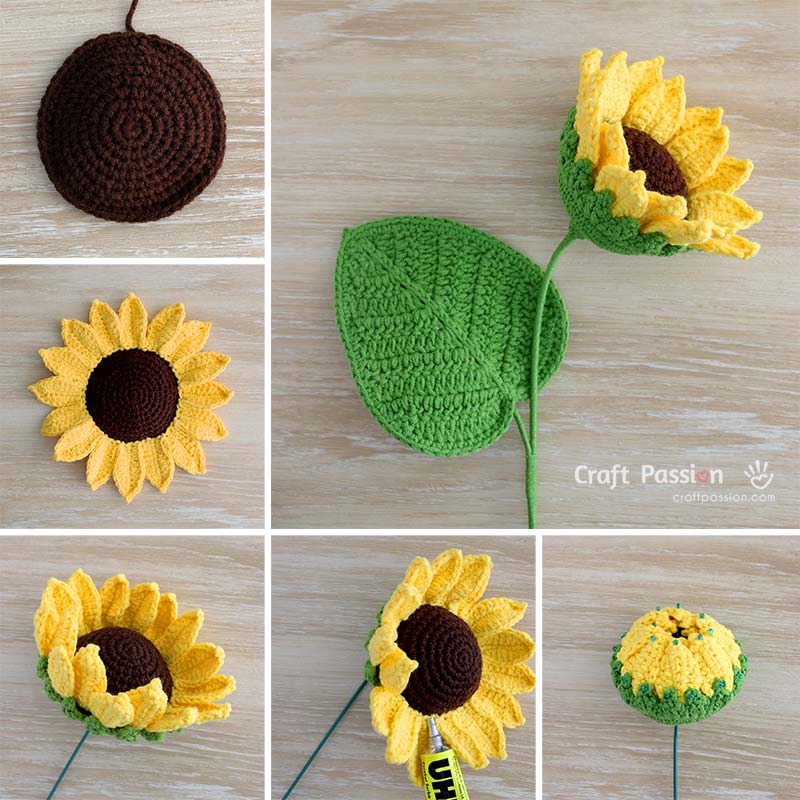
The half-bloom has one layer of wired petals. A little glue along the lower edges keeps them closer to the center while leaving the tips free to curl outward.
I paired it with a Medium Heart-Shaped Leaf.
Opening Sunflower Bud
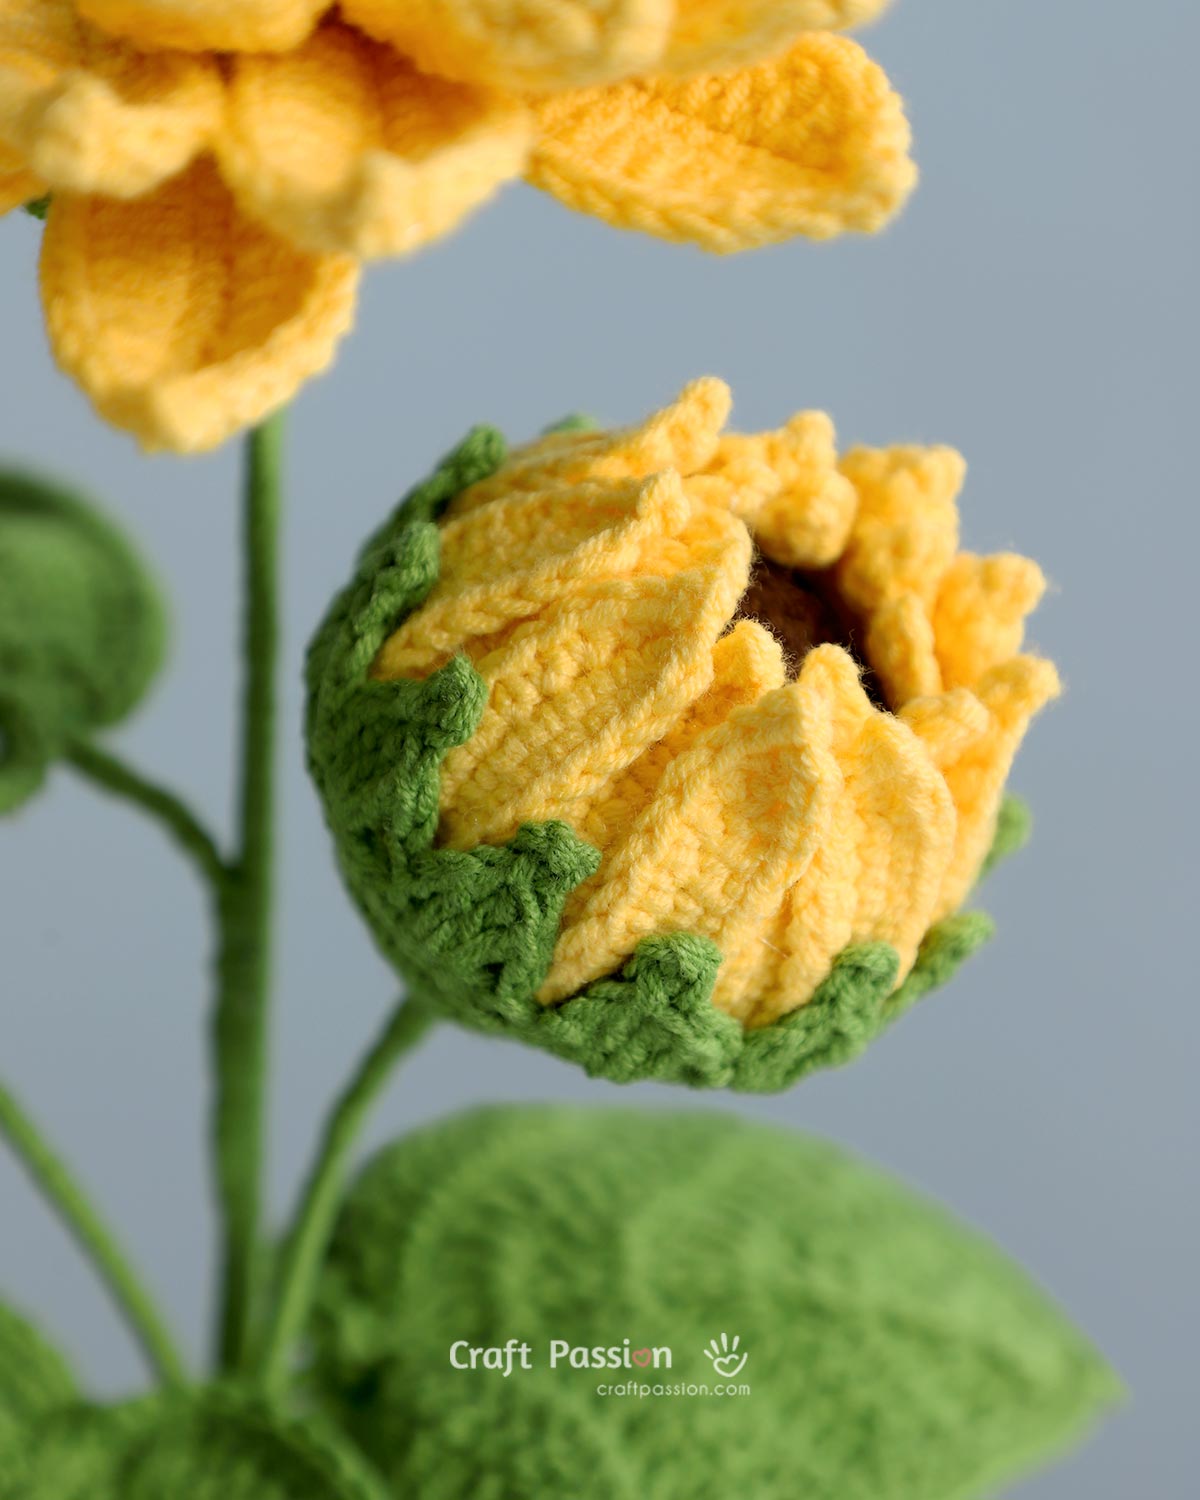
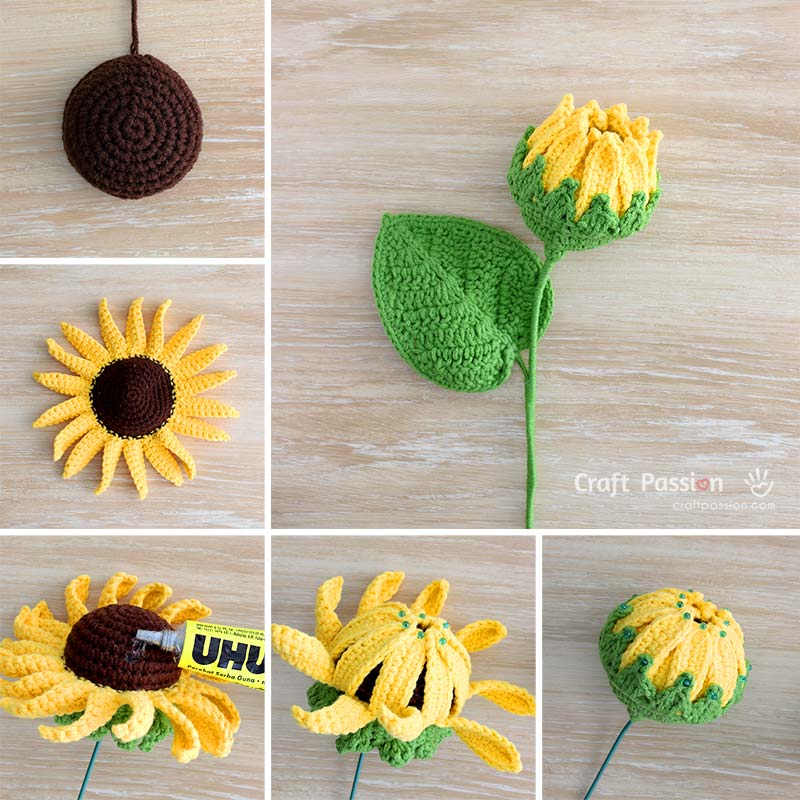
The opening bud is the smallest of the three. Its petals are crocheted without wire and gently secured around the center, with the tips left free as though they are just beginning to open.
I paired it with a Small Heart-Shaped Leaf.
Add the Matching Heart-Shaped Crochet Leaves
The leaves on these flower stalks come from my Heart-Shaped Leaf Crochet Pattern, available in Large, Medium, and Small sizes.
I designed the leaves alongside the sunflower, so their fuller proportions work nicely with the tall stalks. Follow the separate leaf pattern for the complete written instructions and step-by-step photos.
Making a Crochet Sunflower Arrangement
A single crochet sunflower with stem looks lovely in a vase, but mixing different blooming stages makes the arrangement feel much more natural.
I also used the full-bloom and half-bloom sunflowers in a graduation bouquet I made for my daughter. The sunny yellow flowers became a cheerful focal point among the softer pink, purple, blue, and white crochet blooms.
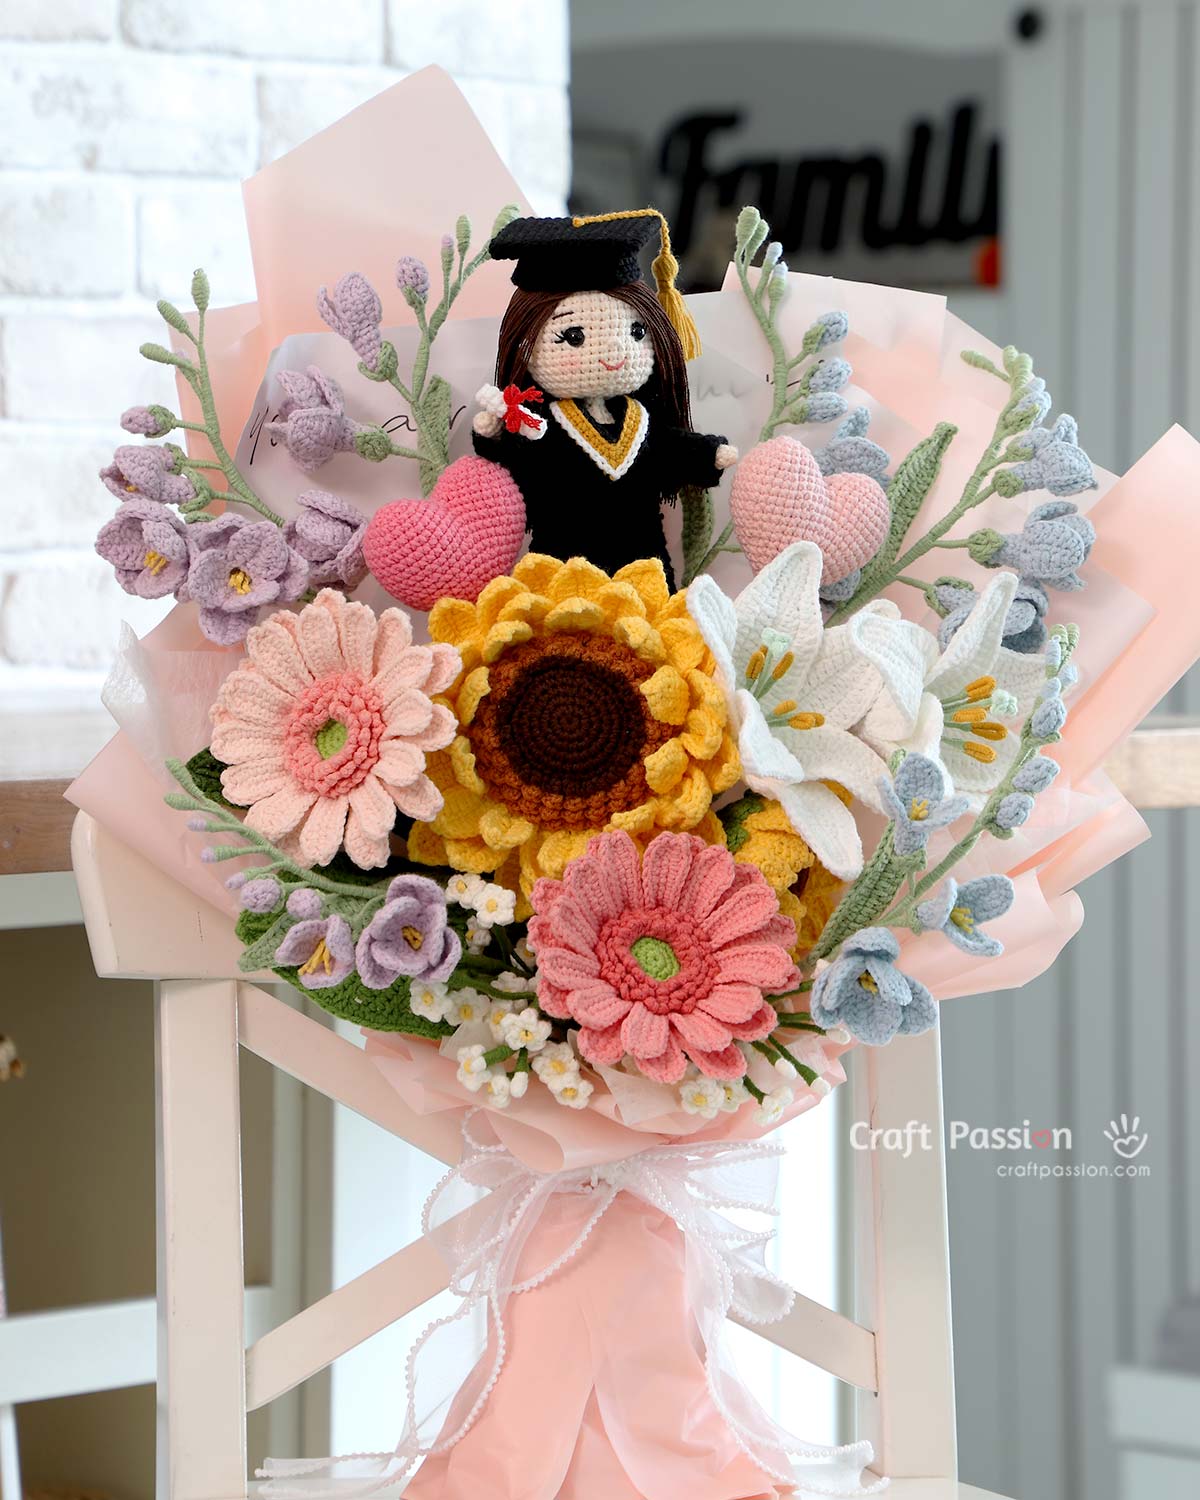
I’ll be sharing more of the flower patterns from this bouquet as I finish preparing them, so stay tuned if you’d like to make your own crochet flower arrangement.
For a simple sunflower display, place the full bloom slightly higher and angle the half bloom and bud in different directions. Let the leaves fall naturally rather than lining everything up evenly.
You can also combine the sunflowers with other crochet flowers for:
- Graduation bouquets
- Birthday gifts
- Mother’s Day
- Thank-you gifts
- Home decor
- Keepsake flower arrangements
Crochet Sunflower FAQ
1. Is this crochet sunflower pattern beginner-friendly?
I recommend it for intermediate crocheters or confident beginners who are comfortable working in rounds. The stitches are familiar, but the wire work, assembly, and shaping need a little more patience.
2. Can you crochet a sunflower without wire?
Yes, but the petals will be softer and harder to shape. I recommend wire for the full bloom and half bloom. The opening bud does not use wire in its petals.
3. Can I use a different yarn weight?
Yes. Thicker yarn will make a larger, heavier sunflower, while thinner yarn will make a more delicate one. Adjust your hook size accordingly, and use a stronger stem if the finished flower becomes heavier.
4. How can I make my crochet sunflower look more realistic?
Shape the petals after assembly instead of leaving them flat. Curve some forward and others backward. The textured center, rounded receptacle, sepals, leaves, and different blooming stages also help create a more natural look.
5. How do I care for a crochet sunflower?
Dust it gently with a soft brush or cloth. Avoid machine washing or soaking because the flower contains wire, glue, and a floral rod. If the petals become flattened, gently reshape them with your fingers.
What’s Next?
Looking for more blooms to add to your collection? Browse my Crochet Flower Patterns for more handmade flower ideas.
You may also enjoy pairing your sunflowers with my Crochet Baby’s Breath Pattern, or Crochet Freesia Flower Pattern, or Crochet Tulip Pattern to create your own everlasting crochet bouquet.
For something quick and beginner-friendly, try my Crochet Flower Applique Pattern. fIt’s a simple little flower that’s fun to make in different colors.
If you make this sunflower, I’d love to see it! Share your project on Instagram and tag @craftpassion, follow Craft Passion on Facebook for more free patterns, and save this crochet sunflower pattern to Pinterest for later, and share this pattern with your crocheter friends.
Happy crocheting!
Downloadable Crochet Pattern Sheet
The complete written pattern below includes the full-bloom sunflower, half-bloom sunflower, and opening bud, from the center disk and petals to the receptacle, sepals, stem, and final shaping.
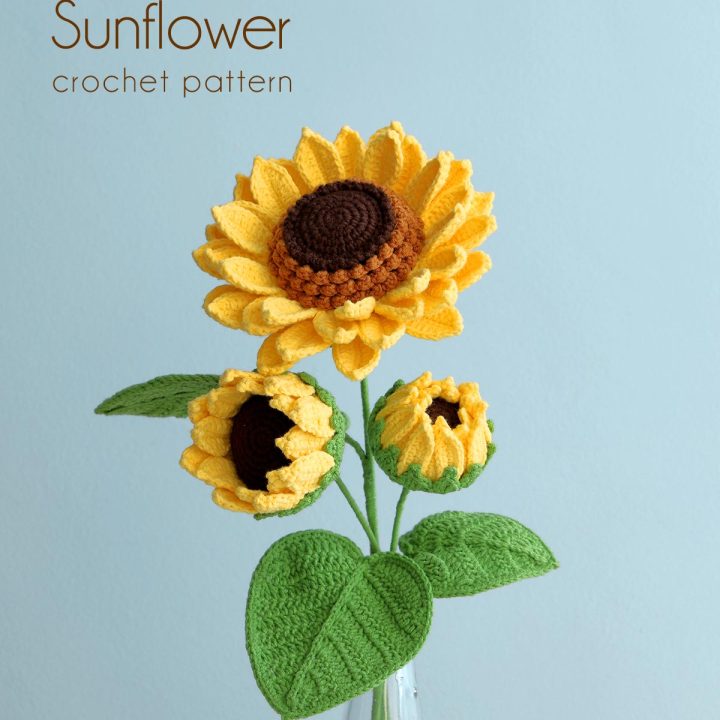
Sunflower Crochet Pattern
Crochet a cheerful sunflower in three stages: full bloom, half bloom, and opening bud. Each version has beautifully shaped petals, a sturdy stem, and a crocheted receptacle with sepals. The full bloom features two layers of petals and textured seed rings, while fine wire helps the petals of the full and half blooms hold their shape. Add the matching heart-shaped crochet leaves to create a lovely sunflower arrangement.
Materials
Yarn - Sport-Weight/Baby-Weight/Fine/Category 2 in CYC's standard
- Dark Brown - for the center disk and inner seed ring (I used #67)
- Brown - for the outer seed rings (I used #65)
- Yellow - for the flower petals (I used #24)
- Grass Green - for the receptacle, sepals, leaves, and stems (I used #37)
Wires
- 0.3 mm silver-colored copper wire - for the petals of the full-bloom and half-bloom sunflowers
- 22 AWG floral wire – for the leaf stems
- 2 mm floral rod (for stalk stem)
Other Materials
Tools
- 2.5 mm Crochet Hook (I used Tulip brand)
- Stitch Markers
- Tapestry Needle
- Pliers & Wire Cutters
- Scissors
- Clear All Purpose Glue ( I recommend UHU) or hot glue
- Pins
Instructions
Pattern Notes
- This pattern is written in US crochet terms.
- The patterns come with 3 blooming stages: full-bloom, half-bloom, and opening bud.
- Each sunflower begins with the dark brown center disk, followed by the petals. The receptacle is crocheted separately, joined to the flower, and finished with sepals.
- The full-bloom sunflower has textured seed rings on the center disk and 2 layers of petals. The half-bloom sunflower and opening bud have plain dark brown centers and a single layer of petals.
- Fine copper wire is crocheted into the petals of the full-bloom and half-bloom flowers to help them hold their shape.
- For the half-bloom and opening bud, glue is used to keep the petals partially closed and create the different blooming stages.
- Prepare each flower stem by bending one end of the 2 mm floral rod into a small circle, then bend the circle at a right angle to the rod. Wrap green yarn below the bend to create a small bump or stopper, which helps prevent the stem from sliding through the receptacle.
- Use only a small amount of glue where needed.
- When the pattern says Join, join with a slip stitch to the first stitch of the round. The joining sl st and the beginning chain are not counted as stitches. Pull the joining sl st snugly so it is small and less noticeable.
- Stitch counts are shown in { } at the end of each round.
- To complete the sunflower stalks, use the matching Heart-Shaped Leaf Crochet Pattern. I paired a Large Leaf with the full bloom, a Medium Leaf with the half bloom, and a Small Leaf with the opening bud.
Abbreviations
MR: magic ring or magic circle
ch3picot: 3-chain picot
inc: 2sc increase, work 2 sc in the same stitch
2dc: dc increase, work 2 dc in the same stitch
sk: skip
st(s): stitch(es)
BLO: back loop only
FLO: front loop only
RS: Right Side
WS: Wrong Side
Full-Bloom Sunflower
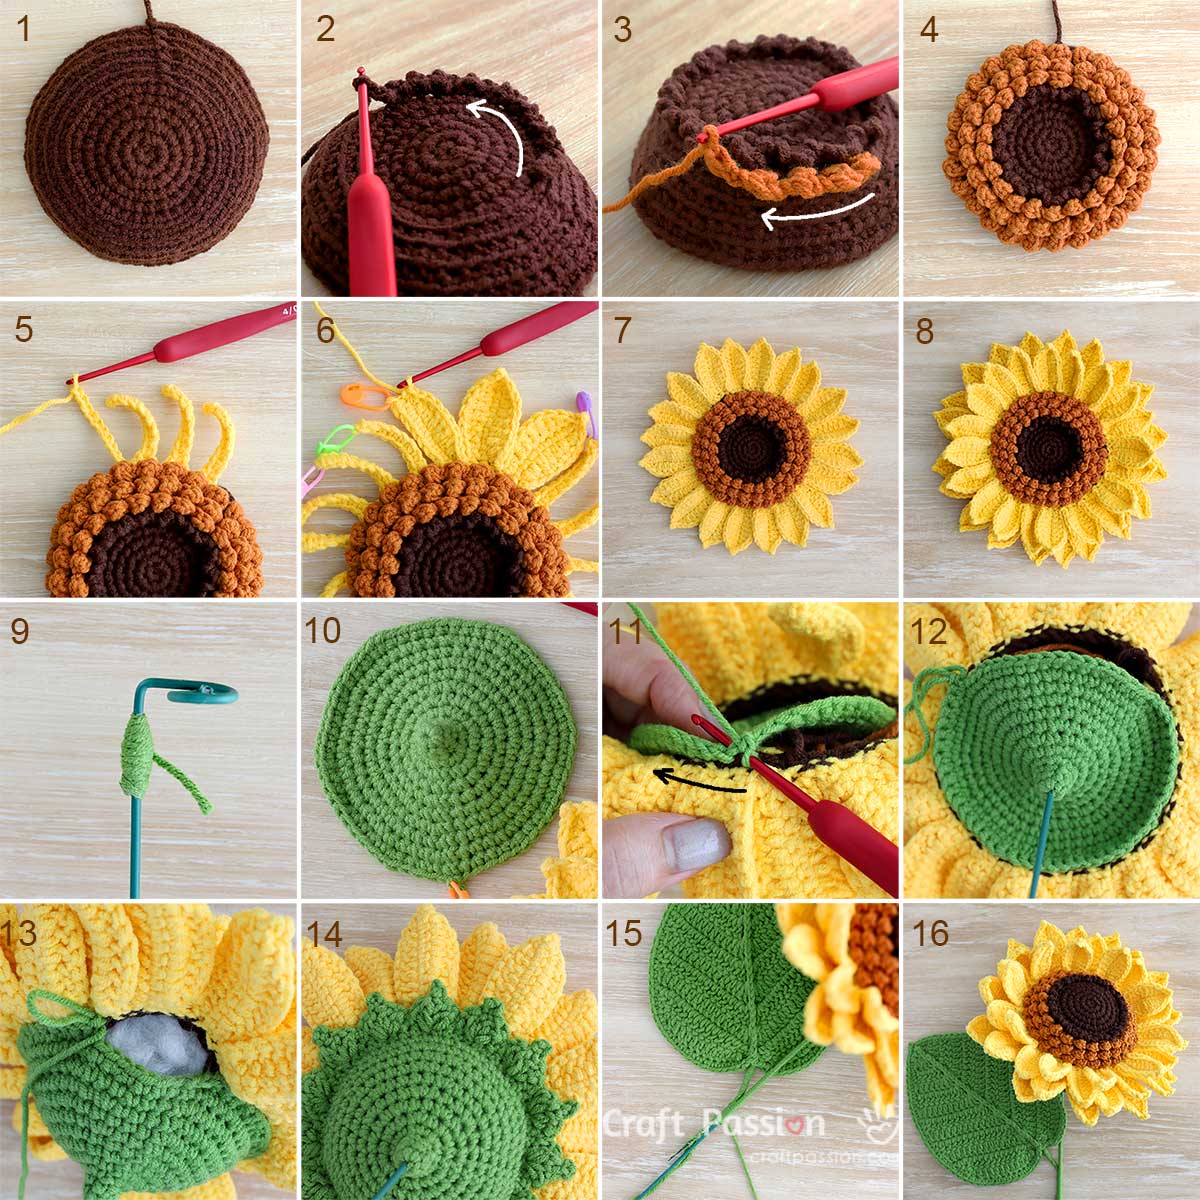
Center Disk (pic 1)
With Dark Brown yarn, make an MR.
Round 1: sc 6 in MR. Join. {6}
Round 2: ch 1, [inc] around. Join. {12}
Round 3: ch 1, [sc, inc] around. Join. {18}
Round 4: ch 1, [inc, sc 2] around. Join. {24}
Round 5: ch 1, [sc 3, inc] around. Join. {30}
Round 6: ch 1, [sc 2, inc, sc 2] around. Join. {36}
Work the following rounds in BLO:
Round 7 [BLO]: ch 1, [sc 5, inc] around. Join. {42}
Round 8 [BLO]: ch 1, [sc 3, inc, sc 3] around. Join. {48}
Round 9 [BLO]: ch 1, [sc 7, inc] around. Join. {54}
Round 10 [BLO]: ch 1, [sc 4, inc, sc 4] around. Join. {60}
Round 11 [BLO]: ch 1, sc around. Join. {60}
fo.
Seed Rings (pics 2 - 4)
Work the seed rings into the unused front loops of Center Disk Rounds 6 - 9.
Seed Ring 1 - Dark Brown
Join a new strand of Dark Brown yarn to the first FLO of Center Disk Round 6 with a sl st.
[ch 2, sl st in next st] around (36 times). fo.
Rotate the center disk so the last round is closer to you. Work the remaining seed rings in the opposite direction so the WS of the seed ring stitches faces up.
Seed Ring 2 - Brown
Working in the FLO of Center Disk Round 7:
[(ch 1, dc) in next FLO, (ch 1, sl st) in next FLO] around (21 times). fo.
Seed Ring 3 - Brown
Working in the FLO of Center Disk Round 8:
[(ch 1, dc) in next FLO, (ch 1, sl st) in next FLO] around (24 times). fo.
Seed Ring 4 - Brown
Working in the FLO of Center Disk Round 9:
[(ch 1, dc) in next FLO, (ch 1, sl st) in next FLO] around (27 times). fo.
Weave all yarn ends to the WS of the center disk, then return the disk to its normal orientation to crochet the petals.
Flower Petals (pics 5 - 8)
Use Yellow yarn. Carry the 0.3 mm wire only when working in Round 2 of each petal layer.
Top Petals
Work the top petals into the FLO of Center Disk Round 10.
Round 1 - Petal Foundations
[ch 10. Place a stitch marker in the last ch to mark the turning ch. Starting in the 2nd ch from the hook, sc in next 9 ch. Continue on the center disk: sk next st, sl st in next 2 sts] repeat 20 times.
You should now have 20 petal foundations extending from the disk.
Round 2 - carry along 0.3 mm wire:
[Work around each petal foundation: sc, hdc, dc 5, hdc, sc, work (sc, ch1picot) in the marked turning ch; continue along the opposite side: sc, hdc, dc 5, hdc, sc. Continue on the center disk: sk next st, sl st in next st] repeat 20 times.
fo.
Bottom Petals
Work the bottom petals into the FLO of Center Disk Round 11.
Begin at the 3rd st to position each bottom petal between two top petals.
Round 1 - Petal Foundations
[ch 12. Place a stitch marker in the last ch to mark the turning ch. Starting in the 2nd ch from the hook, sc in next 11 ch. Continue on the center disk: sk next st, sl st in next 2 sts] repeat 20 times.
You should now have 20 bottom petal foundations extending from the disk.
Round 2 - carry along 0.3 mm wire:
[Work around each petal foundation: sc, hdc, dc 7, hdc, sc; work (sc, ch1picot) in the marked turning ch; continue along the opposite side: sc, hdc, dc 7, hdc, sc. Continue on the center disk: sk next st, sl st in next st] repeat 20 times.
fo.
Weave all yarn and wire ends to the WS of the center disk.
Receptacle (pics. 9 - 14)
With Green yarn, make an MR.
Round 1: sc 6 in MR. Join. {6}
Round 2 - 3: ch 1, sc around. Join. {6}
Round 4: ch 1, [inc] around. Join. {12}
Round 5: ch 1, [sc, inc] around. Join. {18}
Round 6: ch 1, [inc, sc 2] around. Join. {24}
Round 7: ch 1, [sc 3, inc] around. Join. {30}
Round 8: ch 1, [sc 2, inc, sc 2] around. Join. {36}
Round 9: ch 1, [sc 5, inc] around. Join. {42}
Round 10: ch 1, [sc 3, inc, sc 3] around. Join. {48}
Round 11: ch 1, [sc 7, inc] around. Join. {54}
Round 12: ch 1, [sc 4, inc, sc 4] around. Join. {60}
Prepare the floral rod as described in Pattern Note 7. Insert it through the MR opening of the receptacle and apply a small amount of glue at the stopper to secure it.
Join the Receptacle to the Flower
Place the receptacle and flower with their WS together, with the flower facing you.
Work the next round in the opposite direction from the receptacle so the RS of the receptacle and sepals will face outward.
Insert the hook through the BLO of Center Disk Round 11, then through both loops of the corresponding stitch on Receptacle Round 12. Stuff the receptacle lightly with polyester fiberfill before completing the round.
Round 13: ch 1, sc around through both pieces. Join. {60}
Sepals
Round 14: [ch 1, sk next st, (2dc, ch3picot, 2dc) in next st, ch 1, sk next st, sl st in next st] repeat 15 times.
fo.
Weave all yarn ends into the receptacle.
Finishing (pics 15 & 16)
Wrap the floral rod with green yarn, adding a Large Heart-Shaped Leaf as you wrap.
Gently shape the wired petals to give the full-bloom sunflower an open, natural look.
Half-Bloom Sunflower
Center Disk
With Dark Brown yarn, make an MR.
Round 1: sc 6 in MR. Join. {6}
Round 2: ch 1, [inc] around. Join. {12}
Round 3: ch 1, [sc, inc] around. Join. {18}
Round 4: ch 1, [inc, sc 2] around. Join. {24}
Round 5: ch 1, [sc 3, inc] around. Join. {30}
Round 6: ch 1, [sc 2, inc, sc 2] around. Join. {36}
Round 7: ch 1, [sc 5, inc] around. Join. {42}
Round 8: ch 1, [sc 3, inc, sc 3] around. Join. {48}
Round 9: ch 1, sc around. Join. {48}
fo.
Flower Petals
Use Yellow yarn. Carry the 0.3 mm wire only in Round 2.
Work the petals into the FLO of Center Disk Round 9.
Round 1 - Petal Foundations:
[ch 10. Place a stitch marker in the last ch to mark the turning ch. Starting in the 2nd ch from the hook, sc in next 9 ch. Continue on the center disk: sk next st, sl st in next 2 sts] repeat 16 times.
You should now have 16 petal foundations extending from the disk.
Round 2 - carry along 0.3 mm wire:
[Work around each petal foundation: sc, hdc 2, dc 3, hdc 2, sc, work (sc, ch1picot) in the marked turning ch; continue along the opposite side: sc, hdc 2, dc 3, hdc 2, sc. Continue on the center disk: sk next st, sl st in next st] repeat 16 times.
fo.
Weave all yarn and wire ends to the WS of the center disk.
Receptacle
With Green yarn, make an MR.
Round 1: sc 6 in MR. Join. {6}
Round 2 - 3: ch 1, sc around. Join. {6}
Round 4: ch 1, [inc] around. Join. {12}
Round 5: ch 1, [sc, inc] around. Join. {18}
Round 6: ch 1, [inc, sc 2] around. Join. {24}
Round 7: ch 1, [sc 3, inc] around. Join. {30}
Round 8: ch 1, [sc 2, inc, sc 2] around. Join. {36}
Round 9: ch 1, [sc 5, inc] around. Join. {42}
Round 10: ch 1, [sc 3, inc, sc 3] around. Join. {48}
Prepare the floral rod as described in Pattern Note 7. Insert it through the MR opening of the receptacle and apply a small amount of glue at the stopper to secure it.
Place the receptacle and flower with their WS together, with the flower facing you. Join through the BLO of Center Disk Round 9 and both loops of Receptacle Round 10. Stuff lightly with polyester fiberfill before completing the joining round.
Round 11: ch 1, sc around through both pieces. Join. {48}
Round 12: ch 1, sc around, join. {48}
Sepals
Round 13: [ch 1, sk next st, (dc, ch3picot, dc) in next st, ch 1, sl st in next st] repeat 16 times.
fo.
Weave all yarn ends into the receptacle.
Finishing
Wrap the floral rod with green yarn, adding a Medium Heart-Shaped Leaf as you wrap.
Apply a small amount of glue along the lower edge of the petals to hold them closer to the center disk. Glue the sepals lightly to the back of the petals, then pin everything in position until the glue dries.
Remove the pins and gently shape the petals to create a natural half-bloom appearance.
Opening Bud
Center Disk
With Dark Brown yarn, make an MR.
Round 1: sc 6 in MR. Join. {6}
Round 2: ch 1, [inc] around. Join. {12}
Round 3: ch 1, [sc, inc] around. Join. {18}
Round 4: ch 1, [inc, sc 2] around. Join. {24}
Round 5: ch 1, [sc 3, inc] around. Join. {30}
Round 6: ch 1, [sc 2, inc, sc 2] around. Join. {36}
Rounds 7 to 9: ch 1, sc around. Join. {36}
fo.
Turn the disk to crochet the petals.
Flower Petals
Use Yellow yarn. Work the petals into the FLO of Center Disk Round 9.
Round 1 - Petal Foundations:
[ch 10. Place a stitch marker in the last ch to mark the turning ch. Starting in the 2nd ch from the hook, sc in next 9 ch. Continue on the center disk: sl st in next 2 sts] repeat 18 times.
You should now have 18 petal foundations extending from the disk.
Round 2:
[Work around each petal foundation: sc in next 9 sts, work (sc, ch1picot) in the marked turning ch; continue along the opposite side: sc in next 9 sts. Continue on the center disk: sk next st, sl st in next st] repeat 18 times.
fo.
Weave all yarn ends to the WS of the center disk.
Receptacle
With Green yarn, make an MR.
Round 1: sc 6 in MR. Join. {6}
Round 2 - 3: ch 1, sc around. Join. {6}
Round 4: ch 1, [inc] around. Join. {12}
Round 5: ch 1, [sc, inc] around. Join. {18}
Round 6: ch 1, [inc, sc 2] around. Join. {24}
Round 7: ch 1, [sc 3, inc] around. Join. {30}
Round 8: ch 1, [sc 2, inc, sc 2] around. Join. {36}
Prepare the floral rod as described in Pattern Note 7. Insert it through the MR opening and secure the stopper inside the receptacle with a small amount of glue.
Place the receptacle and flower with their WS together. Join through the BLO of Center Disk Round 9 and both loops of Receptacle Round 8. Stuff lightly with polyester fiberfill before completing the joining round.
Round 9: ch 1, sc around through both pieces. Join. {36}
Round 10: ch 1, sc around. Join. {36}
Sepals
Round 11: [ch 2, sk next st, (dc, tr, ch3picot, dc) in next st, ch 2, sl st in next st] repeat 12 times.
fo.
Weave all yarn ends into the receptacle.
Finishing
Wrap the floral rod with green yarn, adding a Small Heart-Shaped Leaf as you wrap.
Apply a small amount of glue to the petals, leaving the tips free, and press them gently against the center disk to form the opening bud. Glue the sepals lightly to the backs of the petals and pin everything in place until dry.
Remove the pins and adjust the petal tips to create a softly opening sunflower bud.
Notes
The total time required is an estimate and may vary depending on your crochet speed and experience level.
You may crochet and sell the finished sunflowers in small batches at maker markets. However, the pattern and images may not be reproduced, republished, or distributed in any form without prior written permission from Craft Passion.
This downloadable crochet pattern is intended for easy offline use and quick reference. For the complete step-by-step tutorial and additional information, visit the full article at: https://www.craftpassion.com/crochet-sunflower-pattern/