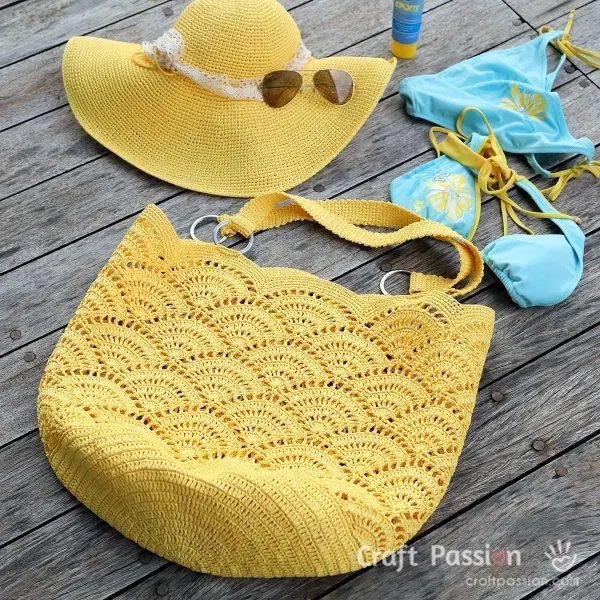
Thank you, dear friends, for loving the yellow wide-brim beach hat that I have shared with the free crochet pattern recently. Now, here is the lovely yellow oversized crochet bag pattern I promised to share to match the crochet hat. Get some raffia yarns of your favorite colors today and start crocheting this free pattern or save it as your next crochet project for your upcoming beach holiday!

WHAT MAKES THIS BEACH BAG UNIQUE?
As you may tell from the photos, this isn’t your normal run-of-the-mill crocheted bag. In fact, this lovely bag is made out of a shell-like pattern you may find on fan-shaped seashells that have been washed ashore. These beautiful patterns are known as the shell stitch technique.
In addition, this beach bag also has scallop edges to enhance the playful character of the bag. Hence, making it the perfect bag for a good time at the beach and it will surely catch all the passers-by’s attention! This is not even the best part of the bag yet, read on to find out the best thing this crocheted tote bag has to offer!!
CROCHET BAG DIMENSIONS
I love this beautiful bag not only for its cute patterns but, more importantly, its size and dimensions. This free crochet tote bag pattern makes a sturdy oversized bag that has a round base of about 15.5″ in diameter and a body (including the shoulder straps) of roughly 25″ tall. It is the perfect size for all your beach trip essentials and more.

STRAW BEACH BAG WITH WIDE OPENING FOR EASY ACCESS
Another plus point of this bag crochet pattern is that it produces a bag with a wide opening which allows you to easily obtain all your necessities. What’s in my bag, you may ask, so here’s a list of essential items I brought on my short beach trip:
- Sunscreen lotion, otherwise you will get “sun-SCREAM”
- Swimsuits & Cover-ups
- Sunglasses
- Wide Brim Beach Hat or Sun Hat
- Beach Bag, make sure it is big enough to put all items in it
- Beach towel
- Drinking water
- Change of Clothes – just in case
- First-aid kit with aloe
- Frisbee or balls or fun floats to play with kids
- Books or Electronic Reader like Kindle (buy them at Amazon)
- GoPro for underwater video shoots (buy it at Amazon)
- Fins, water shoes, and snorkel gear if you plan to have a sea adventure

CROCHET TOTE BAG PATTERN
GIANT SHELL STITCH
scroll ⬇️ to get the free crochet pattern & tutorial
Though we presented it as a beach bag, it is actually great to use as a market bag for your weekly trip to the farmers market. It will definitely hold all the fresh produce in place, preventing bruises on fruits and veggies.
Bringing it to the grocery store for your grocery shopping is another great way to reduce the amount of plastic bags I use.
This crochet bag is also a perfect bag to carry your yarns and work-in-progress knitting and crochet projects when you are on the go. I like to carry my yarn supplies to crochet while waiting to pick up the kids from their classes.
Be it functional for everyday use and/or aesthetically pleasing, it sure is a perfect modern crochet bag pattern to crochet. So make one today, be it for your own or as a gift for loved ones. I would advise you to make a few as no one will resist this beautiful crochet bag from you. As a crocheter who loves to make and give, I know it well!!!

HOW TO CROCHET?
Frankly speaking, it may be difficult for a beginner to master and is more suitable for a crocheter of intermediate or advanced skill level. However, with all the details we explained in the pattern section, we welcome beginners to take up the challenge of crocheting this stunning tote bag.
The written crochet bag pattern includes step-by-step pictures displaying the details for you to refer to. Before jumping into the full pattern section, let’s prepare the materials and tools needed to construct this cute tote bag. You will need approximately 3.5 rolls of raffia yarn, 4 pieces of flat circle ring, a 2.5 mm crochet hook, stitch marker, tapestry needle, and an iron, preferably with a steam function.
As I have mentioned above, this crochet bag pattern is not an easy pattern and is more suited for crocheters with intermediate crochet skills. In order to construct this cute raffia bag, some knowledge of basic crochet stitches is required. I have written a note on the stitches used and things to take note of in this pattern in the section below. Do follow through with all the instructions, and I believe you should have no problem completing it.
If you need a refresher on the basics of crochet, you may read our complete guide to crochet for beginners. There are also plenty of Youtube video tutorials on crochet stitches to guide you. Challenge yourself to the next level and do give it a go!
IMPORTANT NOTE ON THE CROCHET BAG PATTERN
A key point in this crochet bag pattern is that it is not constructed with the regular “round by round” crochet patterns. Instead, it is a “shell by shell” method, where you have to complete a shell before proceeding to make another shell adjacent to it.
This crochet bag pattern is developed based on raffia yarn; however, you may substitute it with acrylic yarn or cotton yarn if you prefer.
STITCHES IN STRAW BEACH BAG PATTERN
The pattern begins from the base and works upwards. The body of the Giant Shell Stitch tote is made from simple stitches such as single crochet stitches, double crochet stitches, triple crochet, slip stitch (sl st), and chain stitch. Whilst, the strap is crocheted from the split single crochet stitch (abbrev as SSC), also known as a crochet knit stitch or waistcoat stitch. Simply insert the hook between the legs of the next stitch instead of the loops to make the SSC. This crochet stitch will produce a more substantial strap that will not be easily stretched by weight.

Once you have mastered this great pattern, you may incorporate it into a crochet purse pattern, market bag patterns, or even garments and blankets with the color combination of your choice.
I have just updated another oversized crochet tote bag. The crochet pattern here is more straightforward than this Giant Shell Stitch Beach Tote Crochet Pattern. If you are looking for large crochet totes to crochet, you may consider this as well.
EASY-TO-CLEAN CROCHET BAG
Got sand in your beach tote? Just shake it off! I purposely made this crochet bag pattern without any lining, just in case the sand gets into the bag, we can quickly shake them off.
You may wipe the crochet beach tote bag with a damp cloth to remove any residue caught from the beach. Iron it with medium heat if needed.

WHAT’S NEXT:
- Start crocheting and share your completed handmade on Facebook and/or Instagram. Remember to tag us, @craftpassion, so that we are able to see them.
- Pin it to Pinterest to add into your future To-Crochet List.
- Share with your crochet groups for a crochet-along event.
- Browse more free crochet patterns to make, particularly for bags & purses and summer-themed crafts.
- Get more free crochet patterns for Raffia Yarn Projects.
Happy crocheting!

Crochet Beach Tote Bag Pattern
The gorgeous giant shell stitch design and the scallop edges make the beach tote unique while cast on a character. Spice up your vacation with these stunning beach essential duos that will surely catch all the passers-by's attention!
Definitely is the best summer vibes crochet bag to make for yourself and your friends.
Materials
- Crochet raffia yarns, 3.5 rolls.
- Flat Circle Ring, 4 pcs.
Tools
- Crochet hook 2.5 mm
- Stitch marker
- Tapestry needle
- Iron, preferably with steam function
Instructions
Finished dimension:
Base: 15.5" diameter
Body with straps: 25" tall
Crochet Tension (4 inches square)
21 sts x 9.5 rows double crochet stitches after blocked)
Abbreviations:
(in American crochet terms)
ch = chain
ch sp = chain space
dc = double crochet
mr = magic ring
R= Row
Rnd = Round
RS = Right Side
sc = single crochet
sk = skip
sl st = slip stitch
ssc = split single crochet / knit stitch / waistcoat stitch
st = stitch
tr = triple crochet
WS = Wrong Side
CROCHET BEACH TOTE BAG PATTERN
This pattern begins from the base and works upward.
The first ch3 of the round is counted as 1 dc stitch unless otherwise specified
BASE (refer to picture 1 & 2)
Rnd 1: ch3, 13 dc into mr, sl st to join the round into the first stitch of the rnd. {14}
Rnd 2: (ch3, dc in first st), 2dc in next 13 sts, sl st to the 3rd ch at the beginning of the rnd. {28}
Rnd 3: ch3, 2dc in next st, (dc in next st, 2dc in next st) 13 times, sl st to the 3rd ch at the beginning of the rnd. {42}
Rnd 4: (ch3, dc in first st), dc in next 2 sts, (2dc in next st, dc in next 2 sts) 13 times, sl st to the 3rd ch at the beginning of the rnd. {56}
Rnd 5: ch3, dc in next st, 2dc in next st, (dc in next 3 sts, 2dc in next st) 13 times, dc in next st, sl st to the 3rd ch at the beginning of the rnd. {70}
Rnd 6: (ch3, dc in first st), dc in next 4 sts, (2dc in next st, dc in next 4 sts) 13 times, sl st to the 3rd ch at the beginning of the rnd. {84}
Rnd 7: ch3, dc in next 2 sts, 2dc in next st, (dc in next 5 sts, 2dc in next st) 13 times, dc in next 2 sts, sl st to the 3rd ch at the beginning of the rnd. {98}
Rnd 8: (ch3, dc in first st), dc in next 6 sts, (2dc in next st, dc in next 6 sts) 13 times, sl st to the 3rd ch at the beginning of the rnd. {112}
Rnd 9: ch3, dc in next 3 sts, 2dc in next st, (dc in next 7 sts, 2dc in next st) 13 times, dc in next 3 sts, sl st to the 3rd ch at the beginning of the rnd. {126}
Rnd 10: (ch3, dc in first st), dc in next 8 sts, (2dc in next st, dc in next 8 sts) 13 times, sl st to the 3rd ch at the beginning of the rnd. {140}
Rnd 11: ch3, dc in next 4 sts, 2dc in next st, (dc in next 9 sts, 2dc in next st) 13 times, dc in next 4 sts, sl st to the 3rd ch at the beginning of the rnd. {154}
Rnd 12: (ch3, dc in first st), dc in next 10 sts, (2dc in next st, dc in next 10 sts) 13 times, sl st to the 3rd ch at the beginning of the rnd. {168}
Rnd 13: ch3, dc in next 5 sts, 2dc in next st, (dc in next 11 sts, 2dc in next st) 13 times, dc in next 5 sts, sl st to the 3rd ch at the beginning of the rnd. {182}
Rnd 14: (ch3, dc in first st), dc in next 12 sts, (2dc in next st, dc in next 12 sts) 13 times, sl st to the 3rd ch at the beginning of the rnd. {196}
Rnd 15: ch3, dc in next 6 sts, 2dc in next st, (dc in next 13 sts, 2dc in next st) 13 times, dc in next 6 sts, sl st to the 3rd ch at the beginning of the rnd. {210}
Rnd 16: (ch3, dc in first st), dc in next 14 sts, (2dc in next st, dc in next 14 sts) 13 times, sl st to the 3rd ch at the beginning of the rnd. {224}
Rnd 17: ch3, dc around, sl st to the 3rd ch at the beginning of the rnd. {224}
Rnd 18: ch, sc around, sl st to the ch at the beginning of the rnd. {224}
Block the base by pressing it with a warm iron. Continue to work on the body
BODY (GIANT SHELL STITCH)
Bottom Shell (refer to pictures 3 to 9)
Note: First bottom shell will take up 29 sts from the base, 2nd to 7th bottom shell will take up 28 sts each, last bottom shell will take up 27 sts. In other words, each shell will take up 29 sts with 1 sts shared between shells.
R1: (RS) ch, sk 3 sts, (dc in next st) 2 times, tr in next st, 5tr in next st, tr in next st, (dc in next st) 2 times, ch, sk 3 sts, sc in next st, ch2, sk 1 st, sc in next st, turn. (refer to picture 3)
R2: (WS) ch, sk 1 st, (dc in next st, ch) 11 times, dc in next st. Proceed to work on the base (Round 18) of the tote, sk 1 st, sc in next st, ch2, sk 2 sts, sc in next st, turn. (refer to picture 4)
R3: (RS) On the shell (2dc in next ch sp) 12 times, dc in next st. Proceed to work on the base (Round 18) of the tote, sk 2 sts, sc in next st, ch2, sk 2 sts, dc in next st, turn. (refer to picture 5)
R4: (WS) ch2, sk 2 sts, dc in next st, (ch2, sk 1 st, dc in next st) 11 times, ch2. Proceed to work on the base (Round 18) of the tote, sk 1 st, slst in next 22 sts, turn. (refer to pictures 6 & 7)
Repeat R1 to R4 to make 8 bottom shells until you reach the last ch2 of round 4 of bottom shell 8, replace ch2 with a dc stitch. (refer to pictures 8 & 9)
Intermediate Shell (refer to pictures 10 & 19)
R1: (WS) ch, sc in the first dc st on the edge of the shell next to it, ch2, sc in next dc st, turn. (refer to picture 10)
R2: (RS) 5dc into ch sp of R1, sc in next dc st on the edge of the shell next to it, ch2, sc in next dc st on the edge of the shell, turn. (refer to picture 11)
R3: (WS) (ch, dc in next st) 5 times, sc in next dc st on the edge of the shell next to it, ch2, sc in next dc st on the edge of the shell, turn. (refer to picture 12)
R4: (RS) (2dc into next ch sp) 2 times, 3dc in next ch sp, (2dc into next ch sp) 2 times, dc in next st, sc in next dc st on the edge of the shell next to it, ch2, sc in next dc st on the edge of the shell, turn. (refer to picture 13)
R5: (WS) (ch, dc in next st ) 12 times, sc in next dc st on the edge of the shell next to it, ch2, sc in next dc st on the edge of the shell, turn. (refer to picture 14)
R6: (RS) (2dc into next ch sp) 12 times, dc in next st, sc in next dc st on the edge of the shell next to it, ch2, sc in next dc st on the edge of the shell, turn. (refer to picture 15)
R7: (WS) ch2, sk 2 st, dc in next st, (ch2, sk 1 st, dc in next st) 11 times, sc in next dc st on the edge of the shell next to it, slst in next 18 st. (refer to picture 16)
Repeat R1 to R7 (as a shell) 8 times to make 1 row of a giant shell pattern until you reach the R7. Omit the instruction of "sl st in next 18 st" because you have completed the whole row. Turn to the right side to continue with the top trim pattern.
Repeat 7 times to create 7 rows of "intermediate shell" pattern.
Top Trim (working with RS facing you) (refer to pictures 22 & 29)
R1: slst into ch sp, ch, *(2sc in ch sp, sc in next dc st) 11 times, 2sc in ch sp*. Repeat pattern * on the next shell until you complete all 8 shells, slst to the first sc st of the round. {35 sts per shell}
R2: slst in next st, ch, (sc in next 33 sts, sk 2 sts) 8 times, slst to the first sc st of the round. {33 sts per shell}
R3: slst in next st, ch, (sc in next 31 sts, sk 2 sts) 8 times, slst to the first sc st of the round. {31 sts per shell}
R4: slst in next st, ch, (sc in next 29 sts, sk 2 sts) 8 times, slst to the first sc st of the round. {29 sts per shell}
R5: slst in next st, ch, (sc in next 27 sts, sk 2 sts, sc in next 10 sts, sc in next 7 sts with Ring, sc in next 10 sts, sk 2 sts) 4 times, slst to the first sc st of the round. {27 sts per shell}
SHOULDER STRAPS (Make 2)
R1: slip knot, ch 8, sc into 2nd ch from hook, sc in next 6 ch, ch, turn.
R2: ssc in next 7 sts, ch, turn.
Repeat R2 until the strap is 20" long (about 115 rows). Width of the strap is about 1.25".
Leave a long yarn end for sewing.
Block all pieces by pressing them with a warm iron.
Sew shoulder straps to the Rings on the beach tote. (refer to picture 31)
Hide all yarn ends if you haven't done so.
MORE DETAILS ON HOW TO CROCHET A GIANT SHELL BEACH TOTE
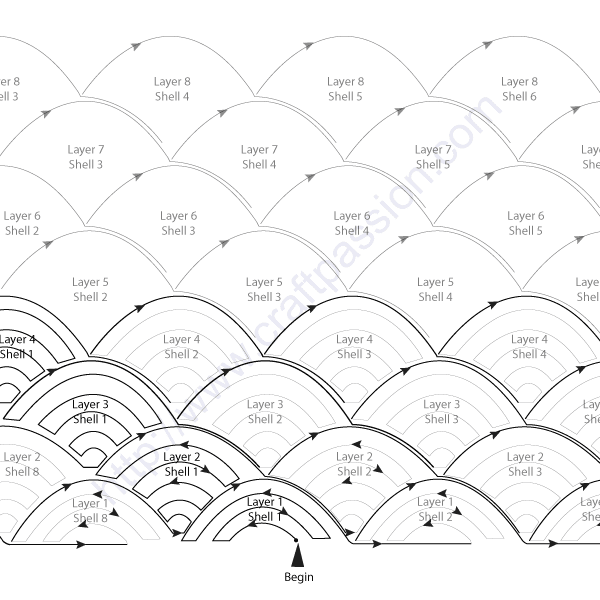
Crochet Flow of the Giant Shell Stitch
(click for bigger picture)
Layer 1 of the shell is referred to as the “Bottom Shell” in the pattern above.
Layer 2 to Layer 8 are referred to as the “Intermediate Shell” in the pattern above.
- Base
The base of the beach tote before blocking.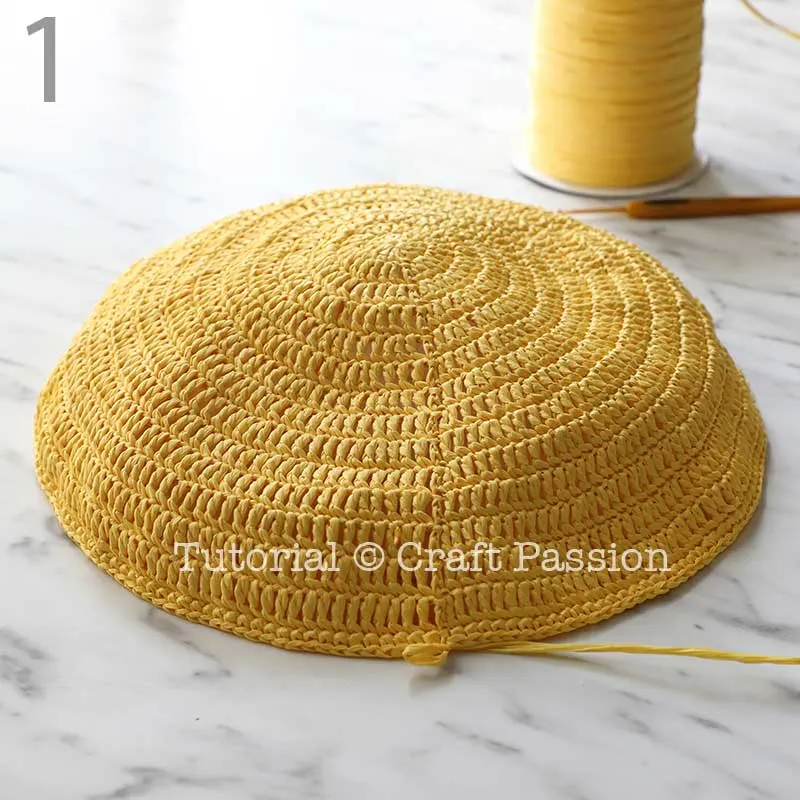
Block the base flat by pressing with a warm iron.
- Bottom Shell Row
Bottom shell R1, working with the right side facing you.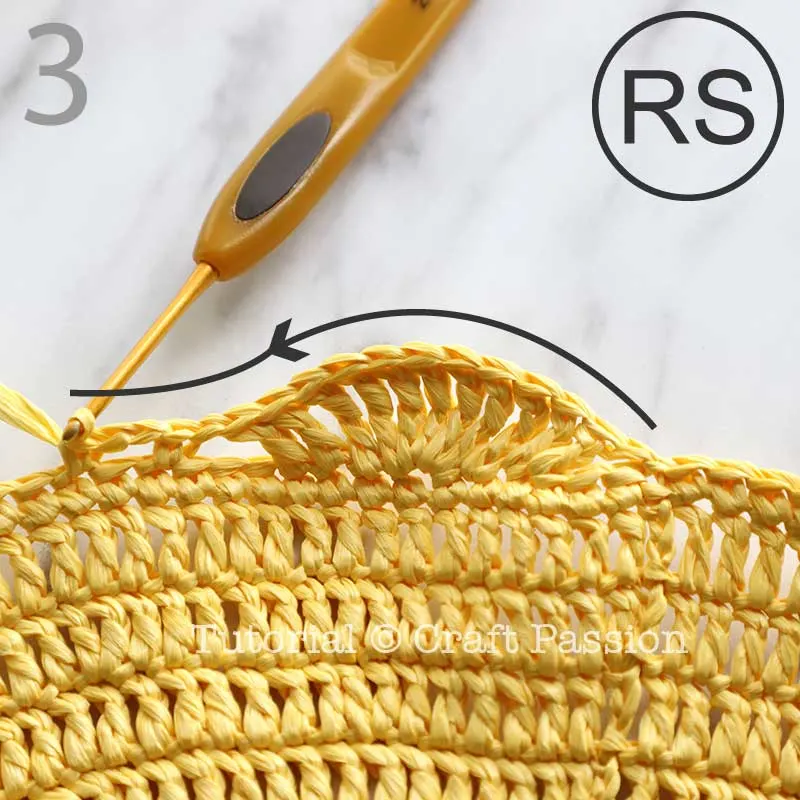
Turn the workpiece around, continue to crochet R2 with the wrong side facing you.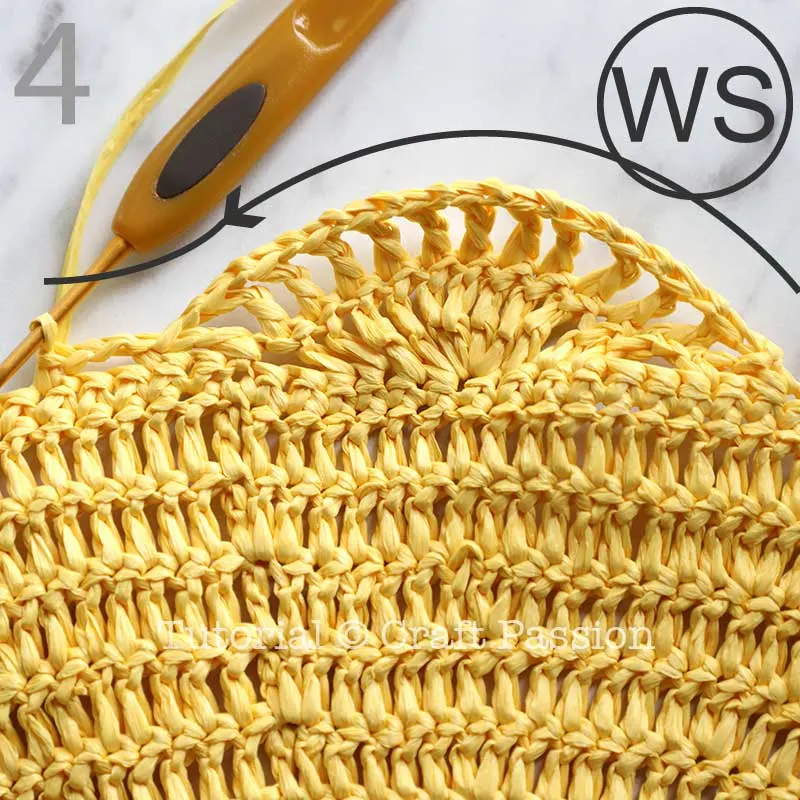
Go on with the pattern to work on bottom shell R3.
Last round of the bottom shell 1.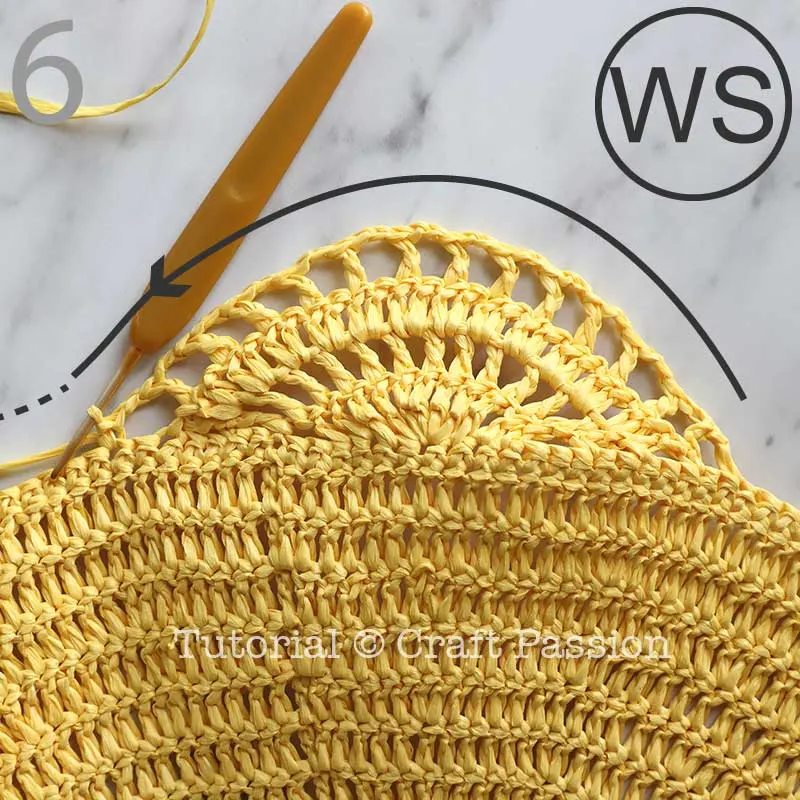
Continue to sl st on the edge of the base to complete bottom shell 1, then you are ready for the second bottom shell.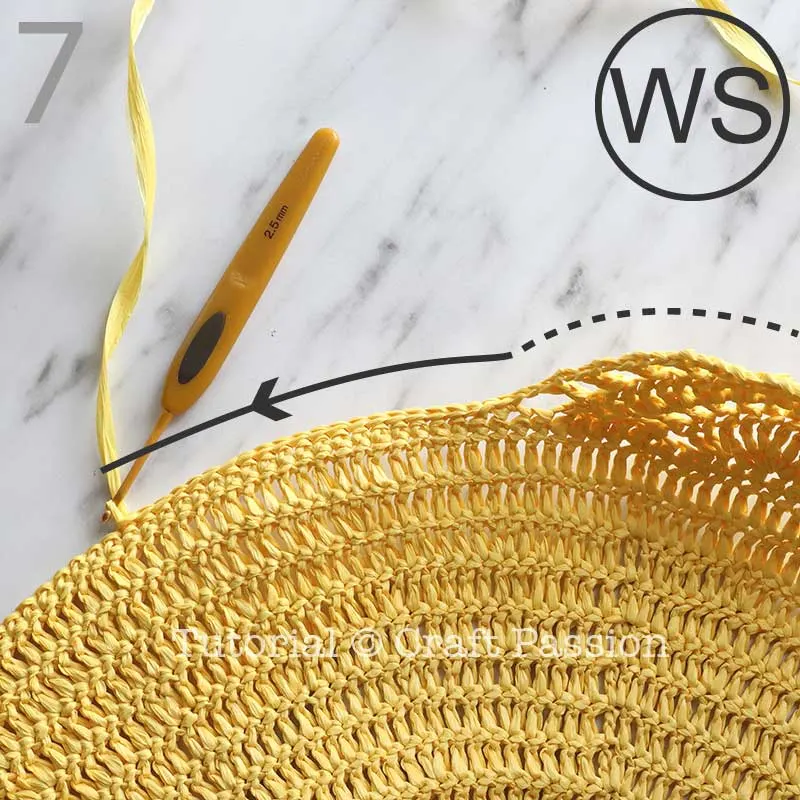
Repeat the pattern from R1 to R4 of the bottom shell to make the second shell.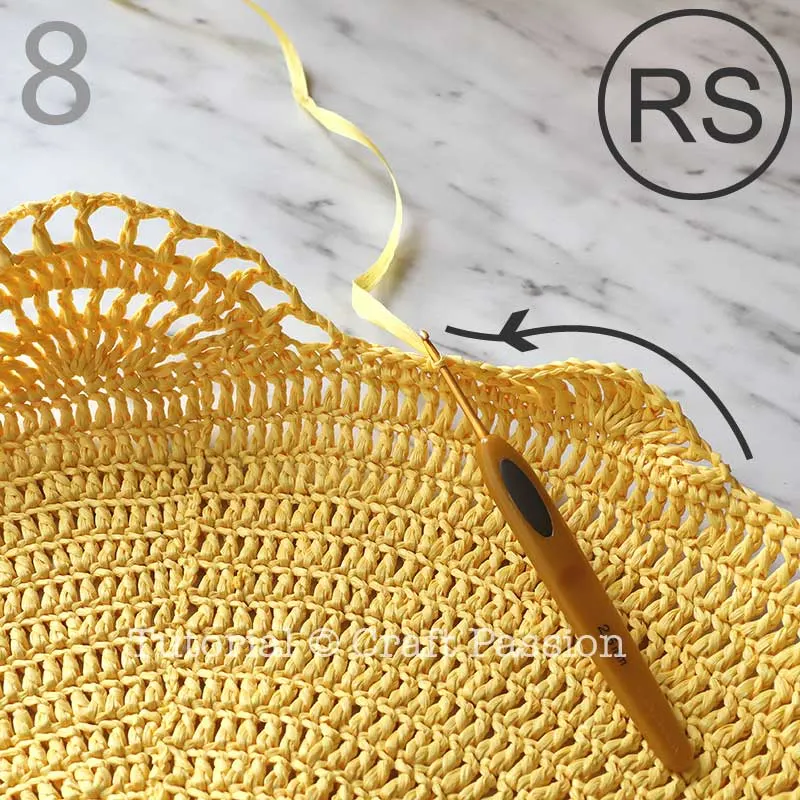
Repeat the bottom shell pattern to complete 8 of them at the edge of the base. Remember to replace the last ch2 to a dc stitch at shell 8.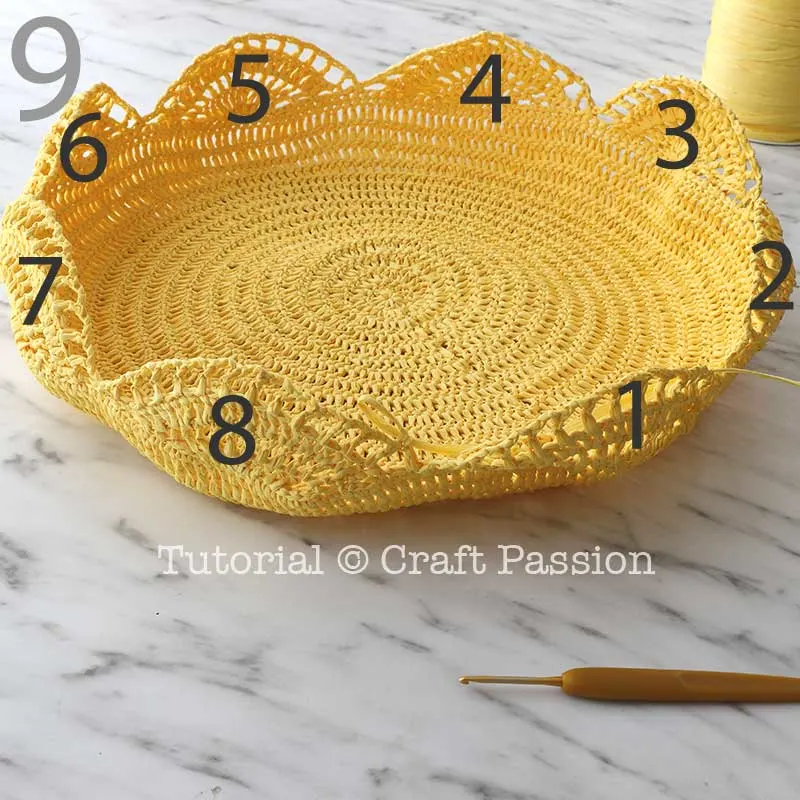
- Intermediate Shell Rows
Begin the first Intermediate shell at layer 2 by making a ch stitch (a). The next sc stitch is performed on the edge of the shell of the bottom layer (b), then makes another 2 ch stitches (c) followed by an sc stitch on the edge of the bottom shell again.
Follow the pattern instruction of R2 to make 5dc sts to the ch. Finish-off the pattern on the edge of the bottom shell.
Repeat as per pattern instructions for the rest of the pattern to make the intermediate shell. This is at R3.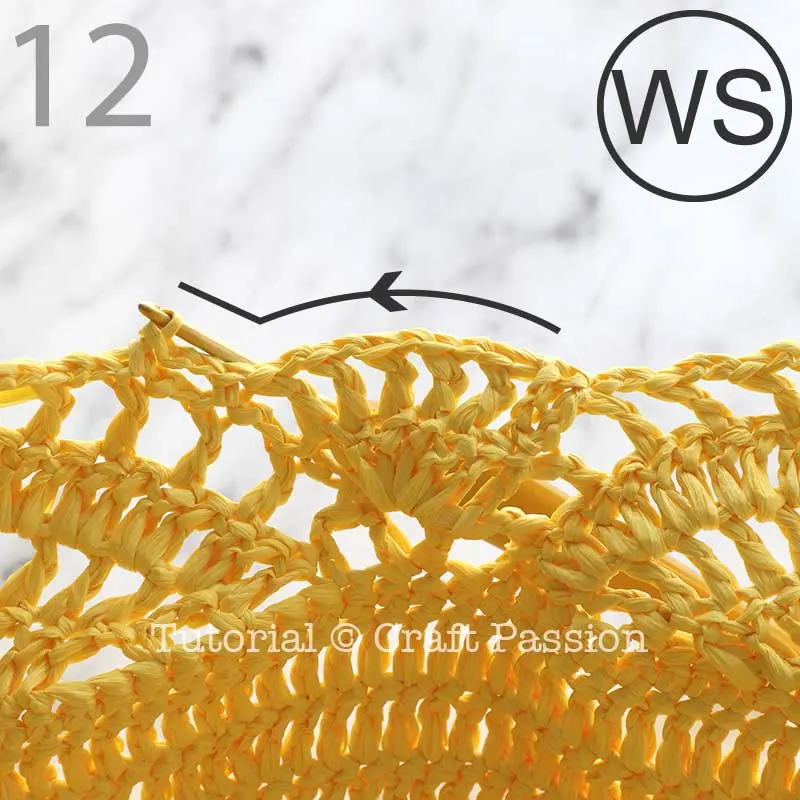
As always, the intermediate shell is clinging between the edges of the shells below it. This is at R4.
At R5.
At R6.
At the last row of the intermediate shell R7, the last sc stitch should be sitting on the center of the shell below it. If the sc is not there, then you might have made a mistake somewhere.
sl st in next 18 sts to the dc stitch of the bottom shell and get ready for making the next shell.
Repeat R1 again on the second shell.
Make 8 shells to complete the second layer of the giant shell stitch. Take note that you do not have to make the 18 sl st stitches on the last shell of the layer.
Repeat the pattern until you have completed all 8 layers of the giant shell stitch. Opt for different tote length by altering the numbers of shell layers for this pattern.
You may block it before continue to the next pattern, or, you may do it later. However, I find that blocking it before making the top trim will have the advantage of a better stitch tension.
- Top Trim
Follow the Top Trim pattern until you reach the last round R5. This is the round that you need to add 4 rings to the beach tote.
Hold the yarn behind the ring on the first sc stitch (of a total of 7 stitches on the ring).
Yarn over to wrap the ring.
Yarn over from the back of the ring on the following sc stitch.
Then yarn over from the front to complete the second sc stitch.
Repeat the yarn-over step from back and front of the ring for each sc stitch until you have completed 7 sc stitches on the ring.
Move on with the normal sc stitches outside the ring by not yarn-over the ring.
Follow the pattern to complete the final rounds with 4 rings attached to it.
- Shoulder Straps
Make a pair of 20″ shoulder straps. The straps are as soft and stable as a canvas strap, they will not scratch your skin if you are using the raffia yarn I am using for this beach tote.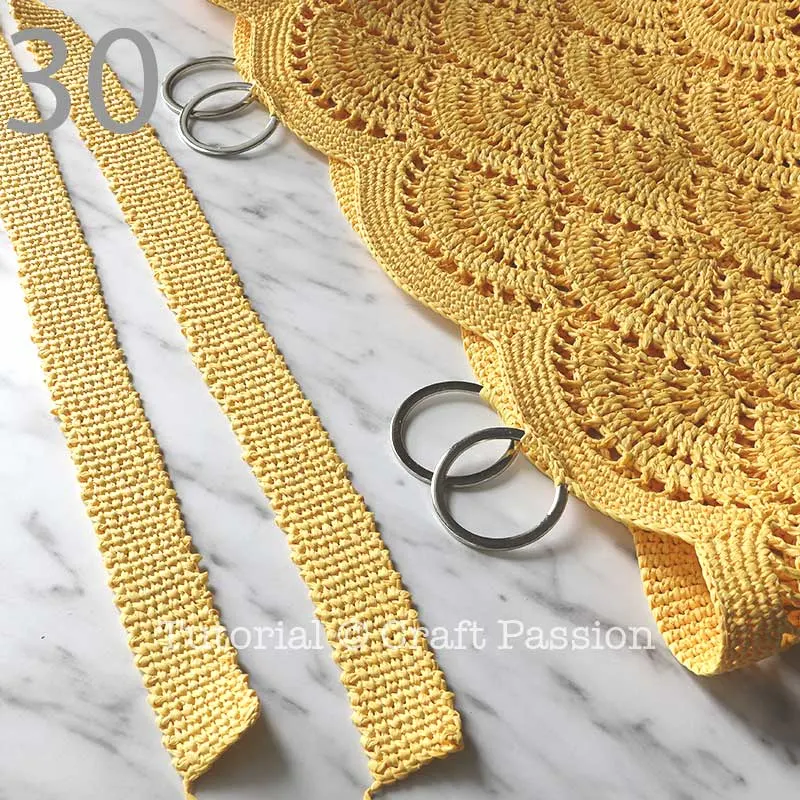
Wrap and sew the end to the rings to attach shoulder straps to the rings.
Completed!!!
Get the free pattern of the matching wide-brim beach sun hat as well to crochet a set of them. Spice up your beach vacation with these beautiful outfits that will surely catch all the attention of passers-by.

Notes
Depending on the speed and hours you spend on the project, the total time needed is only an approximation.
Get the full article at https://www.craftpassion.com/beach-tote-crochet-pattern/
Recommended Products
As an Amazon Associate and member of other affiliate programs, I earn from qualifying purchases.


Katie
Friday 30th of June 2023
Trouble with the bottom shells made 6 and they only filled about 1/2 the base so something is wrong
Craft Passion
Thursday 13th of July 2023
Definitely something is wrong, perhaps it is a mis-counting stitches. Please show us a close-up photo of your bottom shells.
Sherri
Tuesday 30th of May 2023
Just finished this bag. Instructions were a little difficult, but the easy repeat pattern made it easier. I added a liner with pockets.
Livleen Kaur
Wednesday 12th of April 2023
I have started crocheting the bag,for my daughter.I use anchor thread as rafia thread is not easily available in India.Instructions were very helpful.After completion I shall upload its picture.Thanks a lot for the beautiful pattern.
Craft Passion
Wednesday 12th of April 2023
Can't wait to see it, hope you have a wonderful time crocheting it.
Alyssa
Thursday 28th of April 2022
So excited to try this pattern before we step into summer!
I was curious whether there would be major differences if I used cotton yarn instead of raffia. I have quite a bit of yarn stashed, but will go buy raffia yarn if need be.
Craft Passion
Friday 29th of April 2022
Raffia yarn will definitely give a more distinctive pattern to the beach tote. It has a bit of sheen, and no bushy fibers like normal yarn, which makes it clean and neat.
Fan
Sunday 9th of January 2022
The bag is beautiful. I an having trouble following the pattern. Maybe it is just me.