It’s finally here! The crochet version of the sock monkey pattern that I just finished crocheting. This crochet monkey amigurumi is a design that I came up with based on the popular sock monkey, Marcho.

This time, this crochet version of Marcho, whom I call Kimira. She has just moved into Craft Passion’s family after I finished the Sunburst Granny Square Blanket project. Have you seen it? If not, here is the crochet pattern. I think this project could also be something you want to try.
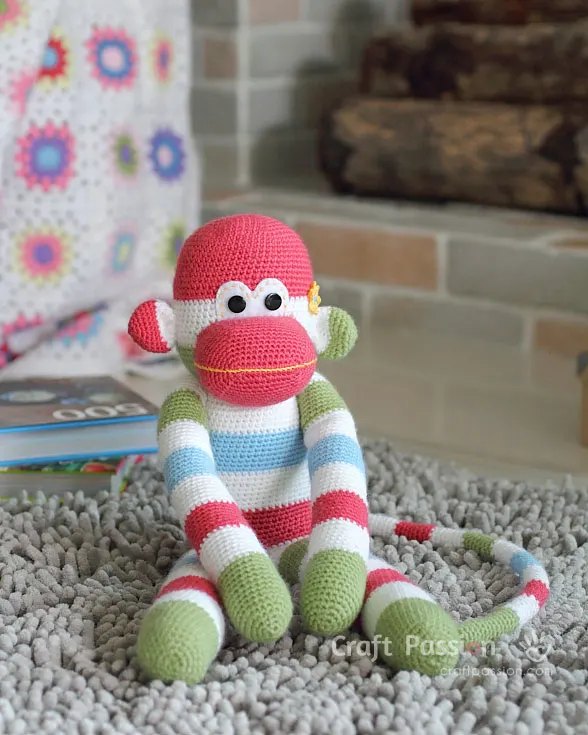
Would you want a crochet version of sock monkey?
The idea of Kimira popped into my head when some leftover yarns got tangled up and looked like they can be made into a cheerful crochet monkey. Wow, I will never forget that moment when the white, melon red, pistachio green and pastel blue lying around on the table created a picture in my head of a colorful monkey under a tree.
The name Kimira instantly sounded, along with monkey chatter and the picture of her turning her head left to right and smiling. From one, another amigurumi monkey popped in, this time, a one-color brown one, followed by a maroon and white one, and before I knew it, I was thinking of how to crochet the sock monkey amigurumi.
So I started and after a few days, finally, here is the crochet monkey and the amigurumi monkey crochet pattern. Somehow, I know you will love making her as much as you do on sock monkey Marcho.
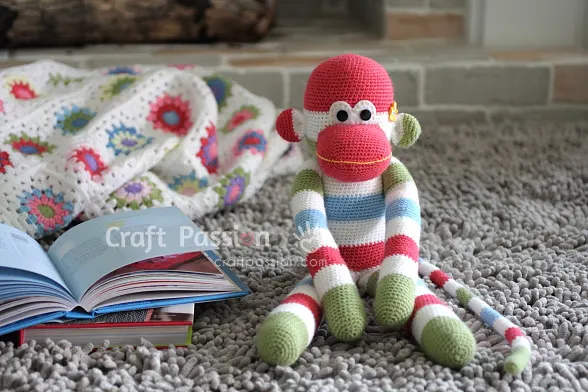
Kimira, sock monkey amigurumi, is about 18” tall and crocheted from light worsted acrylic yarn from Lion Brand. The word amigurumi, is the Japanese word for crochet stuffed animal or crochet doll1.
You can make the crochet stuffed monkey bigger by using a heavier-weight yarn (like worsted yarn) or 10-ply yarn with the appropriate hook size. If you want a smaller monkey, use a lighter-weight yarn. This is one of the things that make amigurumi interesting. Different yarns mean you can create a whole crochet monkey amigurumi family. Fun, isn’t it?
Crochet Monkey Amigurumi Pattern
scroll ⬇️ to get the free amigurumi pattern & tutorial
To add to the fun, we can have the sock monkey amigurumi holding accessories too. Aunty Kimira can be wearing a hat, Uncle Kimiro carrying a ball, and Kiddo Kimiri playing with an apple. They would look so fun together in your craft corner and cheer up your space too. For some ideas, here are more free crochet patterns for you. Your amigurumi monkey collection will look so, so cool.

When you finish, you will see that this crochet monkey amigurumi makes a great soft toy gift for young children. With Christmas in a few months’ time, now is a great time to start crocheting so they’ll be ready by then. And if you can’t wait till then, they’re great as birthday gift tags too. Crochet one and attach it to the birthday gift to make it more special. Everybody loves a gift that’s made with love.
An amigurumi monkey or crochet stuffed monkey will definitely be a gift to remember, plus the young ones will love cuddling them to bed as a crochet pet. With different weight yarns, you can make them in different sizes so there’s one for everybody.

Here they are, side by side – sock monkey Marcho (left) and amigurumi monkey Kimira (right). One sewed from socks and the other is crocheted with yarn. They’re not from the same family but they’re equally cute. Don’t they look like twins?
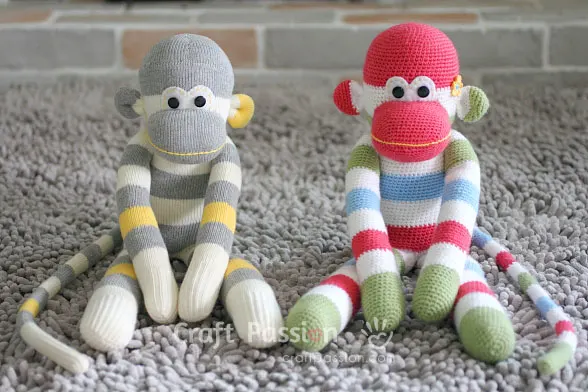
I hope to see you crochet your version of Kimira the amigurumi monkey with the amigurumi monkey crochet pattern below!
WHAT’S NEXT:
- Start crocheting and share your completed handmade on Facebook and/or Instagram. Remember to tag us, @craftpassion, so that we are able to see them.
- Pin it to Pinterest for a future To-Crochet List
- Share with your crochet groups for a crochet-along event.
- If you are new to crochet amigurumi, we have a comprehensive amigurumi guide for beginners.
- Browse more free crochet patterns to make, particularly the crochet animal amigurumi patterns.
Happy crochet!

Amigurumi Monkey Crochet Pattern
Kimira is the crochet version of Macho sock monkey. This crochet monkey amigurumi is about 18 inches tall and made from light worsted acrylic yarn. In amigurumi, you can make the monkey bigger by using heavier-weight yarn (like worsted yarn) or 10-ply yarn with the appropriate hook size. If you want a smaller monkey, use a lighter-weight yarn. This is one of the things that make amigurumi interesting. Different yarns mean you can create crochet a whole monkey amigurumi family. Fun, isn’t it?
Materials
- Yarn in white, melon red, pistachio green and pastel blue (I used Lion Brand's BabySoft Acrylic Yarn)
- Embroidery Floss in Yellow
- 2 x 11.5mm black buttons or safety eyes
- White felt
- Polyester fiberfill
Tools
- 2.5mm hook
- white sewing thread and sewing needle
- Tapestry needle
Instructions
Abbreviations
ch: chain
sc: single crochet
inc: sc2 in a stitch
inv dec: invisible decrease
slst: slip stitch
sk: skip
AMIGURUMI MONKEY CROCHET PATTERN
(Crochet Pattern is written in American Crochet Terms. All patterns work in a spiral round except the muzzle pattern)
HEAD, BODY & LEGS
Working from top to bottom (head to leg).
Start with red yarn
Round 1: sc 6 in magic ring. {6}
Round 2: [inc] around. {12}
Round 3: [inc, sc] around. {18}
Round 4: [inc, sc 2] around. {24}
Round 5: [inc, sc 3] around. {30}
Round 6: [inc, sc 4] around. {36}
Round 7: [inc, sc 5] around. {42}
Round 8: [inc, sc 6] around. {48}
Round 9: [inc, sc 7] around. {54}
Round 10: [inc, sc 8] around. {60}
Round 11-22: sc around. {60}
Change yarn to white (read Note below for the jog-less join for stripes)
Round 23-30: sc around. {60}
Change yarn to green
Round 31-36: sc around. {60}
Round 37: [inv dec, sc 8] around. {54}
Round 38: [inv dec, sc 7] around. {48}
Change yarn to white
Round 39: sc around. {48}
Round 40: [inc, sc 7] around. {54}
Round 41: [inc, sc 8] around. {60}
Round 42-46: sc around. {60}
Change yarn to blue
Round 47-54: sc around. {60}
Change yarn to white
Round 55-62: sc around. {60}
Change yarn to red
Round 63-70: sc around. {60}
Shaped hip (to create a bottom while make an opening to accommodate the legs)
Round 71: sc 18, ch 18, sk 30 st, sc 12. {48}.
Round 72: sc around. {48}
Round 73: [inv dec, sc 6] around. {42}
Round 74: [inv dec, sc 5] around. {36}
Round 75: [inv dec, sc 4] around. {30}
Round 76: [inv dec, sc 3] around. {24}
Round 77: [inv dec, sc 2] around. {18}
Round 78: [inv dec, sc] around. {12}
Round 79: [inv dec] around. {6}
Fasten off and hide yarn.
Stuff head and body with polyester fiberfill
Add Legs
Mark the center lines of the hip to make 2 parts for the left and right legs respectively (refer to tutorial pictures below). Count from the side of the opening, 15 sts on the body and 9 sts on the hip.
Left Leg
Start with white yarn
Round 1: Slip knot, ch5, begin sc at the marking on the body side, sc 15, sc in the corner between the hip and the body, sc 9 on the hip side. {30}
Round 2-8: sc around. {30}
Change yarn to green
Round 9-16: sc around. {30}
Change yarn to white
Round 17-24: sc around. {30}
Change yarn to blue
Round 25-32: sc around. {30}
Change yarn to white
Round 33-40: sc around. {30}
Change yarn to red
Round 41-48: sc around. {30}
Change yarn to white
Round 49-56: sc around. {30}
Change yarn to green
Round 57-66: sc around. {30}
Round 67: [inv dec, sc 4] around. {25}
Round 68: [Inv dec, sc 3] around. {20}
Stuff with polyester fiberfill
Round 69: [inv dec, sc 2] around. {15}
Round 70: [inv dec, sc] around. {10}
Round 71: [iinv dec] around. {5}
Fasten off and leave a long tail for sewing.
Right Leg
Start with white yarn
Slip knot, ch 5.
Round 1: begin sc at the marking on the hip side, sc 9, sc in the corner between the hip and the body, sc 15 on the body side. {30}
Round 2-71: follow the left leg pattern.
Fasten off and hide yarn.
MUZZLE
With red yarn.
Slip knot, ch 13.
Round 1: sc in second ch from hook, sc 10, 4sc in the last ch, turn around (not flip) and work on the free loops of the chain stitch, sc 10, 3sc, slst to the beginning st to form an oval round {28}.
Round 2: ch, [sc 12, inc, inc] 2 times, slst. {32}
Round 3: ch, [sc 12, inc, sc 2, inc] 2 times, slst. {36}
Round 4: ch, [sc 12, inc, sc 4, inc] 2 times, slst. {40}
Round 5: ch, [sc 12, inc, sc 6, inc] 2 times, slst. {44}
Round 6: ch, [sc 12, inc, sc 8, inc] 2 times, slst. {48}
Round 7: ch, [sc 12, inc, sc 10, inc] 2 times, slst. {52}
Round 8: ch, [sc 12, inc, sc 12, inc] 2 times, slst. {56}
Round 9-13: sc around. {56}
Fasten off and leave a long tail for sewing.
Sew a line of stem stitch across the center with yellow embroidery floss.
Note that the ch stitch at the beginning of the round and the slst stitch at the end of the round are just transition stitches, please do not count them into the total stitches in the round nor crochet any stitches on them.
EARS
Make 2. Start with red or green yarn
Round 1: sc 5 in magic ring. {5}
Round 2: [inc] around. {10}
Round 3: [inc, sc] around. {15}
Round 4: [inc, sc 2] around. {20}
Round 5: [inc, sc 3] around. {25}
Round 6-8: sc around. {25}
Change yarn to white
Round 9: sc, [Inv dec, sc 6] around. {22}
Round 10: sc, [Inv dec, sc 5] around. {19}
Round 11: sc, [Inv dec, sc 4] around. {16}
Round 12: sc around. {16}
Fasten off and leave a long tail for sewing.
ARMS
Make 2. Start with green yarn
Round 1: sc 5 in magic ring. {5}
Round 2: [inc] around. {10}
Round 3: [inc, sc in next st] around. {15}
Round 4: [inc, sc in next 2 st] around. {20}
Round 5: [inc, sc in next 3 st] around. {25}
Round 6-15: sc around. {25}
Change yarn to white
Round 16-23: sc around. {25}
Change yarn to red
Round 24-31: sc around. {25}
Change yarn to white
Round 32-39: sc around. {25}
Change yarn to blue
Round 40-47: sc around. {25}
Change yarn to white
Round 48-55: sc around. {25}
Change yarn to green
Round 56-63: sc around. {25}
Change yarn to white
Round 64-69: sc around. {25}
Stuff with polyester fiberfill
Round 70: [Inv dec, sc in next 3 st] around. {20}
Round 71: [Inv dec, sc in next 2 st] around. {15}
Round 72: [Inv dec, sc in next st] around. {10}
Fasten off and leave a long tail for sewing.
TAIL
Start with green yarn.
Round 1: sc 5 in magic ring. {5}
Round 2: [inc] around. {10}
Round 3-15: sc around. {10}
Stuff the tail with polyester fiberfill as you go
Change yarn to white
Round 16-23: sc around. {10}
Change yarn to red
Round 24-31: sc around. {10}
Change yarn to white
Round 32-39: sc around. {10}
Change yarn to blue
Round 40-47: sc around. {10}
Change yarn to white
Round 48-55: sc around. {10}
Change yarn to green
Round 56-63: sc around. {10}
Change yarn to white
Round 64-71: sc around. {10}
Change yarn to red
Round 72-79: sc around. {10}
Change yarn to white
Round 80-87: sc around. {10}
Change yarn to blue
Round 88-95: sc around. {10}
Change yarn to white
Round 96-103: sc around. {10}
Change yarn to green
Round 104-111: sc around. {10}
Change yarn to white
Round 112-119: sc around. {10}
Fasten off and leave a long tail for sewing.
HOW TO ADD LEGS TO THE BODY
This is the body with the hip and an opening for adding the legs.
These are the markings to separate the hip into 2 parts for the legs.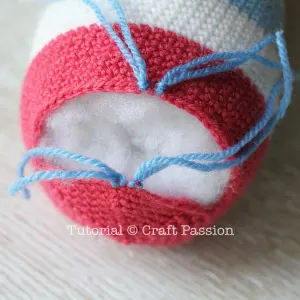
Take off the marking of the left legs and crochet as per pattern instruction. Note that the left leg starts from the front part of the body.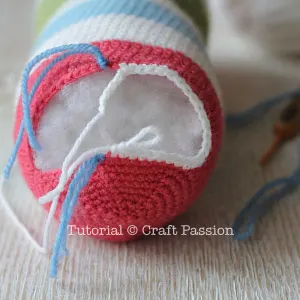
This is where you need to crochet an extra stitch at the corner between the hip and the body, it is in fact the side of an sc stitch.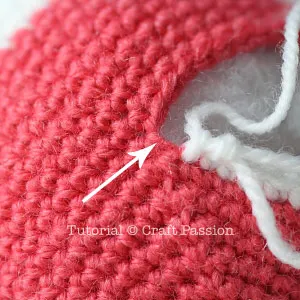
Continue crochet in a spiral round to build the left leg.
This is the right leg. Note the pattern instruction, the first 5 chains are a pre-round 1 base.
Follow the instruction to crochet and don't forget to crochet the extra stitch you need to make at the corner.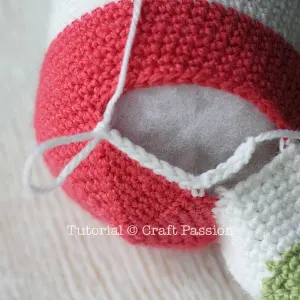
The round completes after you have crochet on the 5 chains of the pre-round 1.
Sew up the opening between the legs after you have completed the stuffing.
In order for the monkey to be able to sit on its own, don’t stuff too much between the hips and legs.
HOW TO ASSEMBLE CROCHET MONKEY
- Complete the rest of the parts according to the amigurumi pattern.
Sew to close all openings of the parts with a tapestry needle.
- Cut white of eye from white felt. You may download and print this eye template or draw your own eyes. Sew the black button to the felt. Decorate the eyes with yellow running stitches near the edge.
A closer look at the muzzle, eyes, and ears; especially the details on the yellow embroidery lines.
If you are making this crochet Monkey amigurumi for a baby, replace the button eyes with embroidery eyes to prevent any choking accident.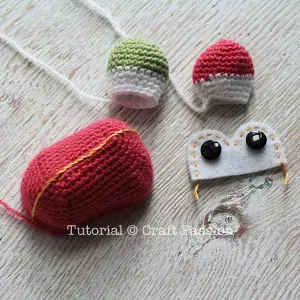
- Sew eyes on the face and mark the muzzle position with an erasable fabric marker. The muzzle marking shape is a rounded corner rectangular.
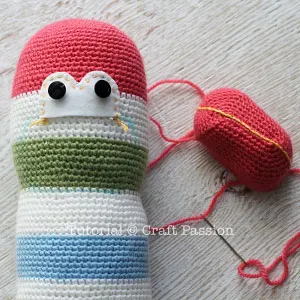
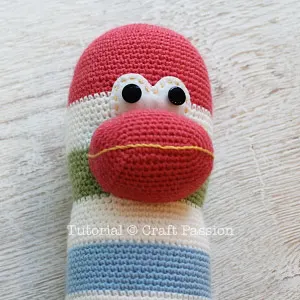
- Pin the muzzle to the face so that it is aligned. Sew it on and stuff before finishing off the sewing.
- Stuff a small bit of polyester fiberfill into the ears, sew up the opening.
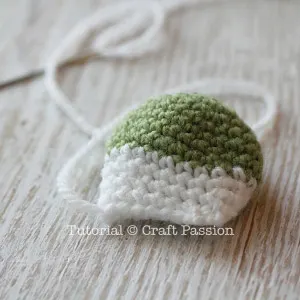
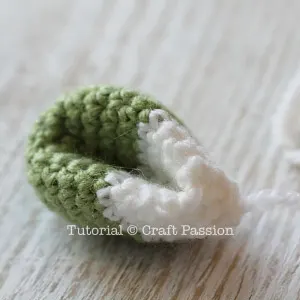
- Fold the ear and sew the base to make a cupped ear. Sew them on the side of the face.
- Sew to close the opening of the arms. Sew them on the side of the body.
Sew on the tail to the back of the crochet monkey.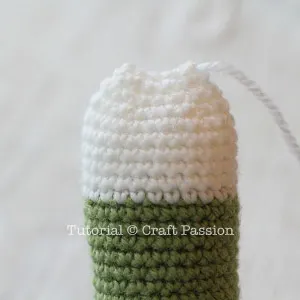
Notes
1. For the jog-less color change (near to perfect straight join) for stripes, please watch this video.
2. This monkey amigurumi pattern is developed based on the sock monkey I sewed, the position of the body parts are the same, if you need to have a closer look at the detail, please refer to the sock monkey sewing tutorial.

Debbie Tawse
Wednesday 27th of September 2023
Finished 2 crochet monkeys , very happy although it was challenging for me. Is it possible to get a pattern half the size of this one. Please and thank you.
L B
Monday 28th of March 2022
Do you stuff the tail? Or leave it floppy?
Thanks!
Craft Passion
Wednesday 30th of March 2022
I stuffed it as I crochet. I will update the pattern for this instruction. Besides leaving it unstuffed, you may insert a pipe cleaner to make the tail shape-able.
Sock Monkey Sewing Pattern - Free Pattern & Tutorial | Craft Passion
Tuesday 16th of June 2020
[…] You may want one too, so after doing some research and testing, here is my version of the sock monkey. It’s a little different from the other versions of monkey toys made of socks, and it doesn’t come with the typical red lips, but it’s just as lovely. And definitely a great sock monkey pattern for you to try on your own. If you want a superhero version, try mine here https://www.craftpassion.com/captain-america-sock-monkey-4. […]
Marie Rozalia
Wednesday 2nd of October 2019
Please help =(
I can't for the life of me do the muzzle! I keep getting an extra stitch, even when doing the first round. I manage to do the first part to 4 sc into the first chain, but after I do the next 10 sc and do the slip stitch, I could and end up with 29. If I slip stitch over two to compensate, when I do the next row, I still end up with 1 or 2 extra stitches. Do you have any tutorials, video or pictures I could see?
Please and thank you for your help!
Craft Passion
Wednesday 2nd of October 2019
Hi Marie, please don't panic. Most people made a mistake for crocheting the slip stitch at the end of the round and counted it as a stitch. Slip stitch at the end of the round and the chain stitch at the beginning of the round are counted as the stitches to be crochet. You can just skip those 2 stitches when you come to the end of the round. Hope this helps.
Carol Lambert
Thursday 22nd of August 2019
Thanks for sharing this pattern for the sock monkey. So cute! I’m making this for my granddaughter. She requested it for her birthday. Would like to make a smaller one for my other granddaughter. Do you happen to have a pattern for one that is smaller? Thanks
Emily
Monday 3rd of May 2021
Hi, Are the terms uk or us terms?
Thanks
Craft Passion
Friday 23rd of August 2019
Sorry, Carol, I did not develop a smaller one but you can use lighter yarn with a smaller hook to make a small one.