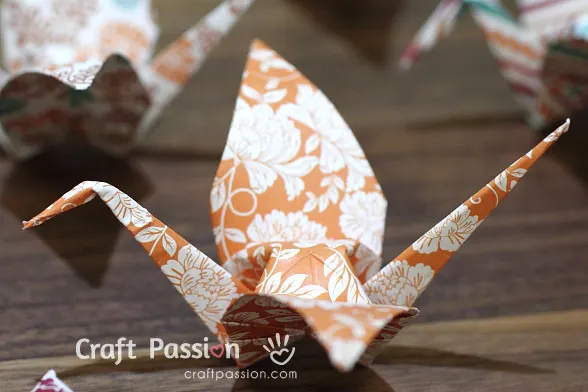
The Origami Crane is one of the most popular origami and paper crafts. When others say about origami, this paper crane will come into the picture of the conversation. Today, we are showing you how to fold an origami paper crane.

In ancient Japanese, crane or tsuru symbolizes honor, good fortune, loyalty, and longevity. The legend promises that anyone who folds a thousand origami cranes will be granted a wish by a crane. The crane is believed to live for 1,000 years and that is the meaning behind 1,000 an individual needs to fold.
How To Make An Origami Crane
scroll ⬇️ to get the how-to tutorial
Origami is one of the art and craft activities in young learners’ classrooms in many countries. Why origami is good for kids? Origami is a paper-folding skill that promotes fine brain exercise. It helps develop hand-eye coordination, fine motor skills, and mental concentration. It is said to have the following benefits if a kid grows up learning origami.
- Mathematical Skills Development
- Building cognitive abilities
- Develops a problem-solving attitude
- Boosts creativity
- Promotes Social Skills
- Aids General wellness
- Makes Science easy
Besides, origami has also been used in a variety of therapeutic settings for adults and seniors, including art therapy, stroke and injury rehabilitation, and also in Alzheimer’s treatment. There are so many advantages that one can benefit from origami, and the best part is that the only material it needs is paper; it can be done anywhere and with people of any age.
WATCH “HOW-TO-MAKE” VIDEO
Origami Paper Crane
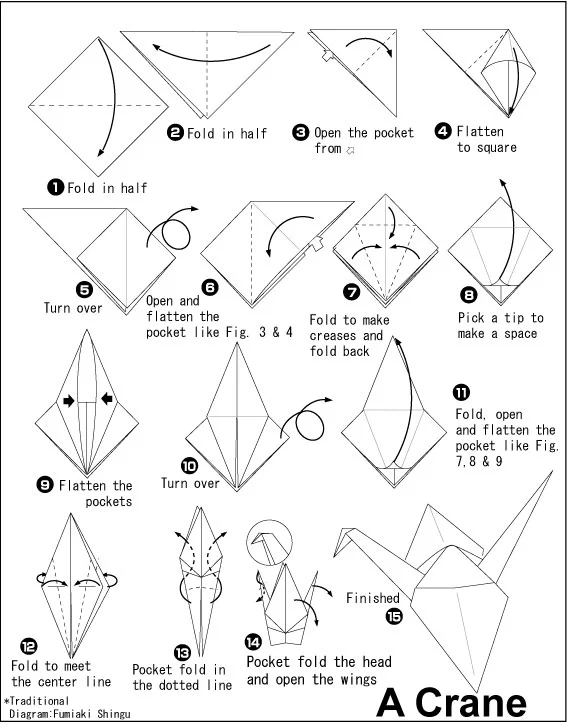
If you prefer a diagram of the folding method, here is a good one from Origami Club. And below is the written origami paper crane instructions:

Origami Crane
The Origami Crane is one of the most popular origami and paper crafts. When others say about origami, this paper crane will come into the picture of the conversation.
In ancient Japanese culture, the crane or tsuru symbolizes honor, good fortune, loyalty, and longevity. The legend promises that anyone who folds a thousand origami cranes will be granted a wish by a crane.
Materials
- Square paper
Instructions
HOW TO MAKE ORIGAMI CRANE
- Prepare a square paper of your preferred size and color. Fold the paper in half diagonally, that is by taking the top corner and folding it to the bottom corner. Press the crease line with your nails and it should run from the left corner tip to the right like in this picture.
- Fold the triangle in half by taking the left corner and folding it to the right.
- Take the top flap and open it, and align the corners at the bottom.
- Creasing the left and right sides.
- Flip the paper over.
- Repeat steps 3 & 4 to the other side.
- Take both sides of the top layer and fold them in to meet in the middle, and fold down the top triangle as shown in the diagram. Make crease lines then unfold all. This step is preparation for the next step.

- Open the flap upwards.
- Fold the left and right sides inward.
- Flip it over and repeat steps 7 to 9.
- It should look like picture 12 when it is done.
- Take the upper layer of both sides and fold the lower parts to meet at the center. Flip the paper over and do the same thing to the other side.
- Take the bottom flap of both layers and fold them over to the top, make a crease line and return the flaps to the bottom.
- Make an inside reverse fold as shown in the diagram.
- Make an inside reverse fold on the head and open the wings to complete the origami crane.

Notes
If you like origami crafts, then try out our origami dress, origami bird, and origami Christmas tree. Click the link to get the how-to tutorial and video. We have more paper crafts projects for you to make too. Hope you have a great time making something beautiful today!
Get the full article at https://www.craftpassion.com/origami-crane/.
Step 1: Prepare a square paper of your preferred size and color size. Fold the paper in half diagonally, that is, by taking the top corner and folding it to the bottom corner. Press the crease line with your nails and it should run from the left corner tip to the right like in this picture.
Step 2: Fold the triangle in half by taking the left corner and folding it to the right.
Steps 3 & 4: Open the top flap, align the corners at the bottom, and crease the left and right sides.
Steps 5 & 6: Flip the paper over and repeat steps 3 & 4 on the other side.
Step 7: Take both sides of the top layer, fold them in to meet in the middle, and fold down the top triangle as shown in the diagram. Make crease lines, then unfold all. This step is preparation for the next step.

Steps 8 & 9: Open the flap upwards. Fold the left and right sides inward.
Steps 10 & 11: Flip it over and repeat steps 7 to 9. It should look like picture 12 when it is done.
Step 12: Take the upper layer of both sides and fold the lower parts to meet at the center. Flip the paper over and do the same thing to the other side.
Step 13: Take the bottom flaps of both layers and fold them over to the top. Make a crease line, and return the flaps to the bottom.
Step 14: Make an inside reverse fold, as shown in the diagram.
Step 15: Make an inside reverse fold on the head and open the wings to complete the origami crane
If you like origami crafts, try out our origami dress, origami bird, and origami Christmas tree. Click the link to get the how-to tutorial and video. We have more paper crafts projects for you to make too. Hope you have a great time making something beautiful today!


Juy Young
Thursday 28th of January 2016
Beautiful art, MeeLian my prayers they have. Thank you for sharing this. Peace
MeeLian
Thursday 14th of August 2014
YES!!! I've made the same type of cranes for the victims of MH17 and placed them at the Schiphol airport but I chained them like the thousand cranes where you can see it at Hiroshima peace memorial. Let the cranes bring these unfortunate one to heaven.
Craft Passion
Friday 15th of August 2014
Thank you, MeeLian.... May them all RIP.
jojo
Monday 17th of March 2014
merci c est splendide
Translate (by Google): thank you c is beautiful