Prepare your stuffed dolls for this spooky festival with adorable crochet doll-size costumes. This way, you can place them next to your child as a prop for photoshoots or even bringing them to a Halloween party. This cute Devil costume consists of five components; the Devil dress, Devil horn headpiece, Devil tail, Devil trident, and Devil cape. Scroll down for the free crochet pattern and learn how to DIY Halloween costumes for stuffed toys!
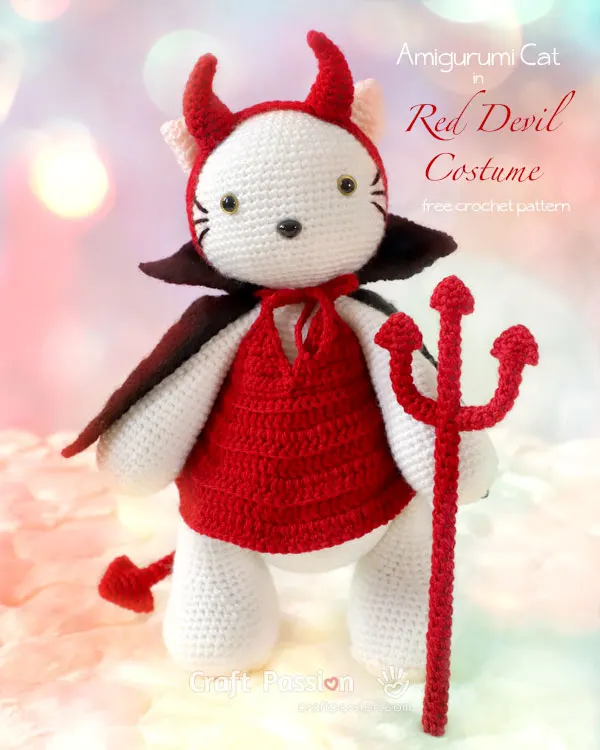
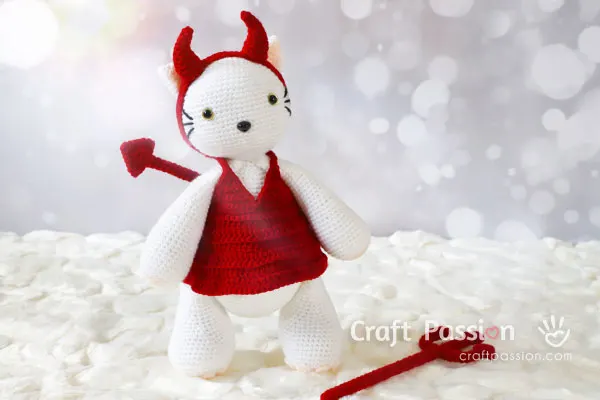
Watch out for the new arrivals of this red Devil cat in a sexy costume, and she is going to take the Halloween festival by storm! Our famous Amigurumi cat made a brief appearance when her black cat husband modeled for the Witch costume photoshoot, but now it’s time for her to shine! For this years’ costume party, Hello Kitty wanted an outfit that was scary yet sexy. That’s when we came up with the design for this Demon Halloween costume! It allows Hello Kitty to unleash her inner Devil while looking gorgeous 😈
How is the Devil connected to Halloween? The Irish folktale claims that it was because of a man named Stingy Jack. Jack made a deal with the Devil but ended up fooling him. After Jack died, Heaven shut its doors behind him, and the Devil kept his promise not to collect his soul. In the end, he was left with a lump of burning coal to light his way as he roamed around the earth.
This Devil costume includes several components to crochet and assembles, rest assured, it’s a pretty straightforward project. If you’re a beginner or wish to DIY Halloween costumes for your loved ones, this is the perfect crochet pattern for you to make.

Red Devil Dress
This backless sexy red halter dress has a low-cut V neckline and an A-line skirt. It is about 5″ long from shoulder to the “hem” of the dress. With a button fastener at the back, it is easy to wear for most stuffed toys or dolls; including most of the animals & wildlife collections in the Craft Passion’s Free Amigurumi Pattern.
The dress is crochet from red acrylic light worsted yarn with a 2.5mm crochet hook. You’ll first crochet the top part of the crochet Devil costume, which is designed to resemble a bikini top. Next, continue to crochet the skirt part to make up the dress.
Devil Cape
The process of creating this Devil cape is the same as the Witch cape that we have shared the free crochet pattern previously. The only difference here is the color! We chose a black cape for the red Devil cat to bring out the vibrant color of her red dress and accessories.
With light worsted acrylic yarn, crochet the collar, drape, and tie separately, then assemble them by lacing the tie through the holes and tying a small ribbon.
Devil Horn Headband
The most significant component for a Devil Halloween costume is its Devil horns, tail, and Devil trident. The Devil horn headband that, Hello Kitty, the amigurumi cat is wearing has a circumference of 11″; however, it is easy to modify the crochet pattern to make it bigger or smaller simply by adding or reducing the stitch of the headband.
Crochet 2 pointy horns and stuff them with polyester fiberfill. Finish off by crocheting the headband according to your doll’s head size and attaching the horns on the band.
Devil Tail
The Devil tail consists of two components; the arrow tip and the tail. Start by making the tip and leaving a long tail for sewing. Then, crochet the tail until you reach 30 rounds or 6″ long before inserting a pipe cleaner to hold it in place. Lastly, connect the two parts by sewing the tip to the round one area of the Devil tail.

Devil Trident
The construction method of the Devil Trident is similar to making an amigurumi; however, instead of stuffing it with polyester fiber, we stuffed it with a disposable chopstick and a pipe cleaner. Then we finish off it by sewing the prong tips to the handle, and you’re all done!
You may probably find a toy devil trident in the store to substitute it, which will make your Demon Halloween costume project easier.
CROCHET DEVIL COSTUME
For Amigurumi
scroll ⬇️ to get the free patterns & tutorial

The world-famous idol couldn’t wait to stand before her fans and showcase her beautiful crochet Red Devil costume. With red as the primary color of this costume, it’s bound to make heads turn and capture the attention of countless onlookers.
Besides putting on the crochet devil costume on an amigurumi doll, you can probably wear it on newborn babies for their photo shooting session.
Feel free to modify the pattern to crochet it in different sizes. Or, adjust the yarn weight and crochet tension to make a size fits toddler or your furry friend; imagine a red devil kid with a pet in a devil dog costume during the trick or treat collecting Halloween candy. How cute it is!

Here is the witch cat and devil cat getting ready for their Halloween party.
If you enjoyed this pattern, click the link for more on free Crochet Halloween Patterns or other free patterns on Halloween-inspired projects.
What’s next after Red Devil Costume? How about the other side of her, in an Angel Costume? Stay tuned. [Updated: click to get the Angel Costume Free Patterns]


How To Make Halloween Red Devil Costume For Amigurumi
Free crochet pattern to make a doll-size Halloween Devil costume that includes a devil dress, devil cape, devil horns headband, devil tail, and devil trident.
Devil Dress: 5 inches Long
Devil Cape: Total length: 7 inches, Drape length 4.5 inches
Devil Horn Headband: 1.5 inches tall horn, 11 inches circumference of the headband
Devil Tail: 7 inches long
Devil Trident: 3 x 8.5 inches
Materials
Devil Dress
- Acrylic yarn in Red (8 ply/DK/Light Worsted)
- Small Button in Red
Devil Cape
- Acrylic yarn in Black and Red (8 ply/DK/Light Worsted)
Devil Horn
- Acrylic yarn in Red (8 ply/DK/Light Worsted)
- Polyester fiberfill
Devil Tail
- Acrylic yarn in Red (8 ply/DK/Light Worsted)
- 12" (Fold to 6") Craft Pipe Cleaner or Craft Floral Wire
Devil Trident
- Acrylic yarn in Red (8 ply/DK/Light Worsted)
- 4" (Fold to 2") Craft Pipe Cleaner or Craft Floral Wire, 2 pcs.
- 8" Recycle-able Chopstick or straight Twig, 1 pc.
Tools
- 2.5mm Crochet Hook
- Tapestry needle or Darning needle
- Scissors
Instructions
HOW TO MAKE A RED DEVIL COSTUME

DEVIL DRESS CROCHET PATTERN

Abbreviations
(In US crochet terms)
ch: chain stitch
dc: double crochet
dcBL: double crochet on Back Loop
inc: 2sc increase
sc: single crochet
slst: slip stitch
RS: Right side
WS: Wrong side
Tension Gauge (4"x4"):
22 sts x 24 rows (Single Crochet Stitch)
22 sts x 10 rows (Double Crochet Stitch)
Top
With Red Yarn:
Base Row: ch 58. Don't fasten, and don't cut yarn. Instead, pull a bigger loop to prevent it from being undone.
Triangle 1
Row 1 (RS): With a new strand of yarn, insert hook at 17th on the base row sts, ch, sc 10, turn.
Row 2 (WS): ch, sc2tog, sc 6, sc2tog, turn.
Row 3: ch, sc2tog, sc 4, sc2tog, turn.
Row 4: ch, sc2tog, sc 2, sc2tog, turn.
Row 5: ch, sc2tog, sc2tog, turn.
Row 6: ch sc2tog
Row 7: ch.
Fasten & hide yarn.
Triangle 2
Row 1 (RS): With a new strand of yarn, insert hook at 28th sts on the base row, ch, sc 10, turn.
Repeat Row 2 to Row 7 of Triangle 1.
Fasten & hide yarn.
Continue from the base row, slst in 6th st from hook (this will create a fastener loop of the dress), slst in the next 15 sts,
*sc on the next 7 stitches on the upward slope triangle 1,
make neck strap for triangle 1 by ch 51, slst in second st from hook, slst in the next 50,
sc on the next 7 stitches on the downward slope triangle 1.*
slst in the stitch of the base row, between 2 triangles.
Repeat the same (* to * of triangle 1) to triangle 2.
slst on the base row till you reach the end.
ch 2. Rotate the piece to work on the dress part.
Dress
Work the following on the other side of the base strip of the top:
Row 1 (RS): sc 53, turn. {53}
Row 2 (WS): ch, (inc, sc 12) repeat 4 times, inc, turn. {58}
Row 3: (ch3, dcBL) into the same st, [dcBL 9, 2dcBL] repeat 2 times, dcBL 8, 2dcBL, [dcBL 9, 2dcBL] repeat 2 times, dcBL 8, turn. {64}
Row 4: (ch3, dc) into the same st, dc 7, [2dc, dc 7] repeat 7 times, turn. {72}
Row 5: (ch3, dcBL) into the same st, dc 8, [2dc, dc 8] repeat 7 times, turn. {80}
Row 6: (ch3, dc) into the same st, dc 9, [2dc, dc 9] repeat 7 times, turn. {88} 
Row 7: (ch3, dcBL) into the same st, dc 10, [2dc, dc 10] repeat 7 times, slst to the first st of the row. turn. {96}
Row 8: (ch3, dc) into the same st, dc 11, [2dc, dc 11] repeat 7 times, slst to the first st of the row. {88}
Fasten and hide yarn.
HOW TO ASSEMBLE DEVIL DRESS
Sew a button on the dress as a fastener at the opposite side of the loop. Wear the dress on a doll and tie the neck strap into a ribbon bow.
DEVIL CAPE CROCHET PATTERN

Abbreviations
(In US crochet terms)
ch: chain
dc: double crochet
2dc: 2 double crochet in an st (dc increase)
inc: 2sc increase
inv dec: invisible decrease
sc: single crochet
sk: skip
slst: slip stitch
Tension Gauge (4"x4"):
22 sts x 24 rows (Single Crochet Stitch)
22 sts x 10 rows (Double Crochet Stitch)
Collar
With Black Yarn:
Row 1 (RS): sc 35, begin at 2nd st from hook, [sc 2, ch2, sk 2] repeat 8 times, sc 2, turn. {34}
Row 2 (WS): ch, sc 34, turn. {34}
Row 3: ch, [inc, sc 10] repeat 3 times, inc. turn. {38}
Row 4 - 5: ch, sc 38, turn. {34}
Row 6: ch, inc, sc 11, inc, sc 12, inc, sc 11, inc, turn. {42}
Row 7 - 8: ch, sc 42, turn. {42}
Row 9: ch, inc, sc 12, inc, sc 14, inc, sc 12, inc, turn. {46}
Row 10 - 11: ch, sc 46, turn. {46}
Row 12: ch, inc, sc 13, inc, sc 16, inc, sc 13, inc, turn. {50}
Row 13: ch, sc 50. {50}
Fasten and hide yarn.
Drape
With a new strand of Purple Yarn and rotate the collar upside-down with RS facing you, continue crochet from Row 1 of the cape.
(Note that the ch3 at the beginning of the row is counted as a stitch in the following crochet pattern)
Row 1 (RS): [ch3, dc] in the same stitch, dc 2, [2dc, dc 2] repeat 10 times, 2dc, turn. {46}
Row 2: ch3, dc 45, turn. {46}
Row 3: [ch3, dc] in the same stitch, dc 14, [2dc, dc 14] repeat 2 times, 2dc, turn. {50}
Row 4: ch3, dc 49, turn. {50}
Row 5: [ch3, dc] in the same stitch, dc 15, 2dc, dc 16, 2dc, dc 15, 2dc, turn. {54}
Row 6: ch3, dc 53, turn. {54}
Row 7: [ch3, dc] in the same stitch, dc 16, 2dc, dc 18, 2dc, dc 16, 2dc, turn. {58}
Row 8: ch3, dc 57, turn. {58}
Row 9: [ch3, dc] in the same stitch, dc 18, [2dc, dc 18] repeat 2 times, 2dc, turn. {62}
Row 10: ch3, dc 61, turn. {62}
Row 11: [ch3, dc] in the same stitch, dc 19, 2dc, dc 20, 2dc, dc 19, 2dc, turn. {66}
This is the length that Hello Kitty the white cat is wearing, if you wish to have a longer cape, continue the following crochet pattern, otherwise, fasten and hide yarn.
Row 12: ch3, dc 65, turn. {66}
Row 13: [ch3, dc] in the same stitch, dc 20, 2dc, dc 22, 2dc, dc 20, 2dc, turn. {70}
Row 14: ch3, dc 69, turn. {70}
Row 15: [ch3, dc] in the same stitch, dc 22, [2dc, dc 22] repeat 2 times, 2dc, turn. {74}
Fasten and hide yarn end.
TIE
With Red Yarn, ch 80 or until it measures 14", fasten and trim the end near to the knot. Apply some adhesive (fabric glue, tacky glue, PVA glue, etc) to secure it.


HOW TO ASSEMBLE DEVIL CAPE
Lace the tie through the 8 holes created by Row 1 of the Collar pattern. Tie a ribbon bow to bring both edges together.
DEVIL HORN HEADBAND CROCHET PATTERN

Abbreviations
(In US crochet terms)
ch: chain stitch
inc: 2sc increase
sc: single crochet
slst: slip stitch
Horn Body
Make 2 with Red yarn:
Round 1: sc 3 in magic ring. {3}
Round 2: sc 2, inc. {4}
Round 3: sc 3, inc. {5}
Round 4: sc 4. inc. {6}
Round 5: sc 5, inc. {7}
Round 6: sc 6, inc. {8}
Round 7: sc 7, inc. {9}
Round 8: sc 8, inc. {10}
Round 9: sc 9, inc. {11}
Round 10: sc 10, inc. {12}
Fasten off.
Fill the horns firmly with polyester fiberfill.
Horn Base
Make 2 with Red Yarn:
Round 1: sc 6 in magic ring. {6}
Round 2 : [inc] around. {12}
Crochet the horn body to the base by inserting the hook through both back loops together, slst around. {12}
Fasten off and leave a long tail for sewing it to the headband.
Headband
The size suits the head of my amigurumi cat, feel free to adjust the size by either increase or reduce the number of the stitches according to the head size of your doll.
Base: ch 62, slst to form a ring
Round 1 - 2: ch sc 62, slst to the first st.
Fasten off and hide yarn.
HOW TO ASSEMBLE THE DEVIL HORNS HEADBAND
- Follow the devil horns crochet pattern to make 2 red horns followed by the bases respectively.

- Crochet to join the base to the horn body.

- You may do the following to pull the horn to arch more, however, this is optional. Start sewing a loop of running stitches from the horn base to the tip on the concave side of the horn. Sew till the tip then sew to come back to the base. Pull the yarn tails from the base to make the horn arches more. Tie the yarn to secure the shape.
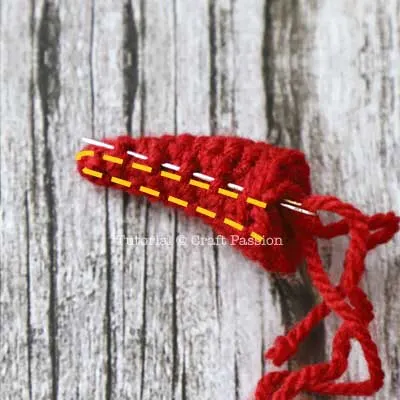
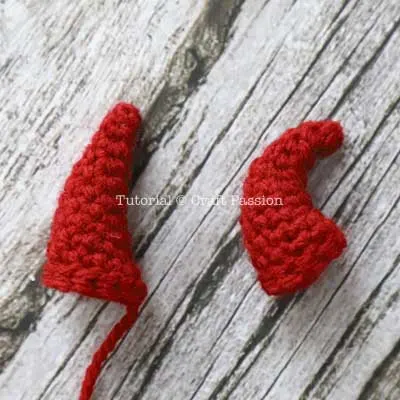
Repeat the same to both horns and make sure they look identical.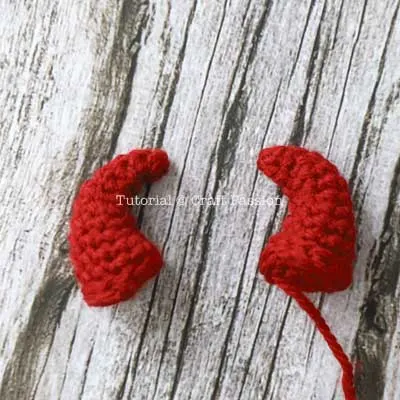
- Crochet the simple headband and sew the horns onto it, about 1.5" (8 sts) space apart. You may adjust the headband size according to your doll.

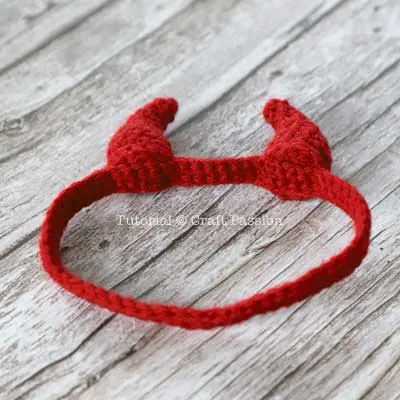
DEVIL TAIL CROCHET PATTERN

Abbreviations
(In US crochet terms)
ch: chain stitch
inc: 2sc increase
sc: single crochet
slst: slip stitch
Arrow Tip
Make 3 with Red yarn.
Round 1: sc 3 in magic ring. {3}
Round 2: inc around. {6}
Round 3: [inc, sc] around. {9}
Round 4: [sc 2, inc] around. {12}
Round 5: [inc, sc 3] around. {15}
Round 6: [sc 2, inc, sc 2] around. {18}
Round 7: [inc, sc 5] around. {21}
Fasten off and leave a long tail for sewing.
Tail
sc 6 in magic ring.
sc around until you reach 30 rouns or the tail is 6" long {6}
Fasten and leave a long tail for sewing.
Fold a Pipe cleaner in half and insert it into the tail.
HOW TO ASSEMBLE THE DEVIL TAIL
Insert the tip to the round 1 area of the tail, sew to attach the arrow tip to the tail.
DEVIL TRIDENT CROCHET PATTERN

Abbreviations
(In US crochet terms)
ch: chain stitch
inc: 2sc increase
sc: single crochet
slst: slip stitch
Prong Tips
Make 3 with Red yarn.
Round 1: sc 3 in magic ring. {3}
Round 2: inc around. {6}
Round 3: [inc, sc] around. {9}
Fasten off and leave a long tail for sewing.
Prong Legs
Make 2 with Red Yarn.
Round 1: sc 5 in magic ring. {5}
Round 2 - 10*: sc around. {5}
fasten off and leave a long tail for sewing.
note *: make 10 rounds or until the length is about 2" long
Trident Handle
Make 1 with Red Yarn.
Round 1: sc 5 in magic ring. {5}
Round 2 - 40*: sc around. {5}
fasten off and leave a long tail for sewing.
note *: make 40 rounds or until the length is about 8" long.
HOW TO ASSEMBLE THE DEVIL TRIDENT
- Crochet all parts by following the trident crochet pattern. Cut 2 pcs of 4" from craft pipe cleaners, bend each into half respectively, twist each of them a little so that they're stronger. I used a recyclable chopstick as the Devil Trident's handle which I kept from a food take-out..

- Insert the craft wire into the prong leg, followed by inserting the leg (round 1 side) into the prong tip. Sew the tip to the leg. Repeat the same to another pair of prong tip and leg.

- Insert Chopstick into the handle with the wider side going in first. Insert the handle (the last round) into the prong tip. Sew the tip to the handle.
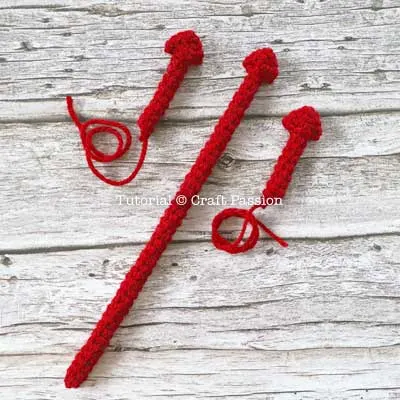
- Sew the prong to the side handle, at 2.5" from the tip. Repeat the same to the prong at the opposite side of the first prong.

- Finally, bend the short prongs to make them pointing upward to complete the Devil Trident.

Notes
Depending on the speed and hours you are spending on the project, the total time needed is only an approximation.
You are allowed to make and sell from this pattern on small-scale production. However, you are not allowed to publish the patterns and pictures in any form without the prior written permission of Craft Passion.
For the full article, visit: https://www.craftpassion.com/crochet-devil-costume-for-amigurumi/
