Dear cat lovers, we’ve got an extraordinary crochet cat stuffed animal pattern for you! If you already have a cabinet full of cat-related stuffed toys & figurines, you’ll want to add this crochet cat to your collection.

A Little Background Story Of Crochet Cat
Ever wondered what Hello Kitty would look like if she became an adult? We imagine she’d look like the elegant white-colored crochet cat pictured on the left in the portrait above, with long arms and limbs.
Besides being a world-famous idol & model, did you know Hello Kitty was once a tourism ambassador to Japan in China and Hongkong? What a successful career cat she is! Little female kittens look up to her and aspire to be just like her when they grow up!

Hello Kitty met her then-boyfriend, Cosmo, the Creative Director, during one of her photoshoot sessions. They immediately hit it off and spent a lot of time together professionally.
As days went by, the pair of friends found out they had so much more in common. Their favorite weekend activities are fishing & hiking. They’re both imaginative, share similar core values and adore children!

After confirming Hello Kitty was the love of his life, Cosmo went down on one knee and popped the question, “Will you marry me?” Of course, the bride said YES!
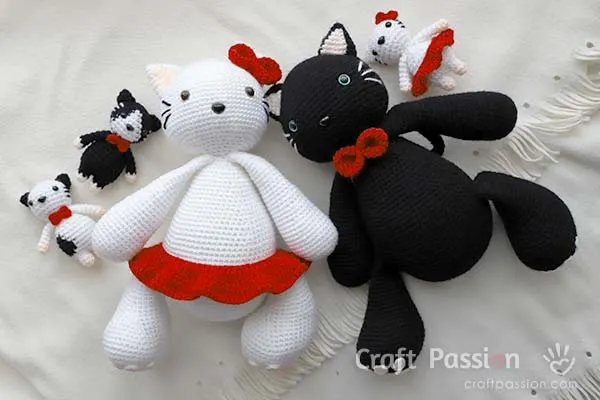
To no surprise, Hello Kitty gave birth to three adorable kittens a year after their marriage. Even though they’re the spitting image of their parents, the kittens all look different! Do look forward to the free amigurumi pattern for the kittens coming up next. [Update: the free crochet pattern of amigurumi kitten is here.]

Material & Tools To Crochet Cat Stuffed Animal
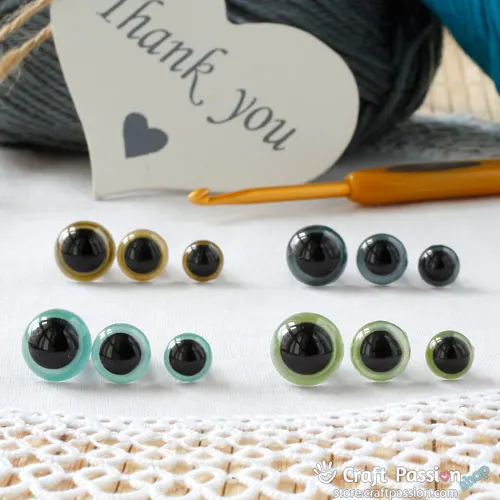
The materials and tools for this crochet cat pattern are pretty basic. Prepare some acrylic yarns in black/white, pastel pink, red, a pair of 10mm colored iris, a piece of 12mm safety nose, polyester fiberfill, craft pipe cleaner/craft floral wire.
As for the tools, you’ll need a 2.5mm crochet hook, long darning needle, water erasable fabric market, scissors, and pins. With that, you’re ready to conquer this cat crochet pattern!
Side Note: Safety eyes and safety noses are baby-friendly and kid-friendly only if they are installed properly. Always use the safety eyes and safety nose that comes with a locking plate. The locking plate locks the eyes and nose in place so that they will not get pulled out from the stuffed animals. If this is still a concern to safety, glue the locking plate to the shaft of the safety eyes and nose to add another level of security.

How To Crochet Cat Amigurumi
Unlike the Amigurumi Dragon, Amigurumi Giraffe, and Amigurumi Elephant, who are crocheted with multiple or vibrant colors, the body of the amigurumi cats are made with neutral colors. Hence, we pay attention to the little details, such as accentuating their paws and inner ear colors or dressing them up with the doll dress/panties or sexy bikini!

First of all, to a crochet amigurumi animal, you will need some basic knowledge of crochet animals. In general, amigurumi are crochet stuffed animals made up mainly of single crochet stitches (abbrev as “sc” in American Crochet Terms).
There are two “bases” for this crochet cat pattern. One of which is the head, which you will use to attach the cats’ ears, crochet the whiskers, and install the safety nose and eyes. The other base is the body, which you will use to connect the Amigurumi cat’s arms, legs, tail, and bow (optional).
Once you’ve crocheted, stuffed, and joined all body parts to the bases, stitch the head to the body! Et voilà, you’ve just made your very own crochet cat.

Remember that even though the free amigurumi pattern is made with black-colored yarn, you may change it to white or any color of your choice. Now that you’ve learned how to crochet cat stuffed animal, it’s time to make one for your cat-loving friend or child.
We have updated the amigurumi cat couples with some nice festival costumes. Click to get the free pattern to make yours today.
Witch Costume
Halloween is just around the corner, we have been busy making Halloween costumes for Cosmo and Hello Kitty. Here is the DIY Witch Costume for Cosmo, consisting of a Witch Hat, a Witch Cape, and a Witch Broom. Start crochet the cat amigurumi now to create fun Halloween gifts for friends and family.

Red Evil Costume
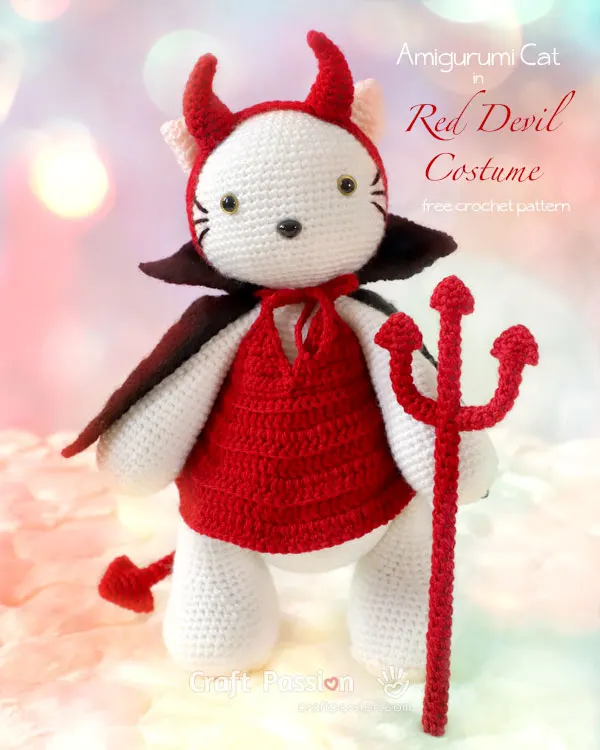
Watch out for the new arrivals of this red Devil cat in a sexy costume, and she is going to take the Halloween festival by storm!
This cute Devil costume consists of five components; the Devil dress, Devil horn headpiece, Devil tail, Devil trident, and Devil cape. Scroll down for the free crochet pattern and learn how to DIY Halloween costumes for stuffed toys!
Angel Costume
After we styled the cats in villains’ costumes, we decided to make an angelic costume for Hello Kity for a change. This beautiful Angel costume includes a White Ruffle Dress, a pair of Angel Wings, a Star Wand, and a Golden Halo.
There are several occasions where you can use our Amigurumi angel crochet costume. Apart from crocheting it as a Halloween decoration, you can display our little doll at home or office until Christmas! She’d act as the perfect gift for young girls as well.

WHAT’S NEXT:
- Start crocheting and share your completed handmade on Facebook and/or Instagram. Remember to tag us, @craftpassion, so that we are able to see them.
- Pin it to Pinterest for a future To-Crochet List
- Share with your crochet groups for a crochet-along event.
- If you are new to crochet amigurumi, we have a comprehensive amigurumi guide for beginners.
- Browse more free crochet patterns to make, particularly the crochet animal amigurumi patterns.
Happy crochet!

Amigurumi Cat Crochet Pattern
Ever wondered what Hello Kitty would look like if she became an adult? We imagine she’d look like the elegant white-colored Amigurumi cat pictured on the left in the portrait above, with long arms and limbs.
Hello Kitty met her then-boyfriend, Cosmo, they get married and Hello Kitty gave birth to three adorable kittens a year after their marriage.
Even though the free amigurumi pattern is made with black-colored yarn, you may change it to white or any color of your choice ☺ Now that you’ve learned how to crochet cat plush, it’s time to make one for your cat-loving friend or child. Details on the variation are given below.
Happy crochet!
Materials
- Acrylic yarn in Black (or White color), 1 ball of 100 gram each ball
- Acrylic yarn in White (or Black color), Short Length (to make Whiskers)
- Acrylic yarn in Pastel Pink color, Short Length (to make the paws and inner ear)
- Acrylic yarn in Red color, Short Length (to make Bow & Skirt)
- 10mm Colored Iris Safety Eyes, 1 pair
- Safety Nose, 12mm. 1 pc
- Polyester fiberfill
- 12" (Fold to 6") Chennile Pipe Cleaner or Craft Floral Wire
Tools
- 2.5mm Crochet Hook
- Darning needle (Long)
- Fabric marker (water erasable), to mark the sewing positions
- Scissors
- Pins
Instructions
Abbreviations
(In US terms)
ch: chain
dc: double crochet
2dc: 2 double crochet in a st (dc increase)
inc: 2sc increase
inv dec: invisible decrease
sc: single crochet
slst: slip stitch
AMIGURUMI CAT CROCHET PATTERN
The following pattern is for the Black Cat, however, if you are making it for White Cat just replace the yarn color from Black to White.
BODY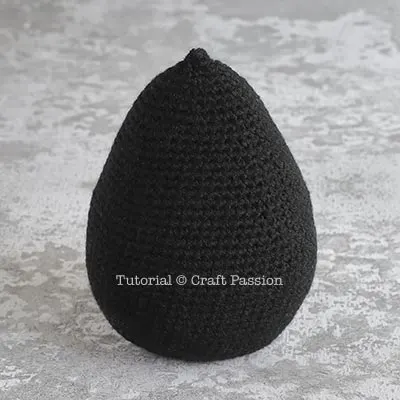
With Black Yarn:
Round 1: ch5, Inc in 2nd ch from hook, sc 2, 5sc in the last ch. Continue on the other side of the chain base, sc 2, 3sc in the last ch. {14}
Round 2: Inc, sc 4, [Inc] 3 times, sc 4, [Inc] 2 times. {20}
Round 3: Inc, sc 6, [Inc] 2 times, sc, Inc, sc 6, [Inc] 2 times, sc. {26}
Round 4: Inc, sc 8, [Inc, sc] 2 times, Inc, sc 8, [Inc, sc] 2 times. {32}
Round 5: Inc, sc 10, Inc, sc 2, Inc, sc, Inc, sc 10, Inc, sc 2, Inc, sc. {38}
Round 6: Inc. sc 12, [Inc, sc 2] 2 times, Inc, sc 12, [Inc, sc 2] 2 times. {44}
Round 7: Inc, sc 14, Inc, sc 3, Inc, sc 2, Inc, sc 14, Inc, sc 3, Inc, sc 2. {50}
Round 8: Inc, sc 16, [Inc, sc 3] 2 times, Inc, sc 16, [Inc, sc 3] 2 times. {56}
Round 9: sc around. {56}
Round 10: sc 25, Inc, sc 27, Inc, sc 2. {58}
Round 11: sc 26, Inc, sc 28, Inc, sc 2. {60}
Round 12: sc 27, Inc, sc 29, Inc, sc 2. {62}
Round 13: sc 28, Inc, sc 30, Inc, sc 2. {64}
Round 14 – 23: sc around. {64}
Round 24: sc 6, [Inv dec, sc 14] 3 times, Inv dec, sc 8. {60}
Round 25: sc around. {60}
Round 26: sc 6, [Inv dec, sc 13] 3 times, Inv dec, sc 7. {56}
Round 27: sc around. {56}
Round 28: sc 6, [Inv dec, sc 12] 3 times, Inv dec, sc 6. {52}
Round 29: sc around. {52}
Round 30: sc 6, [Inv dec, sc 11] 3 times, Inv dec, sc 5. {48}
Round 31: sc around. {48}
Round 32: sc 6, [Inv dec, sc 10] 3 times, Inv dec, sc 4. {44}
Round 33: sc around. {44}
Round 34: sc 6, [Inv dec, sc 9] 3 times, Inv dec, sc 3. {40}
Round 35: sc around. {40}
Round 36: sc 6, [Inv dec, sc 8] 3 times, Inv dec, sc 2. {36}
Round 37: sc around. {36}
Round 38: [sc 4, Inv dec] around. {30}
Stuff the body firmly with polyester fiberfill.
Round 39: sc around. {30}
Round 40: sc 2, [Inv dec, sc 3] 5 times, inv dec, sc. {24}
Round 41: [sc 2, Inv dec] around. {18}
Round 42: [Inv dec, sc] around. {12}
Round 43: [Inv dec] around. {6}
Fasten and leave a long tail for sewing.
HEAD
With Black Yarn:
Round 1: sc 6 in magic ring. {6}
Round 2: [inc] around. {12}
Round 3: [inc, sc] around. {18}
Round 4: [sc 2. inc] around. {24}
Round 5: [inc, sc 5] around. {28}
Round 6: [sc 3, inc, sc 3] around. {32}
Round 7: [inc, sc 7] around. {36}
Round 8: [sc 4, inc, sc 4] around. {40}
Round 9: [inc, sc 9] around. {44}
Round 10: [sc 5, inc, sc 5] around. {48}
Round 11: [inc, sc 11] around. {52}
Round 12: [sc 6, inc, sc 6] around. {56}
Round 13: [inc, sc 13] around. {60}
Round 14: sc around. {60}
Round 15: [inc, sc 9] around. {66}
Round 16 - 23: sc around. {66}
Round 24: [inv dec, sc 9] around. {60}
Round 25: [sc 4, inv dec, sc 4] around. {54}
Round 26: [inv dec, sc 7] around. {48}
Round 27: [sc 3, inv dec, sc 3] around {42}
Round 28: [inv dec, sc 5] around. {36}
Round 29: [sc 2, inv dec, sc 2] around. {30}
Install safety eyes at Round 17, 14 sts apart.
Install safety nose at Round 21, position it at the midline between the eyes.
Stuff with polyester fillings.
Round 30: [inv dec, sc 3] around. {24}
Round 31: [sc, inv dec, sc] around. {18}
Round 32: [inv dec, sc] around. {12}
Round 33: [inv dec] around. {6}
Fasten and hide yarn end.
EARS
Make 2
Begin with Black Yarn then change to Pastel Pink yarn when the written pattern is in Bold text
Round 1: sc 3 in magic ring. {3}
Round 2: [inc] around. {6}
Round 3: inc, sc, inc, sc, inc, sc. {9}
Round 4: sc 3, sc, inc, sc 4. {10}
Round 5: inc, sc, inc, sc 2, inc, [sc, inc] 2 times. {15}
Round 6: sc 2, inc, sc 2, inc, sc 2, inc, sc 6. {18}
Round 7: sc 6, sc 6, sc 6. {18}
Round 8: sc 4, inc, sc, sc 3, inc, sc 2, sc 4, inc, sc. {21}
Fasten and leave a long tail for sewing.
ARMS
Make 2 with Black Yarn.
For White Cat, Begin with Pastel Pink Yarn and crochet for the first 3 rounds, then change yarn to White to continue with the rest of the pattern.
Round 1: sc 6 in magic ring. {6}
Round 2: [inc] around. {12}
Round 3: [inc, sc] around. {18}
Round 4: [sc 2. inc] around. {24}
Round 5: [inc, sc 3] around. {30}
Round 6 - 10: sc around. {30}
Round 11: [sc 8, Inv dec] around. {27}
Round 12 - 13: sc around. {27}
Round 14: [sc 7, Inv dec] around. {24}
Round 15 – 16: sc around. {24}
Round 17: [sc 6, Inv dec] around. {21}
Round 18 – 19: sc around. {21}
Round 20: [sc 5, Inv dec] around. {18}
Round 21 – 22: sc around {18}
Round 23: [sc 4, Inv dec] around. {15}
Round 24 – 35: sc around. {15}
Fasten and leave a long tail for sewing.
Fill the bottom 2/3 of the arms firmly with polyester fiberfill.
CAT PAWS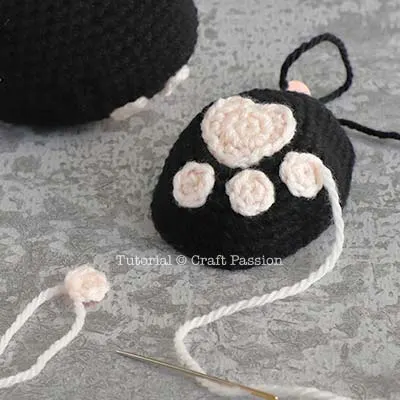
Metacarpal Pad (Heart-Shaped Pad)
Make 2 with Pastel Pink Yarn.
Round 1: sc 6 in magic ring, slst to first st to join. {6}
Round 2: ch, [inc] around, join. {12}
Round 3: ch, inc, sc 2, slst 2, inc, slst 2, sc 2, inc, slst, join. {12}
Fasten and leave a long tail for sewing.
Digital Pad
Make 8 with Pastel Pink Yarn.
Round 1: sc 6 in magic ring, slst to first st. {6}
Fasten and leave a long tail for sewing.
LEGS
Make 2 With Black Yarn
Round 1: ch5, Inc in 2nd ch from hook, sc 2, 5sc in the last ch. Continue on the other side of the chain base, sc 2, 3sc in the last ch. {14}
Round 2: Inc, sc 4, [Inc] 3 times, sc 4, [Inc] 2 times. {20}
Round 3: Inc, sc 6, [Inc] 2 times, sc, Inc, sc 6, [Inc] 2 times, sc. {26}
Round 4: Inc, sc 8, [Inc, sc] 2 times, Inc, sc 8, [Inc, sc] 2 times. {32}
Round 5: Inc, sc 10, Inc, sc 2, Inc, sc, Inc, sc 10, Inc, sc 2, Inc, sc. {38}
Round 6: Inc. sc 12, [Inc, sc 2] 2 times, Inc, sc 12, [Inc, sc 2] 2 times. {44}
Round 7 - 10: sc around. {44}
Round 11: sc 14, Inv dec, sc 12, Inv dec, sc 14. {42}
Round 12: sc 14, Inv dec, sc 10, Inv dec, sc 14. {40}
Round 13: sc 14, Inv dec, sc 8, Inv dec, sc 14. {38}
Round 14: sc 14, Inv dec, sc 6, Inv dec, sc 14. {36}
Round 15: sc 14, Inv dec, sc 4, Inv dec, sc 14. {34}
Round 16: sc 14, Inv dec, sc 2, Inv dec, sc 14. {32}
Round 17: sc 14, Inv dec, Inv dec, sc 14. {30}
Round 18: sc around. {30}
Round 19: [sc 6, Inv dec] 3 times, sc 6. {27}
Round 20 – 21: sc around. {27}
Round 22: sc 6, [Inv dec, sc 5] 3 times. {24}
Round 23 – 24: sc around. {24}
Round 25: sc 5, Inv dec, sc 10, Inv dec, sc 5. {22}
Round 26 – 27: sc around. {22}
Round 28: sc 5, Inv dec, sc 9, Inv dec, sc 4. {20}
Round 29 – 30: sc around. {20}
Round 31: sc 4, Inv dec, sc 8, Inv dec, sc 4. {18}
Fasten and leave a long tail for sewing.
Fill the bottom 2/3 of the legs firmly with polyester fiberfill.
Sew Paw pads to the sole.
TAIL
sc 6 in magic ring. sc around until you reach 30 rounds or the tail is 6" long {6}
Fasten and leave a long tail for sewing.
Fold the Pipe cleaner in half and insert it into the tail.
BOW
Round 1: sc 6 in magic ring. {6}
Round 2: [inc] around. {12}
Round 3: [inc, sc] around. {18}
Round 4 - 12: sc around. {18}
Round 13: [inv dec, sc] around. {12}
Stuff with polyester fillings.
Round 14: [inv dec] around. {6}
Fasten and leave a long tail for sewing.
Wrap yarn at the center, tighten to create a bow.
More Details on how to crochet & assemble the Cat Amigurumi
- Crochet parts of the Amigurumi Cat and stuff them according to the crochet pattern: Body, Head, Ears, Arms, Legs, and Tail.

- Sew Ears to Head:
Mark the top of the head with 2 wide curved lines for the ears' positions; begin at Round 6 extend to Round 13, 18 stitches apart at the top and 33 stitches apart at the bottom. Pin the ears to the marking and sew around.
- Sew Head to the Body:
Position the head on the top of the body. Mark the position and pin to secure it if necessary.
Sew to join the head to the body.
- Sew Arms and Legs:
Sew arms at the side, next to the seam of the head and body.
Followed by sewing legs at round 15 (from the bottom) of the body.
Sew the Whiskers with white yarn at the side of the cheeks, then add a red bow to the cat amigurumi beck.
- Lastly, sew the tail to the back of the body.

 Crochet and assemble the White Cat in a similar way with details given in the above pattern section.
To make the Red Ruffled Skirt, Please follow the following crochet pattern: Or you may use a similar one here.
Red Ruffled Skirt Crochet Pattern
Row 1: ch 70, sc in the 6th st from hook (to make a fastening loop), sc to the end, ch3, turn. {65}
Row 2: ch3 (count a 1 dc st), dc in the same st, repeat [dc, 2dc] 32 times, turn. {98}
Row 3: ch (don't count as a st), sc to the end, turn. {98}
Row 4: ch3 (count a 1 dc st), dc in the same st, repeat [dc, 2dc] 48 times, end with a dc, turn. {147}
Row 5: ch (don't count as a st), sc to the end, turn. {147}
Fasten off. Hide yarn
Sew a small button at the back of the skirt as a fastener.
Notes
Depending on the speed and hours you are spending on the project, the total time needed is only an approximation.
Stuff the parts firmly and densely to give your amigurumi doll a good shape.
You are allowed to crochet and sell Cat on small-scale production. However, you are not allowed to publish the patterns and pictures in any form without the prior written permission of Craft Passion.
For full article, visit: https://www.craftpassion.com/amigurumi-cat-crochet-pattern/
Recommended Products
Purchase the exact same material and tool used in this pattern from Craft Passion Shop.

