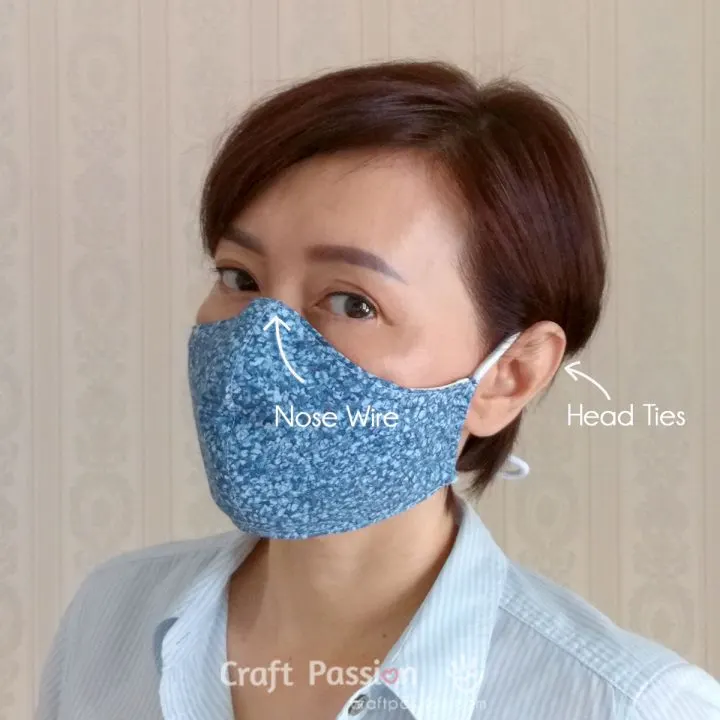
Since the recent pandemic virus outbreak, I have been perfecting and improvising this face mask pattern to include all the features needed to fight against the Covid disease’s spread. One of the features includes adding a slot or pocket for filter media to make the fabric face masks more effective. Secondly, a nose clamp (aka nose wire) is added at the top edge of the fabric face masks to provide a better seal at the nose bridge area. Thirdly, due to shortages of elastic bands and the comfort of the wearability, head tie made out of shoelace and t-shirt yarn are recommended. Fourthly, we produced a sewing video for a better view of the sewing process.
If you are a newbie in sewing and wish to decide which model of sewing machine for beginners suits you, click the link to read on.
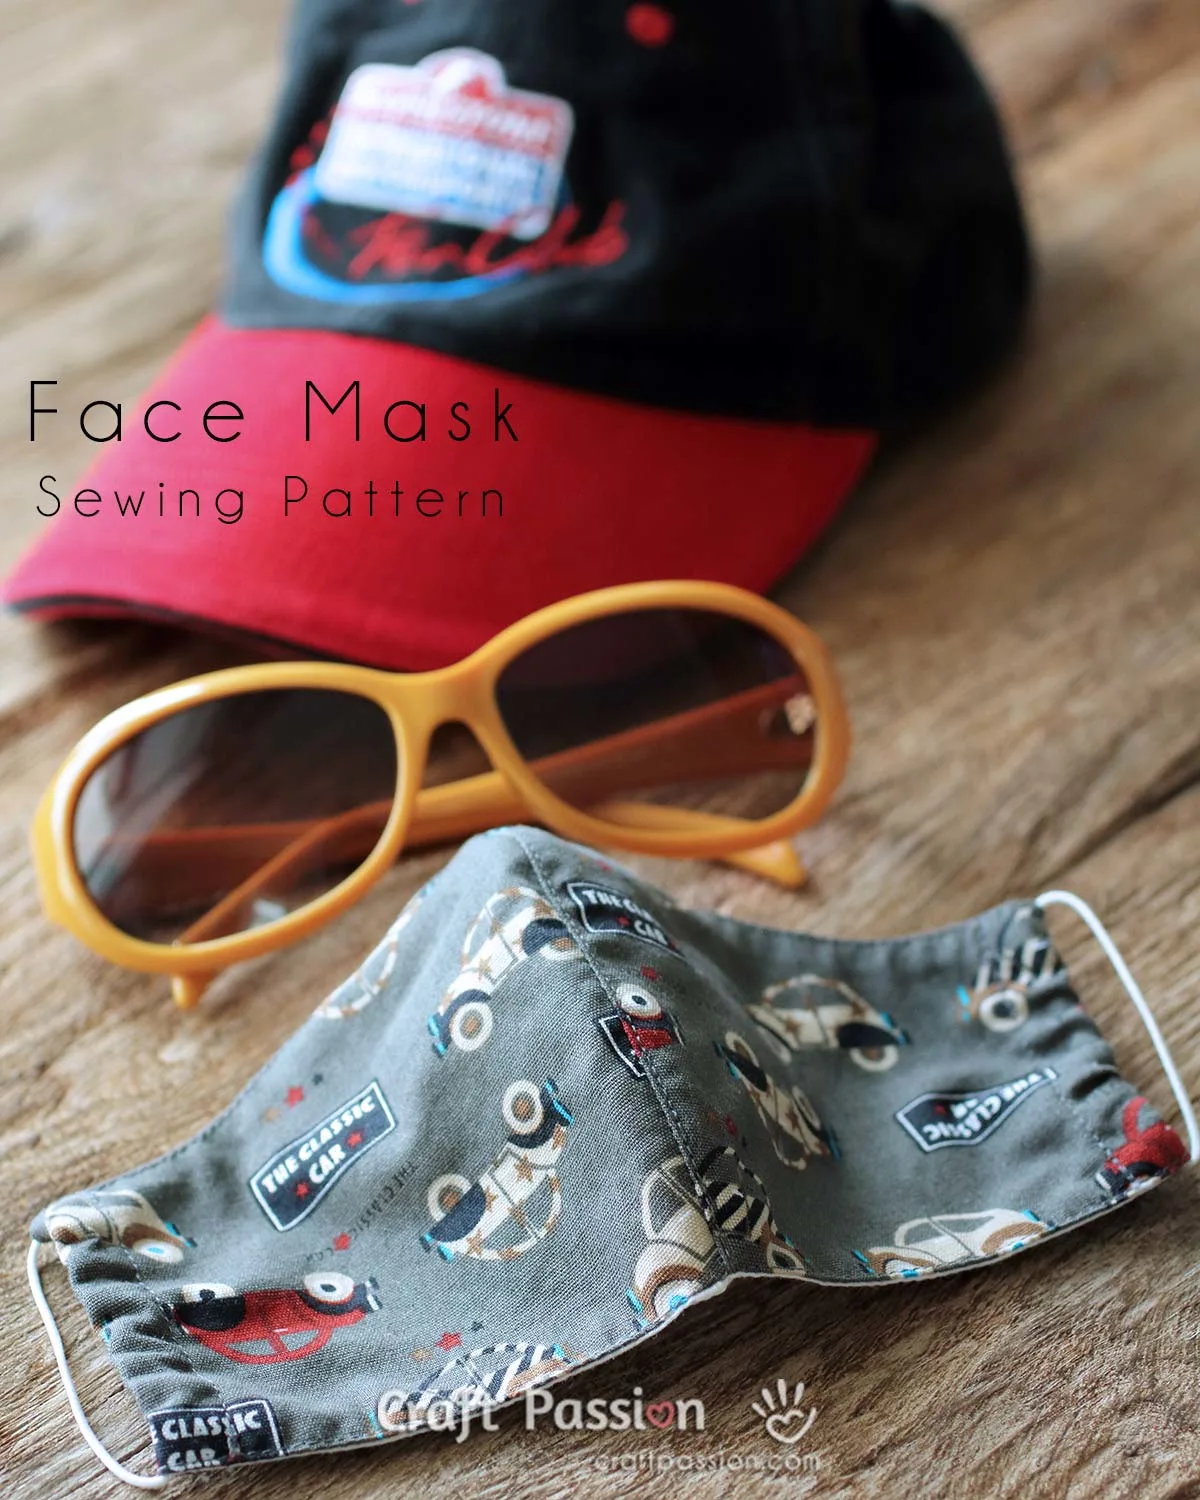
You may read through the following detailed updates done to this printable face mask pattern, some large and some small tweaks to perfect the free sewing pattern. I am glad to receive emails and comments from all channels. They tell me that many hospitals and local authorities have asked their people to sew from Craft Passion’s face mask sewing pattern. The reason is that these homemade fabric face masks provide excellent coverage and seal. I hope my little humble effort and the fabric face mask pattern do make a huge difference to the world. Lastly, not forgetting to thank you for sewing fabric face masks and donating to those who needed them; you are all godsend angels.
Skip all and jump straight to download the printable face mask patterns; click the button below:
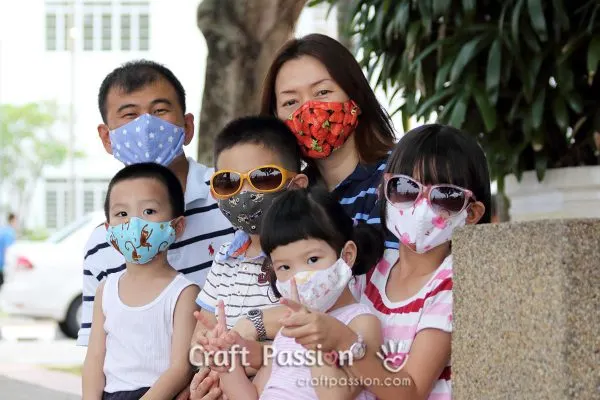
(If clicking the button brings you nowhere, please scroll down to find my family photo (a six-person portrait); the pattern options are just below that picture.)
{30 January 2021 Update:} Recently, some countries’ authorities have recommended wearing a double mask to increase its effectiveness. I have received some queries about whether the Craft Passion Face Mask pattern needs any modification to fit these criteria. It’s a good question, and the answer is you don’t need to make any modifications to the sewing pattern itself. You can easily fit a disposable surgical face mask over or under the Craft Passion mask. With the pocket version, you may slip one into it (just like the one shown at the very end of the page).
{12th December 2020 Update:} Feel free to check out our latest Christmas-inspired face mask sewing patterns. Turn yourself and your children into your favorite Christmas character this festive season: Santa, Reindeer, Snowman, or this if you’re looking for something more classic, simple, and mature yet Christmasy.
{1st June 2020 Update:} We have added a Windowed Face Mask Pattern to the Craft Passion FaceMask List below. Thanks to Kit Kenyon, who works as an educator connected to the special needs communities of Deaf, Hard of Hearing. Kit sees her students’ needs and therefore modified Craft Passion’s Face Mask Pattern (non-pocket version) to include a clear window. Using vinyl or a transparent plastic sheet at the lips area; to accommodate the communities where lip reading is prevalent.
{9th May 2020 Update:} After about three weeks of creating a FaceMask Support Group on Facebook, we have almost six thousand members (the numbers are growing). Welcome to join the group to share and discuss topics across the Craft Passion face mask pattern. Ever since the whole world had entered into a pandemic emergency two months ago, face-covering has become an essential item. You need to wear it when you need to go out of your house. We have learned so many things throughout the face mask sewing journey, from materials to pattern and fitting.
Also, thanks to The Fabric Patch for answering some of them. You may watch the video here. Talking about fitting, though Craft Passion’s face mask pattern has won many likes as the best-fit fabric face masks to sew, however, not everyone is born the same. Some want a longer piece to cover the chin or beard; some have a broader face; some need more room for some reason, and so on. In the video, Cindy from the Fabric Patch talked about fitting and a modified Craft Passion’s mask in the second half of the video (at 19:10). She also mentioned how you could measure your face and find the closest fit-out of the eight sizes that Jesse Killion has modified. Thus, we have included the eight sizes of altered face mask sewing patterns in the pattern list below (item 6).
For those who have great experience in sewing with Craft Passion’s instruction, you may try it out with the same instruction B & C and trim the ear-side of the lining piece 1″ away for the pocket section. Or you may watch the video here to sew it in The Fabric Patch way for a non-pocket sewn-in filter version.
{20th April 2020 Update:} We have created a Craft Passion Face Mask Pattern Support Group on Facebook to further discuss this facemask’s sewing topic. Also, hoping that everyone can own a face mask or two in the current situation, we officially permit those who sew to sell their fabric face masks with a kind thought. We ask all sellers to keep the profit minimal for everyone to afford a reusable fabric face mask to protect themselves and others from the virus. For more info, please refer to the group’s rules section. Please read and adhere to the rules of the group.
{12th April 2020 Update:} We have uploaded a revision (rev 3) of pattern templates to the pattern area to replace the old version. The templates’ shapes and sizes remained the same as the previous version; we only added more info on the template for ease of reference.
{29th March 2020 Update:} Thank you all for the feedback and suggestions, I heard you from the comments (probably miss some, oops). I feel sorry that I can’t thank you individually for the inputs and answer others’ questions. After gathering all the info and pick up the essentials, I have made a video for the face mask sewing tutorial (click to jump straight to the video). In this face mask sewing video, I have included details on cutting and sewing the face mask with a pocket for the filter media. Besides, I have added additional two new pieces of info to the video: a sleeve on the top edge of the face mask for a removable nose wire and a cotton shoelace as the head tie, as shown in the picture below.

The face mask pattern design has an excellent seal along the face contour; however, some may still find that fogging happens to their glasses when they breathe. For that, I have added a nose wire to make the face mask sealed even better, but it is optional. If you don’t need the nose wire, you can still sew the sleeve but skip the wire, or you may completely omit the sleeve part.

Choice of nose wire? Any wire that can be bent and stay in shape is a good choice as the nose wire, for example, twist ties, florist wire, gardening wires, hardware wire of gauge around #20. You may also twist multiple strands of thin wires to make a stronger nose wire. I like pipe cleaner as it also has some cushioning from its chenille stem.
I agreed that certain elastic loops could hurt the ears after a long hour of wearing. To counter this discomfort, you may either wear the elastic bands across the back of the head or use a cotton cord head tie. If you have a few t-shirts to cut out from, T-Shirt Yarn will be perfect too. View the tutorial on how to cut a T-shirt to make a T-Shirt Yarn.
Face Mask With Pocket & Nose Wire Sleeve
{Many have asked me what the make and model of the sewing machine I am using in the video is, so I hope to answer you here:
Bernina, the model is B550 Quilters Edition, bought in the year 2012}
Watch on Youtube
{24th March 2020 Update:} We have added a grid pattern of this printable face mask pattern. Those who don’t have access to a printer may now manually sketch it out on 1/2″ grid graph paper. Or, you may trace the pattern through your monitor by placing a piece of paper on your monitor and tracing; make sure to enlarge the pattern document until you get the size correctly by measuring the 2″ marking with your ruler.
{22nd March 2020 Update:} Good news to Cricut and Silhouette cutter users, I have uploaded the SVG files and Studio3 files here in ZIP format; please get them in the pattern section. Thanks to Tanya Chilton (Cricut) and Marlene Teter (Silhouette) for making these files free for us to download. I do not have these machines, so I can’t open the files. Please let me know if you have any questions about the files. Also, templates with seam allowance are added to the patterns. Please choose your options to download and print.
{19th March 2020 Update:} Men’s size is included in the pattern now we have a total of 4 sizes for everyone from the age of 3 and up; Men, Women,/Teenagers, Young Kids, and Small Kids.
{Feb 2020 Update:} For the past few weeks, I have been receiving many requests on how to add a non-woven filter inside the fabric face masks. Disclaimer: this face mask is not meant to replace the surgical face mask. It is a contingency plan for those who have no avail of a surgical mask in the market. Proper use of a surgical mask is still the best way to prevent virus infection. I have updated the tutorial by adding the option to sew the face mask with a pocket for filter media. Please scroll down further to find the tutorial.
{Jan 2020 Update:} We have collected some feedback from readers and updated a different way to wear the elastic band to put less stress on the ears.

{Original Write-up in August 2013} Contemplating the ever-rising pollution level on our Earth, the respiratory face mask will soon become an essential item in our life. Every year from May till August, we will be attacked by terrible haze. Our neighboring country started to mass-burn their plantation wastes during this dry weather period. They are doing this to clear out their land while producing fertilizers for the next cycle (hmmm, not the right way to recycle, huh~).
The hazardous smoke and burning particles were being transported by the wind, which was blowing toward us. They get trapped in the air, settled in as a haze. The particles in the haze won’t go anywhere else unless the rain washes them down. At times, the API (Air Pollution Index) can go up to 400 (hazardous) in a certain area. The haze is dusty, smokey, and obscuring the clarity of the sky. And all these irritate the eye and respiratory system. It is life-threatening, especially to young and older people and those with weak hearts and lungs.
Besides limiting the outdoor activities and switching on air purifiers at home, my BFF and I urgently needed fabric face masks for our kids to wear. Like most kids nowadays, they have weak lungs and vulnerable respiratory systems, and the haze will impact their health condition. What made us furious and anxious was that the kid’s size facemasks were out of stock in the market. So, I recently sewed up a storm on these double-layered fabric face masks and gave some away to those who needed them.
To share out more so that you can sew your own washable and reusable fabric face masks, I made the pattern into three sizes, small kids (around the age of 3-6, young kids (7-12), Teenage & Adult. However, babies are not recommended to wear a facemask due to safety. However, it is not medically rated but good enough to filter out those haze particles and bad smells.

Before you start sewing, please pre-wash all fabrics, and rewash them before wearing them. In this tutorial, I used quilting weight cotton on both layers, which is good enough for essential filtration. Besides, I sewed some in cotton flannel as the lining too. The filtration is even better but not recommended for small kids as it might be a little difficult for them to breathe through properly.
Apart from wearing it on a hazy day, the fabric face masks would be suitable for motorcyclists, bicyclists, and whoever needs to travel on a heavy traffic road. Exhaust gas from motor vehicles is even perilous and unhealthy! You can also use it on your sick days to prevent spreading the viruses via your respiratory discharge.

Just a suggestion, you can also DIY the face mask for something fun, for example, adding some drawings on a plain white face mask like a “Red Hot Lips”, “Toothless”, “Skeleton Teeth” (a perfect match with the skeleton costume during Halloween), or any funny smiles!!! Just to have fun 🙂
See us posing for the face masks… For Better Life, cheers!!! ***camera rolls***
Printable Face Mask Pattern Templates
Free Downloadable & Printable Face Mask Pattern in various options. Please click to download and print separately.
Type A: Normal face mask
Type B: Face mask with a POCKET for filter insert or as a surgical mask cover.
Type C: Add on a removable NOSE WIRE to Type A and Type B (as shown in the video).
1. Face Mask Sewing Pattern, WITHOUT seam allowance included. (use on Type A, B, and C)
All 4 Sizes: Men, Women/Teenagers, Kids (7-12), Kids (3-6).
2. Ordinary Face Mask Sewing Pattern WITH 1/4″ seam allowance included. (use only on Type A)
Men
Women/Teenagers
Kids (7-12)
Kids (3-6)
3. Pocket Face Mask Sewing Pattern WITH 3/8″ seam allowance included (You may sew with 1/4″ seam allowance). (use on Type B and C)
Men
Women/Teenagers
Kids (7-12)
Kids (3-6)
4. CRICUT Machine (SVG files), with seam allowances of 1/4″ included for Type A, 3/8″ for Type B and C . (use on Type A, B, and C)
Men
Women Teenagers
Kids (7-12)
Kids (3-6)
5. Silhouette Machine (studio3 files), with 1/4″ seam allowance included (use only on Type A)
All 4 sizes in the .zip file
6. New Face Mask Templates Modified by Jeese Killion (8 sizes). Thank you, The Fabric Patch, for the video that mentioned this new pattern in their video. Now, you are able to measure your face and find the best fitting pattern to sew (watch how to measure at 20:40). For those who have great experience in sewing with Craft Passion’s instruction, you may try it out with the same instruction B & C and trim the ear-side of the lining piece 1″ away for the pocket section. Or you may watch the video here to sew it in The Fabric Patch way for a non-pocket version.
7. Windowed Face Mask Sewing Pattern for the Deaf & Hard of hearing communities. Thank you, Kit Kenyon, for the modification and instruction in sewing it. (The link to the pattern will open on a separate page.)
Face Mask Sewing Pattern
Since the recent pandemic virus outbreak, I have been perfecting and improvising this reusable fabric face mask pattern to include all the features needed to fight against the Covid disease’s spread.
Many hospitals and authorities have recommended the printable face mask sewing pattern because it is the best fit homemade fabric face mask. Here are the patterns and tutorials on how to sew these three types of double-layered fabric face masks. You may add more layers on the lining pieces to make a multi-layer face mask for better effectiveness.
It comes in 4 sizes, small kids, young kids, teenagers & Women, and Men.
Type A: Normal face mask
Type B: Face mask with a POCKET for filter insert or as a surgical mask cover.
Type C: Add on a removable NOSE WIRE to Type A and Type B (as shown in the video). It comes with a sleeve to insert nose wire for a better seal and an anti-fog to glasses wearer.
Materials
Fabrics
- Main Fabric (cotton), 13" x 7", prewashed
- Lining Fabric (cotton or flannel), 12" x 7", prewashed
Nose Wire
- Bias Tape, 2" wide 6" long (5" for young kids, 4" for small kids), prewashed. (Optional, as nose wire sleeve)
- Wire, 6" (5" for young kids, 4" for small kids). (Optional, as nose wire), bent the ends inward so they won't poke through the fabric.
Fastener
- Elastic cord: for ear loops, 8" x 2pcs., or, for a head tie, 18" x 2pcs., (this is an approximate length, please measure with your own elastic band to judge; as everyone's head and sizes are different)
- or, shoelace/ribbon/cord/t-shirt yarn with at least 44" length for the head tie
Face Mask Sewing Pattern & Templates
Tools
- Sewing essential
- Sewing Machine or hand sew
- Iron
- Seamstress tracing wheel and paper
- Pencil or soluble fabric marker
Instructions
1. Decide which type and size you want to sew, choose the correct pattern from the list, download and print out the template of Face Mask Sewing Patterns separately.
2. Base on the choice of face mask you want to sew, follow the sewing instructions accordingly. Watch the sewing video if needed for the instruction of Type C face mask or as a reference for other types.
3. Add ties to the face mask, either with elastic ear loops, elastic band, or head tie.
4. Wash the face mask with warm water of at least 60 °C or 140 °F, dry it properly before wearing it. Add filter insert if required.
HOW TO SEW FABRIC FACE MASKS
1. DOWNLOAD TEMPLATE
Decide which type and size you want to sew, choose the correct pattern from the list, download and print out the template of Face Mask Sewing Pattern separately.
Don’t "scale" the printing and DON'T print to "fit the paper", either. It is in letter size paper (8.5″ x 11″), so you should have no problem printing it in 100% size. There is a 2″ scale marking for you to check if you are printing it in the right size.
Cut out the pattern of your size.
[NOTE: You may do a quick enlarge on the printer if you find the pattern is still a little smaller than you needed. ]
[Remark: It is a pdf document and will open in a new tab or window or asking you to download it. Please make sure your computer has the supported software for it to open correctly. Unblock your computer “pop-up blocker” for this site if you have it enabled.
[IMPORTANT: Don’t print the pattern from the browser. The size might not correct. Please open the pdf pattern in Adobe Reader or Adobe Pro and print the actual size (100% scale) from there, DO NOT set to "print to fit paper".]
[With Printer]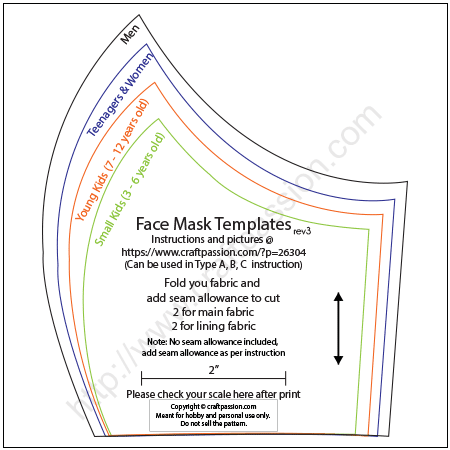
[Without Printer]
TRACE - You may trace the pattern out from your monitor. Download the templates and open them in Adobe Reader. Zoom the template till the 2" guide measures 2" on your ruler, set the screen to the highest brightness. Place a piece of white paper on the monitor and trace the outline with a pen or a marker.
OR
SKETCH - Here is the template (without seam allowance reference on a 1/2" grids, you may hand sketch it on a graph paper or a self-constructed 1/2" gird paper. 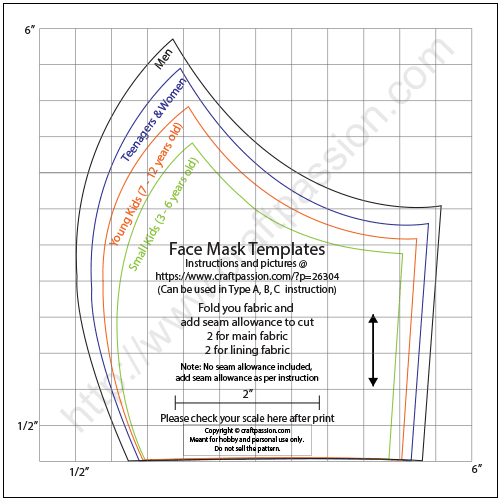
2. SEW
Choose from Type A, Type B, or Type C to sew
Type A: Normal face mask
Type B: Face mask with a POCKET for filter insert or as a surgical mask cover.
Type C: Add on a removable NOSE WIRE to Type A and Type B (As shown in Video). It comes with a sleeve to insert nose wire for a better seal and as an anti-fog to glasses wearer.
TYPE A - NORMAL FACE MASK
- Step A-1.
Fold the main fabric into halve with the wrong side facing each other, pin the paper pattern onto the double-layered fabric. Cut the fabric with 1/4″ allowance, except the ear side. Cut the fabric at the ear side with 1″ seam allowance (1.5" if you are using t-shirt yarn as the head tie).
Insert the tracing paper between the layer, trace sewing lines with the tracing wheel.
Remove pins and paper pattern, get set to sew.
NOTE: If you are using templates that already have seam allowances included, you do not need to add any more seam allowance. The same applies to the lining in the next step.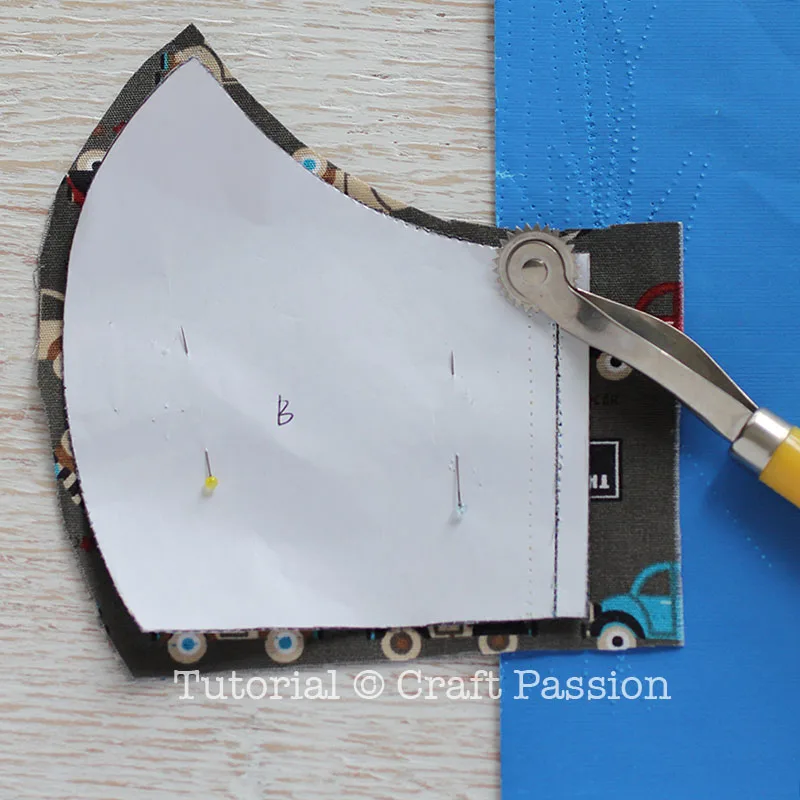
- Step A-2.
Repeat the same as the main fabric, except the ear side seam allowance. Cut the fabric at the ear side with zero seam allowance.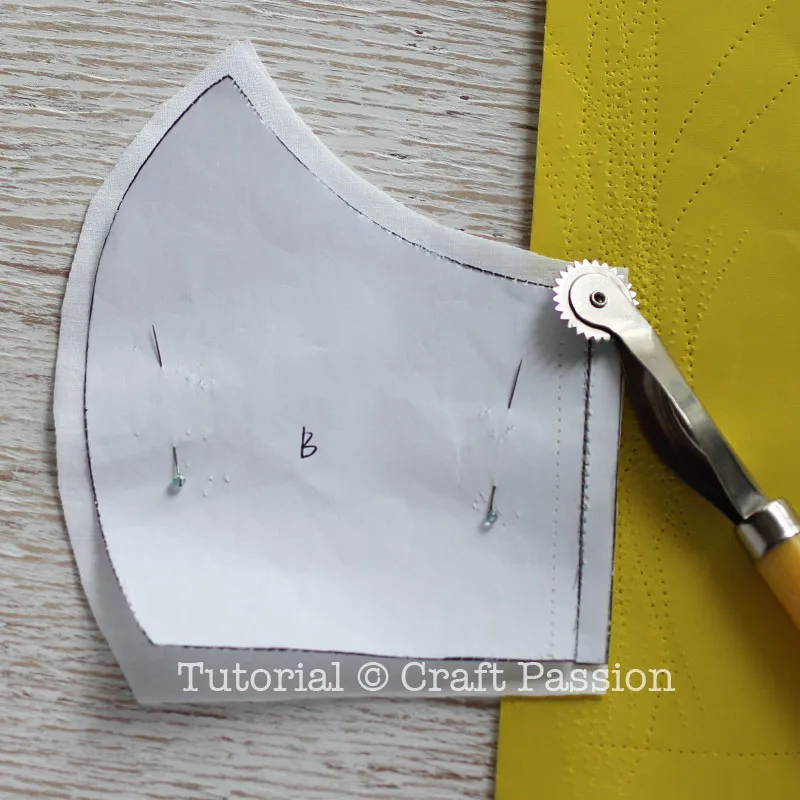
- Step A-3.
Turn the face mask main piece with the right side facing each other and sew the face mask's centerline.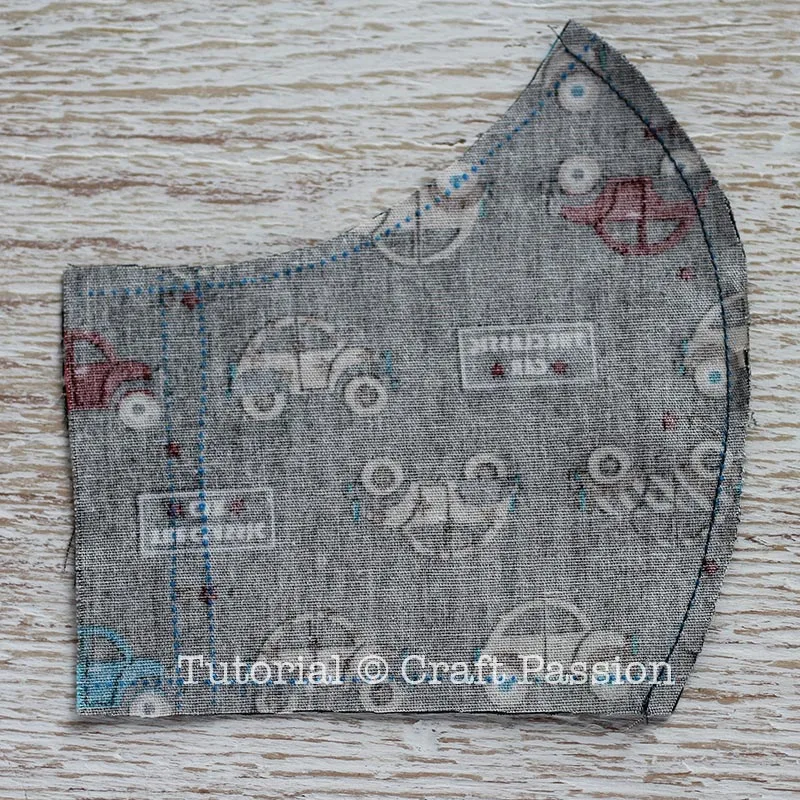
- Step A-4.
Clip curve along with the seam allowance; be careful and don’t accidentally clip on the stitches.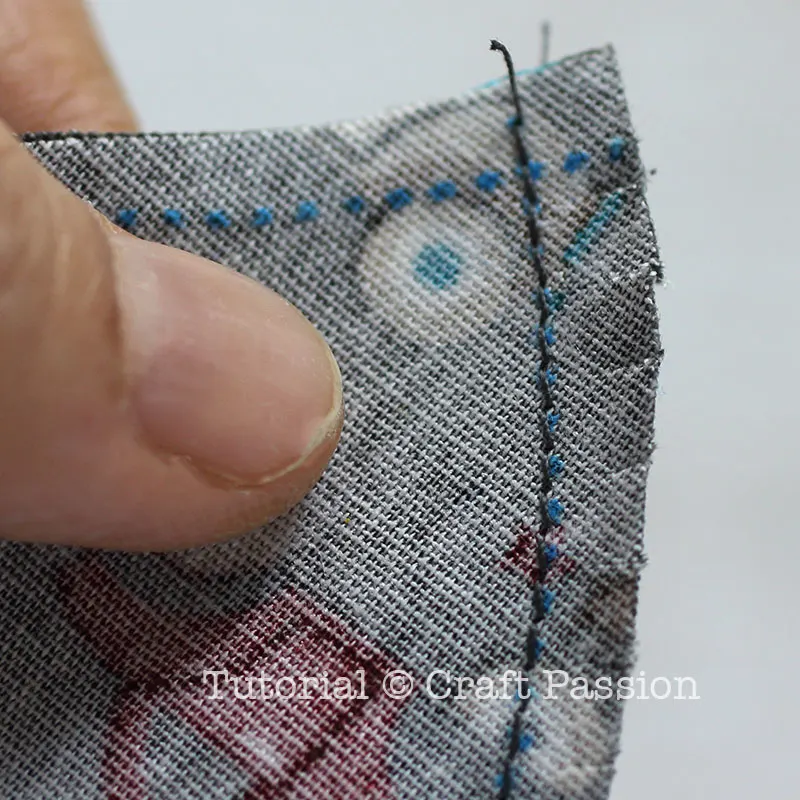
- Step A-5.
Press seam allowance to one side, topstitch near to the seam line on the side where the seam allowance is.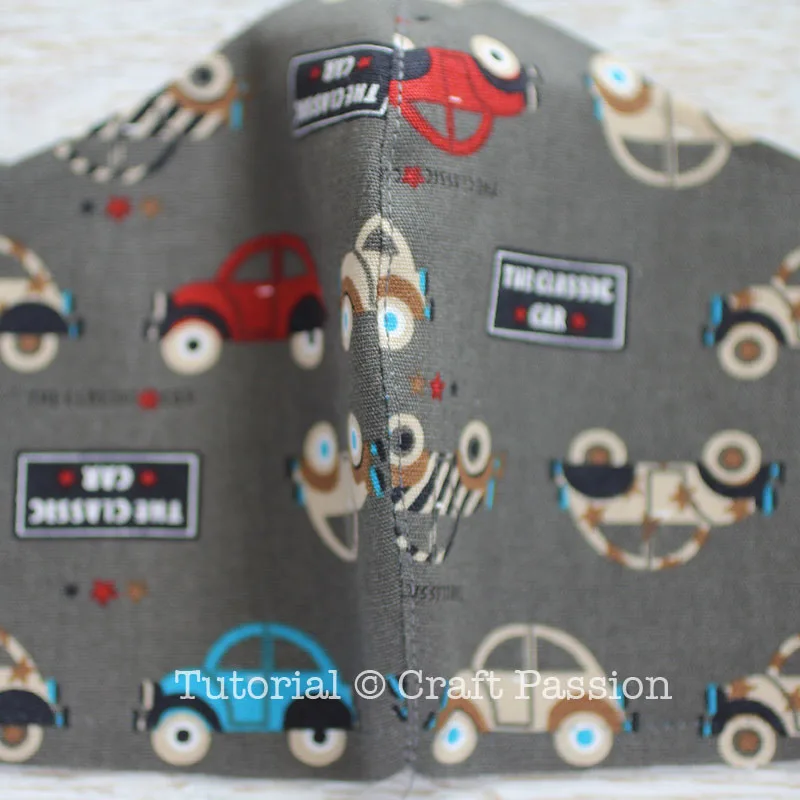
- Step A-6.
Repeat the sewing on the lining part.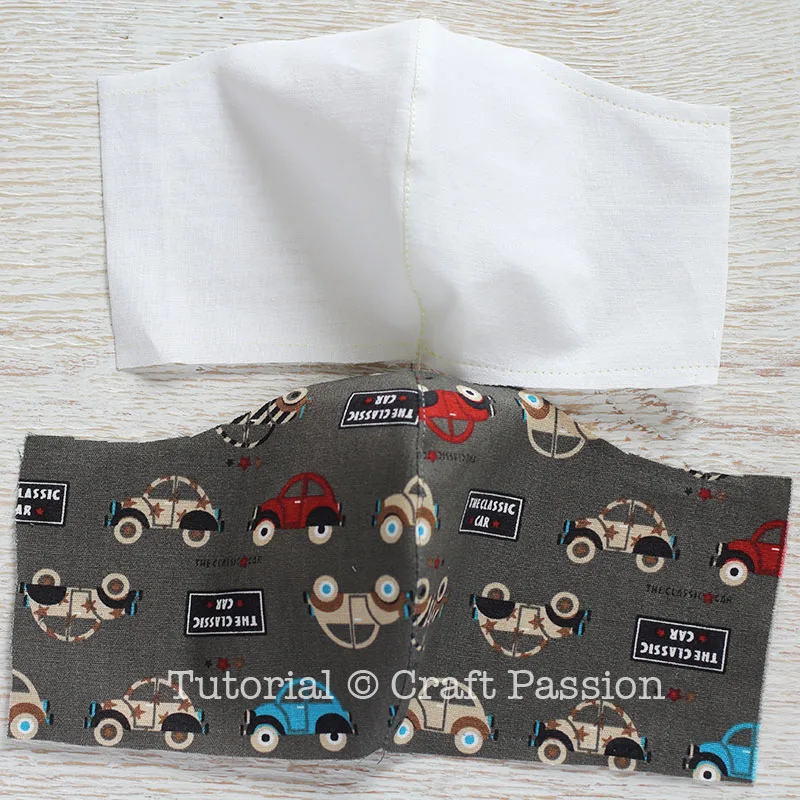
- Add step C-7 to C-11 if you want to add nose wire to the face mask.
- Step A-7.
Flip the lining and place onto the main face mask, align the center seam line, pin and sew the top and bottom lines.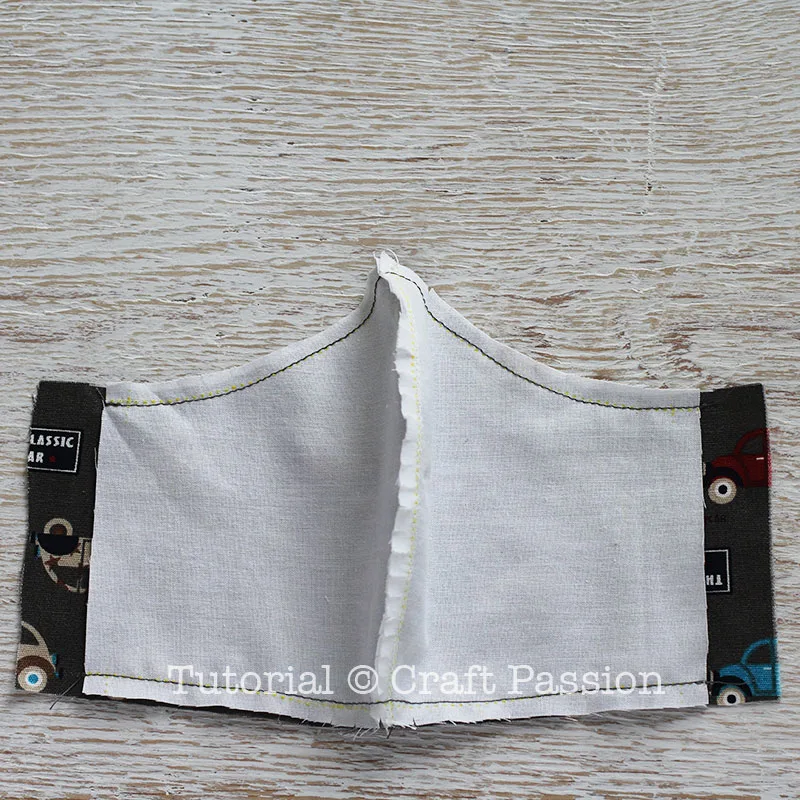
- Step A-8.
Turn the face mask right side out. Press seam neatly and topstitch near the edge.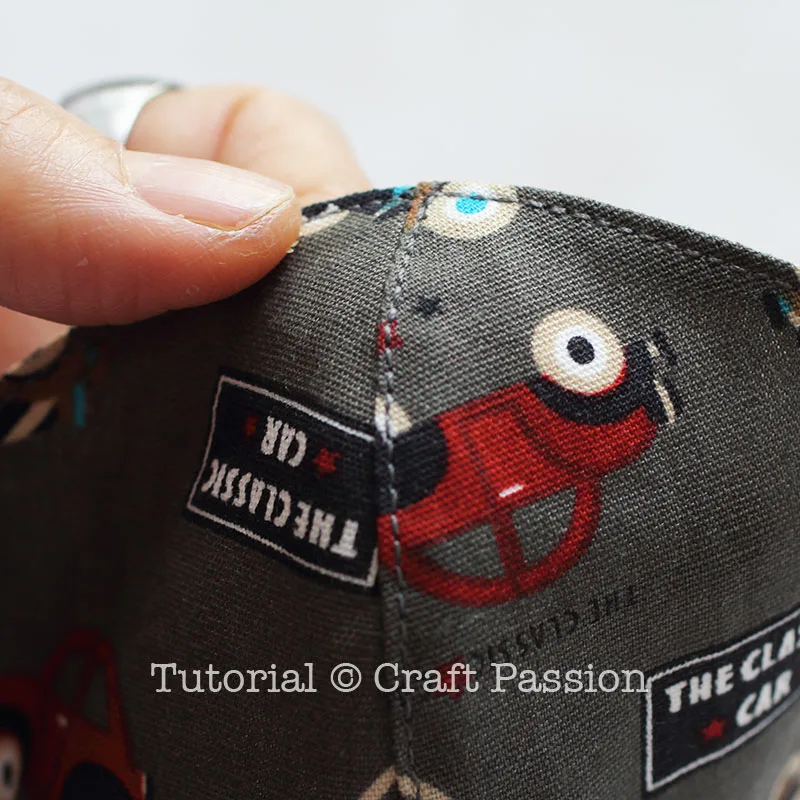
- Step A-9.
This is how it looks like from the inside at this stage. The main fabric of the side ear area is longer than the lining piece. This is going to be the pocket of the elastic band.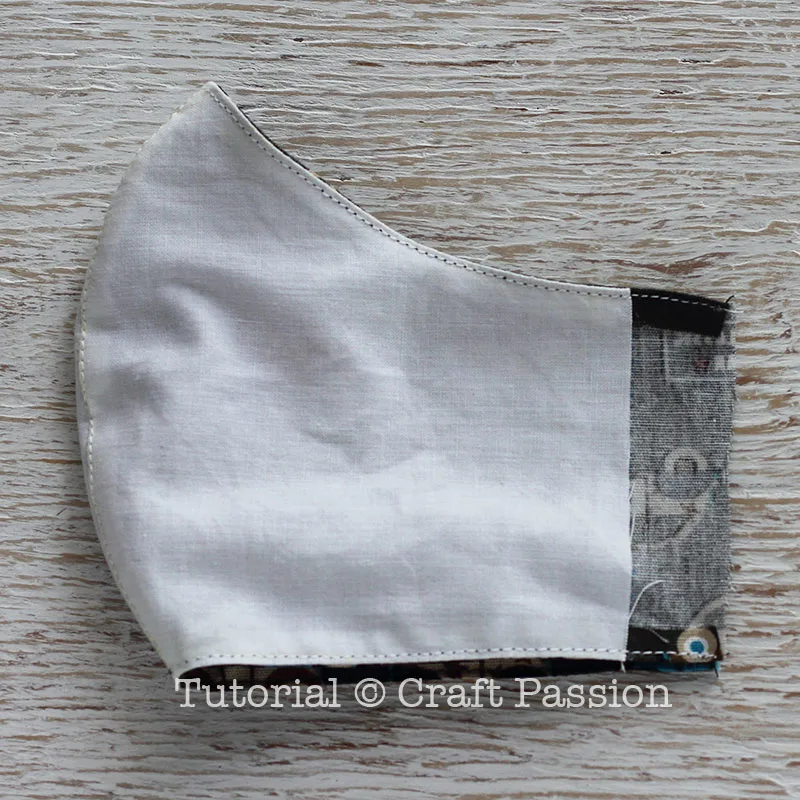
- Step A-10.
Fold in 1/4″ at the raw edge of the side ear, fold again so that the first fold edge is 1/4″ from the lining raw edge.
Sew a straight line down, don’t forget to perform a few back stitches to lock the thread end.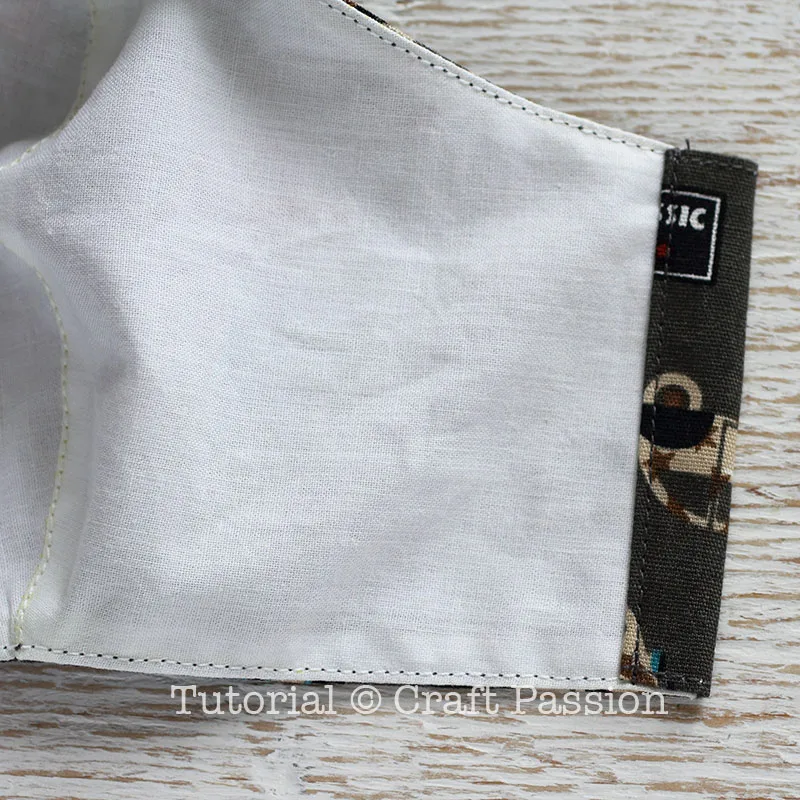
- Step A-11.
Measure and cut the length of the elastic band needed (usually around 6″-8″ depending on the size of the face).
Insert the elastic band through the pocket and tie a dead knot to the ends.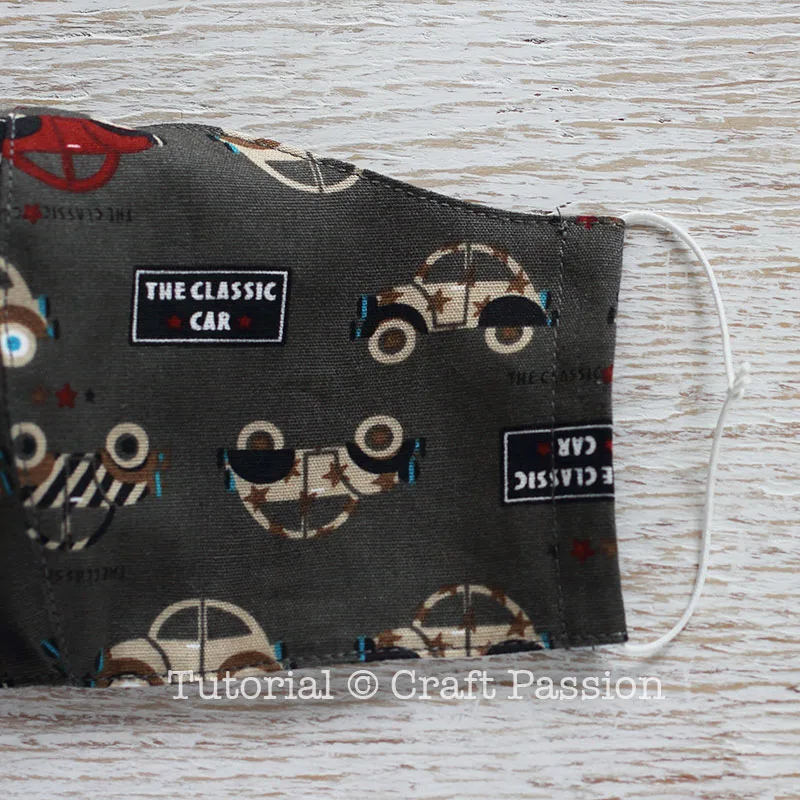
- Step A-12.
Repeat the same to the other side. Pull the elastic band until the knots are hidden in the pocket.
Wear and breathe normally!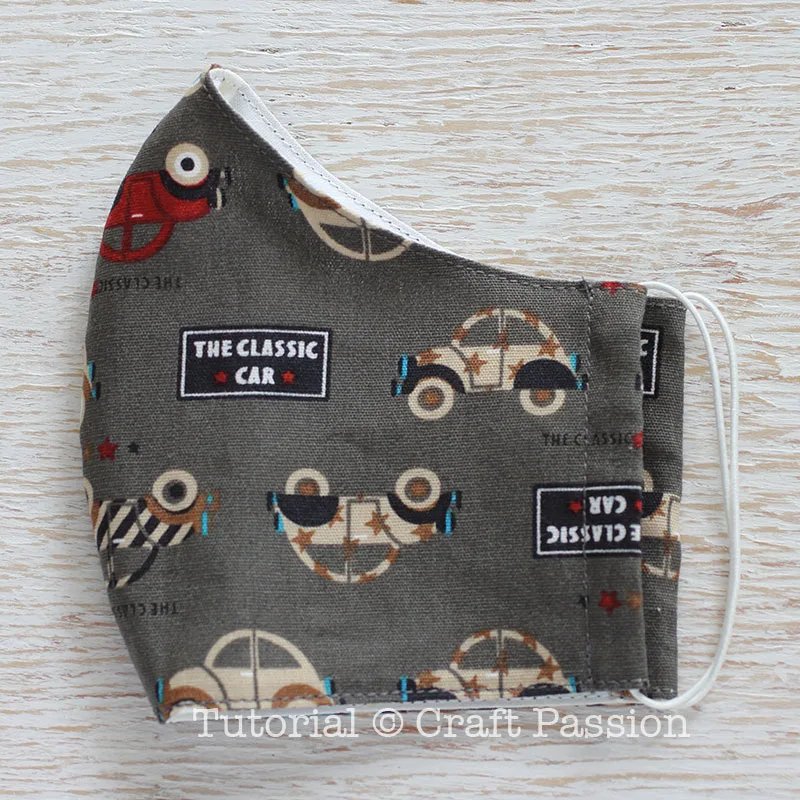
TYPE B - FACE MASK WITH POCKET FOR FILTER INSERT
- Step B-1.
Get ready for all the materials, as stated in the material list above.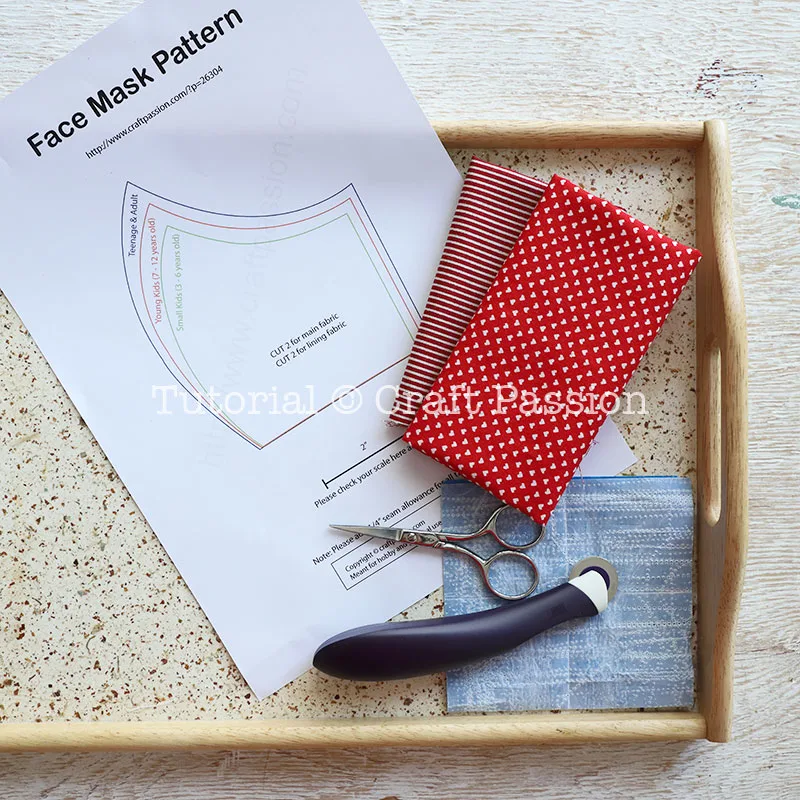
- Step B-2.
Fold the fabric with the wrong side facing each other, place the paper template on it, pin.
Cut the fabric out with ⅜” seam allowance (you can use ¼" seam allowance), except the side of the face mask: 1″ for the outer layer (1.5" if you are using t-shirt yarn as the head tie), ½” for the inner layer.
Trace the sewing lines with the tracing paper and tracing wheel.
NOTE: If you are using templates that already have seam allowances included, you do not need to add any more seam allowance.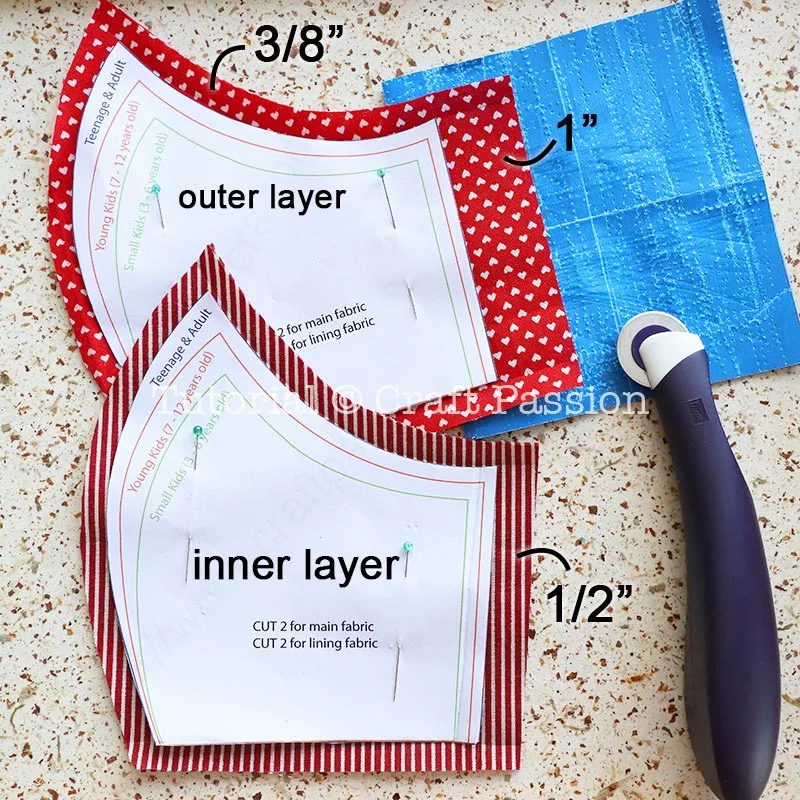
- Step B-3.
Turn the pieces over and pin the pair together with the right side facing each other. Sew the curved lines as shown in the picture.
Draw a line ¼” from the original side sewing line of the inner layer, do the same to the other side of the inner layer.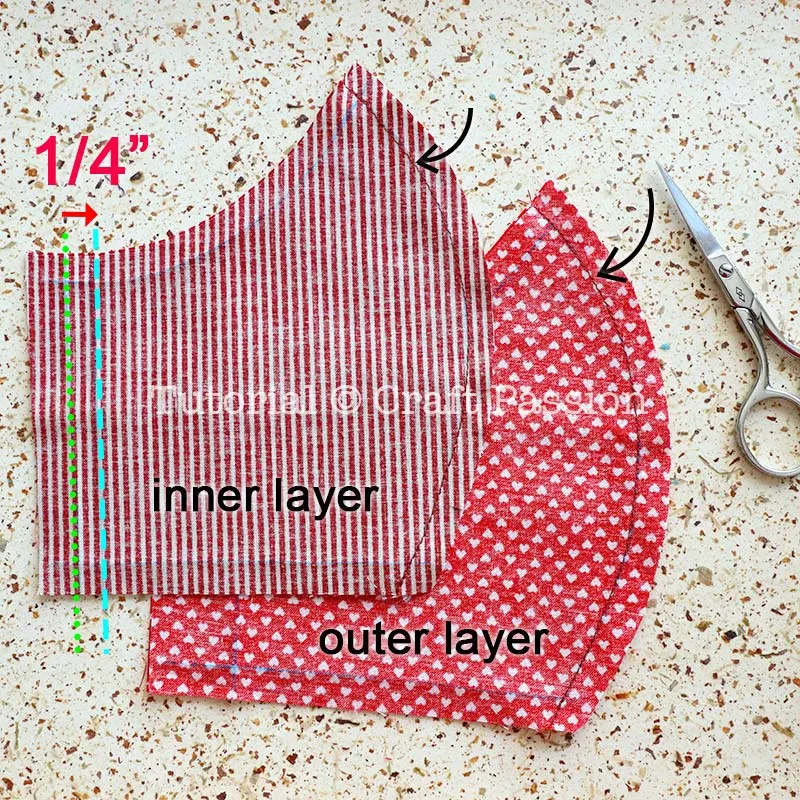
- Step B-4.
Clip the seam allowance about ½” apart. This will let the fabric’s raw edge stretch without pulling the seam when you turn it right side out. Repeat this on both the outer layer and the inner layer.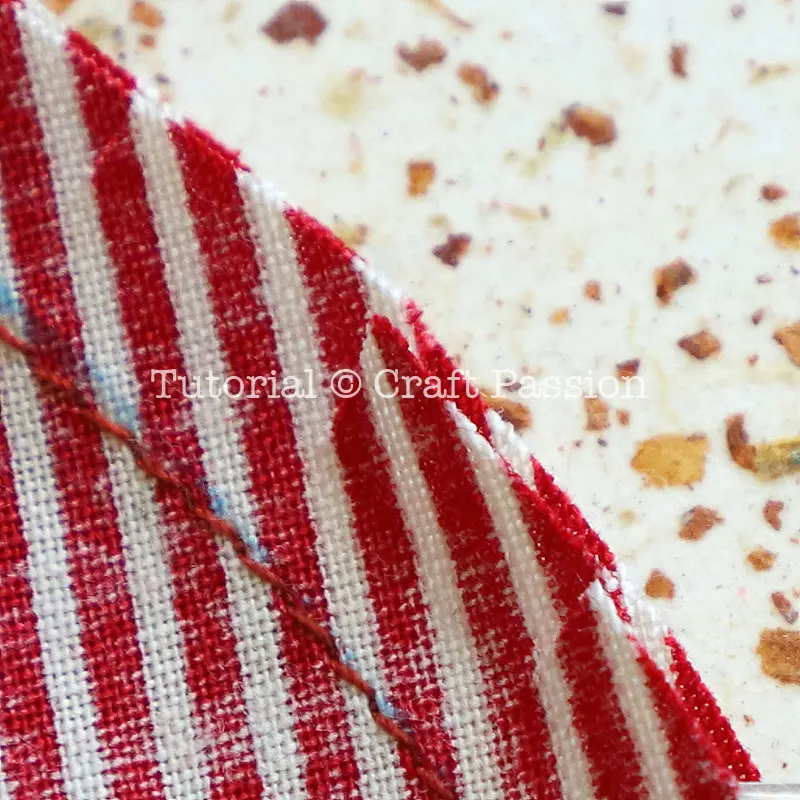
- Step B-5.
Turn the pieces right side out, press the seam allowance to one side, topstitch near the seam line. Repeat the same to the inner layer.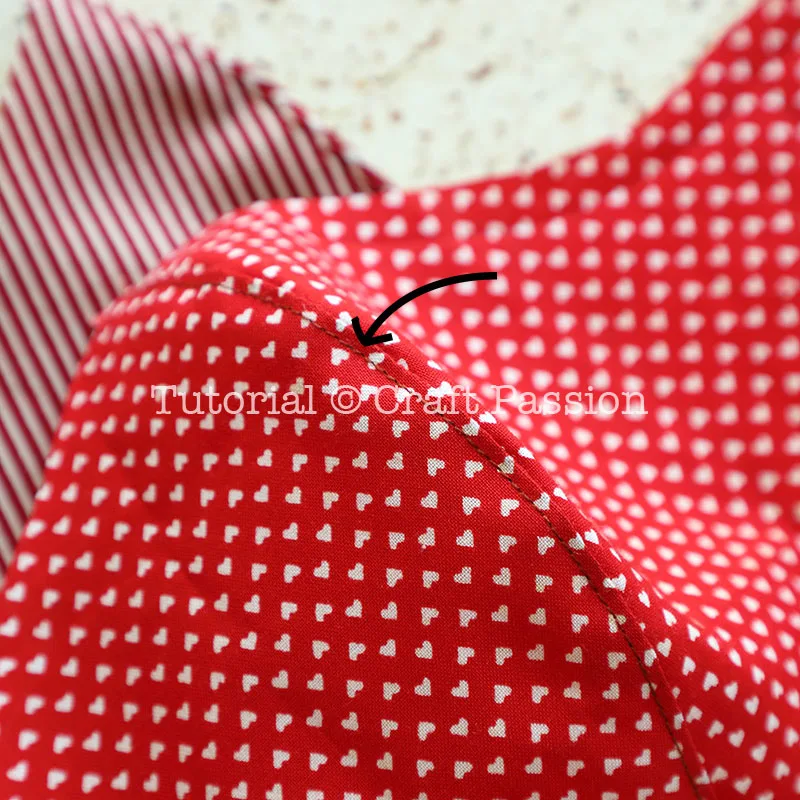
- Step B-6.
Fold the side at the second line drawn next to the original sewing line of the inner layer. Fold the raw edge and hide inside the fold. Topstitch to sew it on. Repeat on both sides of the inner layer.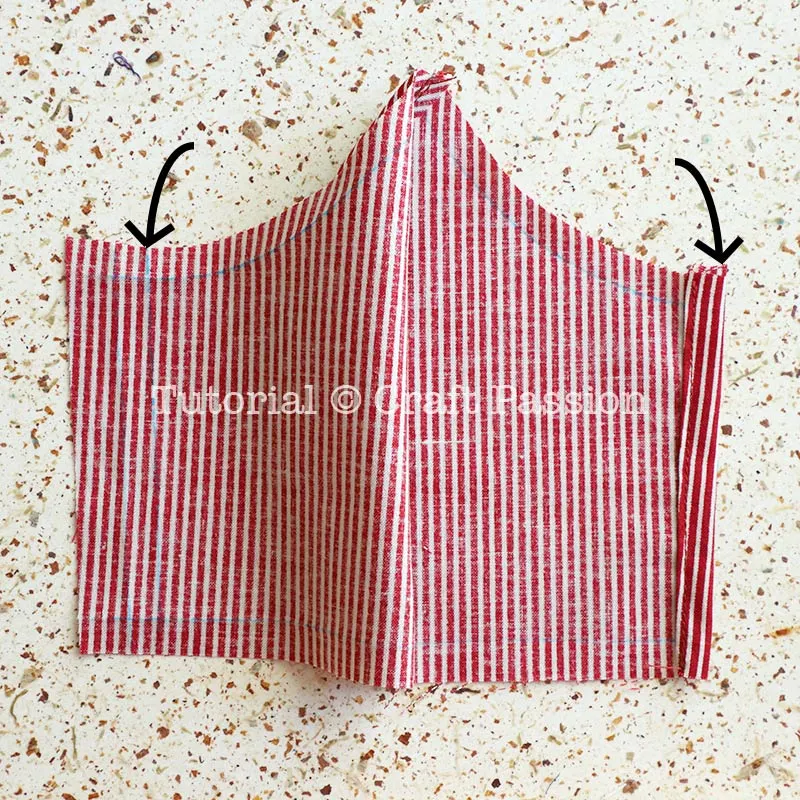
- If you want to add nose wire, add step C-7 to C-11 here.
- Step B-7.
Place the inner layer on top of the outer layer, with the right side facing each other.
Sew the top and bottom seam lines.
You may notice that the edge of the inner layer is now ¼” away from the outer layer's sewing line. If it is not the case, please check if you are sewing it correctly in the previous step.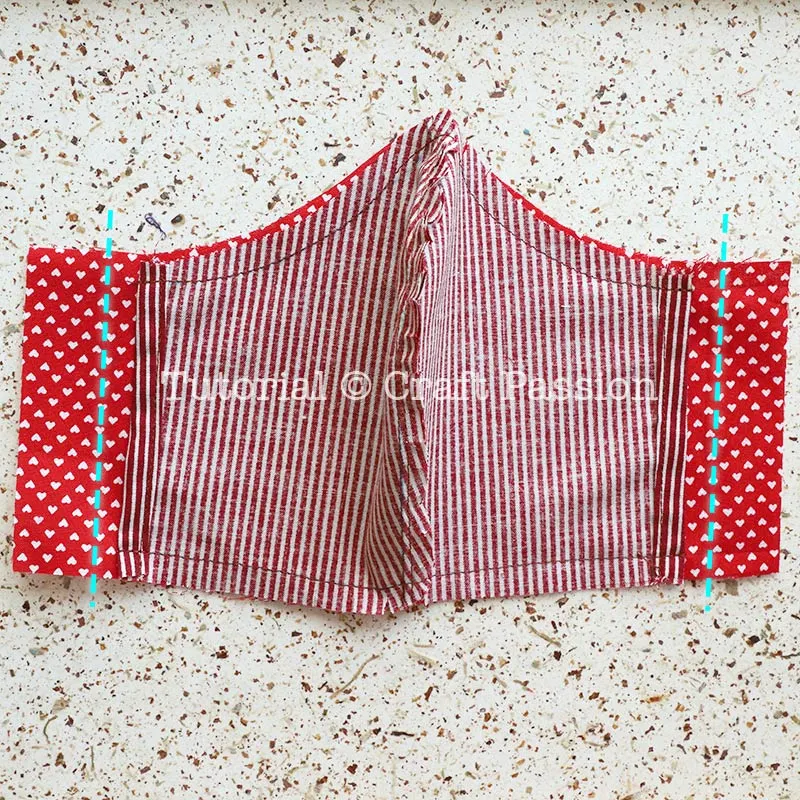
- Step B-8.
Clip curve on the seam allowance where the 2 layers meet. Leave about 1/2″ from the ends un-clip.
Turn the face mask right side out. Press seam flat.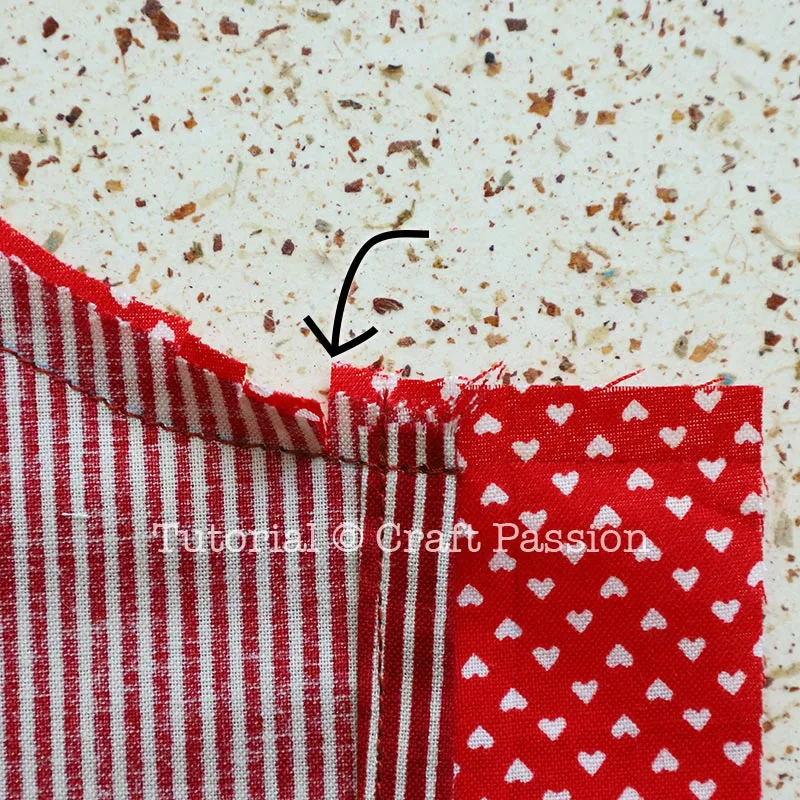
- Step B-9.
Double fold the top and bottom raw edges of the outer layer (both sides). Topstitch near the edge, as shown in the picture. Repeat the same to the bottom seam line.
To make the pocket for the elastic band, fold the side raw edge 1/4″ from the edge, then fold again so that the edge meets the edge of the inner layer.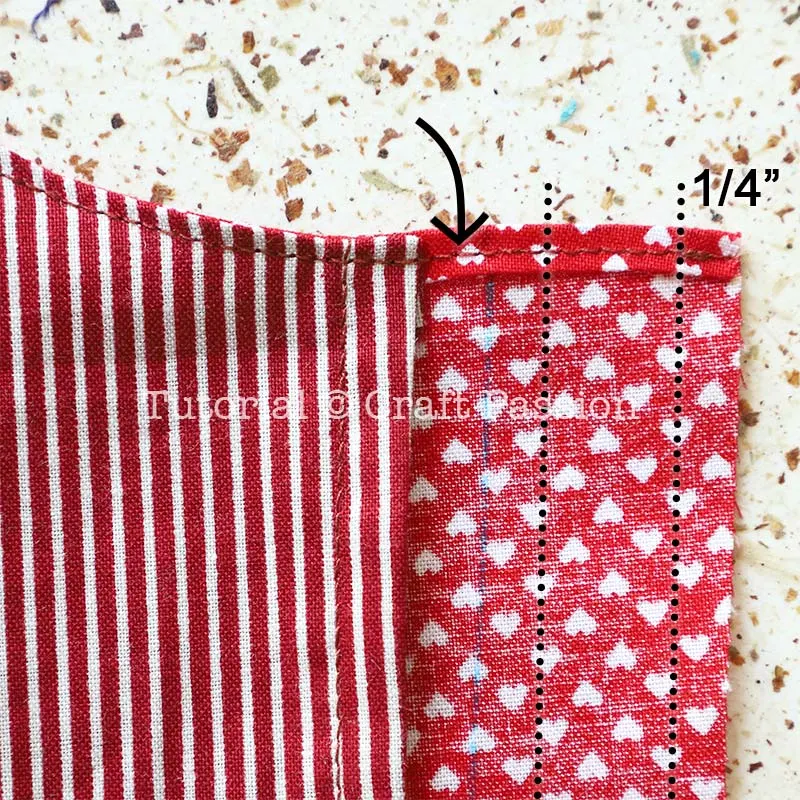
- Step B-10.
Topstitch a vertical line to sew it on. The top and bottom have an opening for you to insert your elastic band.
I added my label while sewing it.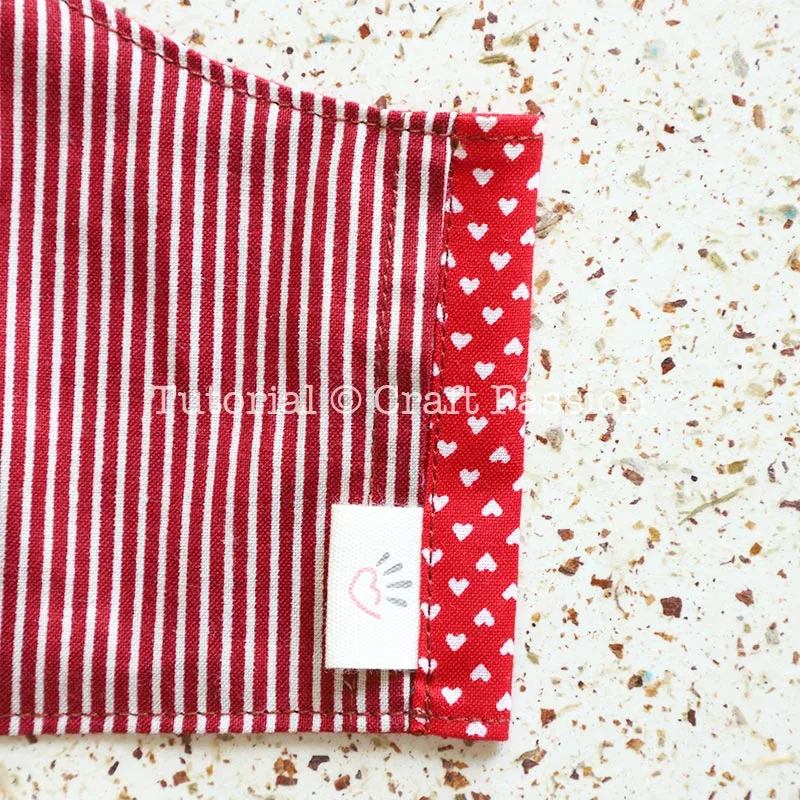
- Step B-11.
This is the opening for the filter insert.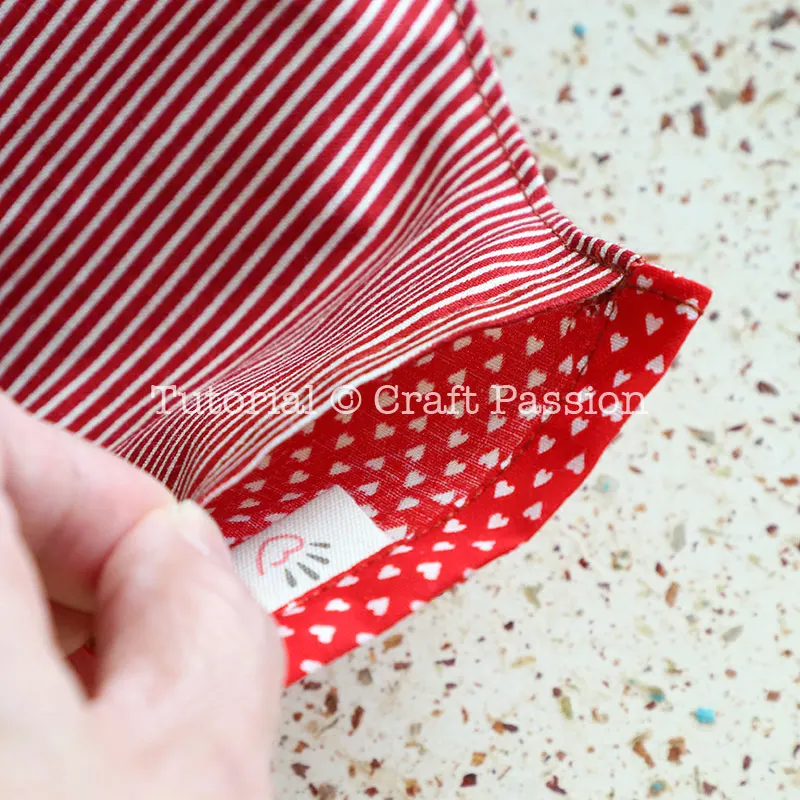
- Step B-12.
Add elastic bands to the pocket face mask the way you like, and it is really to be worn.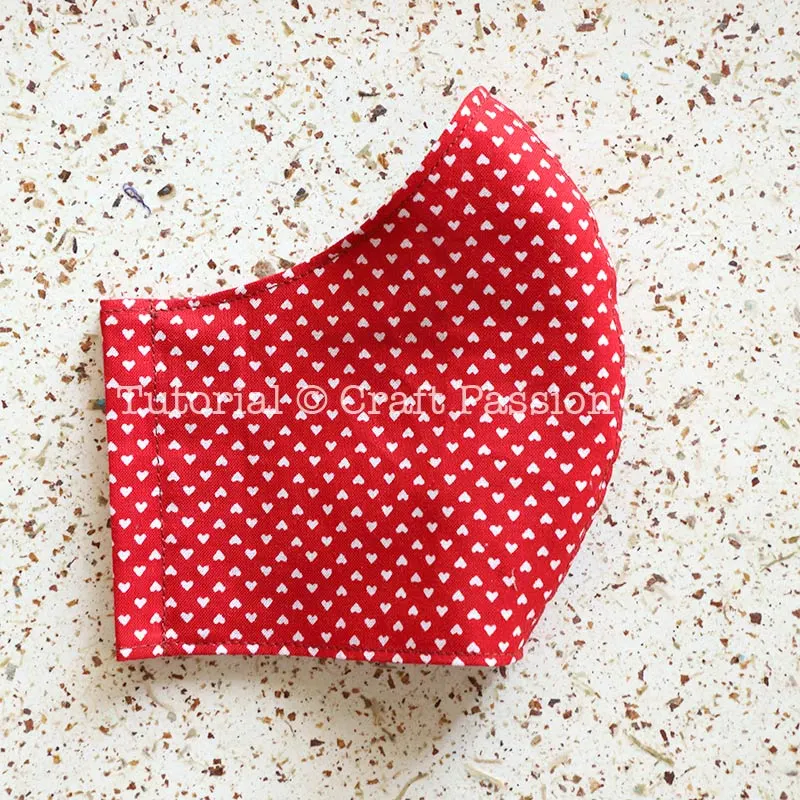
TYPE C - FACE MASK WITH NOSE WIRE (WITH OR WITHOUT POCKET)
- Step C-1 to C-6: Follow step A-1 to A-6 for a non-pocket face mask, or step B-1 to B-6 for a pocket face mask (As shown in the video).
- Step C-7.
Cut a bias strip of 2” wide and 6” long or use store-bought bias tape if you can find it from the shelf.
How to cut bias strip:
Fold the fabric diagonally, draw a line along the crease of the fold, measure 2” from the line and draw a line parallel to it. Cut the strip into 6” length.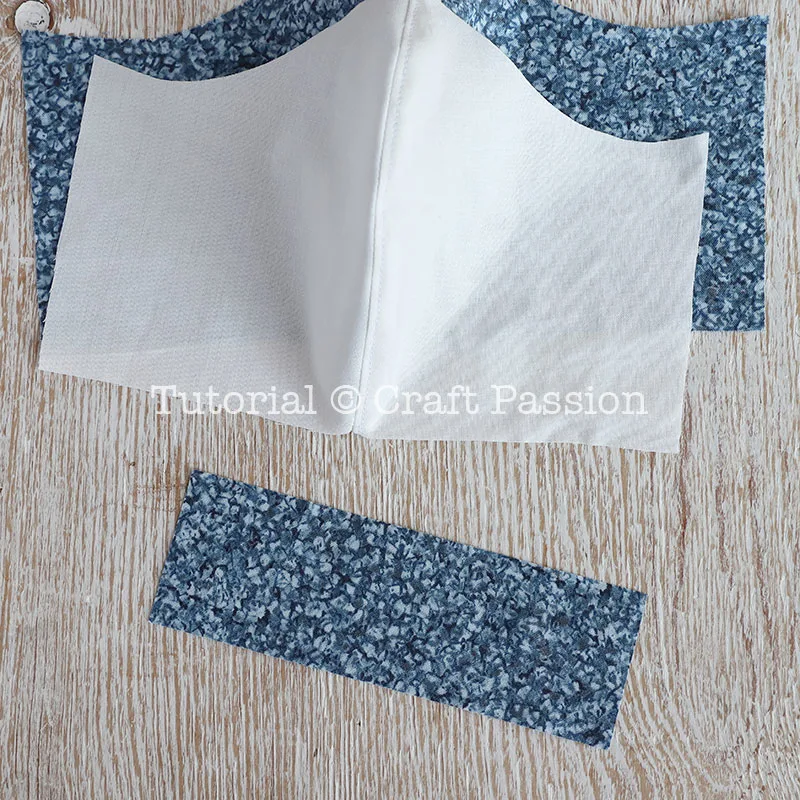
- Step C-8.
Fold ¼” from the 2” ends.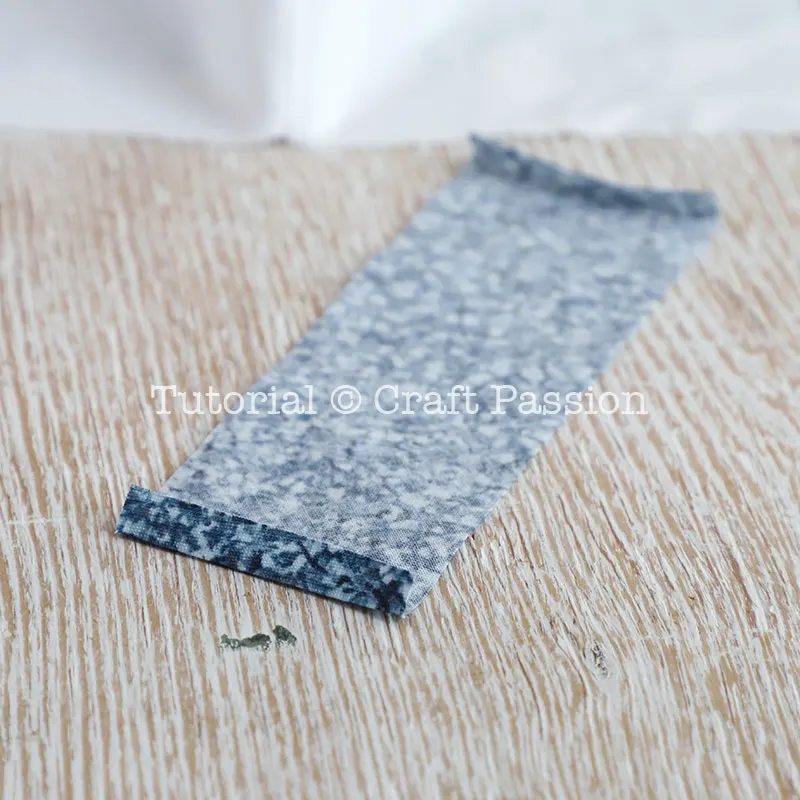
- Step C-9.
Fold the strip into half, lengthwise.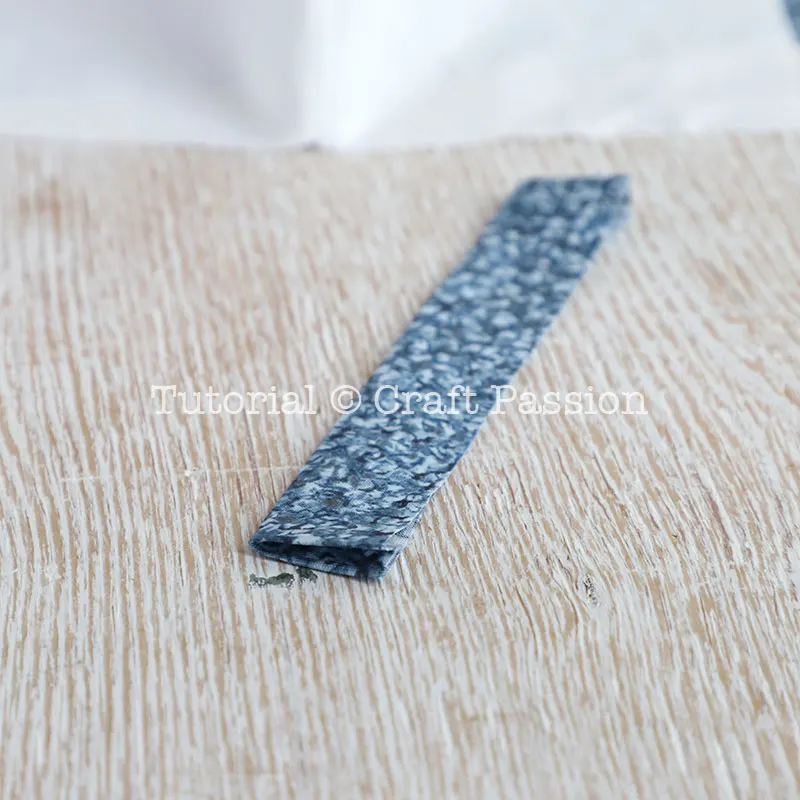
- Step C-10.
Stitch up both ends.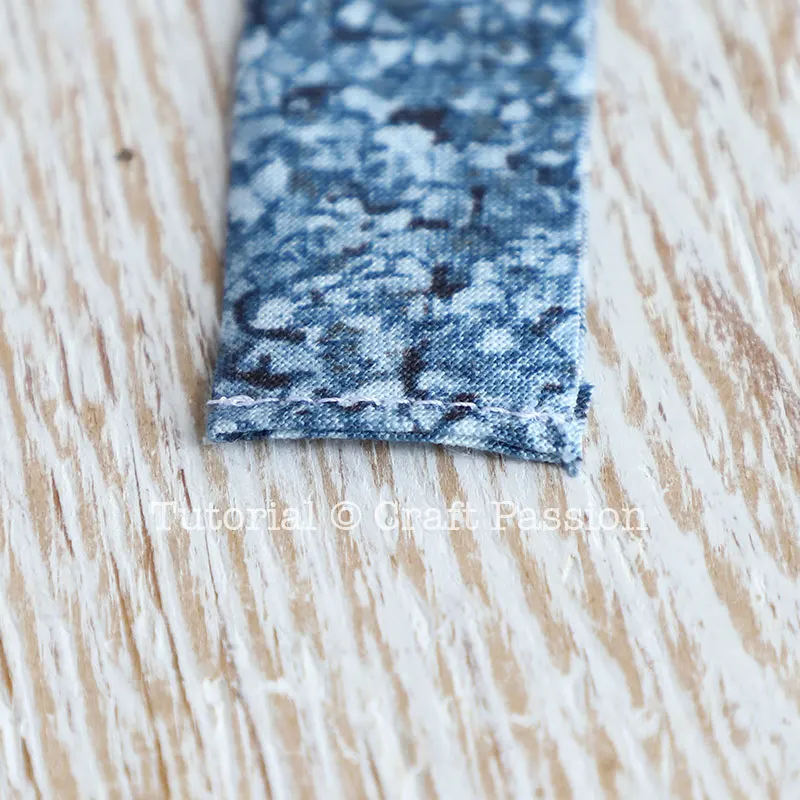
- Step C-11.
Align the bias tape along the front top edge of the lining.
Topstitch at the bottom edge of the bias tape.
Do not remove the pins until you pin the main piece to this lining piece.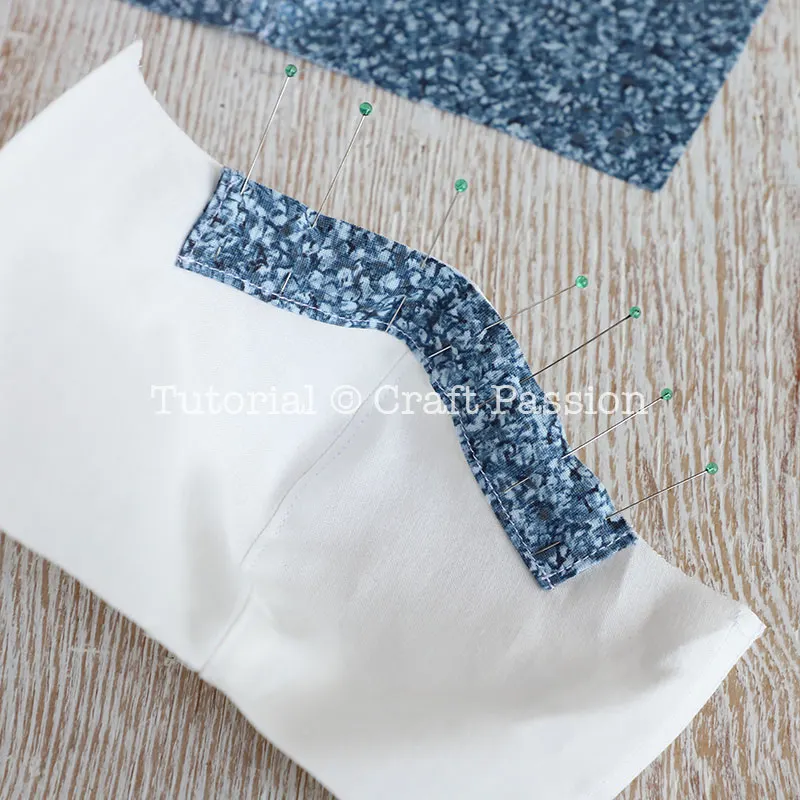
- Step C-12.
Continue to attach the main piece and sew them up into a face mask, as shown above.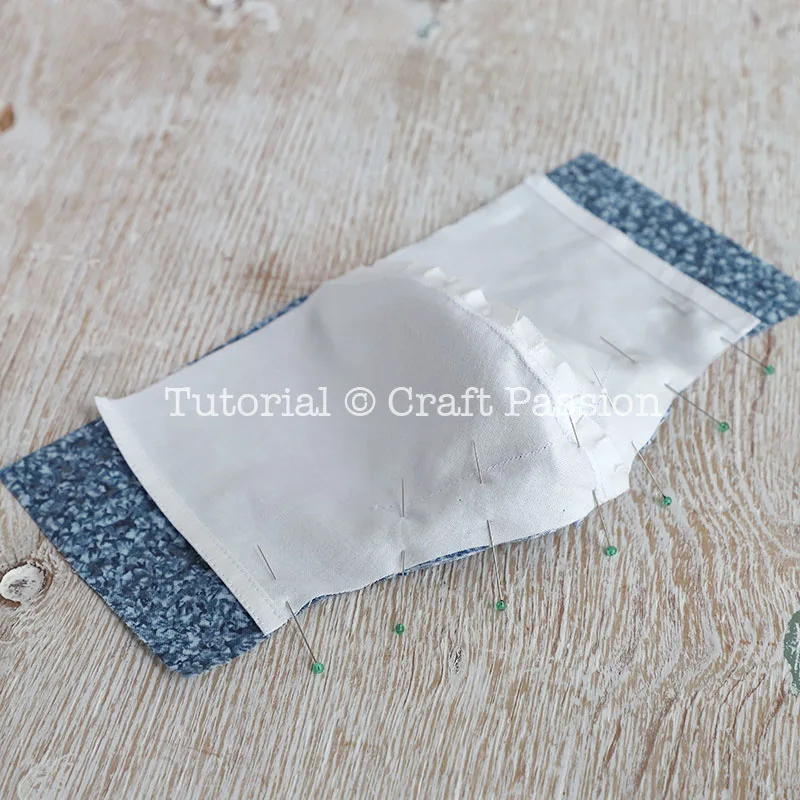
- Step C-13 to C-18: Follow step A-7 to A-12, or step B-7 to B-12 to complete the face mask.
- Step C-19.
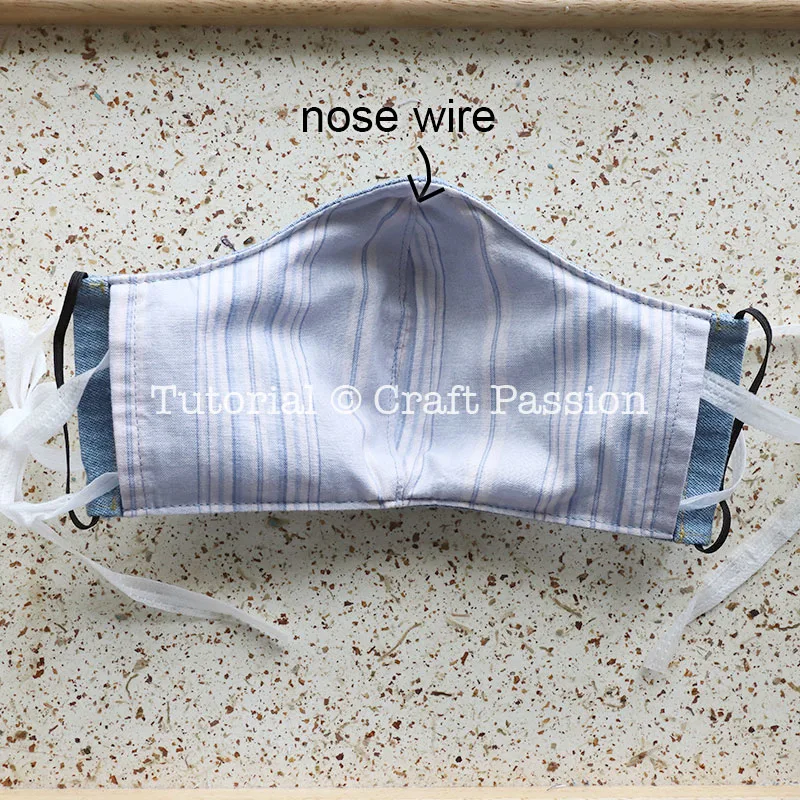
Cut a piece of pipe cleaner about 6” long, bend the ends in to make the pipe cleaner slightly shorter than the nose wire sleeve. Insert it into the sleeve. Remove the wire before washing the face mask.
Other options of nose wire are twist tie, florist wire, garden bonsai wire, aluminum, or other hardware wires as long as it can be bent and stays there. If the wire is too thin or soft, twist multiple pieces to make a thicker nose wire.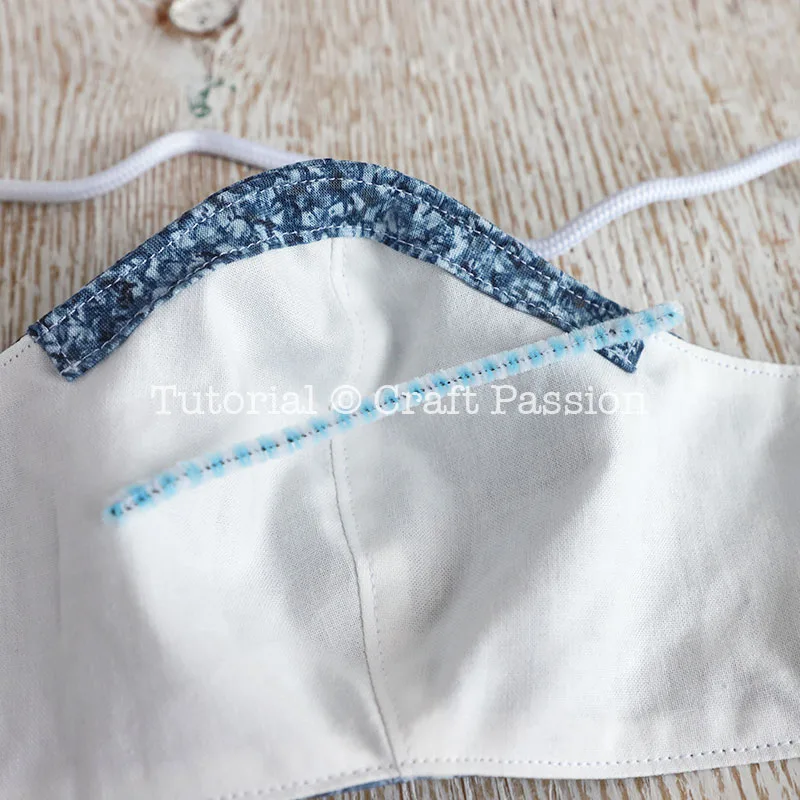
3. WEAR
- Insert Filter Media To The Pocket Type Face Mask
Insert a surgical mask if you are using the face mask as a cover (to make the surgical face mask last longer).
Insert a non-woven fabric if you can’t find any surgical mask in the market. I air-dried a piece of the anti-bacteria wet wipe as the filter insert. Throw away the filter correctly and wash the face mask every day.
Disclaimer: this face mask is not meant to replace the surgical face mask.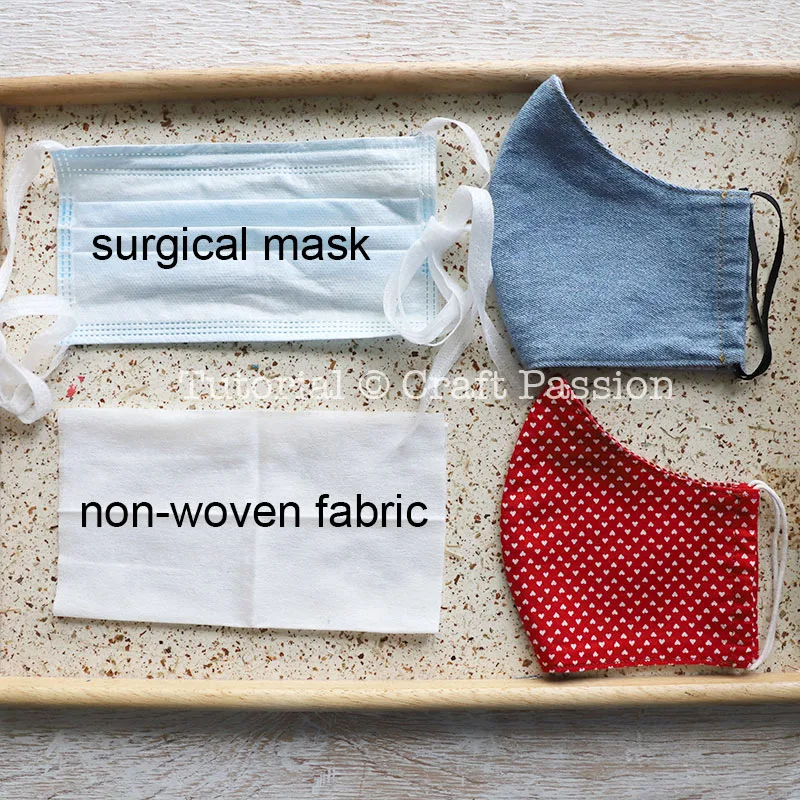
- Insert the medium into the pocket from both openings of the face mask. Adjust it nicely so that the medium doesn’t crumple up.
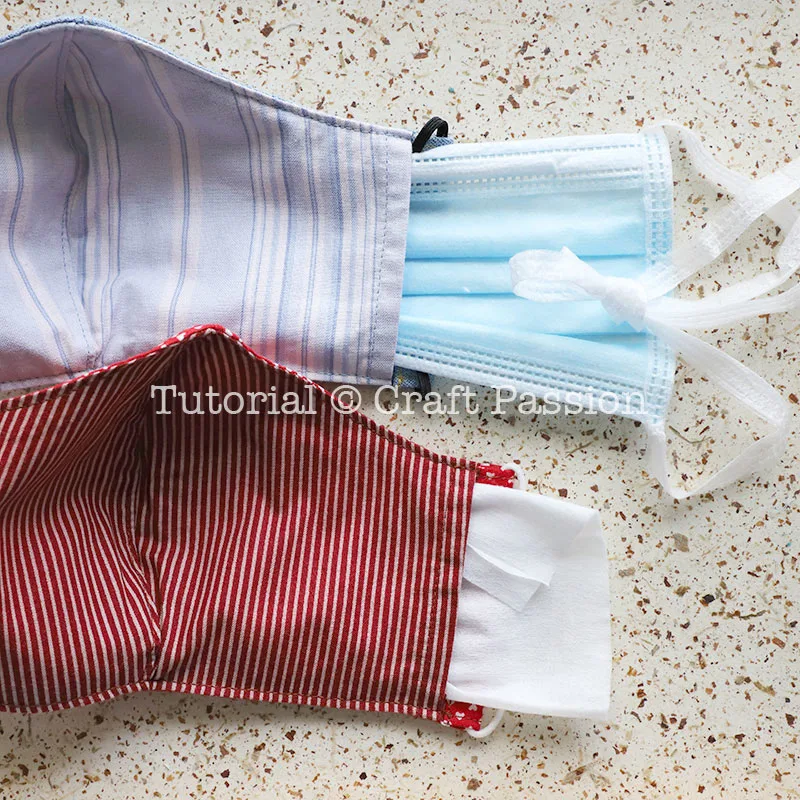
- After the surgical mask is fully inside the cover, push the surgical mask's nose wire to the tip of the cover, bend the wire a little to follow the curve.
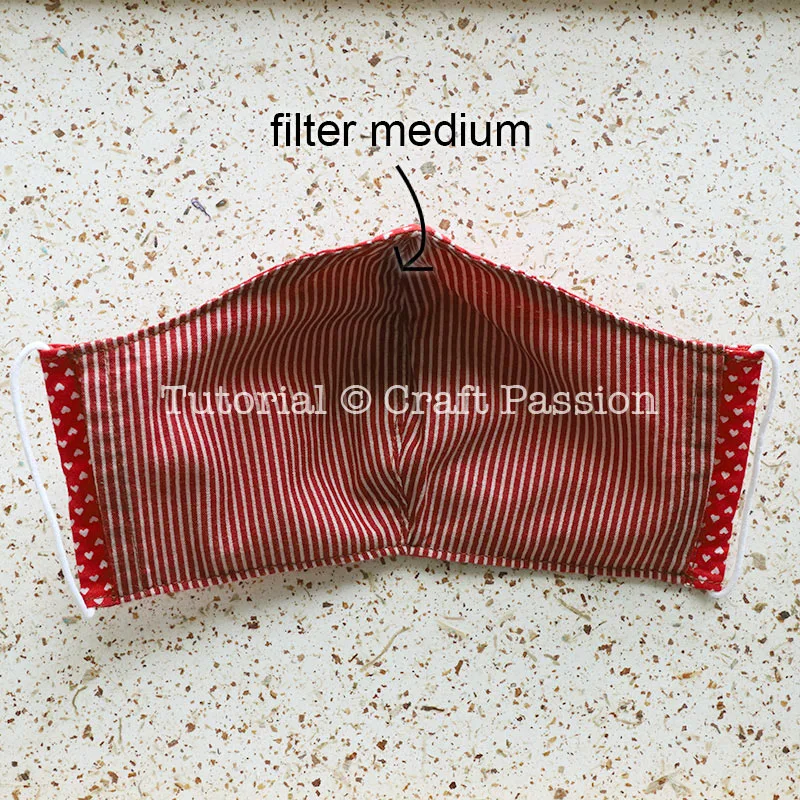
- The filter insert must be placed until the face mask's tip, where the nose position is at.
- Different Ways Of Wearing The Face Mask
This is the better way to string the shoelace or cord for the head tie; my video shows the other way round. This is easier to put on and tie, and if you need to take out the mask briefly, untie the bow to release the mask from your face, the mask will hang on the neck.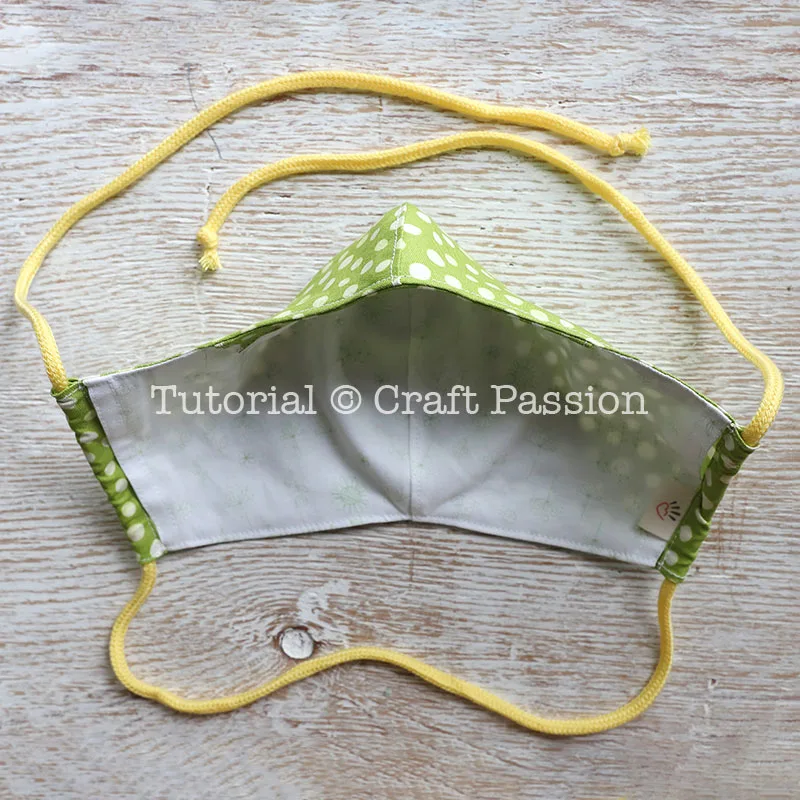
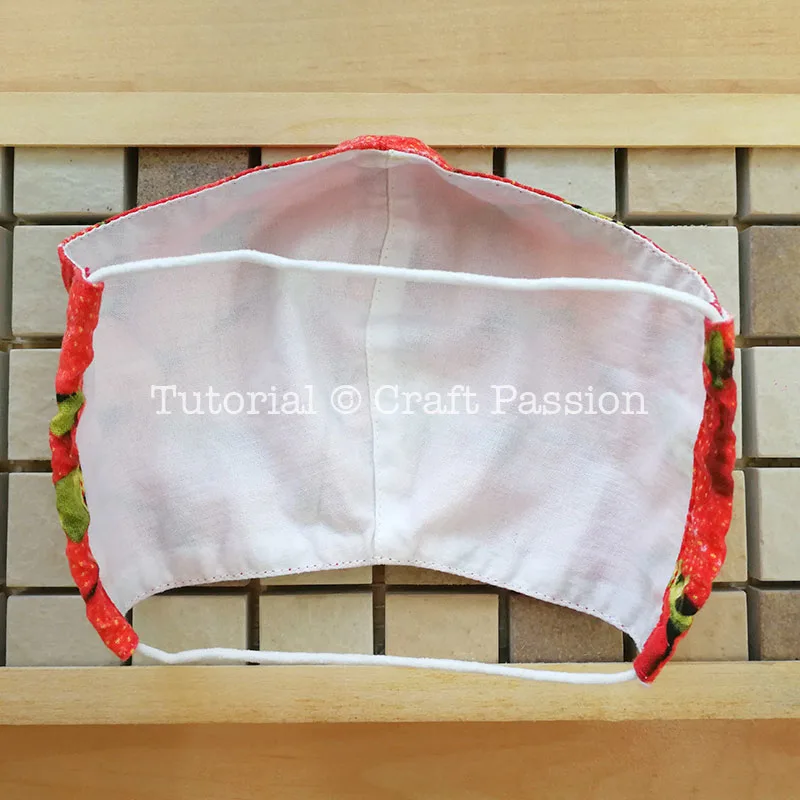
- If you prefer an elastic band, instead of splitting the elastic band into 2 ear loops, use the full length and insert through the channel as shown in the picture, tie a knot and hide the knot in the channel. The length varies for head sizes and the elastic band's strength. Try with yours to check the best length to cut.
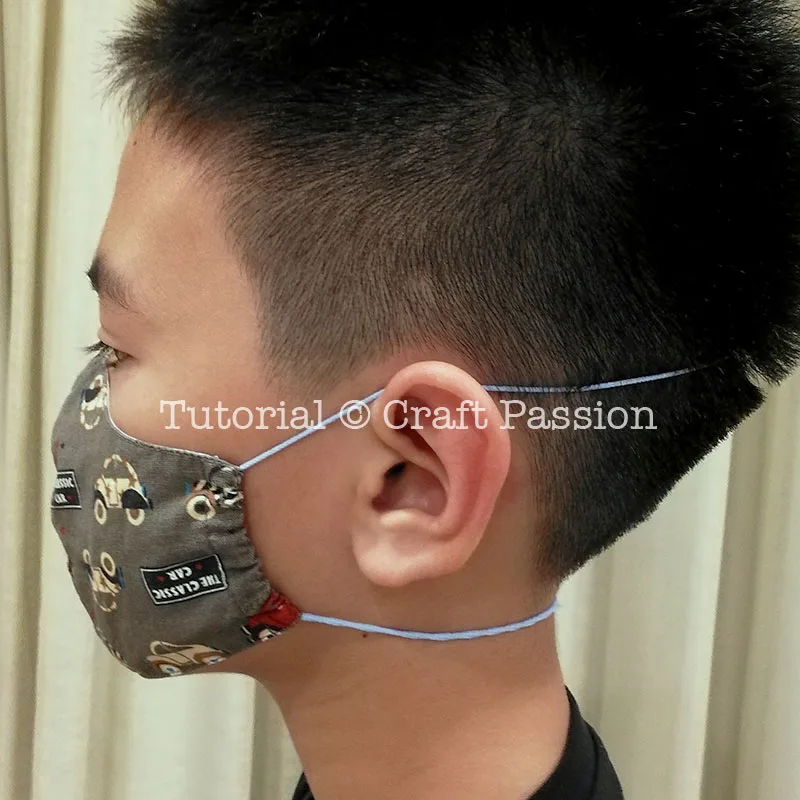
- Wear the face mask with the elastic band sits at the back of the head.
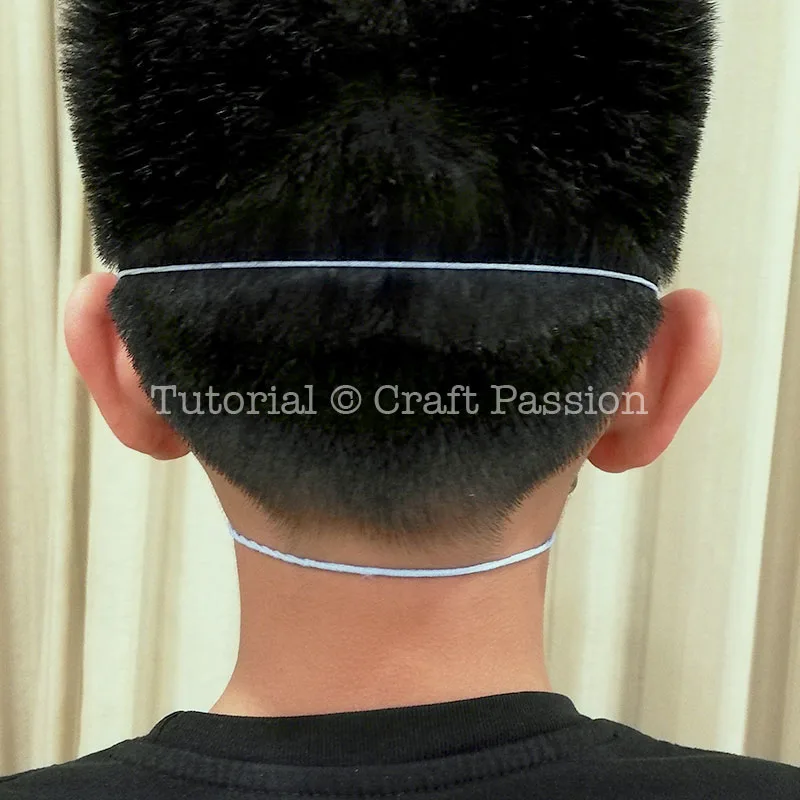
- No more stress on the ears with this method.
Notes
****
For CRICUT users, download the zipped SVG files separately. Notes from Tanya Chilton who is so kind to contribute these files for free:
With the Cricut Maker, you need the Rotary Blade and the purple cutting mat. The setting is: Fabric - Cotton
With the Cricut Explore Air2, all I know is that you have to iron a stabilizer on the back of the fabric first. There are tutorials online on how to do that.
Flip the image to cut the other piece in reverse orientation.
****
For SILHOUETTE users, download the zipped Studio files separately. Notes from Marlene Teter for her kindness to contribute the files for free:
Cut settings are as follows:
Printed cotton fabric ( like the fabric used for making quilts)
Cameo 4
Tool 2
Rotary blade
Force 15
Passes 1
Speed 8
****
This pattern will be updated once we have new resources or ideas coming in. If you get the pattern in pdf file, please check the original pattern for the latest update https://www.craftpassion.com/face-mask-sewing-pattern/
Recommended Products
As an Amazon Associate and member of other affiliate programs, I earn from qualifying purchases.
-
 Mask Nose Bridge Strip, Plastic Nose Bridge Strip Wire for DIY Making, 10CM Double Wire Nose Bridge Strips, Flat Nose Wire Clips Plastic Strips for Handmade Crafting(50PCS)
 -
 25 Yard 1/4 Inch Wide Elastic String Cord Bands Rope for Sewing Crafts DIY Mask (1/4 Inch 25 Yards)
 -
 S&S Worldwide na S&S Worldwide White Medium Elastic Cord
 -
 Elastic Bands for Sewing White Elastic Cord 1/8 Inch Heavy Stretch Rope Earloop String Round 10m
 -
 PLAZALA Cord Lock White Black Soft Plastic Round Elastic Mask Adjustment Buckle Adult Children Elastic Adjustment Accessories (50pcs)
 -
 KLOUD City White 120-Yards Length 1/8" Width Elastic Cord/Elastic Band/Elastic Rope/Bungee/Black Heavy Stretch Knit Elastic Spool
STEPS TO HANDLE YOUR COVID FACE MASK
Wear the face mask properly, and ensure no air is breathing in and out from the sides of the mask.
Handle the fabric face masks carefully, and wash them thoroughly with warm water of 60ºC, or 140 ºF after each use. Do not touch the contaminated side of the face mask. Wash your hand if you accidentally touched it.
Always maintain good hygiene by washing your hands thoroughly with soap for 20 seconds, don’t forget the fingernails and up to the elbows.
Wear safety goggles if needed and avoid rubbing your face, eye, and nose at any cost.
I am still experimenting with using wax to make the fabric face masks to repel water droplets. I know water repellent spray can be used to repel, but it contains chemicals. If you do have a better solution, please comment and let us know.
{29th March 2020 Update:} Expert recommended using Non-Woven Polypropylene (NWPP) as the material to sew for the fabric face masks. Oly-Fun fabric is a non-woven polypropylene material which reusable grocery bags or event bags are made from. Perhaps it is a great alternative to sew in between the cotton layers. However, please check if it is washable at high temperatures for sanitization and whether it can last for repeated washing.
{8th April 2020 Update} You may try non-woven interfacing as the fabric face mask’s inner layers. Since it is washable and durable between washes, you may sew one or 2 layers (depending on the thickness of the interfacing fabric of your choice) into the face mask as a filter. Try it out on one of your face masks before you sew them in bulk. Multi-layers fabric face masks are always more effective than single-layer.
{8th April 2020 Update} Please read the comments for the suggestion on the filter material and do some research on it before jumping to a conclusion. I am not an expert in the material, so I can’t moderate which is a good suggestion. However, be aware that some materials could be dangerous to our lungs.
Thank you. I hope you all stay safe and stay away from any viruses.


Annabelle Garcia
Tuesday 10th of August 2021
I love love this! Thank you!!!!!!
Legoland Facemasks - 30 Minute Crafts
Tuesday 1st of June 2021
[…] can use any mask you like. I used the Craft Passion Face Mask Pattern. We like the fit of this mask, but the curve makes applying vinyl to the front of the mask very […]
Carolyn I.
Tuesday 1st of June 2021
Great pattern! I am at the end of the process and cannot find anywhere on the internet some instructions for a dead knot as written in Step A-12. Any suggestions?
Emma
Thursday 29th of April 2021
Thank you so much for sharing with us this simple but extremely well fitting mask pattern. Have made several since the pandemic began for family and friends and all agree is the best for fit and non-steaming of glasses around!
Karl White
Thursday 15th of April 2021
Thanks!! I have to say this is the best pattern for a mask I've used. It fits better and was easier as well. CHEERS to you for that pattern, the directions, and ALL the various options.