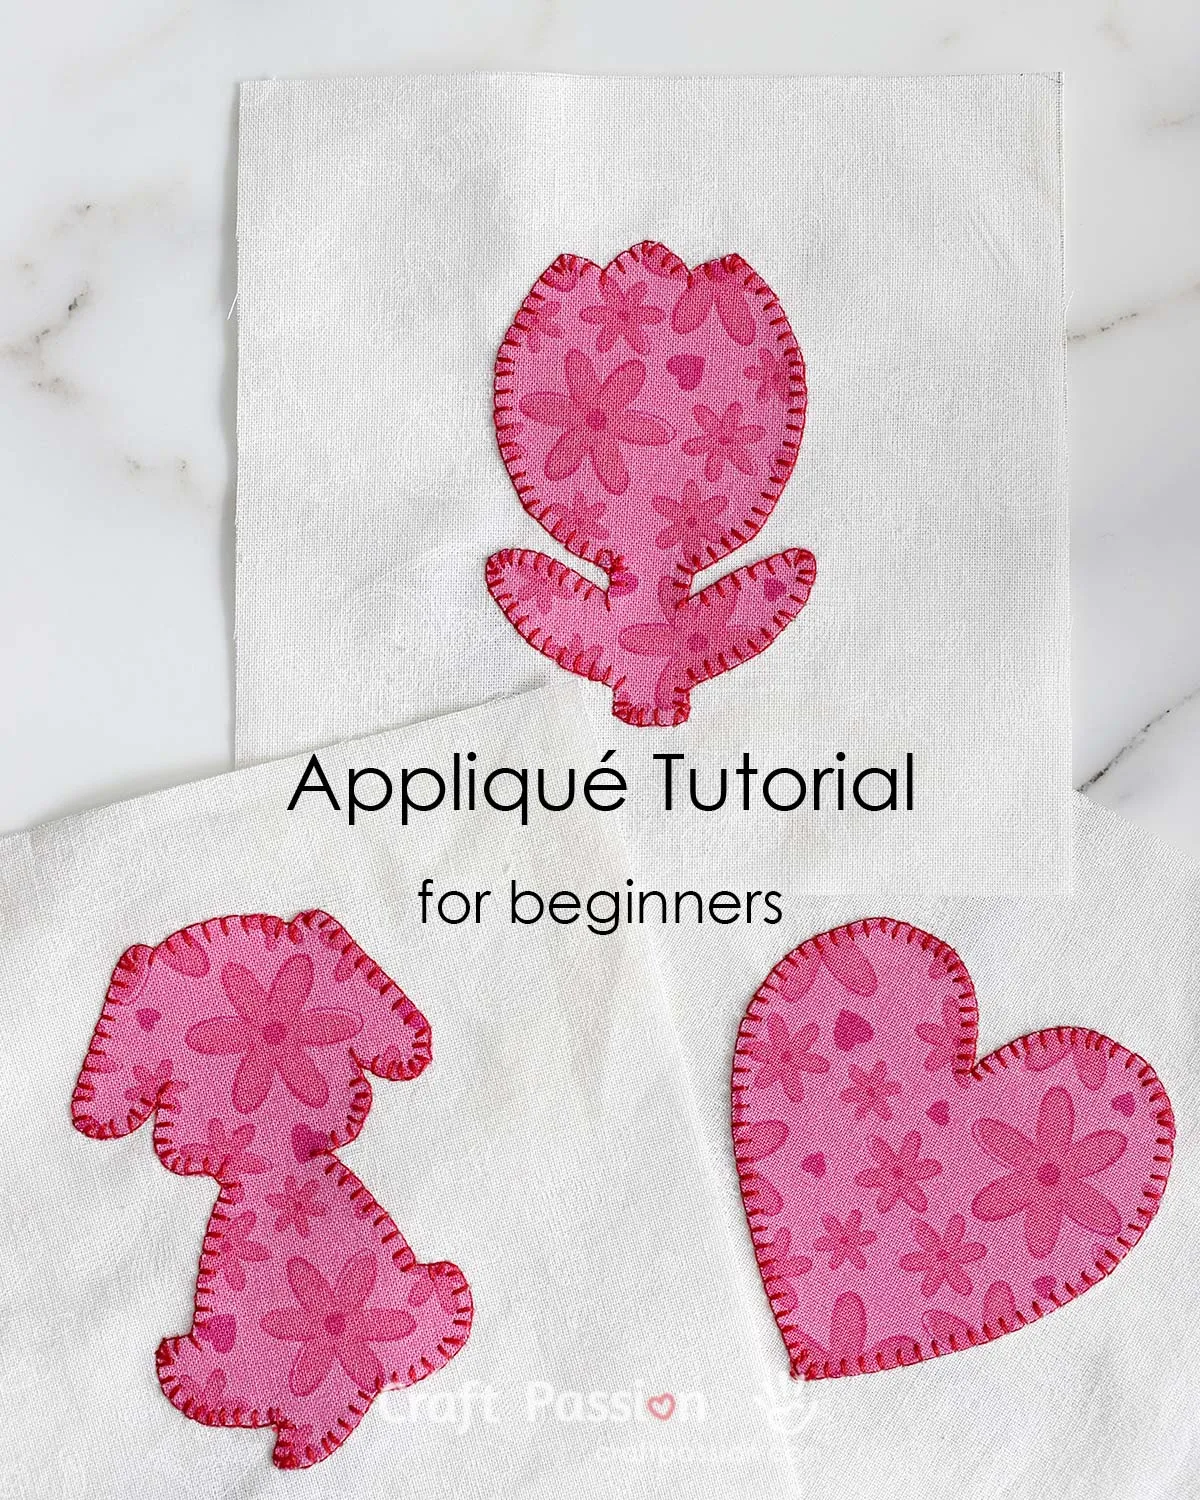
Have you ever been fascinated by the elaborate patterns found in quilts and patchwork on clothing or fabric items? You can make them by learning how to appliqué. This beginner tutorial is designed to walk you through the basics, providing you with step-by-step guides from start to finish. By the end of this tutorial, you will have the knowledge and skills to undertake the appliqué projects in Craft Passion or elsewhere. So, gather your materials, and let’s jump on the bandwagon of making your first appliqué together!

What is Appliqué?
Appliqué is a traditional decorative needlework technique that involves attaching small pieces of fabric to a larger piece of fabric to form patterns or designs. This technique is used to add color and texture to textile arts projects such as quilting, clothing design, and home decor.
The embellishment pieces can be of any shape or size and are usually cut from one fabric and sewn onto another. There are several appliqué methods, the popular ones are:
- Fusible Appliqué
This method uses a fusible web to bond the decorative fabric pieces to the base fabric, making it a quick and easy technique suitable for beginners. It is a type of raw-edge appliqué in which the edges of the fabric pieces are left unfinished. To ensure the durability of the bonded fabric pieces, sew them down to the base fabric, especially if they need to undergo heavy wear or frequent washing, such as in quilts, clothing, and home decor.
- Turned Edge Appliqué
The appliqué pieces’ edges are turned under for a smooth, finished appearance. This method is time-consuming, but it produces a neat and durable finish. It’s ideal for heirloom projects and clothing.
- Reverse Appliqué
Reverse appliqué is a technique that involves cutting away portions of the top layer of fabric to reveal the layer beneath. By reversing the traditional appliqué process, this method achieves a unique texture and depth. If you want to learn how to sew reverse appliqué, this tutorial will walk you through the process.
Which appliqué stitch to sew?
When it comes to stitching techniques for appliqué, there are various options to choose from, such as straight stitch, zig-zag stitch, satin stitch, and blanket stitch.
Additionally, there are two sewing options: you can sew using a sewing machine or hand-sew it.
Choosing the right stitch depends on the project’s requirements, including the look you want to achieve, the speed at which you want to complete the project, and how the finished project will be used.
In this tutorial, we demonstrate how to sew the appliqué using a sewing machine with blanket stitches. However, if you prefer the hand-sew method, you can refer to our video tutorial on how to hand-sew blanket stitches.
How to appliqué for beginners (step-by-step instructions)
Fusible appliqué is undoubtedly the simplest and most accessible among the various appliqué techniques, making it the perfect starting point for beginners. In this tutorial, we will concentrate on the fusible method to help you learn the basics without the initial complexity of sewing.
1. Prepare the supplies

The materials and tools needed for this tutorial are simple:
- Fabrics
- Appliqué fabric – scraps of cotton fabrics or felts big enough for the design in your preferred colors.
- Base Fabric – The base fabric is where you want to attach the appliqué. Depending on your application, it can be anything from quilting-weight cotton fabric to clothing pieces.
- Appliqué Template
- It can be a pre-made template, a downloaded silhouette image, or a self-drafted design that outlines the object you want to create for your appliqué project.
- Fusible Web
- A fusible web is an adhesive material that bonds fabrics together when ironed. High-quality fusible web with a paper backing, such as HeatnBond and Steam-A Seam, works well in fusible appliqué.
- Sharp Scissors
- Small sharp scissors with micro-tips, such as embroidery scissors, are ideal for a precise cut on the appliqué.
- Pen Or Pencil
- A pen or pencil is needed to trace the template outline on the paper backing the fusible web.
- Iron & Ironing Board
- This is needed to bond the fusible web to appliqué fabrics and then to the base.
- Sewing Threads Or Embroidery Floss
- Sewing thread, either matching or contrasting in color, is used to sew the edges of the appliqué to the base fabric. If you prefer hand-sewing, you may opt for embroidery floss for a bolder outline.
- Sewing Machine (optional)
- You can sew the appliqué by hand or with a sewing machine.
2. Print out the template

First of all, you will need a design or template to apply to your fabric to begin your appliqué project.
We have prepared the easy appliqué templates for you to try out. Simply click the link to download the PDF file onto your computer and print it out using your printer. Need a different size? You can adjust the template size to fit your project in the printer setting.
Please note that the appliqué created will be a mirror image of the template. To resemble the template precisely, print it in reverse.
3. Trace the template

Place the fusible web paper on the template with the paper side up, then trace the outline with a pen or pencil.
4. Cut out the fusible web paper template
Cut the fusible web around the traced image; leaving a 1/4″ border is sufficient and doesn’t have to be precise. Doing this will help to reduce the wastage of the fabric and the fusible web.
5. Attach the web template to your fabric

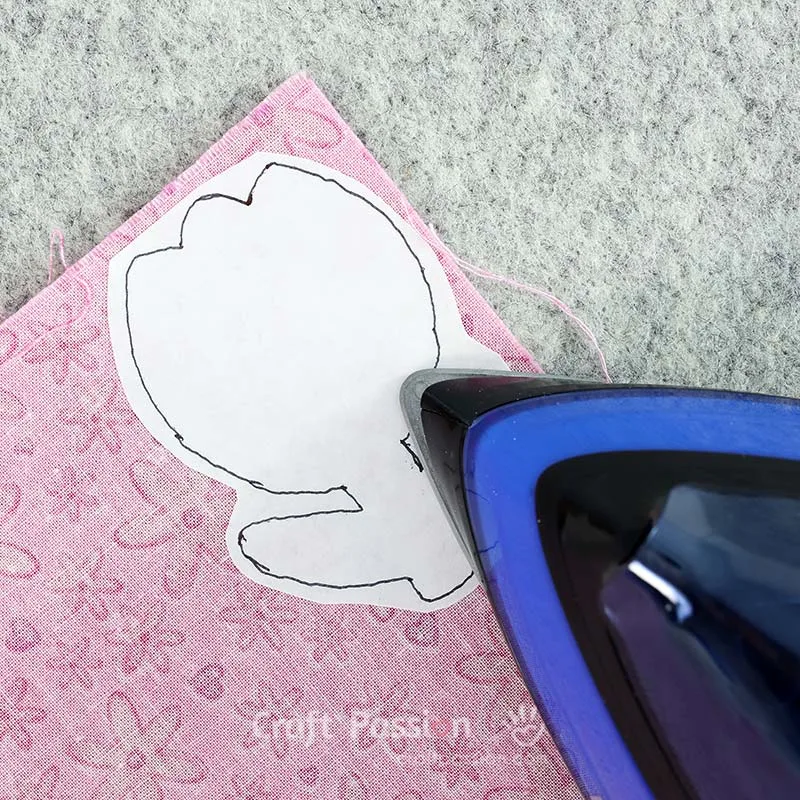
Place the rough webbing side of your traced fusible web template on the wrong side of your chosen fabric. The paper side should be facing upwards.
Once they are in the desired position, press them with a dry, hot iron (on a non-steam setting) for a few seconds. This will melt the web material, thus sticking the template to the back of the fabric. Avoid gliding the iron excessively, as this can cause the glue to shift and stick unevenly. Allow them to cool completely to ensure the web template is firmly bonded to the fabric.
If you’re working with felt or any other fabric that isn’t 100% cotton or linen, use a press cloth while ironing to avoid burning the fabric.
6. Cut out the fabric template

Cut out the fabric template with a pair of small, sharp-tipped scissors. Cut carefully along the traced lines to ensure clean, precise edges.
7. Peel off the web paper

Gently peel off the paper backing from the fusible web to reveal the adhesive side of your fabric template.
8. Secure the appliqué to the base fabric

Place the fabric template on your project surface, adhesive side down. Then, properly position it before pressing it down with a hot iron. Again, no steam is required, and don’t glide the iron too far for better adhesion.
To ensure a strong bond, carefully follow the manufacturer’s instructions for the appropriate heat setting and duration.
9. Stitch around the appliqué

Thread your machine with a color that matches your design. The bobbin thread should be the same color as your base fabric.
Next, set your sewing machine to the desired stitches. If possible, use an appliqué foot, which has a wider split in the front and provides better visibility while sewing.
Carefully guide your project through the machine, following the outline of the appliqué precisely. Take your time and make sure to backstitch at the beginning and end of your stitching to secure the thread in place.
10. Complete

Before moving on to the bigger project, repeat these steps to create additional appliqués.

These appliqués are for my fabric coaster project. You can also follow this coaster sewing tutorial to sew yours.
Frequently Asked Questions
Here are a few additional frequently asked questions that beginners often have:
1. How do I choose the right fabric for appliqué?
It’s best to use beginner-friendly materials that are easy to handle, such as cotton or felt. Avoid slippery or stretchy fabrics, which can be difficult to work with and maintain their shape.
2. How do I prevent the raw edges of the fusible appliqué from fraying?
The fusible web acts as a stabilizer to prevent extensive fraying at the raw edges. To further prevent it, encase the raw edges with a satin stitch or zigzag stitch on a sewing machine.
3. What are some simple appliqué projects for beginners?
For beginners, it’s best to start with simple shapes like circles, stars, or hearts on small projects such as coasters, potholders, tote bags, or cushion covers. These provide a manageable canvas for practicing your stitching technique.
4. Where can I find appliqué patterns?
Beginner-friendly patterns can be easily found online, in sewing books, or in craft magazines. Several websites offer free patterns, too. At the end of this tutorial, you can find a list of our free appliqué patterns from Craft Passion.
5. How can I make the appliqué process faster for a bigger project?
Organize your work into batches to reduce the time spent switching between tasks. For example, you can cut all your pieces at once, then fuse all pieces, and finally stitch them all.
Tracing a large number of templates manually is time-consuming. Another way to save time is to attach your printed templates onto the fusible web. Check out this quick and easy method for making appliqué, like the one we used to create the beautiful Secret Garden Quilt.
What’s Next:
- Start your journey by practicing and perfecting your skills, remember that every stitch tells a story.
- Share your works and stories on Facebook and/or Instagram. Remember to tag us, @craftpassion, so that we are able to see them.
- Save this tutorial to Pinterest for future reference.
- Learn more about the basics of hand sewing and how to choose a sewing machine for beginners.
- Browse more appliqué patterns as shown below; we hope this will inspire you to try out more beautiful designs.
More Free Appliqué Patterns
Start your sewing journey with our free appliqué patterns for beginners. Add your own spin on things or try out new ideas. Let’s sew together and make unique pieces that reflect your personality.
Garden Bugs Appliqués Patterns
In this tutorial, you will learn how to easily create attractive bug appliqué patterns and sew them onto the T-shirt fabric of a onesie. To begin, you need to secure the templates on the onesie using fusible web. Afterward, you can hand sew the edges using embroidery floss to make running stitches. These steps will help you create delightful appliqués on your baby's onesie.
Flower Appliqué Pattern
Build a colorful fabric garden with these flower appliqués. They are part of the Secret Garden Quilt Pattern. These fusible appliqués use a special quilting method called Trapunto quilting to make the flower "pop up".
Ladybug, Snail & Butterfly Appliqué Patterns
We have some small and lively creatures hiding in the appliqué patterns in our Secret Garden. These patterns involve stacking up different parts to create the design. For instance, to make a butterfly, the hind wings are placed at the bottom, followed by the fore wings and the body on top.
Songbird, Tree & Sun Appliqué Patterns
Here come the songbird, tree, and sun patterns to complete the garden. Can you hear the bird chirping from far away?
Secret Garden Applique Font Patterns
Font patterns are great for applique projects. You may draft your own words or download any pre-made font template from the internet to incorporate int your sewing project.
Road Runner Quilt Pattern
Looking for something more masculine instead? Check out these car appliqués and related traffic patterns, including traffic lights, safety cones, and speed limit signs.


