Recently, my garden became the unexpected stage for an exhilarating performance featuring a small, agile frog as the lead dancer. This spectacle sparked a burst of creativity within me – could I possibly craft an origami counterpart that mirrored its dynamic leaps and bounds? After a fun-filled session of trial and error, I emerged victorious, having created a lively origami frog! The thrill of bringing this paper amphibian to life was so infectious that I’m itching to share the excitement with you. Ribbit!
So, let’s get those hands folding and create your very own origami jumping frog! It’s a fantastic activity to do alongside the young ones, transforming a simple craft session into a valuable lesson in motor skills and critical thinking, all while having a blast. Let’s leap into action and fold our way to fun!

Origami has existed for centuries. It began as a practice for special occasions but has become a widespread hobby in recent years. While origami varies in complexity, many appreciate its beauty and simplicity. Although it can be challenging, with the right guidance, you can master this craft in no time!

Without further ado, let’s “hop” right into the step-by-step tutorial on how to make an origami jumping frog! If you have any questions along the way, check out our FAQ section, which you can find after the tutorial!
This post contains affiliate links, and we may receive a commission for purchases made through these links at no extra cost to you.

Craft Supplies You’ll need
- Paper:
I used an 8” by 8” 50gsm green origami paper in the tutorial. Personally, I like to opt for colorful 6″ x 6″ origami paper chiyogami, also known as washi-patterned origami paper. However, for a clearer step-by-step tutorial, bigger plain origami paper obviously still works the best.
- Metal Ruler/Bone Folder:
This is optional, but it will tremendously help to create sharp and perfect creases.
- Markers/Colored Pens/Pencils:
Don’t limit yourself. Let your creativity flow as you draw on the completed origami to create your own funky and unique designs. It is also a great way to customize your craft.
- Googly Eyes/Sticker Eyes
Use googly or sticker eyes to give your frog a fun twist!

How To Make Origami Frog

Step 1:
- Grab a piece of paper of your choice and lay it flat on your desired surface.
- Make sure the sides of the paper measure up to a square.
- Place the paper on its back side, then fold it in half like so.

Step 2:
- Fold the paper in half vertically, crease it, then unfold.
- Fold the paper in half again, this time horizontally, crease it, and unfold as well.
- These are guidelines that will help with the process. You can use a ruler to help create a sharper crease.

Step 3:
- Valley fold the top right corner to the most left of the centerline. Crease it, then unfold it.
- A ruler would come in handy to create a better and sharper crease.
- This step will be crucial for helping you achieve Step 5, so do not skip this!

Step 4:
- Valley fold the left corner to the most right of the centerline, crease it, then unfold.
- Similar to Step 3, this step is also crucial to achieving Step 5!

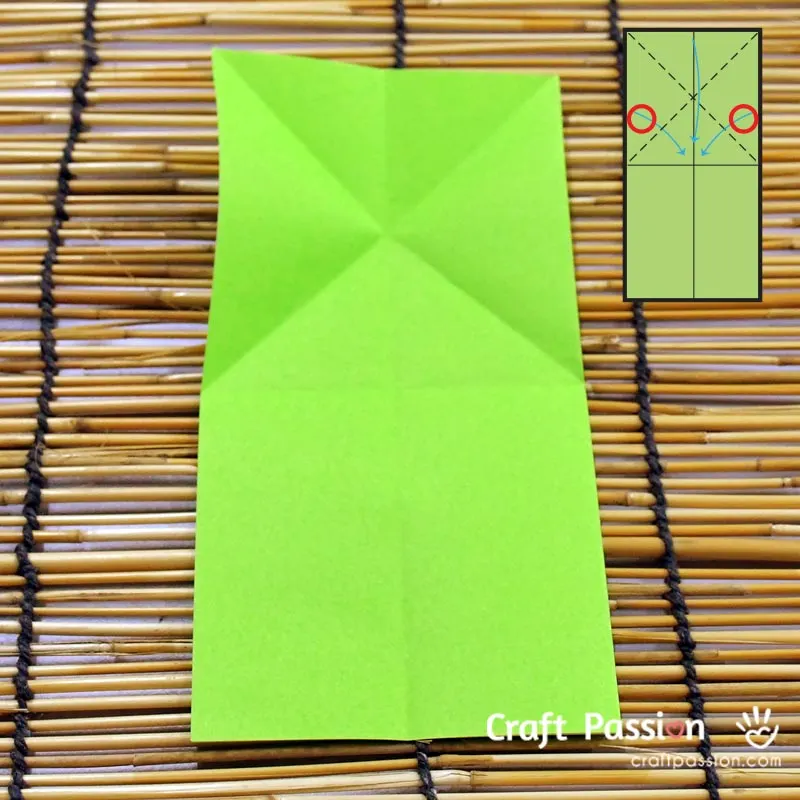
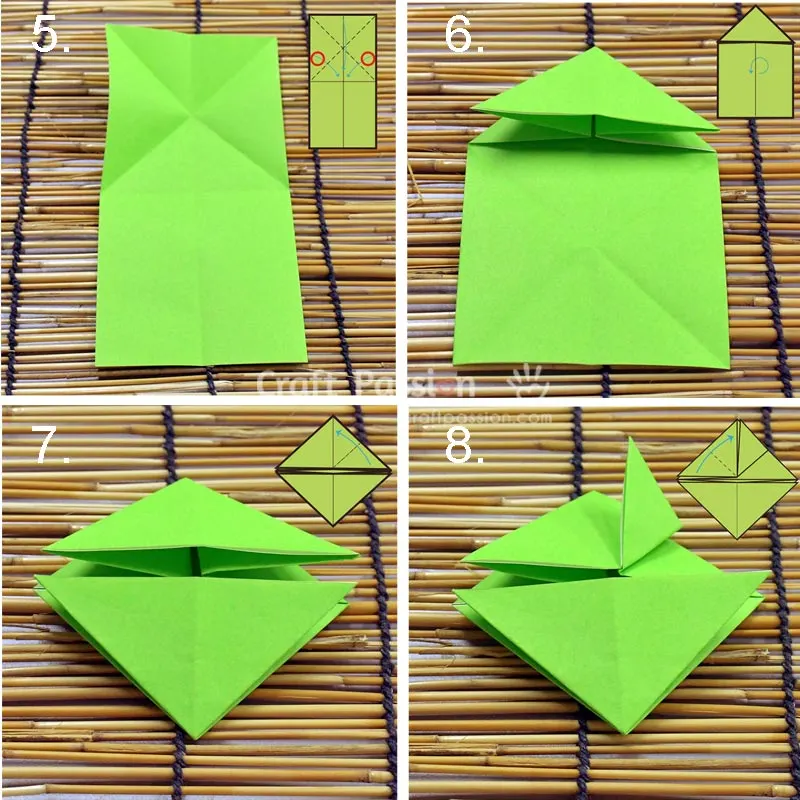
Step 5:
- Then, flip your paper to the back.
- Place it flat on your surface and place your thumbs around the red circle on the diagram.
- Gently put pressure on it as you press it down. It should create 2 identical triangles.
- Crease it so it stays in place and it also acts as a guideline.

Step 6:
- Turn the paper around, then repeat steps 3-5 on the other side.
- Make the 2 diagonal creases as shown in steps 3 & 4
- After that, fold it down, creating the 2 triangular shapes.
- The result should look like a diamond shape.

Step 7:
- Valley fold the top right part of the paper to the center.
- Use the creases to help you identify the center.
- Make sure that the corners touch.
- This will later turn out to be the right-front leg of the frog.

Step 8:
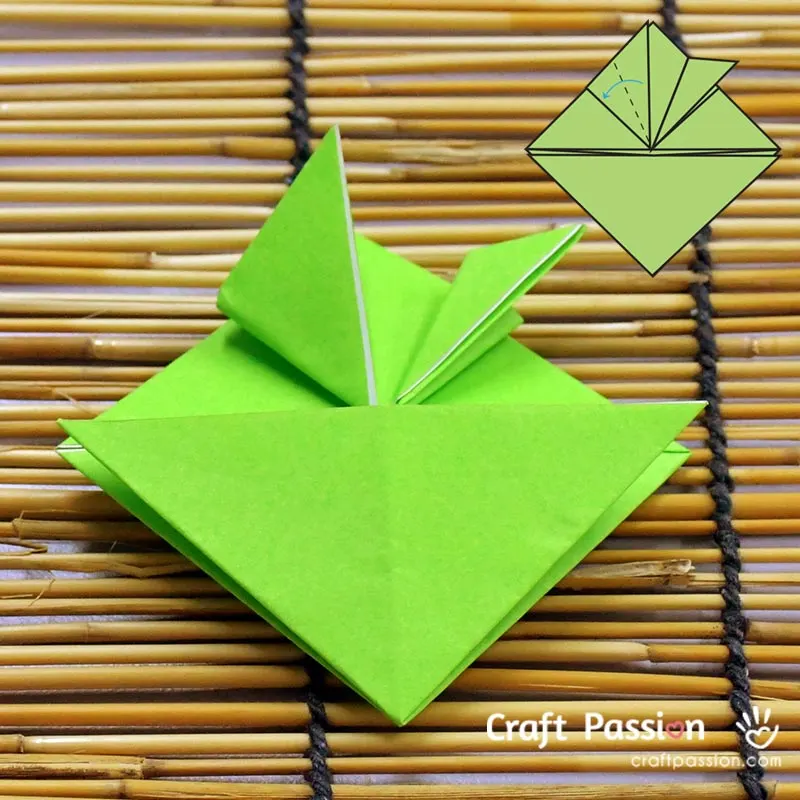
- Valley fold the top left part of the paper to the center as well.
- Pull the paper from the left corner and fold it in half according to the dotted line.
- This will be its left leg! Take note that it should match the other leg from the previous step.

Step 9:
- We’re almost there! Mountain fold the top right triangle so that the frog’s legs peep out of its body.
- That will complete its right-front leg!

Step 10:
- Repeat step 9 on the left-front leg as well.
- If done correctly, it should look like a very short carrot.

Step 11:
- Turn it around, and repeat steps 7 to 10 on the other side.
- They should look identical as they’ll be acting as the hind legs.

Step 12:
- Great job! Now we can turn the paper over so that the frog can stand on its legs.

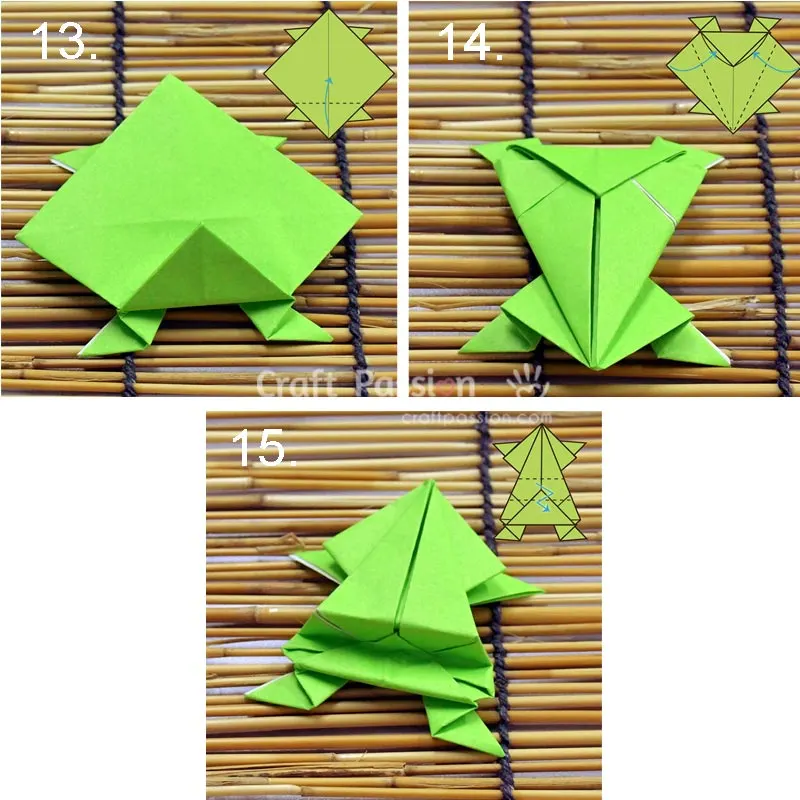
Step 13:
- Fold the bottom part up as close to the middle as you can get.
- Don’t worry if it doesn’t touch the middle, it’ll look just fine.
- Rotate it so that it faces you for the next step.

Step 14:
- Fold the sides into the little pockets found in the small triangle from step 13.
- Fold it as tight as possible, we want Mr. Frog to look as sharp as possible!

Step 15:
- Make a zig-zag fold on its hind legs, and we are ready to hop!
- Mountain fold its hind legs, then fold it by half again.
- Now press onto the frog, and watch it hop away!
FAQs On Origami Frogs
1. I’m having trouble folding the origami frog’s hind legs. What should I do?
Chances are you’ve used a smaller origami paper. For a more comfortable folding experience, we suggest using an origami paper size of 7” by 7” and a thickness of 50gsm. You can also use copy paper, as it makes for a more powerful origami jumping frog! However, take note that A4 paper is usually thicker, so you may have to help your little ones near the end.
2. My origami frog doesn’t really jump. What can I do?
Perhaps your hind legs are folded too narrow. For consistent results, try making the zig-zag fold by mountain folding the frog in step 14 by half such that the hind legs match the tip of the head. After that, valley fold the lower half again by half so that the “butt” of the frog matches the line made via the first part of the zig-zag fold.
3. My origami feels boring. What can I do?
Decorate it! Grab some of your favorite markers, colored pencils, or any other art supplies, and draw away. Kids love it when they get to custom-design their own work. Alternatively, you can also try washi-patterned origami paper or chiyogami paper. They bring a more traditional Japanese vibe to it, which may enhance your origami experience.
4. The tutorial mentioned the valley fold and mountain fold. What do they mean exactly?
Valley folds and mountain folds are 2 of the most basic folds in origami, which make up the majority of the craft. Valley fold is a folding method where the paper will open towards you when creased, while mountain fold does the opposite, where the paper will turn away from you.

What’s Next:
- Share your completed origami on Facebook and/or Instagram. Remember to tag us, @craftpassion, so that we can see them.
- Pin it to Pinterest for fun ideas to enjoy with your children in the future.
- Share with other parents or guardians so they can also enjoy quality time with their little ones.
- Feel free to browse our Kid Crafts page for more inspiration on your next crafting endeavors. In fact, if you’re looking to learn how to make more fun and exciting origami, you can try these out for size:

How to Make Origami Frog
This tutorial shows you how to make an origami frog. You can change and adapt the methods to other materials for your own creative twist.
Materials
- 8” by 8”, 50gsm paper of your choice.
- Googly/Sticker Eyes (Optional)
Tools
- Ruler/Bone Folder (Optional)
- Colored Pens/Pencils (Optional)
Instructions

1. Paper down side up, fold in half.
2. Fold in half again vertically and horizontally, then unfold.
3. Fold the right corner to the middle left edge, then unfold.
4. Fold the left corner to the middle right edge, then unfold.
5. Put your thumb on the back of the paper around the red dots shown. Fold down.
6. Repeat steps 3 to 5 on the other side.
7. Fold the top right part of the paper to the middle line.
8. Fold the top left part of the paper to the middle line.
9. Fold the top right part of the paper down along the dotted line.
10. Fold the top left part of the paper down along the dotted line.
11. Repeat steps 7-10 on the opposite side.
12. Turn the paper over.
13. Fold the bottom of the paper as close up to the middle as possible.
14. Insert the sides of the paper into the pockets of the triangle made in step 13. Rotate the frog such that it is facing towards you.
15. Zig-zag fold the bottom half of the paper.
Complete!
Notes
For more detailed instructions, check out https://www.craftpasssion.com/origami-frog
