Craft Passion is back with another free amigurumi pattern – time to put up some warning signs because this wild little guy is ready to roll. Just kidding. We are excited to introduce our cute crochet dragon, Dinogon, the newest member of our crochet animal family!
Who is Dinogon?
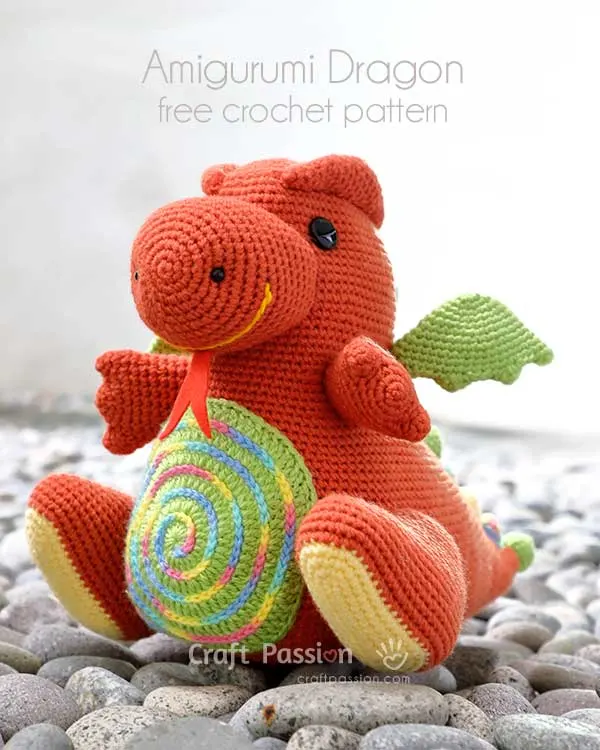
This chubby fellow is not your typical amigurumi dragon. With short wings, fluttering arms, a squishy snout, a protruding rainbow belly, and remarkable spikes, Dinogon is a cross between a dragon and a dinosaur. You can say that he is a crochet dinosaur in case someone claims that he looks like a dinosaur.
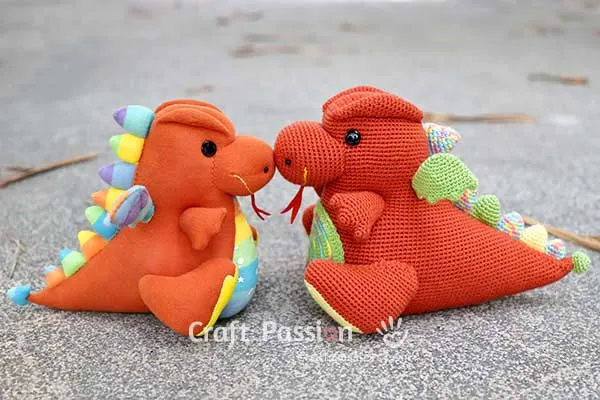
He may look familiar to some of you; that’s because he’s a distant cousin of Drake, the Sock Dragon! Since Drake was so popular, many have asked me to recreate him with a crochet dragon pattern. After a month of designing and fine-tuning the existing sock pattern, we finally welcomed the crocheted dragon into our extended family!
Crochet Dragon Amigurumi Pattern
Dinogon
scroll ⬇️ to get the free crochet pattern & tutorial

What’s The Difference Between Dinogon & Drake?
Well, the main difference is that Dinogon is crocheted from yarn, and Drake is a stuffed dragon sewn from socks. They come from 2 different craft materials but look almost identical when finished. Dinogon, the crochet dragon, has a textured surface with a magical spiral belly, while Drake has a softer and smoother surface with a rainbow belly. They are both just as cute, with a “hug me, hug me” pose.

What Do You Need To Crochet Dragon?
Dinogon measures 8″ W x 12″ L x 9.5″ H, making it the perfect crochet dragon plush toy for kids.
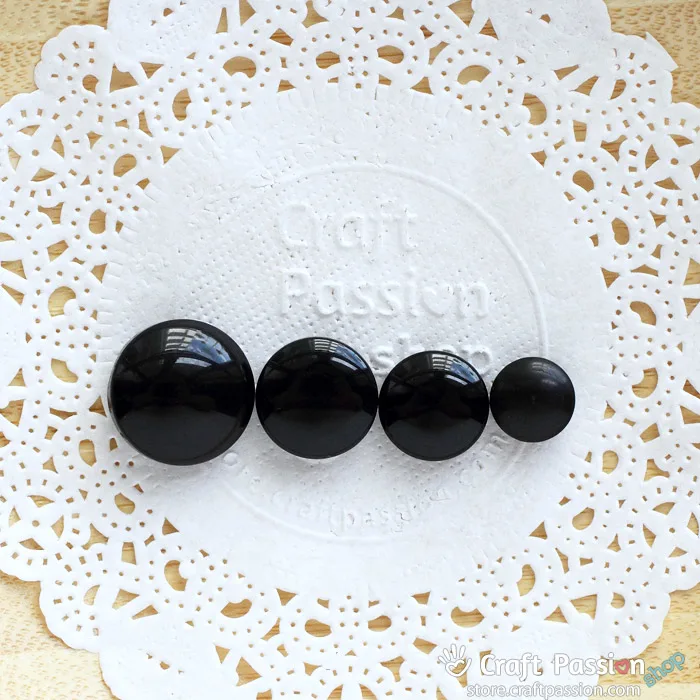
Materials you will need for this amigurumi dragon include a 2.5 mm crochet hook, acrylic yarn in orange, green, yellow, rainbow, and pastel blue, red felt fabric, yellow embroidery floss/yarn, polyester fiberfill, black button eyes and a pair of 6mm dome buttons.
Tools you will need are a darning needle, fabric marker, scissors, pins, and blunt-tip tweezers. Please refer to the pattern section below for the exact amount of yarn needed.

Is It Difficult To Crochet Dragon?
The difficulty level for this amigurumi dragon is medium to difficult. It may be a little difficult for beginners, but with a little patience and determination, it’s no problem! If you have trouble understanding any part of the instructions, we have a crochet animal guide for beginners that you can use as a guide.

Ready For The Crochet Dragon Pattern?
As with all of our other amigurumi patterns, you will need to crochet the body parts separately first. Start with the body using orange yarns. Follow with the belly using green yarn (in rounds), and then crochet a spiral line using rainbow-colored yarn. Next comes the wild-looking pair of ears, the big round snout, the cute rainbow spikes, and the strong dragon wings. Finally, crochet the three-fingered arms and tiny feet! This may look like a lot of work, but trust me, you’ll be happy when they are done.

Now, let’s assemble the Amigurumi Dragon with a few simple steps:-
- Sew the rainbow belly patch to the belly area of the dragon
- Sew on the button eyes with a long tapestry needle, then place the ears on the head and sew around the flap
- Mark the position of the snout on the head with a marker and sew accordingly
- Align the colorful spikes behind Dinogon’s back and sew them in place
- Place the tiny legs, arms, and wings in the appropriate places and sew them to Dinogon’s body

Oh! Remember to sew a small spike at the tip of Dinogon’s tail for a complete outlook. We used vibrant colors to create a contrast between the Amigurumi Dragon’s body and body parts, so he looks more magical. However, if you want a more adult-looking crochet dragon, you could opt to standardize the spikes and tummy to just a single color!
Voila! You have learned how to crochet a dragon. Gift this stuffed dragon to curious children (or adults) who are fond of magical creatures, and let their imaginations run wild!
As toddlers tend to place objects into their mouths, replace the button eyes and nostrils with embroidery or felt material to avoid a choking hazard. This way, your baby can enjoy playing with Dinogan safely ☺

WHAT’S NEXT:
- Start crocheting and share your completed handmade on Facebook and/or Instagram. Remember to tag us, @craftpassion, so that we are able to see it.
- Pin it to Pinterest for a future To-Crochet List
- Share with your crochet groups for a crochet-along event.
- Browse more free crochet patterns to make, particularly for Crochet Animals.
Happy crocheting!

Amigurumi Crochet Dragon Pattern
Name: Dinogon, a distant cousin of Drake, the sock Dragon.
Species: Dragon and Dinosaur mix
Character: joyful, happy, worry-free
Like: Being hugged. Cook and eat, eat tibbits while watching TV
Dislike: exercise, gossip
Dimension: 8 W x 12 L x 9.5 H inches
Crochet parts: Body, Tummy, Ears, Snout, Spikes, Wings, Arms and Legs
Materials
- Acrylic yarn in Orange color, 1.5 balls, 100 gram each
- Acrylic yarn in Green color, 0.5 ball, 100 gram each
- Acrylic yarn in Yellow color, 50 meters
- Acrylic yarn in Rainbow color, 50 meters
- Acrylic yarn in Pastel Blue color, 10 meters
- Felt Fabric, Red, 2" x 2"
- Embroidery Floss or Yarn, Yellow
- Polyester fiberfill
- 15mm Black Button Eye, 1 pair
- 6mm Domed-Button as Nose, 1 pair
Tools
- 2.5 mm crochet hook
- Darning needle (Normal & sc2togLong)
- Fabric marker (water erasable)
- Scissors
- Pins
- Blunt Point Tweezers (for stuffing of small parts)
Instructions
Abbreviations
ch: chain
dc: double crochet
hdc: half double crochet
inc: 2sc increase
inv dec: invisible decrease
sc: single crochet
dec / sc2tog: sc 2 sts together (normal decreasing stitch)
slst: slip stitch
sk: skip
RS: Right Side
WS: Wrong Side
Amigurumi Crochet Dragon Pattern
- BODY
Being with a Base piece with Orange yarn:
Row 1: ch 19, Inc in 2nd ch from hook, sc 16, inc, turn. {20}
Row 2: ch, inc, sc 18, inc, turn. {22}
Row 3 - 11: ch, sc 22, turn. {22}
Row 12: ch, dec, sc 18, dec, turn. {20}
Row 13 - 15: ch, sc 20, turn. {20}
Row 16: ch, dec, sc 16, dec, turn. {18}
Row 17 - 19: ch, sc 18, turn. {18}
Row 20: ch, dec, sc 14, dec, turn. {16}
Row 21 - 23: ch, sc 16, turn. {16}
Row 24: ch, dec, sc 12, dec, turn. {14}
Row 25 - 27: ch, sc 14, turn. {14}
Row 28: ch, dec, sc 10, dec, turn. {12}
Row 29 - 31: ch, sc 12, turn. {12}
Row 32: ch, dec, sc 8, dec, turn. {10}
Row 33 - 35: ch, sc 10, turn. {10}
Row 36: ch, dec, sc 6, dec, turn. {8}
Row 37 - 39: ch, sc 8, turn. {8}
Row 40: ch, dec, sc 4, dec, turn. {6}
Row 41 - 43: ch, sc 6, turn. {6}
Row 44: ch, dec, sc 2, dec, turn. {4}
Row 45 - 47 ch, sc 4, turn. {4}
Row 48: ch, dec 2 times, turn. {2}
Row 49 - 51: ch, 2, turn. {2}
Row 52: ch dec, turn {1}
Row 53 - 55: ch sc, turn. {1}
Continue to work the body in the spiral round, starting from the last st of the base.
Fundamental Round: ch (count as 1 st), sk1, slst 53, inc, 3sc, sc, (sc 2, inc) 4 times, sc 3, 3sc, inc, slst 53, inc. {139}
Remark: the 4 stitch markers at the top left corner shown in the picture above are the places where the increments stitches are located.
Round 1: ch sc 137, inc, sc. {140}
Round 2: inv dec, sc 53, inc, sc 5, inc, sc 12, inc, sc 5, inc, sc 55, inv dec, sc 2. {142}
Round 3: inv dec, sc 136, inv dec, sc 2. {140}
Round 4: inv dec, sc 134, inv dec, sc 2. {138}
Round 5: [inv dec] 2 times, sc 130, inv dec, sc 2. {135}
Round 6: inv dec, sc 129, inv dec, sc 2. {133}
Round 7: inv dec, sc 48, inv dec, sc 12, inv dec, sc 12, inv dec, sc 49, inv dec, sc 2. {128}
Round 8: inv dec, sc 122, inv dec, sc 2. {126}
Round 9: inv dec, sc 120, inv dec, sc 2. {124}
Round 10: [inv dec] 2 times, sc 116, inv dec, sc 2. {121}
Round 11: inv dec, sc 115, inv dec, sc 2. {119}
Round 12: inv dec, sc 43, inv dec, sc 23, inv dec, sc 43, inv dec, sc 2. {115}
Round 13: inv dec, sc 109, inv dec, sc 2. {113}
Round 14: inv dec, sc 107, inv dec, sc 2. {111}
Round 15: [inv dec] 2 times, sc 103, inv dec, sc 2. {108}
Round 16: inv dec, sc 102, inv dec, sc 2. {106}
Round 17: inv dec, sc 37, inv dec, sc 22, inv dec, sc 37, inv dec, sc 2. {102}
Round 18: inv dec, sc 96, inv dec, sc 2. {100}
Round 19: inv dec, sc 94, inv dec, sc 2. {98}
Round 20: [inv dec] 2 times, sc 90, inv dec, sc 2. {95}
Round 21: inv dec, sc 89, inv dec, sc 2. {93}
Round 22: inv dec, sc 32, inv dec, sc 19, inv dec, sc 32, inv dec, sc 2. {89}
Round 23: inv dec, sc 83, inv dec, sc 2. {87}
Round 24: inv dec, sc 81, inv dec, sc 2. {85}
Round 25: inv dec, sc 83.{84}
Round 26: [inv dec] 2 times, sc 76, inv dec, sc 2. {81}
Round 27: inv dec, sc 27, inv dec, sc 18, inv dec, sc 26, inv dec, sc 2. {77}
Round 28: inv dec, sc 71, inv dec, sc 2. {75}
Round 29: inv dec, sc 69, inv dec, sc 2. {73}
Round 30: inv dec, sc 71. {72}
Round 31: inv dec, sc 66, inv dec, sc 2. {70}
Round 32: inv dec, sc 23, inv dec, sc 15, inv dec, sc 26. {67}
Round 33: inv dec, sc 65. {66}
Round 34: inv dec, sc 64. {65}
Round 35: sc around. {65}
Round 36: inv dec, sc 63. {64}
Round 37: sc around. {64}
Round 38: sc 6, inc, sc 10, inc, sc 26, inc, sc 10, inc, sc 8. {68}
Round 39: inv dec, sc 62, inv dec, sc 2. {66}
Round 40: sc 6, inc, sc 11, inc, sc 26, inc, sc 11, inc, sc 8. {70}
Round 41: inv dec, sc 64, inv dec, sc 2. {68}
Round 42: [sc 12, inc] 2 times, sc 14, inc, sc 12, inc, sc 14. {72}
Round 43: inv dec, sc 66, inv dec, sc 2. {70}
Round 44: sc around. {70}
Round 45: inv dec, sc 64, inv dec, sc 2. {68}
Round 46: sc around. {68}
Round 47: inv dec, sc 62, inv dec, sc 2. {66}
Round 48: inv dec, sc 64. {65}
Round 49: inv dec, sc 59, inv dec, sc 2. {63}
Round 50: sc around. {63}
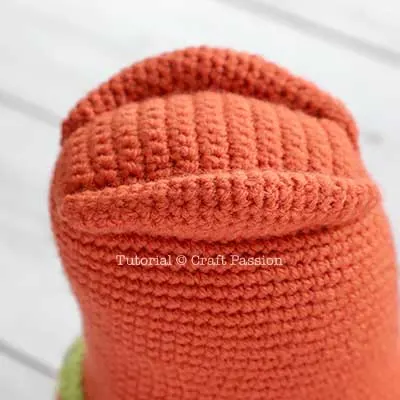
Round 51: inv dec, sc 58, inv dec, sc 2. {61}
Round 52: sc 29, inv dec, sc 3, turn to continue with a flap on the top of the head, extending from forehead to the back of the head.
Top Flap:
Row 1 (WS): ch sc 8, turn. {8}
Row 2 (RS): ch sc 8, turn. {8}
Row 3 (WS): ch sc 8, turn. {8}
Row 4 (RS): ch, inc, sc 6, inc, turn. {10}
Row 5 (WS): ch sc 10, turn. {10}
Row 6 (RS): ch sc 10, turn. {10}
Row 7 (WS): ch, inc, sc 8, inc, turn. {12}
Row 8 (RS): ch sc 12, turn. {12}
Row 9 (WS): ch sc 12, turn. {12}
Row 10 (RS): ch, inc, sc 10, inc, turn. {14}
Row 11 (WS): ch sc 14, turn. {14}
Row 12 (RS): ch sc 14, turn. {14}
Row 13 (WS): ch sc 14, turn. {14}
Row 14 (RS): ch, dec, sc 10, dec, turn. {12}
Row 15 (WS): ch sc 12, turn. {12}
Row 16 (RS): ch sc 12, turn. {12}
Row 17 (WS): ch, dec, sc 8, dec, turn. {10}
Row 18 (RS): ch sc 10, turn. {10}
Row 19 (WS): ch sc 10, turn. {10}
Row 20 (RS): ch, dec, sc 6, dec, turn. {8}
Row 21 (WS): ch sc 8, turn. {8}
Row 22 (RS): ch sc 8, turn. {8}
Fasten and leave a long tail for sewing.
Stuff the body firmly with poly-fill stuffing materials, starting with a smaller amount to stuff the tail area followed by the body then the head.
Bring the top flap over to the back of the head, align to centralize the flap, and sew to close the opening.


- TUMMY
With Green yarn:
Round 1: 2sc, 2hdc, 10dc in magic ring. {14}
Round 2: 2dc around. {28}
Round 3: [2dc, dc] around. {42}
Round 4: [2dc, dc 2] around. {56}
Round 5: [2dc, dc 3] around.{70}
Round 6: [2dc, dc 6] around. {80}
Finish off with hdc 3, sc 2.
Fasten and leave a long tail for sewing.
Surface Crochet slst to embellish a rainbow spiral line with a rainbow color yarn. Insert hook at the sc post, pull yarn over, slst. Repeat surface slst around. Fasten.

- EARS
Make 2 with Orange yarn:
Round 1: sc 3 in magic ring. {3}
Round 2: [inc] around. {6}
Round 3: sc around. {6}
Round 4: sc 5, inc. {7}
Round 5: sc around. {7}
Round 6: sc 6, inc. {8}
Round 7: sc around. {8}
Round 8: sc 7, inc. {9}
Round 9: sc around. {9}
Round 10: sc 8, inc. {10}
Round 11: sc around. {10}
Round 12: sc 9, inc. {11}
Round 13 - 14: sc around. {11}
Round 15: inv dec, sc 9. {10}
Round 16: sc around. {10}
Round 17: inv dec, sc 8. {9}
Round 18: sc around. {9}
Lightly stuff with polyester fillings
Round 19: inv dec, sc 7. {8}
Round 20: sc around. {8}
Round 21: inv dec, sc 6. {7}
Round 22: sc around. {7}
Round 23: inv dec, sc 5. {6}
Round 24: sc around. {6}
Round 25: inv dec around. {3}
Fasten and hide yarn end.
- SNOUT
With Orange yarn:
Round 1: sc 6 in magic ring. {6}
Round 2: [inc] around. {12}
Round 3: [inc, sc] around. {18}
Round 4: [sc 2, inc] around. {24}
Round 5: [inc, sc 3] around. {30}
Round 6: [sc 2, inc, sc 2] around. {36}
Round 7: [inc, sc 5] around. {42}
Round 8: sc around. {42}
Round 9: [sc 3, inc, sc 3] around. {48}
Round 10: sc around. {48}
Round 11: [inc, sc 7] around. {54}
Round 12 - 16: sc around. {54}
Round 17: [inv dec, sc 7] around.{48
Round 18: sc around. {48}
Fasten and leave a long tail for sewing.
- SPIKES
Small Spike
Make 2. One with Green yarn and one with Rainbow yarn.
Round 1: sc 4 in magic ring. {4}
Round 2: [inc] around. {8}
Round 3: [inc, sc] around. {12}
Round 4 - 5: sc around. {12}
Fasten and leave a long tail for sewing.
Lightly stuff with polyester fillings.
Stitch up to close the opening.
Medium Spike
Make 2. One with Yellow yarn and one with Rainbow yarn.
Round 1: sc 4 in magic ring. {4}
Round 2: [inc] around. {8}
Round 3: [inc, sc] around. {12}
Round 4: sc around. {12}
Round 5: [sc 2, inc] around. {16}
Round 6 - 7: sc around. {16}
Fasten and leave a long tail for sewing.
Lightly stuff with polyester fillings.
Stitch up to close the opening.
Large Spike
Make 4. Two with Rainbow yarn, one with Green yarn, and one with Pastel Blue yarn.
Round 1: sc 4 in magic ring. {4}
Round 2: [inc] around. {8}
Round 3: [inc, sc] around. {12}
Round 4: sc around. {12}
Round 5: [sc 2, inc] around. {16}
Round 6: sc around. {16}
Round 7: [inc, sc 3] around. {20}
Round 8 - 9: sc around. {20}
Fasten and leave a long tail for sewing.
Lightly stuff with polyester fillings.
Stitch up to close the opening.
Arrange spikes in a line with 4 large spikes, followed by 2 medium spikes and 1 small spike. Stitch them together to form a line of spikes.

- WINGS
Make 2 with Green yarn:
Round 1: sc 6 in magic ring. {6}
Round 2: [inc] around. {12}
Round 3: [inc, sc] around. {18}
Round 4: [sc 2, inc] around. {24}
Round 5: inc, sc 22, inc. {26}
Round 6: sc around. {26}
Round 7: [inc, sc 4] 5 times, inc. {32}
Round 8: sc 31, inc. {33}
Round 9: [inc, sc 7] 4 times, inc. {38}
Round 10: sc 37, inc. {39}
Round 11: [inc, sc 18] 2 times, inc. {42}
Round 12 (half round): inc, sc 20 {22}
Flatten the wing and crochet the following pattern to both layers together.
Row 13: ch, (hdc, sc) in same st, slst 3, sc, (hdc, dc, hdc) in same st, sc, slst 3, sc, (hdc, dc, hdc) in same st, sc, slst 3, sc 3, dec, turn.
Row 14: ch, sc, dec, turn.
15: ch, dec.
Fasten and leave a long tail for sewing.
- ARMS
Make 2 with Orange yarn. This pattern is made by joining 3 finger pieces together.
FInger 1
Round 1: sc 4 in magic ring. {4}
Round 2: [inc] around. {8}
Fasten and leave a short tail for sewing
Finger 2
Round 1: sc 4 in magic ring. {4}
Round 2: [inc] around. {8}
Round 3: [inc, sc] around. {12}
Fasten and leave a short tail for sewing
Finger 3
Round 1: sc 4 in magic ring. {4}
Round 2: [inc] around. {8}
Continue from Finger 3 to join up the other 2 fingers
Round 3: inv dec, sc 2, then crochet [sc 6 on FInger 2], then crochet [sc 4, inv dec, sc 2 on finger 1], followed by [sc 6 on finger 2], lastly sc 4 on finger 3. {26}
Stitch to close any gaps between the fingers.
Round 4: [sc 11. inv dec] around. {24}
Round 5: sc around. {24}
Round 6: [sc 10, Inv dec] around. {22}
Round 7: sc around. {22}
Round 8: [sc 4, Inv dec, sc 3, Inv dec] around. {18}
Round 9 – 10: sc around. {18}
Round 11: [Inv dec, sc 7] around. {16}
Round 12 – 13: sc around. {16}
Stuff with polyester fillings.
Round 14: [Inv dec, sc 2] around. {12}
Round 15: sc around {12}
Stuff more polyester fillings.
Round 16: [Inv dec] around. {6}
Fasten and leave a long tail for sewing.

- LEGS
Make 2 starting with Yellow yarn:
Round 1: ch13, inc in 2nd ch from hook, sc 10, 5sc in the last ch. Continue on the other side of the chain base, sc 10, 3sc in the last ch. {30}
Round 2: inc, sc 12, [inc] 3 times, sc 12, [inc] 2 times. {36}
Round 3: inc, sc 14, [inc] 2 times, sc, inc, sc 14, [inc] 2 times, sc. {42}
Round 4: inc, sc 16, [inc, sc] 2 times, inc, sc 16, [inc, sc] 2 times. {48}
Change yarn to Orange color.
Round 5: inc, sc 18, inc, sc 2, inc, sc, inc, sc 18, inc, sc 2, inc, sc. {54}
Round 6 – 9: sc around. {54}
Round 10: sc 24, [Inv dec] 2 times, sc 26. {52}
Round 11: sc 23, [Inv dec] 2 times, sc 25. {50}
Round 12: sc 22, [Inv dec] 2 times, sc 24. {48}
Round 13: sc 19, [Inv dec] 4 times, sc 21. {44}
Round 14: sc 19, [Inv dec] 2 times, sc 21. {42}
Round 15: sc 18, [Inv dec] 2 times, sc 20. {40}
Round 16: sc 17, [Inv dec] 2 times, sc 19. {38}
Round 17: sc 16, [Inv dec] 2 times, sc 18. {36}
Round 18: sc 13, [Inv dec] 4 times, sc 15. {32}
Round 19: sc 13, [Inv dec] 2 times, sc 15. {30}
Stuff with polyester fillings.
Round 20: sc 12, [Inv dec] 2 times, sc 14. {28}
Round 21: sc 11, [Inv dec] 2 times, sc 13. {26}
Round 22: sc 10, [Inv dec] 2 times, sc 12. {24}
Round 23: [sc 2, Inv dec] around. {18}
Round 24: [Inv dec, sc] around. {12}
Stuff more polyester fillings.
Round 25: [Inv dec] around. {6}
Fasten and leave a long tail for sewing.
More Details on how to crochet & assemble the Crochet Dragon Amigurumi
- Crochet parts for Amigurumi Dragon and stuff them according to the crochet pattern: Body, Tummy, Ears, Snout, Spikes, Wings, Arms, and Legs.

- Place the tummy patch on the bottom front of the dragon, stitch around.


- Position the ears on the head, align them at the seams of the flap, sew around.
- Sew Eyes and Snout to Head:
a. With a long tapestry needle, sew eyes at round 46, 20 stitches apart. Do not cut the yarn after sewing the first eye, instead, insert it into the head and come out from the second eye to sew another eye. Pull the yarn a little to sink the eyes into the head, knot securely. You can run the yarn through the head a few times to prevent the yarn from snapping in the long run.
b. Mark the snout sewing line on the head as shown in the picture with a water erasable fabric marker. Make sure the total stitches along the sewing line is 48 stitches to match up with the snout.
c. Sew to attach the snout. Sew 2 pcs. of 6mm buttons as the nostrils. Sew a snake tongue to the bottom of the snout and give amigurumi dragon a smile by embroidering a yellow yarn or floss.
- Sew a small spike at the tip of the tail. Align the spikes line at the middle of the back, sew them accordingly.

- Sew Arms and Wings to Body:
a. With a long tapestry needle, sew the arms at round 30, 36 stitches apart. After sewing 2 arms, do not cut the yarn, instead, cross the yarn to other arms to make a stitch then pull the yarn to sink the arms, then knot to secure the position. You can run the yarn through the head a few times to prevent the yarn from snapping in the long run.
b. Place the wings at the mid between arm and spikes, sew them in place. If your wings flop, add 2 stitches at the top edge to strengthen their posture.

- Lastly, sew to attach the legs to the bottom of the body as it is sitting on the floor.

Notes
Depending on the speed and hours you spend on the project, the total time needed is only an approximation.
Stuff the parts firmly and densely to give your amigurumi doll a good shape. If you wish to weigh down the Amigurumi Dragon, you may add a bean bag at the bottom of the body before adding poly stuffing.
You are allowed to crochet and sell Dinogon on small-scale production. However, you are not allowed to publish the patterns and pictures in any form without the prior written permission of Craft Passion.
Get the full article @ https://www.craftpassion.com/amigurumi-dragon-crochet-pattern/
Recommended Products
Purchase the exact same material and tool used in this pattern from Craft Passion Shop.

